Windows 8 Release Preview and SharePoint 2010
**Firstly at the time of writing this article this isn't an officially supported configuration so you are on your own for now – this may change in the future though **
I recently rebuilt my work laptop with the Windows 8 Release Preview (Build: 8400) and followed the same steps in the blog post by Guilherme Santos to get a slipstreamed SharePoint build installed (SharePoint 2010 +SP1 + Feb 2012 CU) onto my environment.
The same steps can be followed as per his blog post, but there are a few post installation tasks you will need to follow to get SharePoint 2010 working as expected on the Windows 8 Release Preview:
1) Update your “SharePoint 2010 Management Shell” shortcuts to add the –v 2 parameter to ensure that the PowerShell profile loads with the V2 version of PowerShell:
Before:
C:\windows\System32\WindowsPowerShell\v1.0\PowerShell.exe -NoExit " & ' C:\Program Files\Common Files\Microsoft Shared\Web Server Extensions\14\CONFIG\POWERSHELL\Registration\\sharepoint.ps1 ' "
After:
C:\windows\System32\WindowsPowerShell\v1.0\PowerShell.exe -v 2 -NoExit " & ' C:\Program Files\Common Files\Microsoft Shared\Web Server Extensions\14\CONFIG\POWERSHELL\Registration\\sharepoint.ps1 ' "
Once the shell loads you can check the version by typing $Host.Version. The major version should be 2, if its 3 then something went wrong.
2) By default on Windows 8 RP new sites created in IIS default to the v4 of the .Net Framework and as such aren't supported by SharePoint 2010 and simply wont work.
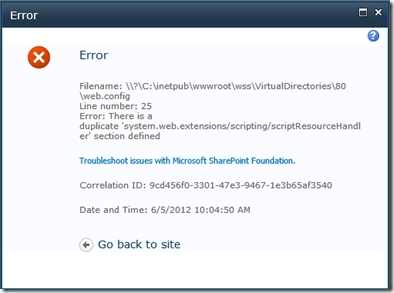
If you create a new web application using central admin, you will get the following error:
To get around this, you will first need to create a generic application pool in IIS and then point the new web application at this app pool in Central admin.
Luckily this is very easy to do with PowerShell: (**Make sure you are running this from a v3 version of PowerShell otherwise you will get various manifest errors when trying to perform the command - Import-Module WebAdministration **)
    1: Import-Module WebAdministration -Force
    2:
    3: $AppPoolName = "Some App Pool Name"
    4: $AppPoolUser = "DOMAIN\User"
    5: $AppPoolPassword = "Password"
    6:
    7: #build the app pool path
    8: $newappPool = ("IIS:\AppPools\" + $AppPoolName)
    9:
   10: #check if the app pool exists
   11: $checkapp = get-item $newappPool -EA 0
   12: if($checkapp -eq $null)
   13: {
   14:     #Create the new app pool
   15:     New-Item $newappPool
   16:
   17:     #Get the app Pool
   18:     $thepool = Get-Item $newappPool
   19:
   20:     #Set the properties
   21:     $thepool.processModel.userName = $AppPoolUser
   22:     $thepool.processModel.password = $AppPoolPassword
   23:     $thepool.processModel.identitytype = 3
   24:     $thepool.managedRuntimeVersion = "v2.0" #Important for Windows 8!
   25:     $thepool | Set-Item
   26:
   27:     Write-Host -ForegroundColor Green "$AppPoolName - created successfully"
   28: }
   29: else
   30: {
   31:     Write-Host -ForegroundColor Red "$AppPoolName - already exists"
   32:     exit 1
   33: }
Once you have created the new application pool you can simply create a new web application from central admin and point the web application creation wizard at the newly created application pool. Easy!
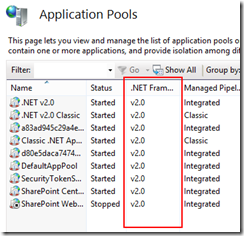
3) Ensure all your application pools are running under the V2.0 version of the framework, otherwise you will get various unexplained errors in your event logs.
To check this, simple go to IIS manager and check the application pools list as per the following diagram, they should all be using v2.0 of the .NET Framework.
I will add extra tips as I find them but these should be enough to get you started for now.
Email me with any questions or issues you may encounter in setting this up.

