The QuickStart Template - Managing Exchange 2013 With DSC - Part 2
Managing Exchange 2013 With DSC
Part 1 - Introducing xExchange
Part 2 - The QuickStart Template
Part 3 - Automating Mount Point Setup and Maintenance for AutoReseed
Part 4 - Using a DSC Pull Server to Deploy the xExchange Module
Part 5 - Installing Exchange Using DSC
The QuickStart Template
Most of the resources that are available in the xExchange module have similar requirements when used in a configuration script. Almost all the resources require that a PSCredential object is passed in, which contains the credentials of the account that will be used to establish a Remote Powershell session to Exchange. Microsoft recommends that when credentials are used within a DSC configuration script, they be encrypted and decrypted using a certificate. If this is not done, passwords will be stored in plain text in the compiled .MOF files for each target computer. For more information, see:
Want to secure credentials in Windows PowerShell Desired State Configuration?
https://blogs.msdn.com/b/powershell/archive/2014/01/31/want-to-secure-credentials-in-windows-powershell-desired-state-configuration.aspx
In addition to the full examples that are included with xExchange, I have created a template which contains common elements that will be used in most configuration scripts which utilize xExchange. This will hopefully make it easier to get started writing your own configuration scripts, or to understand the differences in components.
Template Files
The template contains two files, QuickStartTemplate.ps1, and QuickStartTemplate-Config.psd1. QuickStartTemplate.ps1 is the main configuration script, and what will be compiled into a .MOF file for DSC consumption. QuickStartTemplate-Config.psd1 contains configuration data and variables that are passed into, and utilized by QuickStartTemplate.ps1. The full files look as follows:
QuickStartTemplate.ps1 Full:
     Configuration QuickStartTemplate
    {
        param
        (
            [PSCredential]$ShellCreds
        )

        Import-DscResource -Module xExchange

        Node $AllNodes.NodeName
        {
            #Used when passing credentials securely. This configures the thumbprint of the
            #cert that will be used to decrypt the creds
            LocalConfigurationManager
            {
                CertificateId = $Node.Thumbprint
            }
        }
    }

    #Get credentials if they haven't already been passed
    if ($ShellCreds -eq $null)
    {
        $ShellCreds = Get-Credential -Message 'Enter credentials for establishing Remote Powershell sessions to Exchange'
    }

    ###Compiles the example
    QuickStartTemplate -ConfigurationData $PSScriptRoot\QuickStartTemplate-Config.psd1 -ShellCreds $ShellCreds
QuickStartTemplate-Config.psd1 Full:
     @{
        AllNodes = @(
            #Settings in this section will apply to all nodes.
            @{
                NodeName        = '*'

                #The path to the .cer file containing the public key of the Encryption
                #Certificate used to encrypt credentials for this node

                CertificateFile = 'C:\publickey.cer'


                #The thumbprint of the Encryption Certificate used to decrypt the credentials
                #on target node
                Thumbprint      = '98e1858ee4da01e4fb9f0519bc60d9c30f33b1c6'
            }

            #Each individual server that will be configured needs to be defined next.
            @{
                NodeName = 'e15-1'
            }

            @{
                NodeName = 'e15-2'
            }
        );
    }
To understand the basic DSC components of these, I recommend reading the following two Technet articles. The first article is useful for understanding the components in QuickStartTemplate.ps1, and how the config script is compiled into a MOF file. The second article helps to understand why it is a good idea to break some configuration into a separate section, which is what is done in QuickStartTemplate-Config.psd1, and how to do so.
Get Started with Windows PowerShell Desired State Configuration
https://technet.microsoft.com/en-us/library/dn249918.aspx
Separating Configuration and Environment Data
https://technet.microsoft.com/en-us/library/dn249925.aspx
Individual Components
Now I’ll break down the individual components of these that are not covered in the above articles.
QuickStartTemplate.ps1 Broken Down:
The first section within the Configuration block is the parameters section. In this template, as well as most of my example scripts, there is only a single parameter being passed, a PSCredential object, $ShellCreds. These are the credentials that will be used by the resources to establish a Remote Powershell session to Exchange. The account being used must have appropriate RBAC rights to the corresponding Exchange cmdlets used by the resource (for instance, to use xExchOwaVirtualDirectory, the account must have access to the Get/Set-OwaVirtualDirectory cmdlets). Note that even though xExchange uses Remote Powershell, the server being configured is just making a Remote Powershell session to itself.
     param
    (
        [PSCredential]$ShellCreds
    )
The next line in the script imports the xExchange module for use as a DSC resource. Without doing this, the script will fail to compile if any xExchange resources are used.
Import-DscResource -Module xExchange
For the template, only a single DSC resource is used within the Node block, a LocalConfigurationManager resource. In all other samples, xExchange resources are used within the Node block, after the LocalConfigurationManager section.
The purpose of the LocalConfigurationManager resource within the template is to pass in the thumbprint of the certificate that the target node can use at run time to decrypt credentials.
$Node.Thumbprint comes from QuickStartTemplate-Config.psd1.
     LocalConfigurationManager
    {
        CertificateId = $Node.Thumbprint
    }
Outside of the Configuration block, the first block of code is used to prompt for and store credentials when the configuration script is executed. These will then be passed into the Configuration block as a parameter. The reason I check to see if credentials are null is so that if I’m troubleshooting or running the script multiple times for some reason, I only have to enter the credentials a single time.
     if ($ShellCreds -eq $null)
    {
        $ShellCreds = Get-Credential -Message 'Enter credentials for establishing Remote Powershell sessions to Exchange'
    }
QuickStartTemplate-Config.psd1 Broken Down:
Within the AllNodes node of the configuration data, the first section defines configuration that will be specific to … all nodes. That is specified by the NodeName = ‘*’. The first item that is defined in this section is, CertificateFile, the path to public key export of the certificate that will be used to encrypt credentials on the node compiling the MOFs. The next defined item is Thumbprint. This is the thumbprint of the certificate that was used to encrypt the credentials, and that will be used on target nodes to decrypt the credentials. This certificate will need to be imported, with private key, on each target node that will be configured.
If there were other things that were going to be common to all servers, like ProductKey, they could go in here. They could also just be hard coded in the configuration script.
     @{
        NodeName        = '*'

        CertificateFile = 'C:\publickey.cer'

        Thumbprint      = '98e1858ee4da01e4fb9f0519bc60d9c30f33b1c6'
    }
The next section defines the individual nodes that will have MOF files created for them when the configuration script is compiled. For the template, all that is specified here is the NodeName. In most other examples, computer specific information is put in these as well.
     @{
        NodeName = 'e15-1'
    }

    @{
        NodeName = 'e15-2'
    }
Adding an xExchange Resource
Now I am just going to add a single xExchange resource to the template, an xExchOwaVirtualDirectory resource. At this point, the configuration script is very close to the SimpleOneResourceExample that is also included with the module.
     Configuration QuickStartTemplate
    {
        param
        (
            [PSCredential]$ShellCreds
        )

        Import-DscResource -Module xExchange

        Node $AllNodes.NodeName
        {
            #Used when passing credentials securely. This configures the thumbprint of the
            #cert that will be used to decrypt the creds
            LocalConfigurationManager
            {
                CertificateId = $Node.Thumbprint
            }

            xExchOwaVirtualDirectory OWAVdir
            {
                Identity                      = "$($Node.NodeName)\owa (Default Web Site)"
                Credential                    = $ShellCreds
                BasicAuthentication           = $false
                ExternalAuthenticationMethods = 'Ntlm','WindowsIntegrated'
                ExternalUrl                   = "https://mail-ext.mikelab.local/owa"
                FormsAuthentication           = $false
                InternalUrl                   = "https://mail-int.mikelab.local/owa"
                WindowsAuthentication         = $true
                AllowServiceRestart           = $true
            }
        }
    }

    #Get credentials if they haven't already been passed
    if ($ShellCreds -eq $null)
    {
        $ShellCreds = Get-Credential -Message 'Enter credentials for establishing Remote Powershell sessions to Exchange'
    }

    ###Compiles the example
    QuickStartTemplate -ConfigurationData $PSScriptRoot\QuickStartTemplate-Config.psd1 -ShellCreds $ShellCreds
Testing the Script
After updating the configuration script and data file with your own certificate information and computer information, the next step is to compile it. The very last line in the script is what initiates the compilation, so all you have to do is run the script. However you could just manually compile it with:
QuickStartTemplate -ConfigurationData $PSScriptRoot\QuickStartTemplate-Config.psd1 -ShellCreds $ShellCreds
After it prompts for credentials, if everything ran successfully, you will see output like the following. There should be both a .mof, and a .meta.mof file for each node that is defined in QuickStartTemplate-Config.psd1. The .mof is what actually contains information about how to use the DSC resources. The .meta.mof file contains information required to decrypt the credentials.
PS C:\QuickStartTemplate> C:\QuickStartTemplate\QuickStartTemplate.ps1
Directory: C:\QuickStartTemplate\QuickStartTemplate
Mode LastWriteTime Length Name
---- ------------- ------ ----
-a--- 10/10/2014 1:54 PM 2936 e15-1.mof
-a--- 10/10/2014 1:54 PM 848 e15-1.meta.mof
-a--- 10/10/2014 1:54 PM 2936 e15-2.mof
-a--- 10/10/2014 1:54 PM 848 e15-2.meta.mof
Next we need to configure the Local Configuration Manager on the target computers to be able to decrypt credentials using the specified certificate. This is done with the following command (in this case we are just doing a single computer, E15-1):
Set-DscLocalConfigurationManager -Path .\QuickStartTemplate -Verbose -ComputerName "E15-1"
If it runs successfully, the output should look as follows:
Finally, we can execute the configuration in Push mode. Again, we’ll just work against a single computer. The command is:
Start-DscConfiguration -Verbose -Wait -Path .\QuickStartTemplate -ComputerName "E15-1"
If it runs successfully, the output should look similar to the following:
Common Issues
Issue: Trying to apply the configuration fails with “The SendConfigurationApply function did not succeed”:
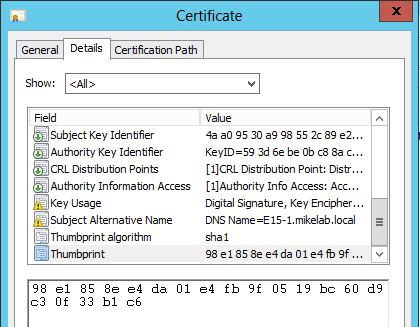
Cause: This can occur if you attempt to copy the Thumbprint of the certificate directly out of the properties window for the certificate. When you do this, it copies the thumbprint string in Unicode instead of ANSI.
This will not be noticeable in the Powershell ISE:
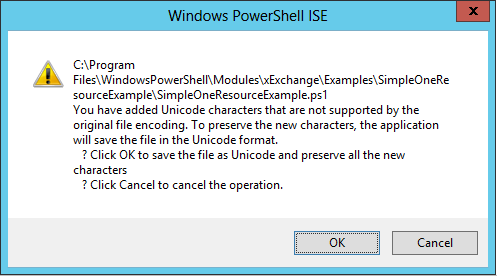
However, when you try to save the file, it will throw the following Warning:
If you open the file in notepad though, save it as type ANSI, and re-open the file in Notepad, you will see an extra ? listed before the thumbprint:
Solution: The easiest solution for this is to not copy and paste out of the certificate properties, and instead just manually type in the Thumbprint. If you still have issues, make sure that the file is saved in ANSI format using Notepad, and then check that you don’t have any hidden characters in the string.
Comments
- Anonymous
October 27, 2014
Managing Exchange 2013 With DSC
Part 1 - Introducing xExchange
Part 2 - The QuickStart Template - Anonymous
October 27, 2014
Managing Exchange 2013 With DSC
Part 1 - Introducing xExchange
Part 2 - The QuickStart Template - Anonymous
November 10, 2014
Managing Exchange 2013 With DSC
Part 1 - Introducing xExchange
Part 2 - The QuickStart Template - Anonymous
December 18, 2014
Managing Exchange 2013 With DSC
Part 1 - Introducing xExchange
Part 2 - The QuickStart Template


