如何在Win8下通过C#+XAML创建一个自定义控件
我们知道在Win8下可以很轻松的通过系统自带的控件来开发一些新的自定义控件,当然语言不限于XAML+C#或者VB.NET。这些控件可以让我们的UI更加丰富多彩。
今天,我向大家介绍一下如何创建这样的自定义控件,我将会以XAML Carousel为例子。
[View:https://www.dotmim.com/sitefiles/Carousel.mp4:550:0]
大家可以从视频中看到,这是一个3D的旋转相册,可以用来展示不同的图片,同时这些图片还包括了一些镜像特效。
或许现在的您想知道怎么才能开发一个如此美观的控件,答案分为以下六步:
1, 如何设置控件外观
2, 声明以及实例化
3, 使用模板
4, 使用数据绑定
5, 整合用户操作以及动画效果
6, 优化处理
如何设置控件外观
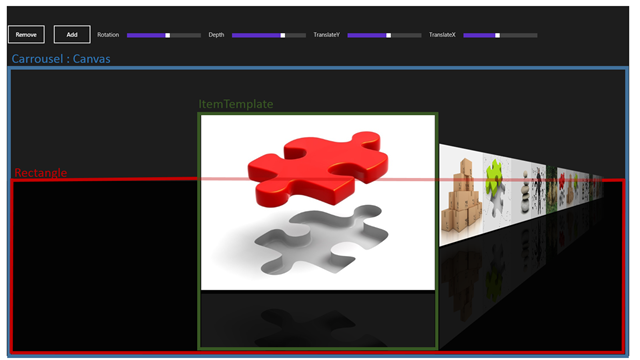
这个控件是基于Canvas开发的,叫做Carousel,其中我们为该控件的ItemTemplate 定义了一个DataTemplate,该DataTemplate是用于描述每一个图片项目由哪些控件组成的。
在这个例子中,你可以看到我使用了一个镜像的特效,我通过翻转X轴(RotationX),缩放Y轴(ScaleY)来实现这样的效果。
我在控件中定义了一个黑框区域来显示这些不同角度的镜像。
有了DataTemplate和依赖属性的帮助,我们可以通过仅仅在模板中设置某些属性值来随意定义不同区域的控件样式。
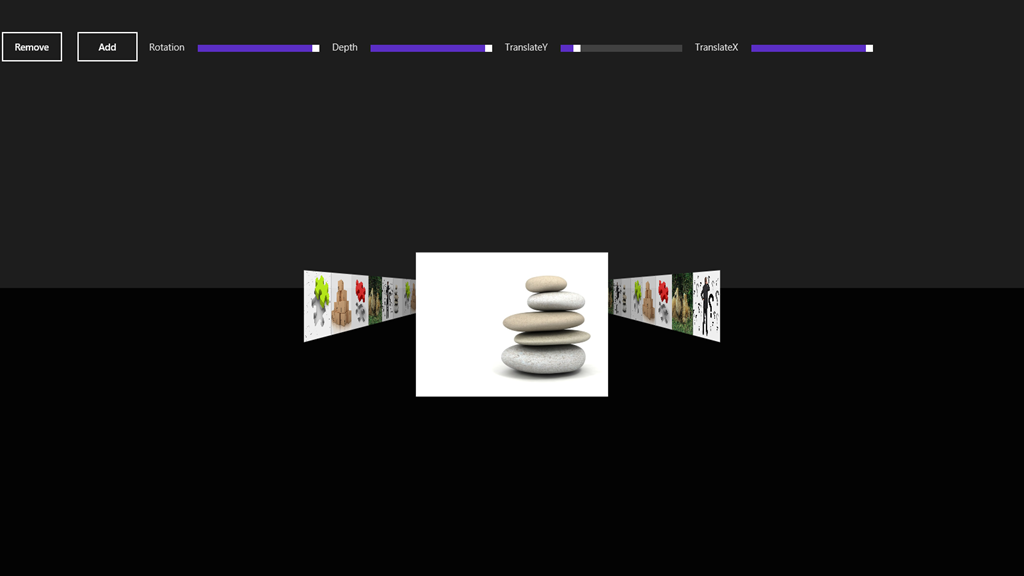
举个例子,我们这里有两种不同的风格:第一种是没有镜像,没有旋转的效果。另一种是有旋转的效果,如下图所示:
声明以及实例化控件
很简单, 在XAML中写如下的语句: <Ctrl:LightStone />。 不过您需要设置以下的属性才能让控件正常工作。
数据源(ItemsSource)
类似于ListBox或者ListView的数据源,我们也应该为这个控件做一些数据源的配置。我比较推荐的是用ObservableCollection<T>这个集合类型,通过这个我们可以很方便得在运行程序的时候为控件添加或删除数据。
依赖属性
- TransitionDuration:动画时长,以ms为单位
Depth:未选中项目的深度
- Rotation:未选中项目的旋转
- TranslateX:未选中项目的X轴位移
- TranslateY:对所有项目的Y轴位移
缓动函数的配置
你可以配置一些函数来控制图像的动画效果,具体可以参考https://msdn.microsoft.com/en-us/library/ee308751.aspx
我使用下面的函数来完成动画效果:
使用模板
XAML提供了一个非常简单的方式来实现ItemTemplate,下面的代码可以把数据绑定到控件上。在这个模板里面,我定义了一个图片并且设置了图片相对的镜像以及透明度。
 <ctrl:LightStone.ItemTemplate>
 <DataTemplate>
 <Grid>
 <Grid.RowDefinitions>
 <RowDefinition Height="Auto"/>
 <RowDefinition Height="Auto"/>
 </Grid.RowDefinitions>
 <Image Source="{Binding BitmapImage}" Width="600" VerticalAlignment="Bottom"
 Stretch="Uniform"></Image>

 <Rectangle Grid.Row="1" Fill="Black" Margin="0,10" ></Rectangle>

 <Image Grid.Row="1" VerticalAlignment="Top" Width="600" Margin="0,10"
 Source="{Binding BitmapImage}" Stretch="Uniform"
 Opacity="0.1" >
 <Image.RenderTransform>
 <CompositeTransform ScaleY="1" />
 </Image.RenderTransform>
 <Image.Projection>
 <PlaneProjection RotationX="180"></PlaneProjection>
 </Image.Projection>
 </Image>

 </Grid>
 </DataTemplate>
 </ctrl:LightStone.ItemTemplate>
具体实现
ItemTemplate实则为DataTemplate,下面是代码:
 /// <summary>
 /// Item Template
 /// </summary>
 public DataTemplate ItemTemplate
 {
 get
 {
 return itemTemplate;
 }
 set
 {
 itemTemplate = value;
 }
 }
在绑定的时候,LoadContent() 这个方法可以帮助我们创建UIElement
 /// <summary>
 /// Bind all Items
 /// </summary>
 private void Bind()
 {
 if (ItemsSource == null)
 return;

 this.Children.Clear();
 this.internalList.Clear();

 foreach (object item in ItemsSource)
 this.CreateItem(item);

 this.Children.Add(rectangle);
 }

 /// <summary>
 /// Create an item (Load data template and bind)
 /// </summary>
 private FrameworkElement CreateItem(object item, Double opacity = 1)
 {
 FrameworkElement element = ItemTemplate.LoadContent() as FrameworkElement;
 if (element == null)
 return null;

 element.DataContext = item;
 element.Opacity = opacity;
 element.RenderTransformOrigin = new Point(0.5, 0.5);

 PlaneProjection planeProjection = new PlaneProjection();
 planeProjection.CenterOfRotationX = 0.5;
 planeProjection.CenterOfRotationY = 0.5;
 element.Projection = planeProjection;

 this.internalList.Add(element);
 this.Children.Add(element);

 return element;
 }
数据绑定
ItemsSource提供了数据绑定的功能。
不过我们需要自己的数据集合,可以通过如下的方式定义一个数据类型
  public class Data
 {
 public BitmapImage BitmapImage { get; set; }
 public String Title { get; set; }
 }
下面这段代码用来实例化:
 public ObservableCollection<Data> Datas { get; set; }

 public MainPageViewModel()
 {
 this.Datas = new ObservableCollection<Data>();
 this.Datas.Add(new Data { BitmapImage = new BitmapImage(new Uri("ms-appx:///Assets/pic01.jpg", UriKind.Absolute)), Title = "Wall 05" });
 this.Datas.Add(new Data { BitmapImage = new BitmapImage(new Uri("ms-appx:///Assets/pic02.jpg", UriKind.Absolute)), Title = "Wall 06" });
 this.Datas.Add(new Data { BitmapImage = new BitmapImage(new Uri("ms-appx:///Assets/pic03.jpg", UriKind.Absolute)), Title = "Wall 07" });
 }
实现方法
当数据源发生变化的时候,我使用依赖属性里面的一个回调方法来重新建立绑定。请参考我定义的ItemSourceChangedCallback函数:
 /// <summary>
 /// Items source : Better if ObservableCollection :)
 /// </summary>
 public IEnumerable<Object> ItemsSource
 {
 get { return (IEnumerable<Object>)GetValue(ItemsSourceProperty); }
 set { SetValue(ItemsSourceProperty, value); }
 }

 // Using a DependencyProperty as the backing store for ItemsSource.
 //This enables animation, styling, binding, etc...
 public static readonly DependencyProperty ItemsSourceProperty =
 DependencyProperty.Register("ItemsSource",
 typeof(IEnumerable<Object>),
 typeof(LightStone),
 new PropertyMetadata(0, ItemsSourceChangedCallback));
这个函数允许我可以用自己的逻辑来添加或者删除一个或者多个列表项目
 private static void ItemsSourceChangedCallback(DependencyObject dependencyObject, DependencyPropertyChangedEventArgs args)
 {
 if (args.NewValue == null)
 return;

 if (args.NewValue == args.OldValue)
 return;

 LightStone lightStone = dependencyObject as LightStone;

 if (lightStone == null)
 return;

 var obsList = args.NewValue as INotifyCollectionChanged;

 if (obsList != null)
 {
 obsList.CollectionChanged += (sender, eventArgs) =>
 {
 switch (eventArgs.Action)
 {
 case NotifyCollectionChangedAction.Remove:
 foreach (var oldItem in eventArgs.OldItems)
 {
 for (int i = 0; i < lightStone.internalList.Count; i++)
 {
 var fxElement = lightStone.internalList[i] as FrameworkElement;
 if (fxElement == null || fxElement.DataContext != oldItem) continue;
 lightStone.RemoveAt(i);
 }
 }

 break;
 case NotifyCollectionChangedAction.Add:
 foreach (var newItem in eventArgs.NewItems)
 lightStone.CreateItem(newItem, 0);
 break;
 }
 };
 }

 lightStone.Bind();
 }
整合用户操作以及动画效果
用户输入
为了能响应用户的输入,我们需要处理Point的各种事件。当然我们可以用GestureRecognizer这个方法,不过在我们的例子中尽量做到简化。
目的很简单:如果用户用他的手指,鼠标或者触摸笔移动超过40px的时候,我们可以定义为用户想要去切换图片。
下面是代码:
 /// <summary>
 /// Initial pressed position
 /// </summary>
 private void OnPointerPressed(object sender, PointerRoutedEventArgs args)
 {
 initialOffset = args.GetCurrentPoint(this).Position.X;
 }

 /// <summary>
 /// Calculate Behavior
 /// </summary>
 private void OnPointerReleased(object sender, PointerRoutedEventArgs pointerRoutedEventArgs)
 {
 // Minimum amount to declare as a manipulation
 const int moveThreshold = 40;

 // last position
 var clientX = pointerRoutedEventArgs.GetCurrentPoint(this).Position.X;

 // Here is a "Tap on Item"
 if (!(Math.Abs(clientX - initialOffset) > moveThreshold))
 return;

 isIncrementing = (clientX < initialOffset);

 // Here is a manipulation
 if (clientX < initialOffset)
 {
 this.SelectedIndex = (this.SelectedIndex < (this.internalList.Count - 1))
 ? this.SelectedIndex + 1
 : this.SelectedIndex;

 }
 else if (this.SelectedIndex > 0)
 {
 this.SelectedIndex--;
 }

 initialOffset = clientX;
 }
我没有使用Guesture来响应用户的触摸事件,而是使用了Tap事件。
为了能获取到被Tap的项,我使用了UIElement.TranformToVisual这个方法:
var rect = child.TransformToVisual(this).TransformBounds(new Rect(0, 0, child.DesiredSize.Width, child.DesiredSize.Height));
这里是完整的代码:
 /// <summary>
 /// Tap an element
 /// </summary>
 private void OnTapped(object sender, TappedRoutedEventArgs args)
 {
 var positionX = args.GetPosition(this).X;
 for (int i = 0; i < this.internalList.Count; i++)
 {
 var child = internalList[i];
 var rect = child.TransformToVisual(this).TransformBounds(new Rect(0, 0, child.DesiredSize.Width, child.DesiredSize.Height));

 if (!(positionX >= rect.Left) || !(positionX <= (rect.Left + rect.Width))) continue;

 isIncrementing = (i > this.SelectedIndex);

 this.SelectedIndex = i;
 return;
 }
 }
动画效果
UIElement.Projection给我们提供了一个非常好的特效。
当我们需要做投影效果设置的时候,我们可以考虑是否是3D效果的投影,或者是平板投影的效果。在这里,我使用了平板投影的特效。
我们可以仅通过一个StoryBoard来完成XAML的一个动画特效:
 /// <summary>
 /// Update all positions. Launch every animations on all items with a unique StoryBoard
 /// </summary>
 private void UpdatePosition()
 {
 if (storyboard.GetCurrentState() != ClockState.Stopped)
 {
 storyboard.SkipToFill();
 storyboard.Stop();
 storyboard = new Storyboard();
 }


 isUpdatingPosition = true;

 for (int i = 0; i < this.internalList.Count; i++)
 {
 var item = internalList[i];

 PlaneProjection planeProjection = item.Projection as PlaneProjection;

 if (planeProjection == null)
 continue;

 // Get properties
 var depth = (i == this.SelectedIndex) ? 0 : -(this.Depth);
 var rotation = (i == this.SelectedIndex) ? 0 : ((i < this.SelectedIndex) ? Rotation : -Rotation);
 var offsetX = (i == this.SelectedIndex) ? 0 : (i - this.SelectedIndex) * desiredWidth;
 var translateY = TranslateY;
 var translateX = (i == this.SelectedIndex) ? 0 : ((i < this.SelectedIndex) ? -TranslateX : TranslateX);

 // CenterOfRotationX
 // to Get good center of rotation for SelectedIndex, must know the animation behavior
 int centerOfRotationSelectedIndex = isIncrementing ? 1 : 0;
 var centerOfRotationX = (i == this.SelectedIndex) ? centerOfRotationSelectedIndex : ((i > this.SelectedIndex) ? 1 : 0);
 planeProjection.CenterOfRotationX = centerOfRotationX;

 // Dont animate all items
 var inf = this.SelectedIndex - (MaxVisibleItems * 2);
 var sup = this.SelectedIndex + (MaxVisibleItems * 2);

 if (i < inf || i > sup)
 continue;

 // Zindex and Opacity
 var deltaFromSelectedIndex = Math.Abs(this.SelectedIndex - i);
 int zindex = (this.internalList.Count * 100) - deltaFromSelectedIndex;
 Canvas.SetZIndex(item, zindex);
 Double opacity = 1d - (Math.Abs((Double)(i - this.SelectedIndex) / (MaxVisibleItems + 1)));

 var newVisibility = deltaFromSelectedIndex > MaxVisibleItems
 ? Visibility.Collapsed
 : Visibility.Visible;

 // Item already present
 if (item.Visibility == newVisibility)
 {
 storyboard.AddAnimation(item, TransitionDuration, rotation, "(UIElement.Projection).(PlaneProjection.RotationY)", this.EasingFunction);
 storyboard.AddAnimation(item, TransitionDuration, depth, "(UIElement.Projection).(PlaneProjection.GlobalOffsetZ)", this.EasingFunction);
 storyboard.AddAnimation(item, TransitionDuration, translateX, "(UIElement.Projection).(PlaneProjection.GlobalOffsetX)", this.EasingFunction);
 storyboard.AddAnimation(item, TransitionDuration, offsetX, "(UIElement.Projection).(PlaneProjection.LocalOffsetX)", this.EasingFunction);
 storyboard.AddAnimation(item, TransitionDuration, translateY, "(UIElement.Projection).(PlaneProjection.GlobalOffsetY)", this.EasingFunction);
 storyboard.AddAnimation(item, TransitionDuration, opacity, "Opacity", this.EasingFunction);
 }
 else if (newVisibility == Visibility.Visible)
 {
 // This animation will occur in the ArrangeOverride() method
 item.Visibility = newVisibility;
 item.Opacity = 0d;
 }
 else if (newVisibility == Visibility.Collapsed)
 {
 storyboard.AddAnimation(item, TransitionDuration, rotation, "(UIElement.Projection).(PlaneProjection.RotationY)", this.EasingFunction);
 storyboard.AddAnimation(item, TransitionDuration, depth, "(UIElement.Projection).(PlaneProjection.GlobalOffsetZ)", this.EasingFunction);
 storyboard.AddAnimation(item, TransitionDuration, translateX, "(UIElement.Projection).(PlaneProjection.GlobalOffsetX)", this.EasingFunction);
 storyboard.AddAnimation(item, TransitionDuration, offsetX, "(UIElement.Projection).(PlaneProjection.LocalOffsetX)", this.EasingFunction);
 storyboard.AddAnimation(item, TransitionDuration, translateY, "(UIElement.Projection).(PlaneProjection.GlobalOffsetY)", this.EasingFunction);
 storyboard.AddAnimation(item, TransitionDuration, 0d, "Opacity", this.EasingFunction);
 storyboard.Completed += (sender, o) =>
 item.Visibility = Visibility.Collapsed;
 }
 }

 // When storyboard completed, Invalidate
 storyboard.Completed += (sender, o) =>
 {
 this.isUpdatingPosition = false;
 this.InvalidateArrange();
 };

 storyboard.Begin();
 }
为了让动画效果更加便捷地被使用,我们可以设置一个DoubleAnimation:
 public static void AddAnimation(this Storyboard storyboard, DependencyObject element,
 int duration,double fromValue, double toValue, String propertyPath,
 EasingFunctionBase easingFunction = null)
 {
 DoubleAnimation timeline = new DoubleAnimation();
 timeline.From = fromValue;
 timeline.To = toValue;
 timeline.Duration = TimeSpan.FromMilliseconds(duration);
 if (easingFunction != null)
 timeline.EasingFunction = easingFunction;

 storyboard.Children.Add(timeline);

 Storyboard.SetTarget(timeline, element);
 Storyboard.SetTargetProperty(timeline, propertyPath);
 }
优化处理
为了保证我们的控件可以在配置较低的机器上运行无阻,我们必须保证只处理那些可见的图片,并且仅仅对那些图片使用动画效果。
为了实现这个目标,我们把不可见的图片(Opacity为0)从控件中删除,当然,有需要的时候再显示出现。
 // Dont animate all items
 var inf = this.SelectedIndex - (MaxVisibleItems * 2);
 var sup = this.SelectedIndex + (MaxVisibleItems * 2);

 if (i < inf || i > sup)
 continue;

 // Get if item is visible or not
 var newVisibility = deltaFromSelectedIndex > MaxVisibleItems
 ? Visibility.Collapsed
 : Visibility.Visible;
同时,使用ArrangOverride方法,我们可以来检查一个图片是否出现。
 // Items appears
 if (container.Visibility == Visibility.Visible && container.Opacity == 0d)
 {
 localStoryboard.AddAnimation(container, TransitionDuration, rotation, "(UIElement.Projection).(PlaneProjection.RotationY)", this.EasingFunction);
 localStoryboard.AddAnimation(container, TransitionDuration, depth, "(UIElement.Projection).(PlaneProjection.GlobalOffsetZ)", this.EasingFunction);
 localStoryboard.AddAnimation(container, TransitionDuration, translateX, "(UIElement.Projection).(PlaneProjection.GlobalOffsetX)", this.EasingFunction);
 localStoryboard.AddAnimation(container, TransitionDuration, offsetX, "(UIElement.Projection).(PlaneProjection.LocalOffsetX)", this.EasingFunction);
 localStoryboard.AddAnimation(container, TransitionDuration, translateY, "(UIElement.Projection).(PlaneProjection.GlobalOffsetY)", this.EasingFunction);
 localStoryboard.AddAnimation(container, TransitionDuration, 0, opacity, "Opacity", this.EasingFunction);
 }
 else
 {
 container.Opacity = opacity
 }
大家可以在这里找到对应的例子:LightStone.zip
Comments
- Anonymous
March 11, 2015
个人感觉,学习到了不少东西。


