Customizing FIM 2010 R2 Portal
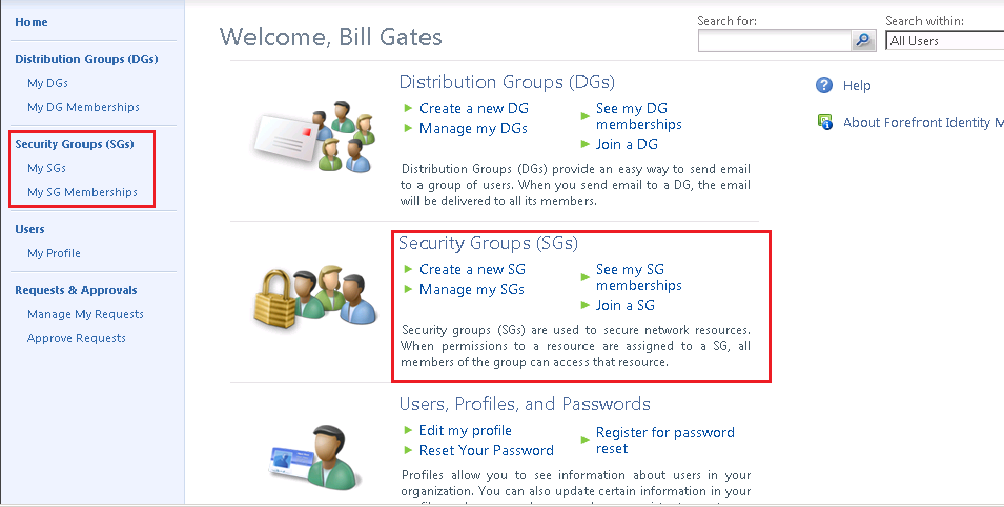
Get "Security Group" Option for Non-admin users

use Keywords to make security groups visible to nonadministrators
- Log on to the FIM Portal as Administrator.
- Under Administration, click Navigation Bar Resources.
- Click Security Groups (SGs).
- In Usage Keywords, type BasicUI.
- Click OK, and then click Submit.
- In order to get Security groups option in mid section of the portal , click on "Home Page Resources"
- Repeat steps 3 to 5.
- Do IISReset.
Get Password Reset Option On FIM Portal
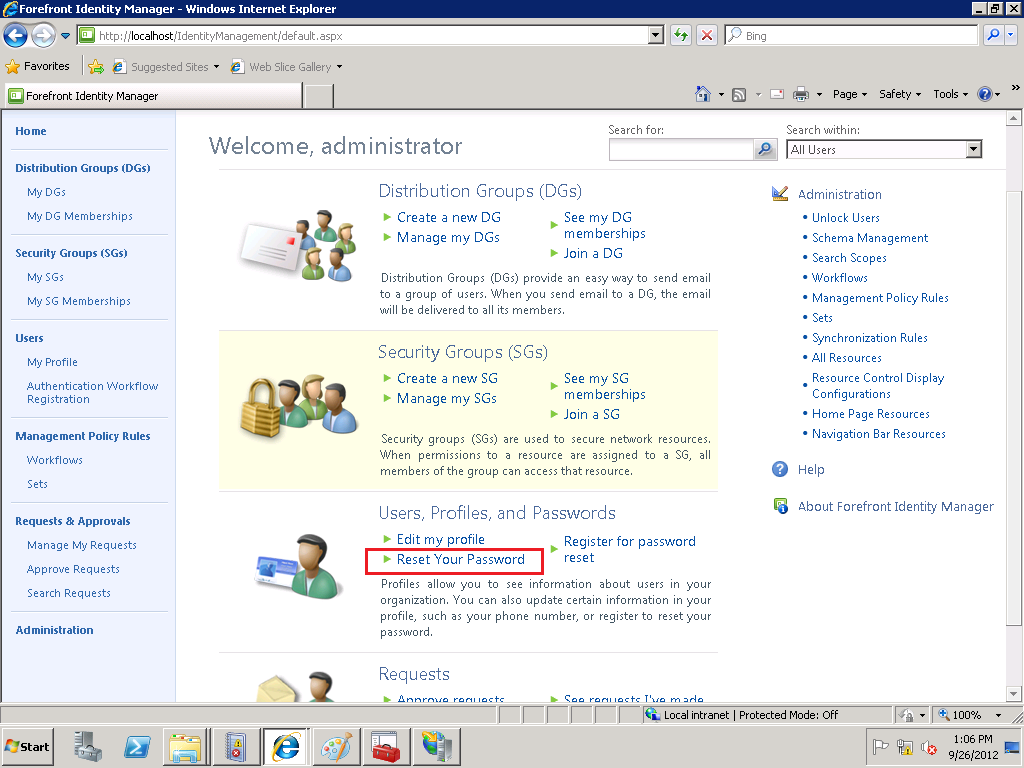
- Click on “Home Page resources” in the administration option of the FIM Portal
- Click on new , type “Reset Your Password” in the displayName textbox
- Type “BasicUI” in the Usage keyword option , click next.
- Under UI position , select Region-“Center Region of Home Page”,Parent Order-“3”,Order-“3”
- Under Behavior panel , type your password reset portal URL in the Navigation URL option.
- Click on finish
- Do IISReset
Create custom attributes on portal
- Log on to the FIM Portal as the administrator.
- On the FIM Portal home page, under Administration, click Schema Management.
- On the Schema Management – All Resource Types page, click All Attributes.
- Click New.
- On the Create Attribute page, under General, type the following information in the following fields:
- System name – AttributeName
- Display name – AttributeName
- Data Type – In the menu, click Indexed String.
- Description – Enter any Description you want.
- Click Finish to move directly to the Summary page.
- On the Summary page, click Submit.
- On the Schema Management – All Bindings page, click New.
- On the General page, enter the following information in the following fields:
- Resource Type – To select the required bound resource type, do the following:
- Click the Browse icon next to Resource Type.
- On the Please Select A Resource Type page, in Search for, type User, and then press ENTER.
- Under Display Name, select the AttributeName check box, and then click OK.
- On the Summary page, click Submit
To modify the configuration for user creation
- Log on to the FIM Portal as Administrator.
- On the FIM home page, under Administration, click Resource Control Display Configurations.
- On the Resource Control Display Configuration page, click Configuration for User Creation.
- On the Configuration for User Creation page, click Export configuration, and then save the file as Create_User_backup.xml. Minimize the FIM Portal.
- Copy the Create_User_backup.xml configuration file, and then save it as Create_User_New.xml.
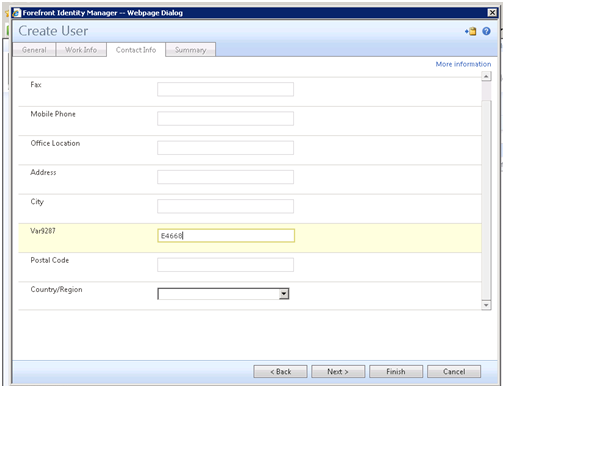
- Open the Create_User_New.xml configuration file, and make the following changes:
- To add a new Control named var9287, Insert the following XML code after the “City” section
<my:Control my:Name="Var9287" my:TypeName="UocTextBox" my:Caption="{Binding Source=schema, Path=Var9287.DisplayName}" my:Description="{Binding Source=schema, Path=Var9287.Description}">
<my:Properties>
<my:Property my:Name="Required" my:Value="{Binding Source=schema, Path=Var9287.Required}"/>
<my:Property my:Name="Columns" my:Value="34"/>
<my:Property my:Name="MaxLength" my:Value="128"/>
<my:Property my:Name="Text" my:Value="{Binding Source=object, Path=Var9287, Mode=TwoWay}"/>
</my:Properties>
</my:Control>
- Restore the FIM Portal, and in Configuration Data, click Browse.
- Select the Create_User_New.xml configuration file that you just modified, and then click Open.
- Click OK, and then click Submit.
- Click Start, click Run, type iisreset, and then click OK.