Analyzing Twitter Data with Hive in HDInsight and SteamInsight
In this tutorial you will query, explore, and analyze data from twitter using Apache™ Hadoop™-based Services for Windows Azure and a Hive query in Excel. Social web sites are one of the major driving forces for Big Data adoption. Public APIs provided by sites like Twitter are a useful source of data for analyzing and understanding popular trends.
This tutorial is composed of the following segments:
1. Request and configure a new Hadoop on a Windows Azure cluster.
2. Search for, download, install, and use Microsoft Big Data Analytics for Twitter.
3. Read the Readme.
4. Processing Twitter data on HDInsight using Hive Add-in.
Microsoft provides a website which covers the common how-tos and should help you get you started. http://social.technet.microsoft.com/wiki/contents/articles/6204.hdinsight-services-for-windows-en-us.aspx

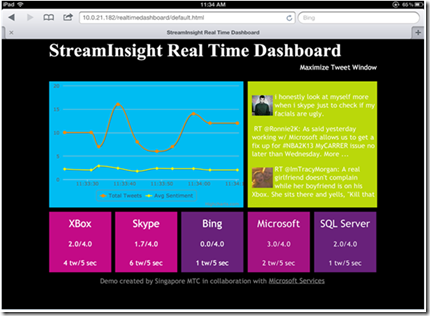
In the tutorial we will show how to query, explore, and analyze data from Twitter using Hadoop on Windows Azure and a Hive query in Excel. The Demo created by Singapore MTC in collaboration with Microsoft Services
1. Request and configure a new Hadoop on a Windows Azure Cluster
This step requires access to the CTP for Apache Hadoop-based Service for Windows Azure. Go to
https://www.hadooponazure.com/
and click on the invitation link. If you already have access, click the Sign in button.

Request a new cluster. Below is an example of a 3 node cluster called “mailboxpeak.” Enter a username and password and click the Request cluster button. If you have questions, refer to the “Apache Hadoop-based Service for Windows Azure How-To and FAQ.”

2. Search for, download, install, and use Microsoft Big Data Demo for Twitter
The Demo can be found at http://twitterbigdata.codeplex.com/
“This demo showcases a solution for analyzing Twitter tweets using real-time analytics and real-time data visualization. The demo also stores achieved data allowing individual business intelligence solutions to be created through Excel.”[1]
This demo requires Windows 8, StreamInsight 2.1 and WebSockets, Excel 2010 and PowerPivot (the latter of which can be downloaded at
http://www.microsoft.com/download/en/details.aspx?id=29074
).
Open Microsoft Analytics for Twitter and paste the following movie tags and accounts into the keywords in the appconfig file: “Windows 8, Phone 8, Office 2013”
First head to the source code tab and look for the download link. Download the file and open it up in visual studio. From here the README.txt file should help to get the solution up and running. You will need an account for Azure Blob Storage and Azure DB as well as your own Twitter user name and password to be able to receive tweets from Twitter’s Streaming service. Make sure to add this information into the application config file!
This solution uses StreamInsight, so you'll need to install StreamInsight for this to work. We test the code using StreamInsight version 2.1 on-prem running in embedded server. To run the SI client, you'll need to update the instance_name appsetting in the app.config file to point to your local StreamInsight instance.
3. Read the Readme
3.1 Websockets
This solution uses WebSocket to send data to the real-time dashboard. To get WebSocket to work, you need to run the StreamInsight application on Windows 8 or Server 2012 with WebSocket enabled. Read the following blog post to understand how to enable WebSockets
- http://www.paulbatum.com/2011/09/getting-started-with-websockets-in.html
To get the SI application to properly send data to the real-time dashboard, do the following:
- Update the ws_url appsettings in Twitter.Client\app.config file with the IP address of the machine running the SI client application.
- Update the wsHost variable in the default.js file with the same IP address. The default.js file is located in the RealTimeDashboard\js folder.
- Start the Twitter Client application first, then start the real-time dashboard after so that it can connect to the server web sockets created by the SI client application
3.2 Azure blob storage
The StreamInsight application need to write tweet header information to Azure Database. Connect to your Azure Database and then execute the "Create Azure DB Objects.sql" to create the database table and stored procedure required by the Azure Database Output Adapter.
Remember to update the app.config file in the StreamInsight.Demos.Twitter.Client project and provide the correct connection information to the Azure database.
The SI application also save tweets in the original JSON format to Azure Blob Storage. You'll need to create a blob storage on Azure and then create a container in the storage account. I recommend installing a free tool call CloudXplorer to be able to view the files in your storage account.
Also remember to provide the account name and key in the appsettings section of the SI client app.config file.
3.3 HDInsight and Blobstorage
Once StreamInsight application saves tweets to Azure Blog Storage and Azure Database, then perform the following steps on
HadoopOnAzure in the order listed:
- Map the Azure Blob Storage to HOA.
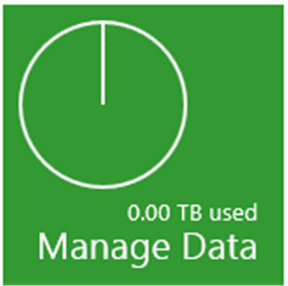
- Log into your HOA cluster and click on "Manage Cluster".
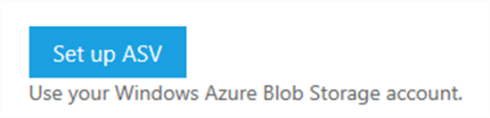
- Click on "Set up ASV"
- Specify your Azure Storage Account Name and Passkey. You get these fields from your Azure Portal. This is the same info you specify in the StreamInsight.Demos.Twitter.Client app.config file
- In the HOA home page, click on the Open Ports icon and then open the ODBC Server port so that you can connect to the cluster using the ODBC driver later.
1. Set up ASV
Configure your Window Azure Blob Storage Account by clicking on the Manage Data icon,
followed by Set up ASV.
You are going to need your value for the Windows Azure Storage Account Name (in this case hadoopdemo) and its primary access key.

You can find the storage account name and access key under Manage Keys
Enter your Windows Azure storage account name and primary access key and click Save settings.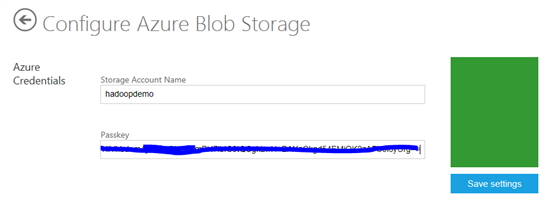
Click on the Interactive Console icon.
If the connection was setup successfully

If the connection was setup successfully, you should be able to use the following javascript command to list files in the blob container:
js> #ls asv://<containername>/
For creating a directory on the HDFS use:
js> #mkdir /example/data
To upload small sample text files, run:
js> #put
Source: C:\hadoop\example\data\Sample.txt
Destination: /examples/data
2. Create External table
I also have code in "Analyze Tweets with Hive.txt", which I commented, that will enable you to create an external Hive table that reads directly from Azure Blob Storage.
- del /q c:\twitter
- hadoop fs -get asv://twitter/ C:\twitter
- hadoop fs -put c:\twitter /twitter
- hadoop distcp asv://container>/<file>/ /user/<accountname>/<folder> to copy a file directly to the HDFS, leave out the file name to copy the entire container.
- Process data using Hive. The Hive queries are in the file "Analyze Tweets with Hive.txt". Copy this file to the c:\ drive on HOA head node and then run the following command (it is possible to share your clipboard with the headnode). The results will be saved in a few hive tables. Read the queries in that file to find out more.
- cd C:\apps\dist\hive-0.9.0\bin
- hive.cmd
- hive -f "c:\Analyze Tweets with Hive.txt"
- note: the command line supports drag and drop for avoiding incorrect directory paths,
4. Using Hive in Excel with PowerView 4.1 Hive Add-in
The above scripts will generate a series of hive tables. You will pull data from those tables into PowerPivot using the queries listed in the file "Hive Queries for ODBC Driver.txt". There are currently some issues with the way the Hive ODBC driver works, so you'll need the workaround specified in those scripts.
- Inside PowerPivot, you'll need to create relationships between table and also add "related" fields into the tweet_details table. See the Hive Results - PP 2010.xlsx to see how the PP data model is created.
- Once the PP model is created, save it into SharePoint 2010 and create the PowerView report. A picture of what the Power
View report looks like is included in the "Logical Architecture Diagram.vsdx" file. It was created using Visio 2013.
4.2 Set Up Hive ODBC and the Hive Panel in Excel to Retrieve the Hive Data
This section is copied from the Apache Hadoop-based Service for Windows Azure How-To and FAQ, which can be found by clicking the Downloads tile

at the Hadoop on Windows Azure portal.

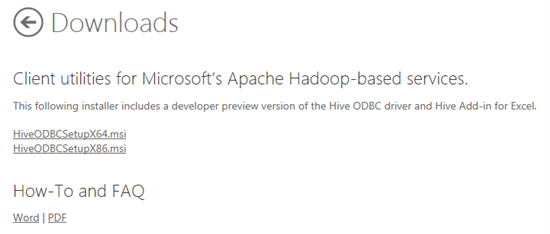
This is also where you can download HiveODBCSetup for 64-bit or 32-bit Excel.
How to connect the Excel Hive Add-In to Hadoop on Windows Azure via HiveODBC
One key feature of the Microsoft Big Data Solution is the solid integration of Apache Hadoop with the Microsoft Business Intelligence (BI) components. A good example of Apache Hadoop integration with Microsoft BI components is the ability of Excel to connect to the Hive data warehouse framework in the Hadoop cluster. This section walks you through using Excel via the Hive ODBC driver.
Installing the Hive ODBC Driver
In order to run the installation, you must download the 64-bit Hive ODBC driver MSI file from the Hadoop on Windows Azure portal.
Double-click HiveODBCSetupx64.msi to start the installation.
Read the license agreement. If you agree to the license agreement, click I accept followed by Install.

Once the installation has completed, click Finish to exit the ODBC Driver for Hive Setup wizard.
Installing the Excel Hive Add-In
To install this add-in, you must have previously installed the 64-bit Hive ODBC driver, as well as a copy of Excel 2010 64-bit.
Start Excel 2010 64-bit. You will be asked to install the HiveExcel add-in. Click Install.
Once the add-in has been installed, click the Data tab in Microsoft Excel 2010. You should see the Hive Panel, as shown in the following screenshot:

Creating a Hive ODBC Data Source to Use with Excel
Click Start->Control Panel to launch the Control Panel for Microsoft Windows.
In the Control Panel, Click System and Security->Administrative Tools->Data Sources (ODBC). This will launch the ODBC Data Source Administrator dialog.
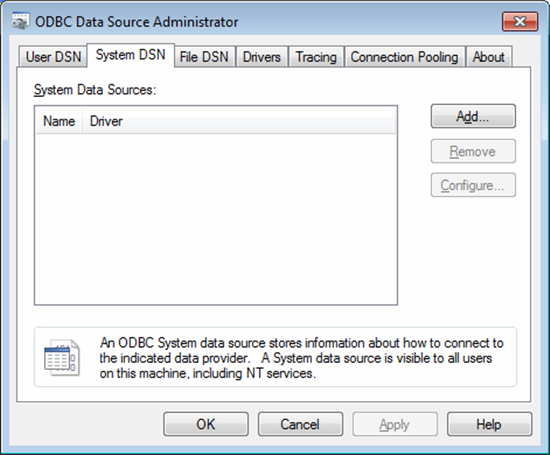
In the ODBC Data Source Administrator dialog, click the System DSN tab.
Click Add to add a new data source.
Click the HIVE driver in the ODBC driver list.
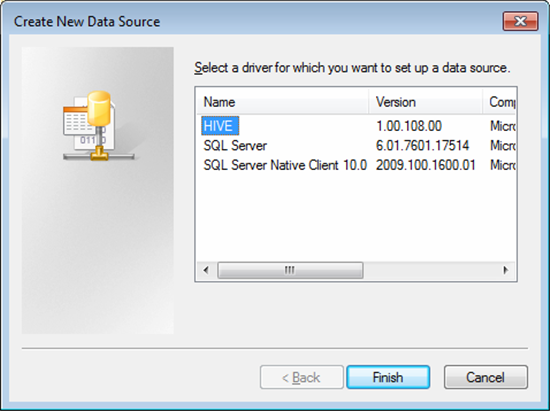
Click Finish. This will launch the ODBC Hive Setup dialog, as shown in the following screenshot:

Enter a name in the Data Source Name box. For example, MyHiveData.
In the Host box, enter the host name of the cluster you created on the portal. For example, myhadoopcluster.cloudapp.net.
Enter the username you used to authenticate on the portal.
Click OK to save the new Hive data source.
Click OK to close the ODBC Data Source Administrator dialog.
Retrieving Hive Data in Excel
Open Excel 2010 64-bit. Once it is open, click the Data tab.
Click on Hive Panel to open the Hive panel in Excel.
In the drop-down list labeled Select or Enter Hive Connection, select the data source name you previously created.
You will be asked to enter the password to authenticate with the cluster on the portal. Enter the password for the username.
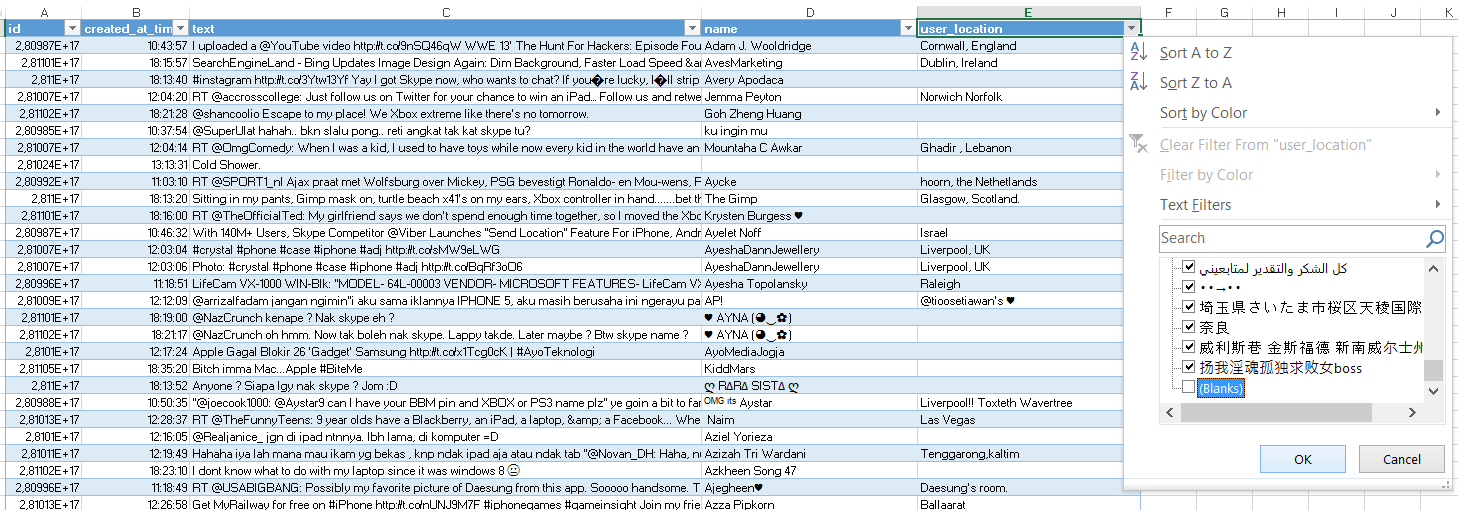
In the drop-down list labeled Select the Hive Object to Query, select hive [Table].
Select the checkbox for each of the columns in the table. The Hive Query panel should look similar to the following image:

4.3 PowerView
For the data processed in this tutorial, you would execute a query like:
select id, created_at_time, text, name, user_location from tweet_details where (id is not null) limit 3000;
Next: filter out blanks and other non desired value’s.
**
**
** Tile by created_at_time (30-12-1899)**
When inserting data into PowerView, the created_at_time value's will be converted to a date, specifically to the date 30-12-1899, this is a custom time format error.

Add new column
Use the TEXT Formula = TEXT (VALUE;"uu:mm:ss") I used uu due to Dutch Excel settings, using ("hh:mm:ss") would be similar expression for English version, and left out second to group messages by minutes.

Tile by corrected Time

Summary
In this tutorial we have seen how to query, explore, and analyze data from Twitter using HDInsight service and a Hive query in Excel with PowerView.
I would like to thank
Michael Agranov and Brad Severtson for writing the Wiki on how to Analyse Twitter Movie Data with Hive in Hadoop On Azure.
Vu Le and Andrew Moll for sharing their Demo on Codeplex with the community, this was my first Wiki article and have enjoyed the experience of sharing with the Microsoft Community.