Installing and Configuring an nCipher Hardware Security Module (HSM) with FIM CM 2010
This document covers information to install nShield PCI module, configure it and configure FIM CM to use nCipher CSP and KSPs. Review the vendor Quick Start guide (nShield_Quick_Start_Guide.pdf) before attempting to use these instructions.
Thales and Brian Komar have produced an E-Book that discusses this integration in considerable detail. It requires contact information (and undoubtedly will result in a call from their sales folks who are very nice people). Or the book can be had on Amazon for $19.99.
Installing and configuring the module (CSP configuration) :
1) Install the module : Follow the instructions in section ‘Installing an nShield module’ in document Hardware_Installation.pdf and install the module.
2) Install the nCipher software :
**a) ** Install Java 2 runtime environment
**b) ** Copy files from the vendor media to the computer which has the module and run setup.exe. Refer section ‘2.2 – Install the nCipher software’ in the document nShield_Quick_Start_Guide.pdf and install the software.
3) Test the installation : Run the instructions mentioned in section ‘2.3 Test the installation’ in the document nShield_Quick_Start_Guide.pdf and verify the installation.
4) Fix KeySafe starting issue : KeySafe application is used to manage keys, cards and modules. It can be found at All Programs -> nCipher .Open file %NFAST_KMDATA%\config\config in notepad.Modify ‘# nonpriv_port=PORT’ to ‘nonpriv_port=9000’ and ‘# priv_port=PORT’ to ‘priv_port=9001’.Restart hard server by running commands net stop “nFast Server” and net start “nFast Server”.
5) Create a security world : Use ‘64bit CSP install wizard’( This is at All Programs->nCipher) and follow instructions in section ‘2.4 - Create a security world’ in document nShield_Quick_Start_Guide.pdf to create a security world.
6) Create an Operator Card Set : Follow instructions in section ‘2.5 Create an Operator Card Set (OCS)’ to creats OCS. In Step 1 choose ‘Module protection (requires no extra cards but is less secure) instead of ‘Operator Card Set Protection’.(See screenshot below)

7) Test the security world : Test the security world using instructions mentioned in ‘2.6 Test the security world’ in nShield_Quick_Start_Guide.pdf.
Configuring FIM CM to use nCipher CSP :
1) Storing clmagent private key on the module : Duplicate certificate template ‘user’ ,choose version ‘Windows 2003 Server , Enterprise Edition’ and name it ‘CLMAgent User nCipherCSP’. In the certificate template properties in ‘Request Handling’ tab uncheck ‘Allow private key to be exported’ checkbox,in CSPs select ‘nCipher Enhanced Cryptographic Provider’.
In ‘Subject name’ tab uncheck checkboxes ‘include e-mail name in subject name’ and ‘E-mail name’. Create user with name ‘clmAgent’ in AD. Give the certificate template ‘Read’ and ‘Enroll’ permissions to the user. Publish the cert template in CA. Log on as user ‘clmAgent and request certificate using the certificate template. After the certificate is issued we can see keys in ‘KeySafe’.(In ‘KeySafe’ Keys -> List Keys ). Obtain hash of the certificate , remove spaces in the certificate hash and update following web.config keys to include the hash.
<add key="Clm.SigningCertificate.Hash" value="EC761076E6D555553C16B53E753455F33B55555C" />
<add key="Clm.ValidSigningCertificates.Hashes"   value="EC761076E6D555553C16B53E753455F33B55555C" />
<add key="Clm.SmartCard.ExchangeCertificate.Hash" value="EC761076E6D555553C16B53E753455F33B55555C" />
In CA Properties -> Policy Module -> Properties -> Signing Certificates include the clmAgent certificate hash.
1) Storing clmEnrollAgent private key on the module : Similar to steps mentioned in 1 duplicate certificate template ‘Enrollment Agent’, logon as clmEnrollAgent, request certificate using the template and include it’s certificate hash in web.config key Clm.EnrollAgent.Certificate.Hash.
2) Storing clmKRAgent private key on the module : Similar to steps mentioned in 1 duplicate certificate template ‘Key Recovery Agent’ ,logon as clmKRAgent, uncheck checkbox ‘CA certificate manager approval’ in ‘Issuance Requirements’ tab and request certificate using the certificate template. In CA properties -> Recovery Agents include the certificate.
3) Run Config wizard : In Config wizard choose ‘use existing accounts for agents’ and ‘configure certificates manually’.
4) Set Encryption algorithm to TripleDES :
<add key="Clm.Encryption.Algorithm" value="TripleDes" />
Installing and configuring the module(KSP configuration) :
1) nCipher CSP and KSPs cannot coexist. Before doing KSP configuration CSP configuration should be removed. To remove the CSP configuration
a) Delete keys from HSM : In KeySafe go to Keys->List Keys select a key and click ‘Discard Key!’ button.
b) Erase Module : Put the module in pre-initialization mode. In KeySafe go to Modules->Erase Module and click ‘Erase Module!’ button.
c) Delete Security world : Delete the files in the directory to which the NFAST_KMDATA environment variable points.
2) Doing KSP configuration is same as CSP configuration except we need to use ‘CNG configuration wizard’ instead of ‘CSP install wizard’ to create security world. Follow the steps 1 to 7 above in “Installing and configuring the module(CSP configuration)” to configure the module for KSP. In step 5 use ‘CNG configuration wizard’ instead of ‘64bit CSP install wizard’ to create security world. Remaining steps are same.
Configuring FIM CM to use nCipher KSP :
1) FIM CM KSP based certificates can be used for encryption only.They cannot be used for signing. Agent certificates are used for signing. So the certificates can not use nCipher KSP.
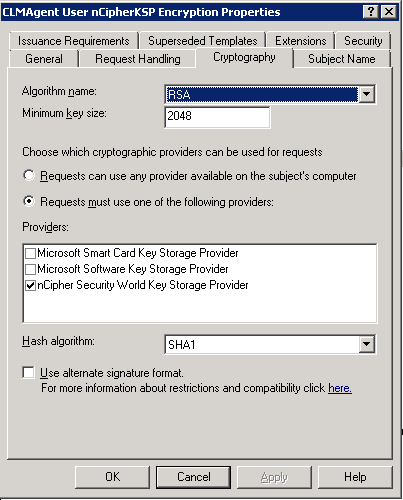
2) Storing encryption private key on the module : Duplicate certificate template ‘user’ ,choose version ‘Windows 2008 Server , Enterprise Edition’ and name it ‘nCipher KSP Encryption Cert Template’. In the certificate template properties in ‘Request Handling’ tab uncheck ‘Allow private key to be exported’ checkbox,in Cryptography tab select ‘nCipher Security World Key Storage Provider’.(see screenshot below)

In ‘Subject name’ tab uncheck checkboxes ‘include e-mail name in subject name’ and ‘E-mail name’. Create user with name ‘clmAgent’ in Active Directory. Give the certificate template ‘Read’ and ‘Enroll’ permissions to the user. Publish the cert template in CA. Log on as user ‘clmAgent and request certificate using the certificate template. Obtain hash of the certificate ,remove spaces in the certificate hash and update following web.config key to include the hash.
<add key="Clm.Encryption.Certificate.Hash" value="" />
1) Run Config wizard.
2) Set <add key="Clm.Encryption.Algorithm" value="Aes" />
Additional information
- Download the Microsoft Windows Server 2008 PKI and Deploying the nCipher Hardware Security Module White Paper
- nCipher hardware security modules get Windows Server 2008 certification
- Windows 2000 dated article http://technet.microsoft.com/en-us/library/dd277354.aspx