Azure: Provisioning BizTalk Services Using the Management Portal
Introduction
This wiki article is an extension on the documentation of Azure BizTalk Services (formerly called Windows Azure BizTalk Services or WABS): BizTalk Services: Provisioning Using Microsoft Azure Management Portal. This new service in Microsoft Azure offers B2B in the Cloud supporting EDI, Integration with SaaS solutions and create bridges between Line-Of-Business(LOB) systems and the Cloud through various protocols. To be able to do so you will to provision a BizTalk Service in Microsoft Azure first. Provisioning of a BizTalk Services requires you to perform a few steps by means of using the Microsoft Azure Management Portal.
Azure BizTalk Service is offered in four tiers:
- Developer: Interesting for developers to explore the capabilities of the service.
- Basic: Just as the term offers capabilities for common EAI yet without connectivity towards LOB systems.
- Standard: This offers more capabilities as connectivity with LOB systems is supported. This means it includes adapters for SAP, Oracle, SQL Server, Oracle eBS and Siebel. These adapters are WCF-based. Standard offers also scaling.
- Premium: Includes the whole package with B2B capabilities.
Note: More specific details of the tiers can be found at BizTalk Services: Developer, Basic, Standard and Premium Editions Chart.
Depending on the scenario you face within an enterprise (customer) and implementing a solution based upon BizTalk Services you will choose between basic, standard or premium. This comes with a different price tag depending if you choose pay-as-you-go or 6-12 month plan. See the pricing details. Interesting on this page is also that if you scroll down further you will find the FAQ.
Prerequisites
To provision an Azure BizTalk Service you will of course need a Microsoft Azure Subscription. You have different options to setup one by:
- Signing up for a Trail for a month
- Acquire through purchase plan
- Acquire through MSDN Subscription
As soon as you have a subscription with Azure you can make use of the services it offers like Azure SQL Database, Azure Access Control Service (ACS), and Azure Storage, which you will need for provisioning of the BizTalk Service. You will need to create an Azure SQL database, a ACS namespace account and storage account:
- Create the SQL Database Server
- Create the Access Control Service (ACS) namespace
- Create a Storage Account
The Azure BizTalk Service is currently in preview. To work with the service you will to go to the preview features: https://account.windowsazure.com/PreviewFeatures and click Try it out.
Provision the Azure BizTalk Service
To provision the Azure BizTalk Service you have to navigate to the BizTalk Service in the management portal. There you click at the bottom of the navigation pane, NEW+ and then navigate through App Services --> BizTalk Service --> Custom Create.
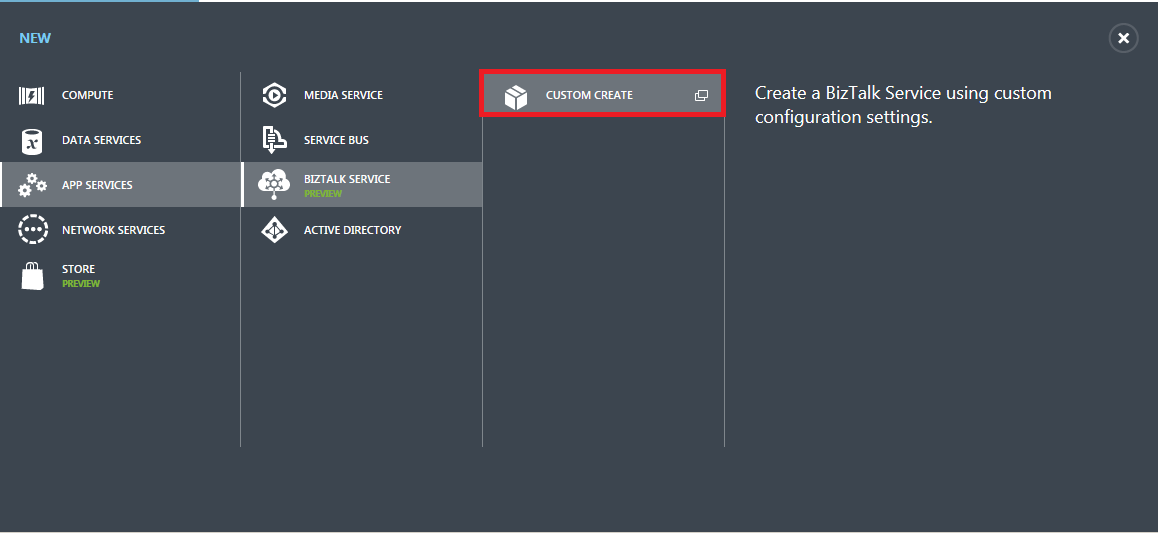
A wizard will presented to you in front of the Management Portal. Here you will go through several steps before the BizTalk Service will be provisioned for you. The first step is specifying the BizTalk Service Setting.
Enter the BizTalk Service setting
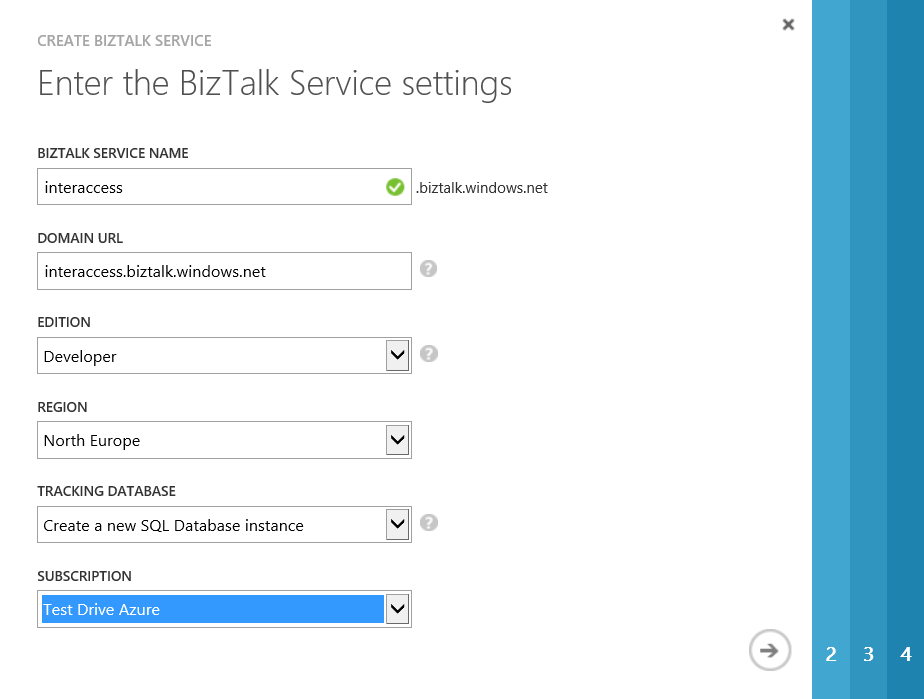
In the BizTalk Service Name you can specify an unique name that will added to default DNS .biztalk.windows.net. This will form a URL that can be used to access your BizTalk Service. By default the domain url is the name you give your BizTalk Service Name. You can specify a custom domain if you want. With the edition property you can choose the edition you want depending on your scenario (see Introduction). In case you are in the testing/development phase then you should choose Developer. With the region you can choose where to host your BizTalk Service depending on the geographic region your in. With the tracking database you can choose between two options:
- Use an existing SQL Database instance: You can use the SQL Database created previously in Create the SQL Database Server. You need the login name and password specified when the SQL Database Server was created (see Specify database setting).
- Create a new SQL Database instance: You can use this option to create a new SQL Database on an existing SQL Database Server. You need the login name and password specified when the SQL Database Server was created (see Specify database setting).
Finally you choose the subscription where you want to host your BizTalk Service. After specifying the BizTalk Service Settings you can click the arrow to go to next step.
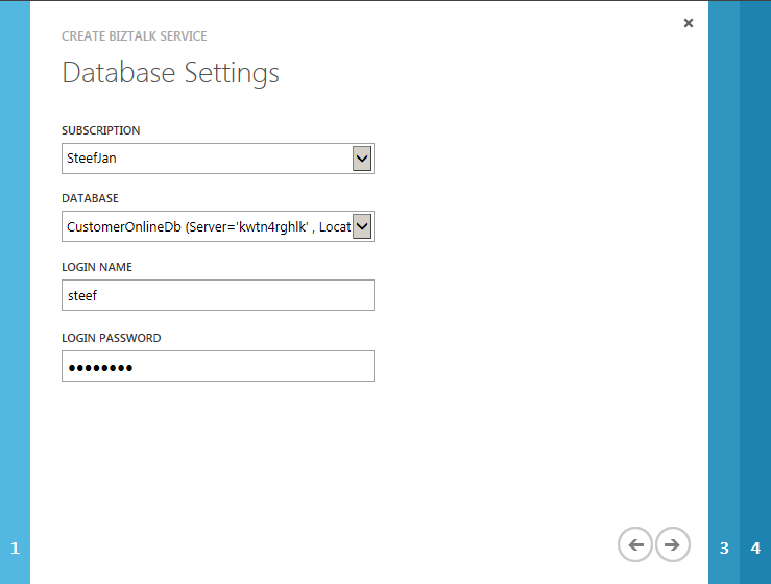
Specify database setting
In this section of provisioning the BizTalk Service you specify the tracking database details.
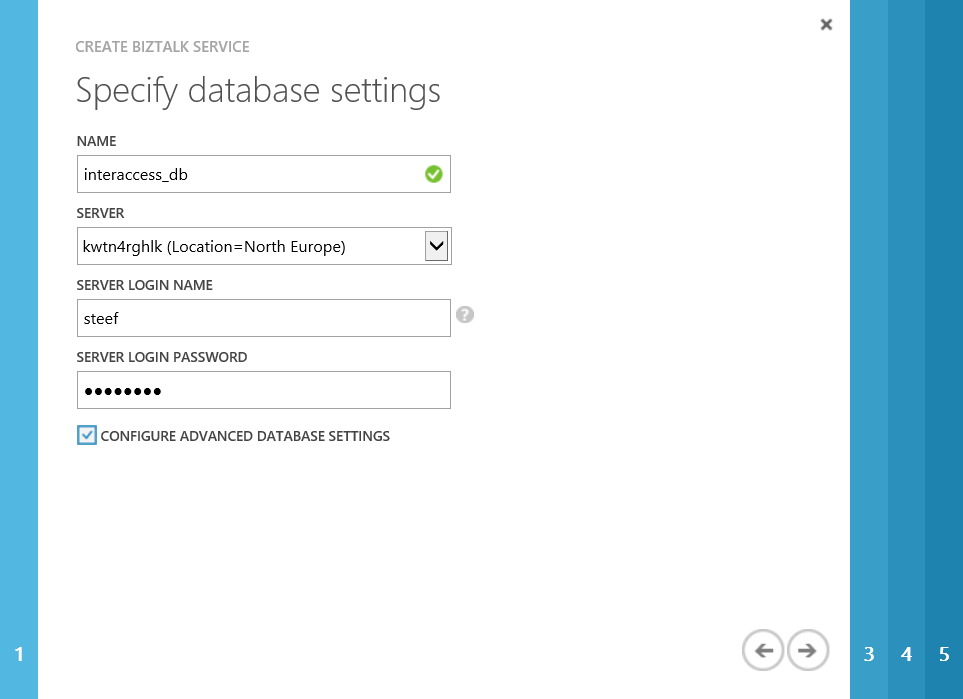
In case Create a new SQL Database instance was chosen you will see screen above. You can specify the name of the database, select the database server created earlier on (see Prerequisites) and provide login name and password. Finally you can also check if you want to configure advanced database settings. Another page will be available (see below).

In this page you can specify the edition you want for the tracking database. You have the option:
- Web: Scales from to 1 to 5 Gb.
- Business: Scales from 10 to 150 Gb.
Note: Both allow you to set maximum size, and both are billed on an amortized schedule, where your capacity is evaluated daily.
Here you can also specify the collation you desire.
In case Use an existing SQL Database instance was chosen then you can specify subscription of the database, select the server and then provide login name and password (see picture below).
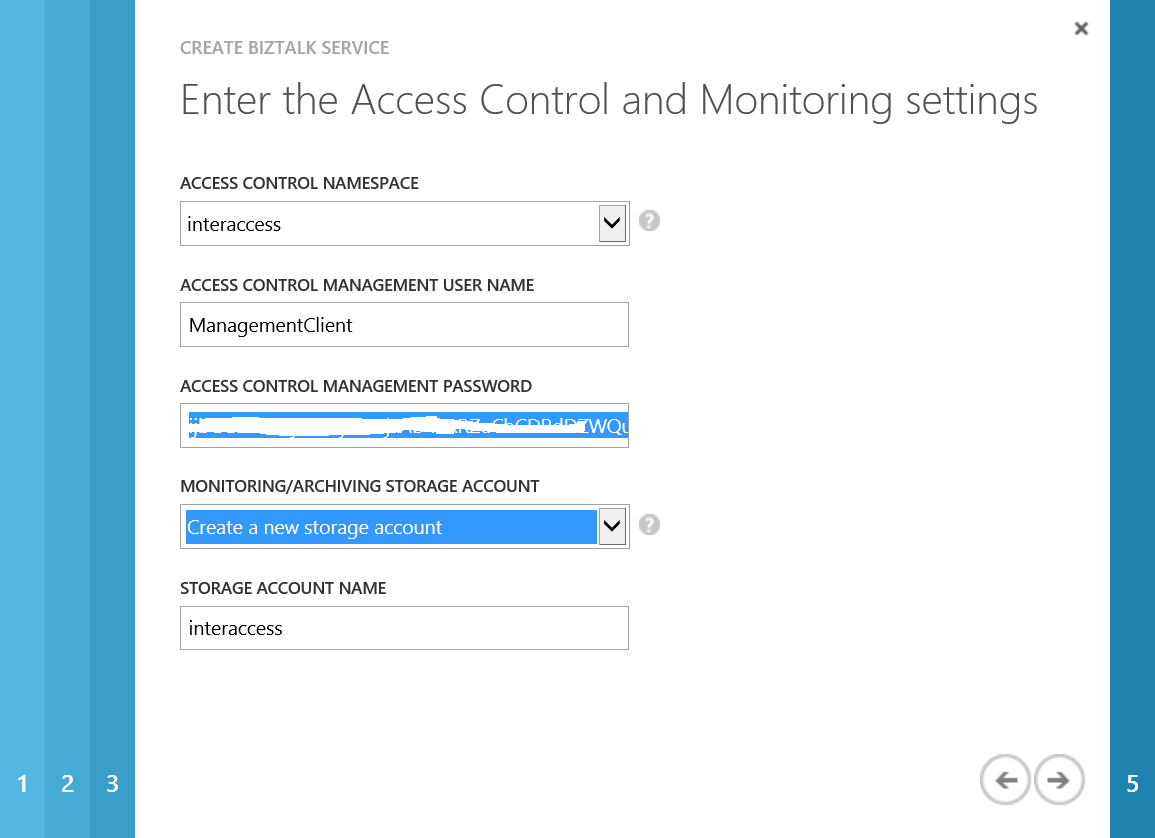
Enter the Access Control and Monitoring settings
You can specify the access control namespace in the section of access control and monitoring settings. In case you have created one or more namespaces then you can choose between them (see Prerequisites). Beside namespace you specify the issuer name and key belonging to the chosen namespace.
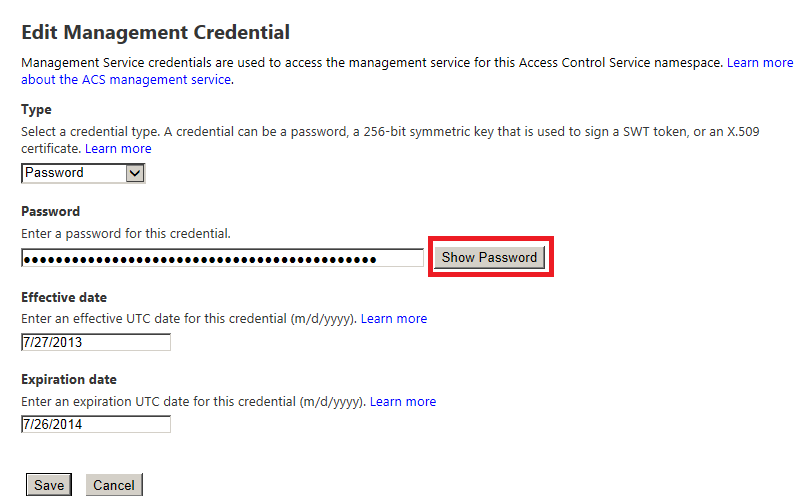
To get the user and password settings, you need to click on the Manage button in the Access Control Namespace section of the Active Directory module in the Azure portal. This will direct you to the ‘old’ ACS management portal (Silverlight). Here you can manage your acces control namespace. Select in the left pane under Administration Management Service. Then under management service account select ManagementClient. Under credentials select Password. If that is not available then you can add it.

When you select password you can click Show password and copy and then paste in the access control management password.
For monitoring/archiving you can choose an existing storage account (see Prerequisites) or specify you want to create a new one. In latter case you can specify a name for storage account.
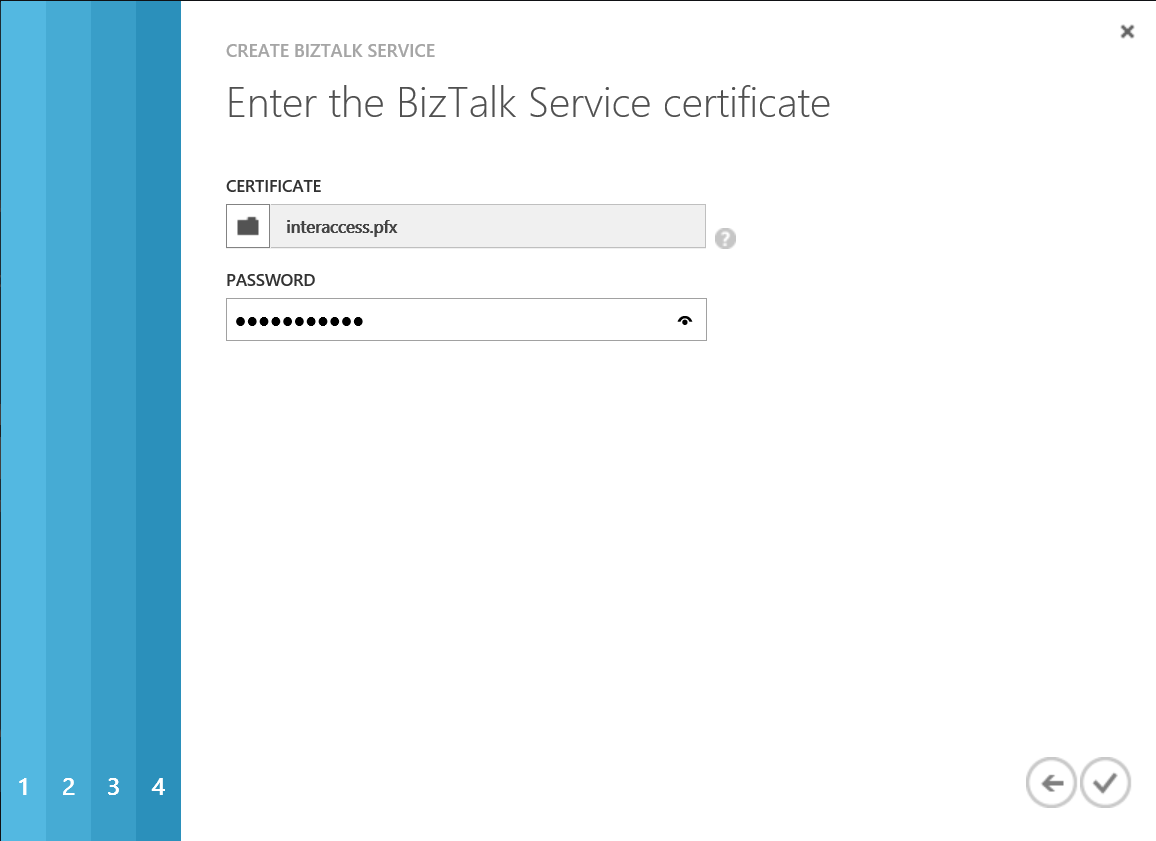
Enter the BizTalk Service Certificate
In the final section you will have to upload a private SSL certificate (CertificateName.pfx) that includes your BizTalk Service name. You then enter the password and click the Complete check mark.
Depending on which phase you are you can create your own self-signed certificate in case your still developing or testing and chosen the Developer Edition (see Enter the BizTalk Service Setting). You can use makecert commandline tool and issue command like:
Makecert -pe -r -n "CN=<yourservicename>.biztalk.windows.net" -e "01/01/2015" -ss *my *
-pe : Marks the generated private key as exportable. This allows the private key to be included in the certificate.
-r : Creates a self-signed certificate.
-n : Specifies the subject's certificate name. This name must conform to the X.500 standard. The simplest method is to specify the name in double quotes, preceded by CN=;
-e : Specifies the end of the validity period.
-ss : Specifies the subject's certificate store name that stores the output certificate.
Note: The CN name has to service name e.g. name of you BizTalk Service in case you provide a different name you may run into some trust issues, when you try to deploy your bridge for instance. The fully qualified domain name (FQDN) of your Azure BizTalk Services URL is required (see Enter the BizTalk Service setting).
After performing makecert action with the given parameters you can export your PFX from your certificate store and upload it. The Certificate Store can be accessed by mmc, see How to: View Certificates with the MMC Snap-in and Export a Certificate.
If you need one for production phase you can purchase a certificate from for instance Godaddy. When you create the certificate request and send to your certification authority, you specify the following certificate properties:
- Enhanced Key Usage: Server Authentication. Additional key usages can be enabled on the certificate. At a minimum, Azure BizTalk Services requires Server Authentication.
- Common Name: Enter the fully qualified domain name (FQDN) of your Azure BizTalk Services URL.
Now everything is specified you can click mark and provisioning of the BizTalk Service will start.

Post provisioning step of the BizTalk Service
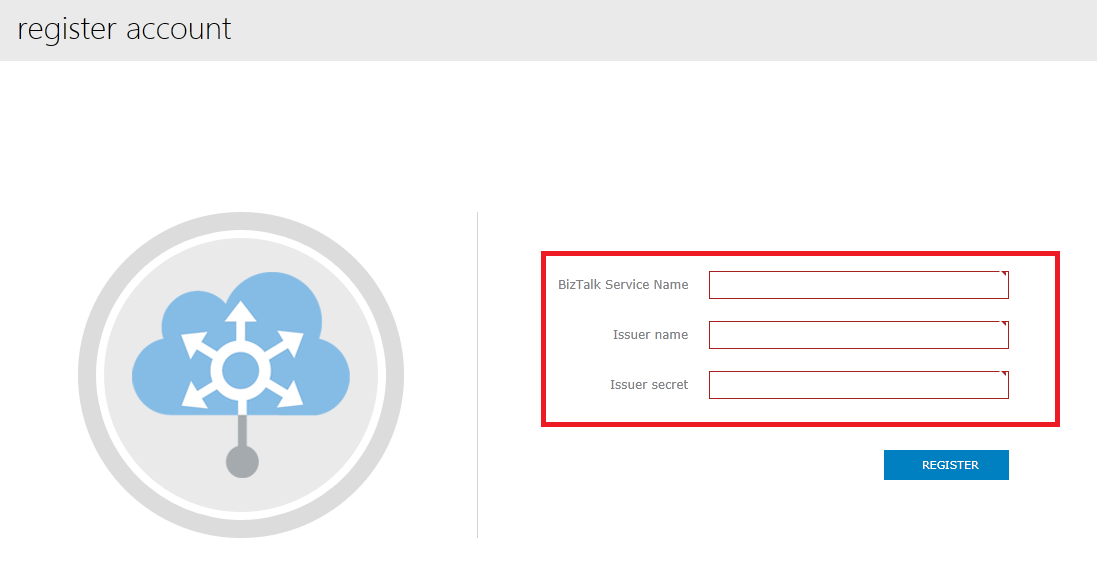
After the provisioned of the BizTalk Service you can register it in the BizTalk Service management portal, which is a Silverlight portal that will be there during the preview. By clicking on the Manage button you will be taken to the Silverlight portal.

On this portal, you have will have to specify three settings:
- BizTalk Service: the name of the BizTalk Service you specified (see Enter the BizTalk Service setting).
- Issuer name: the name of an ACS user that belongs to your ACS namespace (see Enter the Access Control and Monitoring settings)
- Issuer secret: the shared secret key of that user (see Enter the Access Control and Monitoring settings)
See Also
For documentation on BizTalk Services see Azure BizTalk Services documentation. In case you want to start creating BizTalk Services applications then you need to install BizTalk Services SDK (See Installing the Azure BizTalk Services SDK - June 2013 Preview) on your machine.
Another important place to find a huge amount of Azure BizTalk Services related articles is the TechNet Wiki itself. The best entry point is Azure BizTalk Services resources on the TechNet Wiki.
If you are also looking for BizTalk Server related articles, the best entry point is BizTalk Server Resources on the TechNet Wiki.