Azure and SQL Database Tutorials - Tutorial 4: Using Windows Azure Worker Role and Windows Azure Queue Service
This tutorial demonstrates using a worker role and Azure queue service.
Note
If you wish to contribute to this page, use the Edit tab at the top (sign-in required). If you wish to provide feedback for this documentation please either send e-mail to azuredocs@microsoft.com or use the Comment field at the bottom of this page (sign-in required).
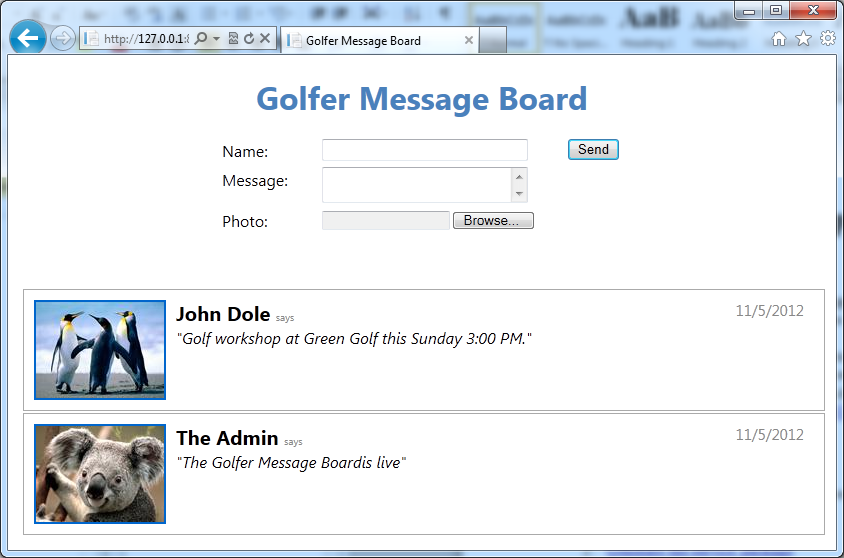
In tutorial 1 and tutorial 3, you created a simple golfer message board application. In the application, a Web role provides the front-end that allows golfers to view the contents of the message board and add new entries. Each entry contains a name, a message and an image. When golfers post new messages, a Web role stores the text portion of the message using the Table service, and the image using the Blob service. The Web role also renders this information to the browser so golfers can view the content of the message board.
You have probably noticed that the images are displayed in the original size, which takes a lot of space. In tutorial 4, you will expand the application with a new worker role in the background generating thumbnails based on the images. When the messages are listed, only the thumbnails are used.
Last reviewed: 11/4/2011
Note: Completing tutorial 1 and tutorial 3 are not a pre-requisites for this tutorial. However, it helps with understanding the scenario.
Note: The tutorial code has been tested on Windows Azure SDK (October 2012).
Objectives
In this tutorial, you will learn how to:
- Use the Queue service
- Understand worker role
Prerequisites
Note the following requirements before you begin this lesson:
- Before you begin this step you must complete the steps in [[Windows Azure and SQL Database Tutorials (en-US)]].
Understanding the Architecture
The following diagram illustrates the development components and the runtime components involved in this tutorial:
- You develop the Windows Azure application using Visual Studio and Windows Azure SDK.
- You deploy the application to Windows Azure Emulator for testing, and to Windows Azure.
- A Windows Azure project includes two configuration files: ServiceDefinition.csdef and ServiceConfiguration.cscfg. These files are packaged with your Windows Azure application and deployed to Windows Azure.
- A service hosted in Windows Azure consists of one or more Web roles and worker roles. A Web role is an ASP.NET Web application accessible via an HTTP or HTTPS endpoint and is commonly the front-end for an application. A worker role is a role that is useful for generalized development, and may perform background processing for a Web role. This tutorial contains a Web role and a worker role. For more information, see Overview of a Windows Azure Application at http://msdn.microsoft.com/en-us/library/gg432976.aspx.
- The Windows Azure storage services provide persistent, redundant storage in the cloud. The storage services include these fundamental services: Blob service, Queue service, and Table service. The Table service and the Blob service are used in this tutorial. For more information, see [[Understanding Data Storage Offerings on the Windows Azure Platform]].
- You can use the portal to administrate Windows Azure platform resources.
Understanding the Queue Service
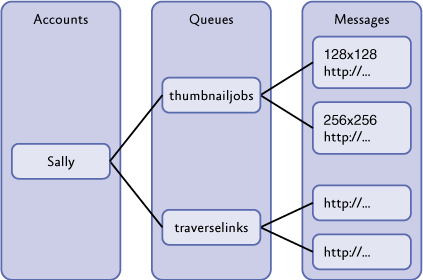
The Queue service architecture consists of a three-level hierarchy: accounts, queues, and messages. A Windows Azure storage account encompasses the Blob, Queue, and Table services. A queue is a logical destination for sending messages. There can be any number of queues in an account in the Queue service. A queue stores messages and makes them available to applications. Messages are stored in queues. There is no limit to the number of messages that can be stored in a queue, but the size of each individual message cannot exceed 8KB. To accommodate large object messages, you can put the large object in a blob and then send the URI of that object as a message to a queue. For more information, see [[articles:Understanding Data Storage Offerings on the Windows Azure Platform]], and Windows Azure Queue – Programming Queue Storage at http://go.microsoft.com/fwlink/?LinkId=153402.
In this Article
- Lesson 1: Modify the Message Data Model
- Lesson 2: Modify the Web Role
- Lesson 3: Add a Worker Role for Background Processing
- Lesson 4: Test and Deploy the Application
Lesson 1: Modify the Message Data Model
In tutorial 1, you created the data model in the MessageBoard_Data project. In this lesson, you will modify the schema so that it includes an additional data member for the thumbnail URL. You will also add a member function for updating the thumbnail URLs. This function will be called from the worker role after the worker role generates the thumbnails.
Procedures
In this lesson, you will go through the following procedures:
- Open the golfer message board application
- Modify the table schema
- Modify the implementation of the object
- Rebuild the project
To open the Golfer Message Board application
- Click Start, point to All Programs, point to Microsoft Visual Studio 2012, right-click Visual Studio 2012, and then click Run as administrator.
- If the User Account Control dialog appears, click Yes.
- Click the FILE menu, point to Open, and then click Project/Solution.
- In File name, type C:\AzureTutorials\Tutorial4\GolferMessageBoard\GolferMessageBoard.sln, and the click Open.
In tutorial 1, you defined a fixed schema for the table to storage messages. You must modify the schema to include a new data member for storing the URL to the image in the Blob service.
To modify the table schema
In Solution Explorer, expand MessageBoard_Data, and then double-click MessageBoardEntry.cs to open the file.
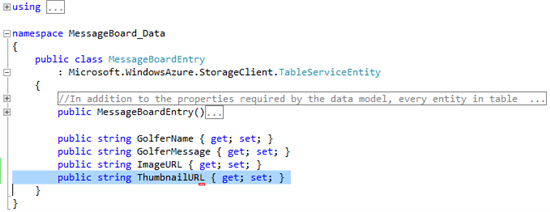
At the end of the class, define a new data member by adding the following line:
public string ThumbnailURL {get; set;}The file looks like the following after modification:
Press Ctrl+S to save the MessageBoardEntry.cs file.
To modify the implementation of the object
In Solution Explorer, right-click the MessageBoard_Data project, and then click Add Reference.
In the Reference Manager dialog, expand Assemblies, and then click Framework.
Select System.Drawing, and then click OK.
In Solution Explorer, expand MessageBoard_Data, and then double-click MessageBoardDataSource.cs to open the file.
In the beginning of the file, add the following namespace declarations by inserting the code snippet Tutorial04-Lesson01-Task03_MessageBoardDataSourceNameSpaceDeclaration:
using System.Drawing;
using System.Drawing.Imaging;
using System.Drawing.Drawing2D;
In the beginning of the class, add the following data members by inserting the code snippet Tutorial04-Lesson01-Task03_MessageBoardDataSourceDataMembers:
private const string messageQueueName = "golfermessageboardqueue"; //queue name must be in lower case
private CloudQueueClient queueClient;
private CloudQueue queue;
At the end of the constructor, add the following lines of code to create the queue by inserting the code snippet Tutorial04-Lesson01-Task03_MessageBoardDataSourceConstructor:
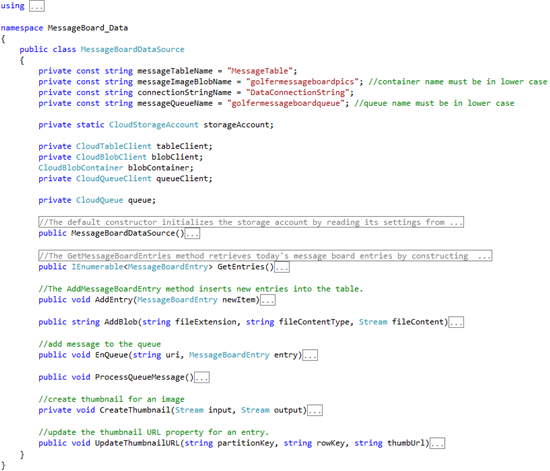
//create queue
queueClient = storageAccount.CreateCloudQueueClient();
queue = queueClient.GetQueueReference(messageQueueName);
queue.CreateIfNotExist();
At the end of the class, add a new member functions for updating thumbnail URL by inserting the code snippet Tutorial04-Lesson01-Task03_MessageBoardDataSourceMethods:
//add message to the queue
public void EnQueue(string uri, MessageBoardEntry entry)
{
   // queue a message to process the image
   CloudQueueMessage message = new CloudQueueMessage(String.Format("{0},{1},{2}", uri, entry.PartitionKey, entry.RowKey));
   queue.AddMessage(message);
}

public void ProcessQueueMessage()
{
   // retrieve a new message from the queue
   CloudQueueMessage msg = queue.GetMessage();

   if (msg != null)
   {
      // parse message retrieved from queue
      var messageParts = msg.AsString.Split(new char[] { ',' });
      var imageBlobUri = messageParts[0];
      var partitionKey = messageParts[1];
      var rowkey = messageParts[2];

      string thumbnailBlobUri = System.Text.RegularExpressions.Regex.Replace(imageBlobUri, "([^\\.]+)(\\.[^\\.]+)?$", "$1-thumb$2");
      CloudBlob inputBlob = blobContainer.GetBlobReference(imageBlobUri);
      CloudBlob outputBlob = blobContainer.GetBlobReference(thumbnailBlobUri);
      using (BlobStream input = inputBlob.OpenRead())
      using (BlobStream output = outputBlob.OpenWrite())
      {
         CreateThumbnail(input, output);

         // commit the blob and set its properties
         output.Commit();
         outputBlob.Properties.ContentType = "image/jpeg";
         outputBlob.SetProperties();

         // update the entry in the table to point to the thumbnail
         UpdateThumbnailURL(partitionKey, rowkey, thumbnailBlobUri);


         queue.DeleteMessage(msg);
      }
    }
}

//create thumbnail for an image
private void CreateThumbnail(Stream input, Stream output)
{
   int width;
   int height;
   var originalImage = new Bitmap(input);
   if (originalImage.Width > originalImage.Height)
   {
      width = 128;
      height = 128 * originalImage.Height / originalImage.Width;
   }
   else
   {
      height = 128;
      width = 128 * originalImage.Width / originalImage.Height;
   }
   var thumbnailImage = new Bitmap(width, height);


   using (Graphics graphics = Graphics.FromImage(thumbnailImage))
   {
      graphics.InterpolationMode = InterpolationMode.HighQualityBicubic;
      graphics.SmoothingMode = SmoothingMode.AntiAlias;
      graphics.PixelOffsetMode = PixelOffsetMode.HighQuality;
      graphics.DrawImage(originalImage, 0, 0, width, height);
   }

   thumbnailImage.Save(output, ImageFormat.Jpeg);
}

//update the thumbnail URL property for an entry.

public void UpdateThumbnailURL(string partitionKey, string rowKey, string thumbUrl)
{
   TableServiceContext tableServiceContext = tableClient.GetDataServiceContext();


   var results = from g in tableServiceContext.CreateQuery<MessageBoardEntry>(messageTableName)
      where g.PartitionKey == partitionKey && g.RowKey == rowKey
      select g;

   var entry = results.FirstOrDefault<MessageBoardEntry>();
   entry.ThumbnailURL = thumbUrl;
   tableServiceContext.UpdateObject(entry);
   tableServiceContext.SaveChanges();
}
The file looks like the following after modification:
To rebuild the project
- In Solution Explorer, right-click MessageBoard_Data, and then click Rebuild. Make sure the rebuild is successful.
What did I just do?
In this step, you modified the data model.
Next Steps:
You will modify the Web role.
Return to Top
Lesson 2: Modify the Web Role
In this lesson, you modify the markup so that the Web page displays the thumbnails instead of the original images. Each thumbnail is a link to a page displaying the original images. You also modify the code behind file for creating a queue and adding messages to the queue.
Procedures
In this lesson, you will go through the following procedure:
To modify the markup
In Solution Explorer, expand MessageBoard_WebRole, right-click Default.aspx, and then click View Markup.
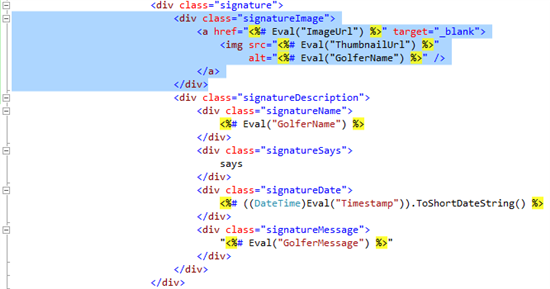
Find the <div> tag with class=”signatureImage”. Replace the <div> tag with the one in the code snippet Tutorial04-Lesson02-Task01_WebRoleDisplayImage:
<div class="signatureImage">
   <a href="<%# Eval("ImageUrl") %>" target="_blank">
      <img src="<%# Eval("ThumbnailUrl") %>"
          alt="<%# Eval("GolferName") %>" />
   </a>
</div>
The <div> tag looks like the following after the modification:
Press Ctrl+S to save the Default.aspx file.
The following procedure demonstrates creating a queue and adding a message. A message may be up to 8KB in size and must be in a format that can be included in an XML request with UTF-8 encoding.
To modify the code-behind
In Solution Explorer, expand MessageBoard_WebRole, right-click Default.aspx, and then click View Code.
Inside the btnSend_Click() method, find the line where the variable entry is declared and update the line with the following:
MessageBoardEntry entry = new MessageBoardEntry() {
   GolferName = txtName.Text,
   GolferMessage = txtMessage.Text,
   ImageURL=blobURI,
   ThumbnailURL = blobURI};
Inside the btnSend_Click() method, after the “ds.AddEntry(entry)” line, add code to queue a message that will process the image:
ds.EnQueue(blobURI, entry);Press Ctrl+S to save the file.
In Solution Explorer, right-click MessageBoard_WebRole, and then click Rebulid.
What did I just do?
In this step, you modified the Web role to communicate with the worker role for generating thumbnails in the background.
Next Steps:
You will add a new worker role to the solution for background processing.
Return to Top
Lesson 3: Add a Worker Role for Background Processing
A worker role runs in the background to provide services or execute time-related tasks like a service process. In this lesson, you create a worker role to read work items posted to a queue by the Web role front-end. To process the work item, the worker role extracts information about a message board entry from the message and then retrieves the corresponding entity from the Table service. It then fetches the associated image from the Blob service and creates the thumbnail, which is also stored as a blob. Finally, to complete the processing, it updates the URL of the generated thumbnail blob in the message board entry.
Procedures
In this lesson, you will go through the following procedures:
- Add a new worker role project
- Modify the WorkerRole class
- Build the project
- Add the storage account settings
To add a new worker role project
- In Solution Explorer, expand MessageBoard, right-click Roles, point to Add, and then click New Worker Role Project.
- In the Add New Role Project dialog, type or select the following values, and then click Add.
Name Value Category Installed/Windows Azure Cloud Service/.NET Framework 4.X/Wroker Role/Visual C# Template Worker Role Name MessageBoard_WorkerRole - In Solution Explorer, right-click the MessageBoard_WorkerRole project, and then click Add Reference.
- In the Reference Manager dialog, expand Projects, click Projects, select MessageBoard_Data, and then click OK.
To modify the WorkerRole class
In Solution Explorer, expand MessageBoard_WorkerRole, and then double-click WorkerRole.cs to open the file.
At the top of the file, add the following namespace declarations:
using MessageBoard_Data;In the beginning of the class, add the following declaration:
private MessageBoardDataSource ds;Inside the OnStart method and immediately before the return method, add the following code to create the MessageBoardDataSource object. The MessageBoardDataSource constructor creates the queue:
ds = new MessageBoardDataSource();Replace the body of the Run() method, the code snippet for the new Run() method is Tutorial04-Lesson03-Task02_WorkerRoleRun:
public override void Run()
{
   while (true)
   {
      ds.ProcessQueueMessage();
   }
}
Press Ctrl+S to save the file.
To build the project
- In Solution Explorer, right-click MessageBoard_WorkerRole, and then click Build. Make sure the rebuild is successful.
To add the storage account settings
In Solution Explorer, expand MessageBoard, expand Roles, and then double-click MessageBoard_WorkerRole to open the properties for this role.
Switch to the Settings tab.
Click Add Setting.
Type or select the following values.
Name Value Name DataConnectionString Type Connection String Value (click the ellipses button (…), and then select Use the Windows Azure storage emulator) Note: The Windows Azure storage emulator provides local instances of the Blob, Queue, and Table services that are available in the Windows Azure. For more information, see Overview of the Windows Azure Storage Emulator at http://msdn.microsoft.com/en-us/library/gg432983.aspx.
Press Ctrl+S to save changes to the role configuration.
What did I just do?
In this step, you added a new worker role to the solution for generating thumbnail images from given images in the background.
Next Steps:
You will test and deploy the application.
Return to Top
Lesson 4: Test and Deploy the Application
In this lesson, you test the application in the development fabric environment, package the application, and then deploy the application to Windows Azure.
Note: If you don’t have a Windows Azure Platform subscription, see the Provisioning Windows Azure section of [[articles: Windows Azure and SQL Azure Tutorials]].
Procedures
In this lesson, you will go through the following procedures:
- Test the application
- Generate the service package
- Sign in to Windows Azure
- Create a storage account. You need a storage account to utilize Windows Azure storage services, for example the table service.
- Create a cloud service. The cloud service is used to host the message board application.
- To configure the ServiceConfiguration.Cloud.cscfg file
- Deploy the application to the staging environment
- Test the application
- Promote the application to the production environment
To test the application
- In Solution Explorer, right-click MessageBoard, and then click Set as Startup Project.
- From the Debug menu, click Start Debugging. You will see a compute emulator icon added to the notification area of taskbar, and a new Internet Explorer window showing the Golfer Message Board application.
- Switch to Internet Explorer to view the message board application.
- Add a few entries to the message board by entering your name and a message before clicking Send.
- Close the Internet Explorer window.
After the application is tested successfully in the compute emulator environment, the next step is to create the service package and then deploy the application to Windows Azure.
To generate the service package
In Solution Explorer, right-click the MessageBoard cloud project, and then select Package.
In the Package Windows Azure Application dialog, select the following values:
Name Value Service configuration Cloud Build configuration Release Click Package. After Visual Studio builds the project and generates the service package, Windows Explorer opens with the current folder set to the location where the generated package is stored. The default directory is C:\AzureTutorials\Tutorial4\GolferMessageBoard\MessageBoard\bin\Release\app.publish. Make sure to write down the path. You will need it in the deployment lesson.
You will get a few warning messages about 'DataConnectionString" set up to use the local storage emulator. You can ignore these warning for now.
For deploying the golfer message board application, you must have a storage account for accessing the Windows Azure storage services, and a cloud service, which is a container for service deployments in Windows Azure. For better performance, you might want to create an affinity group to group the service and the storage accounts within a subscription according to geo-location.
To sign in to Windows Azure
Open a Web browser and browse to http://windows.azure.com/. This is the Windows Azure Management Portal.
Sign in using the Windows Live ID associated with your Windows Azure account.
Note: If you haven’t had a Windows Azure Platform subscription, see the Provisioning Windows Azure section of this tutorial.
The next step is to create a storage account for using Windows Azure table service and blob service. If you have created a storage account in [[Windows Azure and SQL Database Tutorials - Tutorial 1: Using Windows Azure Web Role and Windows Azure Table Service (en-US)|tutorial 1]] or [[Windows Azure and SQL Database Tutorials - Tutorial 3: Using Windows Azure Blob Service (en-US)|tutorial 2]], you can skip this step.
To create a storage account for the golfer message board application to store its data
- From the portal, in the left pane, click STORAGE.
- On the bottom left corner, click NEW, click STORAGE, and then click QUICK CREATE.
- Type or select the following values.
Name Value URL <yourname>gmb (i.e. johndolegmb) REGION/AFFINITY GROUP (Choose the region where you wish your service to run, most likely, the one that is closest to your current location. Select an affinity group instead of a region if you want your storage services to be in the same data center with the cloud service that you will create in the next step. To create an afinity group, open the NETWORKS area of the Management Portal, click AFFINITY GROUPS, and then click CREATE.) - Click the check mark on the bottom right corner. Wait until the status of the storage account changes to Online. The process can take several minutes.
- Once the strorage account is created, click the storage account from the storage account list to select it, and then click MANAGE KEYS on the bottom of the page.
- Record the STORAGE ACCOUNT NAME and PRIMARY ACCESS KEY. Later in the tutorial, you will need to configure your cloud service to use storage account by specifying the account name and the access key.
- Close the dialog.
If you have published other tutorial projects before, you can either update the existing cloud service, or create a new cloud service. If you choose to create a new cloud service, you must give a different cloud service URL.
To create a cloud service
- From the portal, in the left pane, click CLOUD SERVICES.
- On the bottom left corner of the portal page, click NEW, click COMPUTE, click CLOUD SERVICE, and then click CUSTOM CREATE.
- Type or select the following values.
Name Value URL <yourname>gmb Note: The URL prefix must be unique.
REGION/AFFINITY GROUP (For better performance, select the same region as the one you chose for the storage service, or use an affinity group.) Deployment a cloud service package now (not selected) - Click the check sign on the bottom right corner. Wait until the status changes to Created. This process could take several minutes.
When you create and test the application locally, the application is configured to use the development storage. Now you have created a storage account, you can configure the application to use the stroage account before deploying the application to Windows Azure. The configuration information is in the ServiceConfiguration.Cloud.cscfg file. This file was created when you generated the service package.
To configure the ServiceConfiguration.Cloud.cscfg file
- Use Notepad to open C:\AzureTutorials\Tutorial4\GolferMessageBoard\MessageBoard\bin\Release\app.publish\ServiceConfiguration.Cloud.cscfg. This path can be different if you installed the tutorial files into a different folder than the c root directory. Notice the value of DataConnectionString is "UseDevelopmentStorage=true".
- Change the value of DataConnectionString to DefaultEndpointsProtocol=https;AccountName=<your storage account name>;AccountKey=<your storage account primary access key>. Replace <your storage account name> and <your storage account access key> accordingly.
- Change the value of Microsoft.WindowsAzure.Plugins.Diagnostics.ConnectionString to DefaultEndpointsProtocol=https;AccountName=<your storage account name>;AccountKey=<your storage account primary access key>. You must replace <your storage account name> and <your storage account primary access key> with the actual account name and account key for the storage account that you created earlier in the tutorial.
- Optionally, you can increase the Instances count to scale out the application.
- Save the file and close Notepad.
To deploy the application to the staging environment
- From the portal, in the left pane, click CLOUD SERVICES.
- In the middle pane, click the cloud service you just created. The default name is <yourname>gmb..
- From the top of the page, click STAGING.
- Click UPLOAD A NEW STAGING DEPLOYMENT, or UPDATE on the bottom of the page if you have deployed a tutorial application before.
- From Upload a package, type or select the following value.
Name Value Deployment name v1.3.0.0 Package location C:\AzureTutorials\Tutorial3\GolferMessageBoard\MessageBoard\bin\Release
\app.publish\MessageBoard.cspkgConfiguration file C:\AzureTutorials\Tutorial3\GolferMessageBoard\MessageBoard\bin\Release
\app.publish\ServiceConfiguration.Cloud.cscfgDeploy(or Update) even if one or more roles contain a single instance (Selected). You can always increase the number of instances from the portal. Start deployment (this option is not available for updating a service) (Selected) Allow update if role sizes or number of roles change. (this option is only available for updating a service) (Selected) ROLE(this option is only available for updating a service) All - Click the check sign on the bottom right corner of the page.
- Wait until the upload process is completed. The process can take several minutes to complete. Notice the DEPLOYMENT NAME is changed to v1.3.0.0.
To test the application in the staging environment
- From the portal, in the left pane, click CLOUD SERVICES.
- In the middle pane, click the cloud service you created.
- From the top of the page, click STAGING.
- On the right side of the page, click the site URL.
- Test the application by entering one or more entries.
After the application is working correctly in the staging environment, you are ready to promote it to the production environment.
To promote the application to production
From the portal, in the left pane, click CLOUD SERVICES.
In the middle pane, click the cloud service you created.
From the top of the page, click STAGING.
On the bottom of the page, click SWAP.
On the right, click YES.
On the top of the page, click PRODUCTION. It takes several minutes to complete the operation.
On the right, click the SITE URL.
In the Properties pane, click the URL in the DNS name box. The application is opened in a new browser tab or a new browser window depending on your browser configuration.
Note: Some DNS services take longer to replicate the records. If you get a page not found error, you might need to try browsing to the URL again in a few minutes.
Test the application in the production environment by entering one or more entries.
What did I just do?
In this step, you tested and deployed the golfer message board to Windows Azure.
Next Steps:
Congratulations! You have completed the first four Windows Azure and SQL Database tutorials. We will continue adding new tutorials.
Return to Top
See Also
- [[Windows Azure and SQL Database Tutorials (en-US)]]
- Windows Azure and SQL Database Tutorials - Tutorial 1: Using Windows Azure Web Role and Windows Azure Table Service (en-US)
- Windows Azure and SQL Database Tutorials - Tutorial 2 Using SQL Database
- Windows Azure and SQL Database Tutorials - Tutorial 2.1 Create an OData Service
- Windows Azure and SQL Database Tutorials - Tutorial 3 Using Windows Azure Blob Service
- [[Using the Windows Azure Web Role and Windows Azure Table Service with PHP]]
- [[Using the Windows Azure Web Role and SQL Database with PHP]]
Return to Top