Using the SB-Messaging Adapter & ESB Toolkit to send messages to the Windows Azure Service Bus
Introduction
BizTalk Server 2013 introduces the new SB-Messaging adapter to send and receive message from the Windows Azure Service Bus entities like Queues, Topics, and Relays. The topics on MSDN provide instructions on how to configure an SB-Messaging receive location and a send port to receive and send messages from the Service Bus but there is no information provided on how to do it with the ESB Toolkit. This is because there is no out of the box SB-Messaging Adapter Provider available in the ESB Toolkit. To make it work with the ESB Toolkit, you will have to create a Custom SB-Messaging Adapter Provider. Furthermore is also a Custom SB-Messaging Routing Service needed. Normally the Routing Service of the ESB Toolkit set’s all the necessary properties of the Dynamic Send Port but the Authentication Properties and the Brokered Message Properties from the SB-Messaging adapter have to be set on the message as context properties. Because the Routing Service doesn't provide that functionality you have to create a Custom Service for it.
Steps
The following steps are necessary to use the SB-Messaging adapter in the ESB Toolkit and send messages to the Windows Azure Service Bus:
- Create a Custom SB-Messaging Adapter Provider
- Create a Custom Itinerary Messaging Service
- Create an itinerary with the Custom Messaging Service
- Testing the itinerary
Create a Custom SB-Messaging Adapter Provider
To create a Custom Adapter Provider:
Add a Class Library Project to your Solution.
Add a reference to the following assembly:
- Microsoft.Practices.ESB.Adapter
Add a new class item to your Class Library Project and name it AdapterProvider.
Derive from the BaseAdapterProvider base class and create a SetEndPoint method that sets the endpoint context properties of the message.
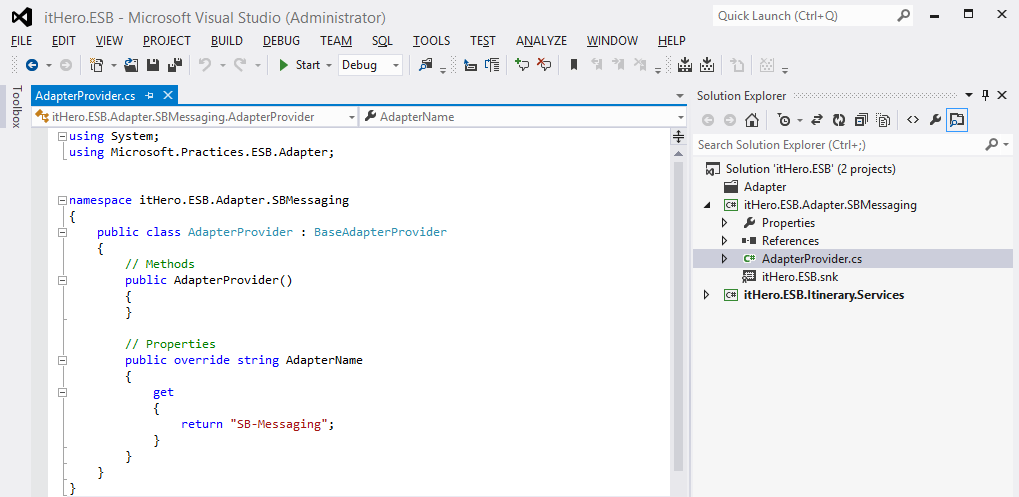
Figure 1. Custom SB-Messaging AdapterProvider class
Register the adapter provider by adding it to Esb.config configuration files using an <adapterProvider> element with a name for the adapter as the name attribute, the fully qualified name of the class as the type attribute, the moniker as the moniker attribute (multiple values should be separated by a comma), and optionally the assembly of the actual adapter as the adapterAssembly attribute.
<adapterProvider name="SB-Messaging" type="itHero.ESB.Adapter.SBMessaging.AdapterProvider,
itHero.ESB.Adapter.SBMessaging, Version=1.0.0.0, Culture=neutral, PublicKeyToken=cdb4e8bc8e6104aa"
moniker="SBMessaging" />
Create a Manifest File for Custom Adapter Properties
When creating a custom adapter provider, you must also provide designer support for the adapter
provider to those resolver extenders that display an endpoint configuration property. To enable designer support, it is necessary to create an adapter provider manifest file. The manifest file should be placed in the same folder as the Itinerary Designer binaries: C:\Users\MyUser\AppData\Local\Microsoft\VisualStudio\11.0\Extensions\ncg5g43x.y5w
<?xml version="1.0" encoding="utf-8"? >
<adapterPropertyManifest adapterName="SB-Messaging">
    <aliases>
        <alias name="globalPropertySchemas" value="Microsoft.BizTalk.GlobalPropertySchemas,
        Version=3.0.1.0, Culture=neutral, PublicKeyToken=31bf3856ad364e35" />
    </aliases>
    <properties>
        <property name="IssuerName" type="WCF.IssuerName" assembly="globalPropertySchemas" />
        <property name="IssuerSecret" type="WCF.IssuerSecret" assembly="globalPropertySchemas" />
        <property name="StsUri" type="WCF.StsUri" assembly="globalPropertySchemas" />
        <property name="Label" type="SBMessaging.Label" assembly="globalPropertySchemas" />
    </properties>
</adapterPropertyManifest>
Register the new assembly in the global assembly cache.
Create a Custom Itinerary Messaging Service
Create a Custom Routing Service that is based on the RoutingService in the Microsoft.Practices.ESB.Itinerary.Services Assembly. I used Reflector to get the code from the RoutingService class from the ESB Toolkit.
Add a Class Library Project to your Solution.
Add references to the following assemblies:
- Microsoft.BizTalk.Message.Interop
- Microsoft.BizTalk.Component.Interop
- Microsoft.Practices.ESB.Itinerary
- Microsoft.Practices.ESB.Resolver
- Microsoft.Practices.ESB.Adapter
- Microsoft.Practices.ESB.Exception.Management
Add a new class item to your Class Library Project and name it ServiceBusService.
Derives from IMessagingService, in the Execute method, include all logic necessary to make modifications to the message or the message context.
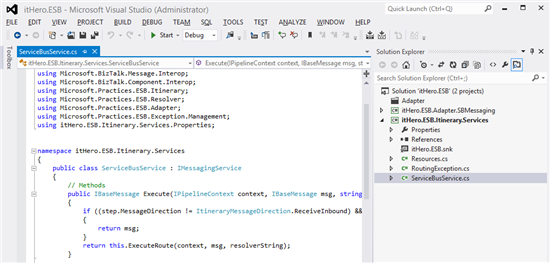
Figure 2. Custom Routing Service.
Add extra code to set the URI for the Service Bus Access Control Service STS endpoint, the issuer name and the issuer key for the Service Bus namespace because the properties are not set on the adapter, but on the message as context properties. Also the Brokered Message Properties are set on the message as context properties.
01.//Set WCF-properties
02.msg.Context.Write("IssuerName", http://schemas.microsoft.com/BizTalk/2006/01/Adapters/WCF-properties,
03.endpointConfigItems["IssuerName"]);
04.msg.Context.Write("IssuerSecret", http://schemas.microsoft.com/BizTalk/2006/01/Adapters/WCF-properties,
05.endpointConfigItems["IssuerSecret"]);
06.msg.Context.Write("StsUri", http://schemas.microsoft.com/BizTalk/2006/01/Adapters/WCF-properties,
07.endpointConfigItems["StsUri"]);
08.
09.//Set BrokeredMessage-properties
10.msg.Context.Write("Label", http://schemas.microsoft.com/BizTalk/2012/Adapter/BrokeredMessage-properties,
11.endpointConfigItems["Label"]);
Register the Custom Itinerary Messaging Service by adding it to the Esb.config configuration file using an <itineraryService> element.
<itineraryService id="10000" name="itHero.ESB.Itinerary.Services.ServiceBusRouting"
type="itHero.ESB.Itinerary.Services.ServiceBusService, itHero.ESB.Itinerary.Services, Version=1.0.0.0, Culture=neutral,
PublicKeyToken=191980cbfe160b14" scope="Messaging" stage="AllReceive"/>
Register the new assembly in the global assembly cache.
Create an itinerary with the Custom Messaging Service
Create an itinerary that contains the Custom Routing Service. Use a Resolver to set the SB-Messaging Adapter Provider.
- Open Visual Studio as an Administrator and open/create the ESB Solution.
- Right click on the ESB solution and select Add / New Project.
- In the “Add New Project” PopUp window, select BizTalk ESB Itinerary Designer. Give it a name and click on the OK button.

Figure 3. Add New Project.
- In Solution Explorer, right-click the ItineraryLibrary project, point to Add, and then click New Itinerary.
- From the Toolbox, drag an Itinerary Service model element to the design surface.
In the Properties select:- Itinerary Service Extender: Messaging Extender
- Service Name: ServiceBusService
- Name: RoutingService
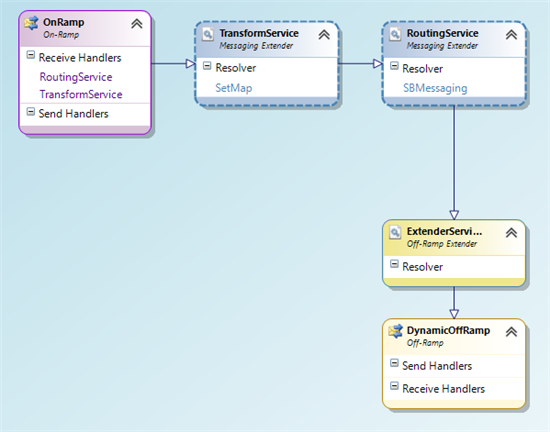
Figure 4. Itinerary that contains the Custom Routing Service.
- Add a Resolver to the ServiceBus Routing Service and set the Transport Name and the Location of the Azure Queue.
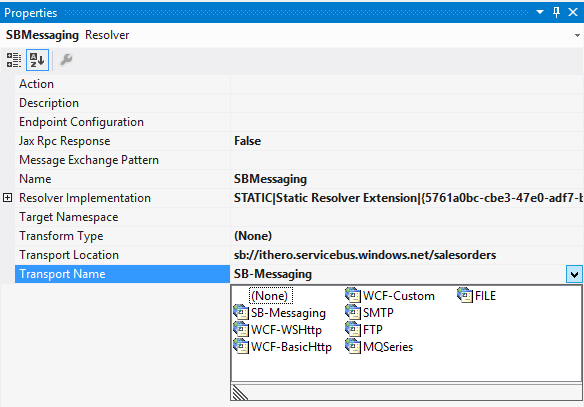
Figure 5. Resolver properties.
- In the Management Portal, obtain the Credentials for the Namespace.
- In the left navigation pane, click the Service Bus node, to display the list of available namespaces.
- Select the namespace you just created from the list shown in the right pane.
- Click on Connection Information.
- In the Access connection information dialog, Copy the Default Issuer and Default Key entries.
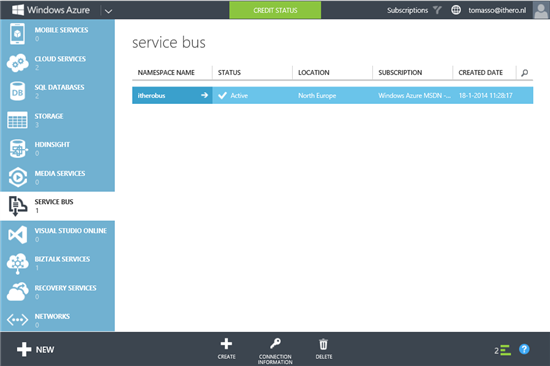
Figure 6. Management Portal.
- Set the Authentication properties and Brokered Message Properties in the Endpoint Configuration property of the Resolver.
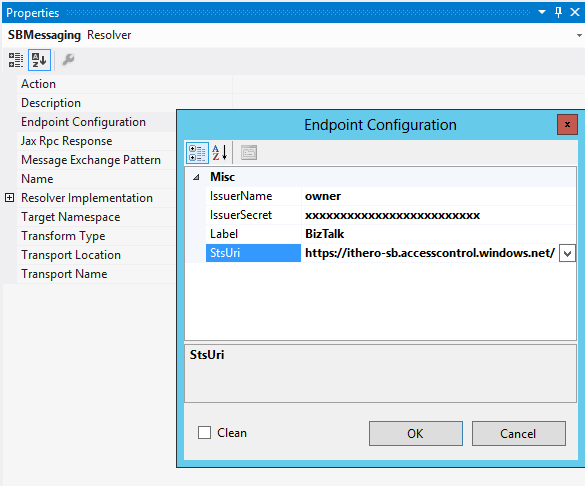
Figure 7. Endpoint Configuration property.
Testing the sample
Once the itinerary is deployed to an XML file, the solution is ready to be tested.
Run the Itinerary Test Client to send a message with an itinerary to the ESB.ItineraryServices On-Ramp.
In Windows Explorer, open the folder \Source\Samples\Itinerary\Source\ESB.Itinerary.Test where you installed the Microsoft BizTalk ESB Toolkit samples, and then start the application named Esb.Itinerary.Test.exe.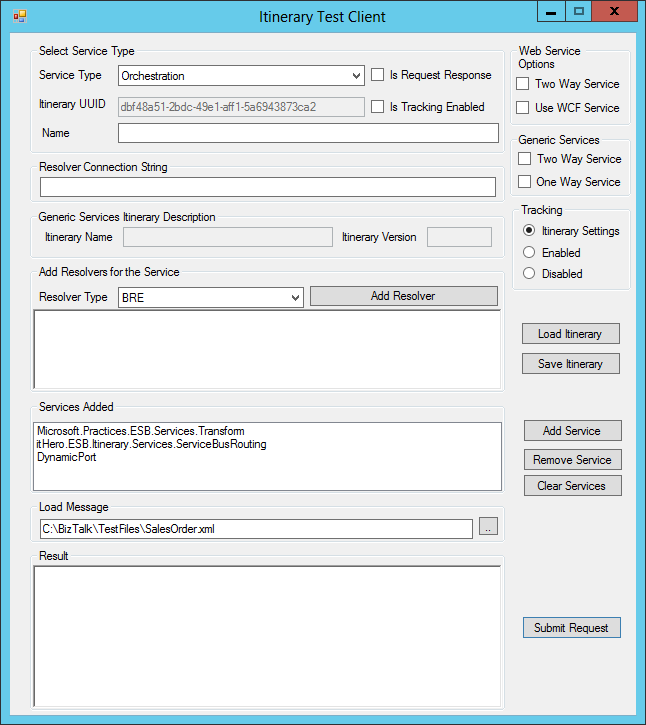
Figure 8. Itinerary Test Client.
You can use WireShark to verify that the authentication was successful.

Figure 9. WireShark.
Run the Service Bus Explorer to get the XML message that is sent to the Azure Service Bus Queue.
Here you can also view the Brokered Message Properties that are set on the message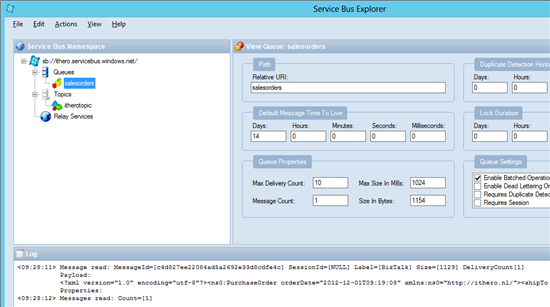
Figure 10. Service Bus Explorer.
Code Samples
You can download the Custom Messaging Service and the SB-Messaging Adapter Provider with the source code from the MSDN Code Gallery:
See Also
Read suggested related topics:
- BizTalk Server 2013: Connect to the Windows Azure Service Bus
- Windows Azure Service Bus Resources
- BizTalk Server: ESB Survival Guide
Another important place to find a huge amount of BizTalk related articles is the TechNet Wiki itself. The best entry point is BizTalk Server Resources on the TechNet Wiki.