Drawing/Inking Api in Windows Runtime Apps
Introduction
If you are planning to develop an application that is going to have the drawing capability, one of the first namespaces to resort to in WinRT is the Inking namespace. Using the InkManager in Windows 8 (Metro) applications, you can:
- Draw ink strokes
- Capture ink strokes
- Render Strokes on a Canvas using different geometries
- Select Strokes
- Delete Strokes
- Save and Load Strokes
- Convert strokes to text through handwriting recognition
- Copy/Paste strokes from the clipboard
- Hit Test the pen input
In this article, we will be talking about different methodologies for rendering the pen input, interacting with the InkManager, manipulating existing ink strokes and finally implementing multi-touch enabled applications.
Code Sample: Windows 8.1 Input: Ink sample in C#/Xaml
Rendering Pointer Movements
Maybe the easiest and the most efficient way to render the pen input is to render each pointer movement when the pointer is pressed until it is released.
For this purpose, we add a canvas element on our page:
<Grid Background=”White”>
    <Canvas Name=”InkCanvas” Background=”White” Margin=”0,0,0,0″ />
</Grid>
Let us add the pointer handlers to our page. We need two handlers for PointerPressed, PointerMoved.
public void  OnCanvasPointerPressed(object sender, PointerRoutedEventArgs e)
{
    // Get information about the pointer location.
    PointerPoint pt = e.GetCurrentPoint(InkCanvas);
    m_PreviousContactPoint = pt.Position;

    // Accept input only from a pen or mouse with the left button pressed.
    PointerDeviceType pointerDevType = e.Pointer.PointerDeviceType;
    if (pointerDevType == PointerDeviceType.Pen ||
        pointerDevType == PointerDeviceType.Mouse && pt.Properties.IsLeftButtonPressed)
    {
        e.Handled = true;
    }
    else if  (pointerDevType == PointerDeviceType.Touch)
    {
        // Process touch input
    }
}
When the user presses the pointer or uses the Ink Pen, we just record the starting point (m_PreviousContactPoint) to use.
Then when the pointer moves, we assume that the user is trying to draw something on the canvas:
public void  OnCanvasPointerMoved(object sender, PointerRoutedEventArgs e)
{
    if (e.Pointer.PointerId == m_PenId)
    {
        PointerPoint pt = e.GetCurrentPoint(InkCanvas);

        currentContactPt = pt.Position;
        x1 = m_PreviousContactPoint.X;
        y1 = m_PreviousContactPoint.Y;
        x2 = currentContactPt.X;
        y2 = currentContactPt.Y;

        var color = m_CurrentDrawingColor;
        var size = m_CurrentDrawingSize;

        if (CalculateDistance(x1, y1, x2, y2) > 2.0)
        {
            //
            // If the delta of the mouse is significant enough,
            // we add a line geometry to the Canvas
            Line line = new  Line()
            {
                X1 = x1,
                Y1 = y1,
                X2 = x2,
                Y2 = y2,
                StrokeThickness = size,
                Stroke = new  SolidColorBrush(color)
            };

            m_PreviousContactPoint = currentContactPt;

           // Draw the line on the canvas by adding the Line object as
           // a child of the Canvas object.
           InkCanvas.Children.Add(line);
        }
    }
    else if  (e.Pointer.PointerId == m_TouchId)
    {
        // Process touch input
    }
}
And for the PointerReleased, we just set e.Handled to true.
At this point we already have an example that can draw images and of which you can adjust the size and the color of the drawn lines.
But what if you want to use some more advanced functions such as hand writing recognition or copy/paste and save/load functionality. For these options, it is better to use InkManager and render the strokes that the InkManager records.
Rendering Strokes from InkManager
For the InkManager to be able to record the strokes, we need to pass on the pointer events to the InkManager.
In the PointerPressed event handler:
// (Already have) PointerPoint pt = e.GetCurrentPoint(InkCanvas);

// Pass the pointer information to the InkManager.
CurrentManager.ProcessPointerDown(pt);
In the PointerMoved event handler:
// Pass the pointer information to the InkManager.
CurrentManager.ProcessPointerUpdate(pt);
In the PointerReleased event handler:
// Pass the pointer information to the InkManager.
CurrentManager.ProcessPointerUp(pt);
So once we are recording the movements of the pointer, the InkManager will create a list of strokes for us to use to render.
You can render each stroke using a BezierSegment and a PathFigureCollection
private void  RenderStroke(InkStroke stroke, Color color, double width, double opacity = 1)
{
    // Each stroke might have more than one segments
    var renderingStrokes = stroke.GetRenderingSegments();

    //
    // Set up the Path to insert the segments
    var path = new  Windows.UI.Xaml.Shapes.Path();
    path.Data = new  PathGeometry();
    ((PathGeometry)path.Data).Figures = new  PathFigureCollection();

    var pathFigure = new  PathFigure();
    pathFigure.StartPoint = renderingStrokes.First().Position;
    ((PathGeometry)path.Data).Figures.Add(pathFigure);

    //
    // Foreach segment, we add a BezierSegment
    foreach (var renderStroke in renderingStrokes)
    {
        pathFigure.Segments.Add(new BezierSegment()
        {
            Point1 = renderStroke.BezierControlPoint1,
            Point2 = renderStroke.BezierControlPoint2,
            Point3 = renderStroke.Position
        });
    }

    // Set the general options (i.e. Width and Color)
    path.StrokeThickness = width;
    path.Stroke = new  SolidColorBrush(color);

    // Opacity is used for highlighter
    path.Opacity = opacity;

    InkCanvas.Children.Add(path);
}
You can retrieve a list of strokes by calling the GetStrokes method of the InkManager.
To create a complete implementation, you can create a Refresh method which would remove the Line elements that are added while the user is still moving the pointer and only render the strokes from the InkManager.
The refresh method would then be called when the user releases the pointer and the temporary paths that are drawn during the action are replaced by the BezierSegments.
Saving the Ink Strokes
In WinRT API, the only function that InkManager exponses for saving strokes is the SaveAsync method. This might be quite disappointing for most since in good old silverlight, one could easily load an InkPresenter to WriteableBitmap and manupulate it as he/she wants.
try
{
    Windows.Storage.Pickers.FileSavePicker save = new  Windows.Storage.Pickers.FileSavePicker();
    save.SuggestedStartLocation = Windows.Storage.Pickers.PickerLocationId.Desktop;
    save.DefaultFileExtension = “.png”;
    save.FileTypeChoices.Add(“PNG”, new  string[] { “.png” });
    StorageFile filesave = await save.PickSaveFileAsync();

    using (IOutputStream fileStream = await filesave.OpenAsync(FileAccessMode.ReadWrite))
    {
        if (fileStream != null)
        {
            await m_InkManager.SaveAsync(fileStream);
        }
    }
}
catch (Exception ex)
{
    var dialog = new  MessageDialog(ex.Message);
    dialog.ShowAsync();
}
In this implementation we are using a FileSavePicker to create a file, but we could as well use an InMemoryRandomAccessStream. Using the memory stream also help you to display the image in an Image control right away. (e.g. You might want to preview the image that is drawn in a smaller size.)
Loading the Ink Strokes
When the ink strokes are serialized into an image file, you as well load these strokes back to an InkManager and also use them to render the image for further editing perhaps..
using (IRandomAccessStream stream = await storageFile.OpenAsync(Windows.Storage.FileAccessMode.Read))
{
    await m_InkManager.LoadAsync(stream);

    if (m_InkManager.GetStrokes().Count > 0)
    {
        // RenderStrokes();
    }
}
You could possibly use the same render function that was outlined on the previous section.
Important Notes
The saving of the ink strokes creates a rectangle that is only a small cutout from the whole canvas. (e.g. Canvas.ActualWidth = InkManager.BoundingRectangle.Left + InkManager.BoundingRectangle.Width + InkManager.BoundingRectangle.Right) Still trying to figure out how to include the whole canvas area in the image that is saved.
The main reason for this cropped version of the canvas is the fact that even though we are saving the stokes to a “PNG” file (and the microsoft version uses “GIF”), the file is actually in ISF format (*.isf). You can as well rename the extension to .isf and open the image file with paint and save it as “*.png”. You will notice that the magic number change on the file binary and the file size change.
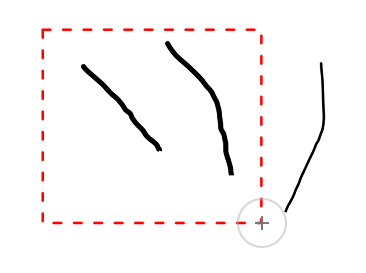
Selecting Strokes
For selecting the strokes created by the ink manager, you can create a selection rectangle (Windows.Foundation.Rect) while the user is selecting an area; and use this rectangle for both:
- Visually display the selection area
- Select the strokes in the ink manager that intersects with it
To identify the selection area, we use the existing subscriptions for Pointer events. So when the user presses the mouse (or touches the screen, will come back to it in my next post) we create an initial selection point and as the user moves the pointer we update our selection rectangle with the new position.
According to the selection rectangle, to visualize the selection area, we use a simple Rectangle (Windows.UI.Xaml.Shapes.Rectangle) with dashed borders. Once we have the visual rectangle, we can add it to our canvas.
/// <summary>
/// Creates a dashed rectangle shape to show the selection bounds
/// </summary>
/// <returns></returns>
private Rectangle RenderSelectionBound()
{
    var selectionRectangle = new  Rectangle
    {
        StrokeDashArray = new  DoubleCollection {3, 5},
        StrokeDashCap = PenLineCap.Round,
        Width = m_SelectionRectangle.Width,
        Height = m_SelectionRectangle.Height,
        StrokeThickness = 4,
        Stroke = new  SolidColorBrush(Colors.Red),
        Margin = new  Thickness(m_SelectionRectangle.Left, m_SelectionRectangle.Top,
            m_SelectionRectangle.Right, m_SelectionRectangle.Bottom)
    };

    m_Canvas.Children.Add(selectionRectangle);

    return selectionRectangle;
}
Here, the important thing to notice is the fact that we only need to create a new rectangle when the canvas is cleared (i.e. refreshing the canvas and redrawing the strokes) and/or there is no parent assigned to our rectangle. Technically, when the mouse is still moving and not yet released, we can simply update the current shape and update layout.
When the pointer is released, we first need to identity the selected strokes. In order to do this, I used a simple intersect between each stroke and the selection rectangle. We can improve this by adding additional checks to see if the strokes bounding rectangle is completely encompassed by the selection rectangle.
private void  UpdateStrokeSelections()
{
    var inkStrokes = m_InkManager.GetStrokes();

    foreach (var inkStroke in inkStrokes)
    {
        var boundingBox = inkStroke.BoundingRect;
        boundingBox.Intersect(m_SelectionRectangle);

        //
        // Don't select the item if the intersecting area is empty
        inkStroke.Selected = boundingBox != Rect.Empty;
    }
}
So finally when the stroke selections are in place, we can go ahead and redraw the canvas. (I am using double thickness for selected strokes while rendering them.)
Further Implementation
InkManager actually supports two different methods for selecting strokes according to the points that are passed into the method. (i.e. SelectWithLine and SelectWithPolyLine). SelectWithLine function does exactly what we are doing here, and makes a selection creating a bounding rectangle between two points.
Dragging Selected Strokes
Normal drag scenario deals with the gestures on a specific control, however, in our implementation we want to select a number of strokes and move only these selected items.
For the drag implementation, in select mode, we make (kind of) a hit test on the abstract selection rectangle; checking if the pointer pressed event occurred inside the bounds of the selected area (and if there are any strokes selected).
if (m_InkManager.GetStrokes().Any(stroke => stroke.Selected) && m_SelectionRectangle.Contains(m_SelectionInitialPoint))
{
    m_IsDragging = true;
    m_PreviousSelectionRectangle = m_SelectionRectangle;
}
Once the dragging starts (note that we are taking a backup of the selection rectangle), we update the selection rectangle according to the pointer deltas; invalidating the selection visual with the new coordinates.
var currentPoint = e.GetCurrentPoint(m_Canvas).Position;

var xDelta = currentPoint.X - m_SelectionInitialPoint.X;
var yDelta = currentPoint.Y - m_SelectionInitialPoint.Y;

m_SelectionRectangle.X += xDelta;
m_SelectionRectangle.Y += yDelta;
Further Implementation
It would be to actually nice to change the mouse cursor according to the current function (i.e. Select or Drag). Also in this implementation, we keep on calling GetStrokes function on the ink manager. This might have performance penalties. I think a caching list can come in handy in this implementation. Another nice thing to have would be to redraw the strokes with the new coordinates inside the selection box while the user is dragging them.
Copy/Paste Selected Strokes to Clipboard
Ink manager comes with many useful functionality. There are two functions that deal with the clipboard information. (i.e. CopySelectedToClipboard and PasteFromClipboard).
So when the user selects a group of segments, he/she can use the Copy action (i.e. in the flyout that opens up with the More application bar button) to copy these strokes to clipboard. These strokes can be pasted on any application that supports the ISF (Ink Serialized Format) content type (i.e. you can paste them onto a bitmap file on paint).
public async void CopyToClipboard()
{
    if (m_CurrentMode != CanvasMode.Select)
        SelectAllStrokes();

    m_InkManager.CopySelectedToClipboard();
}
Pasting the clipboard data is pretty much the same. The only difference is that we have to first check if there is any data in the clipboard and the ink manager can actually retrieve the data that is in the clipboard. For instance, if you try to draw something on paint, and then try to copy/paste it to ink manage; you will get a “false” from the CanPasteFromClipboard method.
public async void CopyToClipboard()
{
    if (m_CurrentMode != CanvasMode.Select)
        SelectAllStrokes();

    m_InkManager.CopySelectedToClipboard();
}
NOTE: In both of these methods, if the current mode is “Select” we just deal with the selected bunch of the strokes, if the current mode is something else; we select all the strokes for the user.
Multi-Touch
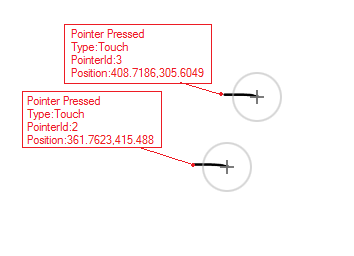
As you might have noticed, each pointer event includes the PointerPoint which we were using to retrieve the location of the pointer gesture. When it comes to multiple touch enabled devices, another property of this class becomes important – PointerId. Essentially what happens is, every time a “pointer” comes in contact with the control that is firing the events, the pointer gets a new id assigned. So for instance, if I was trying to draw with two fingers on different coordinates on a canvas, each of the press, move, release events would be fired independently associated with a different pointer instance with a separate id.
As an example, we can use the simulator and select the Pinch/Zoom Touch mode. In this case we have two pointers. If we were to add the following line to the pointer pressed event handler, we can easily see how the touch points are handled.
CurrentPointerDevice = args.Pointer.PointerDeviceType;

// Get information about the pointer location.
PointerPoint pt = args.GetCurrentPoint(m_Canvas);

System.Diagnostics.Debug.WriteLine("Pointer Pressed\r\nType:{0}\r\nPointerId:{1}\r\nPosition:{2}\r\n",
    CurrentPointerDevice.ToString(), args.Pointer.PointerId, pt.Position.ToString());
The simulator screen combined with the debug output looks similar to the screenshot below.
Revising the Canvas Manager
Considering the repercussions of Canvas Manager trying to micromanage each pointer event from different pointers itself, we should let it delegate a little.
For this purpose, we can create a handler class that will deal with the pointer events until the pointer is released. (e.g. draw the temporary lines until the canvas manager takes over, or move the selected ink strokes with the selection zone until the user releases the pointer)
public abstract  class PointerHandler : IDisposable
{
    protected readonly  CanvasManager m_Parent;

    /// <summary>
    /// Abstract PointerHandler class, if implemented, deals with pointer move events
    /// </summary>
    /// <param name="parent">CanvasManager that created and owns this pointer handler</param>
    public PointerHandler(CanvasManager parent)
    {
        m_Parent = parent;
    }

    /// <summary>
    /// Pointer Id defines the specific pointer used used for this touch
    /// <remarks>
    /// In multi touch enabled devices each pointer gets a unique id.
    /// </remarks>
    /// </summary>
    public uint  PointerId { get; set; }

    /// <summary>
    /// Handle the new point
    /// </summary>
    /// <param name="pt"></param>
    public abstract  void HandlePointerMove(PointerPoint pt);

    /// <summary>
    /// Dispose is supposed to be used when the pointer handler is not needed anymore
    /// <example>When the ink pointer handler is disposed, it is suppose to clear all its lines drawn</example>
    /// </summary>
    public abstract  void Dispose();
}
So if we were to implement a pointer handler for the drawing mode (e.g. InkPointerHandler), it would be responsible for creating a number of line geometries drawn the same pointer until the pointer is released and temporary lines cleaned up so we can use the Bezier segments from the ink manager. In this pattern, the canvas manager would be only responsible for creating the handler (i.e. on pointer pressed event) and passing on the pointer move events.
private void  OnCanvasPointerPressed(object sender, PointerRoutedEventArgs args)
{
    CurrentPointerDevice = args.Pointer.PointerDeviceType;

    // Get information about the pointer location.
    PointerPoint pt = args.GetCurrentPoint(m_Canvas);

    System.Diagnostics.Debug.WriteLine("Pointer Pressed\r\nType:{0}\r\nPointerId:{1}\r\nPosition:{2}\r\n",
        CurrentPointerDevice.ToString(), args.Pointer.PointerId, pt.Position.ToString());

    switch (m_Settings.CurrentMode)
    {
        case CanvasMode.Select:
            // TODO:
            break;
        case CanvasMode.Erase:
            // TODO:
            break;
        default:
            // We create the appropriate pointer handler and add it to the hash table keyed with the pointer id
            m_Handers.Add(pt.PointerId, new  InkPointerHandler(pt, this));
            // We still need to pass the pointer down event to the inkmanager so it can create the bezier approximation.
            CurrentManager.ProcessPointerDown(pt);
            break;
    }

    args.Handled = true;
}
The pointer moved event handler would be responsible for passing on the pointer moved event to the InkManager and the ink handler.
private void  OnCanvasPointerMoved(object sender, PointerRoutedEventArgs args)
{
    PointerPoint pt = args.GetCurrentPoint(m_Canvas);

    if (m_Settings.CurrentMode == CanvasMode.Select)
    {
        #region Select
        // TODO:
        #endregion
    }
    else if  (m_Handers.ContainsKey(args.Pointer.PointerId))
    {
        m_Handers[pt.PointerId].HandlePointerMove(pt);
        CurrentManager.ProcessPointerUpdate(pt);
    }
    else if  (m_Settings.CurrentMode == CanvasMode.Erase ||
        (pt.Properties.IsEraser && args.Pointer.PointerDeviceType == PointerDeviceType.Pen))
    {
        #region Erase
        // TODO:
        #endregion
    }
 }
Implementing the Ink PointerHandler
InkPointerHandler would be a quick implementation of the PointerHandler. We already have the basic code in CanvasManager that deals with drawing the temporary lines until the ink manager takes over. We can move this code to the derived class and expose the Canvas member of the CanvasManager to the child handlers.
public override  void HandlePointerMove(PointerPoint pt)
{
    m_CurrentContactPt = pt.Position;

    var color = m_Parent.Settings.CurrentMode == CanvasMode.Ink ? m_Parent.Settings.CurrentDrawingColor : m_Parent.Settings.CurrentHighlightColor;
    var size = m_Parent.Settings.CurrentMode == CanvasMode.Ink ? m_Parent.Settings.CurrentDrawingSize : m_Parent.Settings.CurrentHighlightSize;

    if (CheckPointerDrawingDelta(m_CurrentContactPt))
    {
        var line = new  Line
        {
            X1 = m_PreviousContactPt.X,
            Y1 = m_PreviousContactPt.Y,
            X2 = m_CurrentContactPt.X,
            Y2 = m_CurrentContactPt.Y,
            StrokeThickness = size.Size,
            Stroke = new  SolidColorBrush(color.Color)
        };


        if (m_Parent.Settings.CurrentMode == CanvasMode.Highlight) line.Opacity = 0.4;

        m_PreviousContactPt = m_CurrentContactPt;

        // Draw the line on the canvas by adding the Line object as
        // a child of the Canvas object.
        m_Parent.Canvas.Children.Add(line);

        // Adding the lines to a local container so canvas manager can reuse these
        // i.e. one pointer is released but the other one is still drawing, remove the lines for
        // the released handler and add the lines from the current one.
        m_Lines.Add(line);
    }
}
As you might have noticed, the handler code is almost completely copied from the previous CanvasManager implementation.
And the whole class structure looks like:
public class  InkPointerHandler : PointerHandler
{
    private Point m_PreviousContactPt;

    private Point m_CurrentContactPt;

    private List<Line> m_Lines = new List<Line>();

    private double  m_DrawingDelta = 3.0;

    /// <summary>
    /// Checks if the new point from the pointer move event meets the drawing threshold
    /// </summary>
    /// <param name="point">The new point reference received from pointer event</param>
    /// <returns><code>true</code> if the it meets the threshold</returns>
    private bool  CheckPointerDrawingDelta(Point point)
    {
        // Calculating the distance between the previous contact and the new point
        double distance = Math.Sqrt(
            Math.Pow((point.X - m_PreviousContactPt.X), 2) +
            Math.Pow((point.Y - m_PreviousContactPt.Y), 2));

        return (distance > m_DrawingDelta);
    }

    /// <summary>
    /// Temporary Lines drawn with simple geometry (i.e. line segments)
    /// </summary>
    internal List<Line> Lines
    {
        get { return m_Lines; }
    }

    public InkPointerHandler(PointerPoint initialContact, CanvasManager parent) : base(parent)
    {
        m_PreviousContactPt = initialContact.Position;
        PointerId = initialContact.PointerId;
    }

    public override  void HandlePointerMove(PointerPoint pt)
    {
        //... See Previous Snippet
    }

    public override  void Dispose()
    {
        throw new  NotImplementedException();
    }
}
Finally when the pointer is released the canvas manager is responsible for clearing the canvas and redrawing the geometries using the ink manager Bezier segments. While doing this, we have to keep in mind that some of the pointer handlers might still be drawing their temporary lines.
private void  OnCanvasPointerReleased(object sender, PointerRoutedEventArgs args)
{
    if (m_Settings.CurrentMode == CanvasMode.Select && m_Handers.Values.OfType<SelectionPointerHandler>().Count() == 1)
    {
        #region Selecting
        // TODO:
        #endregion
    }
    else if  (m_Handers.ContainsKey(args.Pointer.PointerId) && m_Handers[args.Pointer.PointerId] is  InkPointerHandler)
    {
        PointerPoint pt = args.GetCurrentPoint(m_Canvas);

        // Pass the pointer information to the InkManager.
        CurrentManager.ProcessPointerUp(pt);

        m_Handers.Remove(pt.PointerId);
    }

    // Call an application-defined function to render the ink strokes.
    RefreshCanvas();

    args.Handled = true;
}
And the refresh canvas method implementation looks like:
/// <summary>
/// Renders the canvas with the strokes and any other additional elements (selection box)
/// </summary>
/// <remarks>If we are in the selection mode, we check for any strokes that intersect with the Selection Rectangle</remarks>
private void  RefreshCanvas()
{
    System.Diagnostics.Debug.WriteLine("Refresh Canvas");

    m_Canvas.Children.Clear();

    // Renders the ink strokes from the ink managers (i.e. ink and highlight)
    RenderStrokes();

    //
    // Getting all the temporary lines from currently active ink handlers
    foreach (var line in (m_Handers.Values.OfType<InkPointerHandler>().SelectMany(handler => handler.Lines)))
    {
        m_Canvas.Children.Add(line);
    }

    if (m_Settings.CurrentMode == CanvasMode.Select)
    {
        m_Handers.Values.OfType<SelectionPointerHandler>().First().DrawSelectionBounds();
    }
}
Conclusion
Overall, InkManager can really be powerful dealing with the strokes and manipulating the strokes. However, as a developer, we would need build a whole set of functions around it to create a easy and understandable UI experience. Another culprit is the fact that Inking namespace is missing from the windows phone runtime applications. This can be compensated with additional classes to store and manipulate the strokes and simple bezier approximation algorithms.