Database Engine: Dynamic Data Masking
Introduction
 This is one of the two articles that bring us Dynamic Data Masking solutions (1) Using Security layer, and (2) Using SQL Server 2016 new feature, which is this article. Both articles use the same introduction and preparation. If you already created all the basic elements from the other article, then you can jump to the next section: Implementing Dynamic Data Masking feature in SQL Server 2016.
Dynamic data masking (DDM) is a solution that aims at real-time data masking of production data. DDM changes the data stream so that the data requester does not get full access to sensitive data, while no physical changes to the original production data take place.
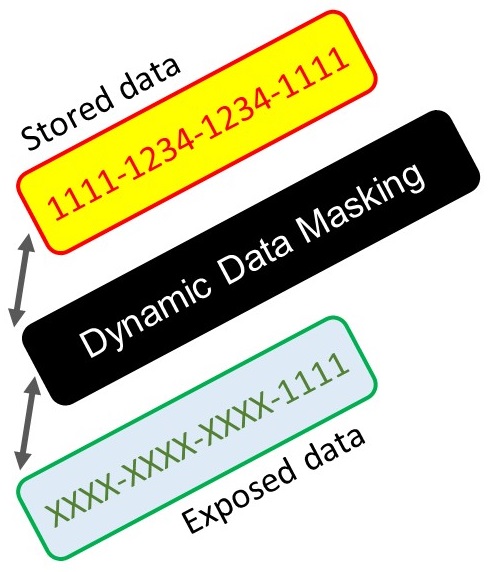
DDM does not intend to fully prevent unauthorized access to sensitive data. For this we can revoke any use of the data, on database level, on elements level (table, view, functions, etc’), on rows level (built-in from SQL 2016 version), on columns level, etc’. By revoking permissions to use the data, any attempt of using the unauthorized data will raise error. Instead of fully prevent unauthorized access to sensitive data, DDM gives us solutions to expose some of the information, while masking the rest. This allows us to determine how and which parts of the information will be exposed.
For example, a supporter at a call center may identify callers by the 4 last digits of their Credit Card number. Therefore, we do not want to fully prevent access to to the sensitive data (credit card number). We need to expose this part of the data (the 4 last digits), but at the same time, the credit card number should not be fully exposed to the supporter. In other words, we want to mask part of the data while exposing other part of the data.
There are several ways we can implement Dynamic Data Masking, for example: (1) creating policy-based security layer at the Database level, (2) using policy-based security Feature at Database level(This feature was added to SQL Server 2016), (3) using external intermediate layer between the server and the client like proxy, and (4) using external security layer in the application level.
Designing external security layer in the application level is a common scenario for application’s architecture. This solution based on the assumption that our data available only throw our application. In reality this is probably not the case! This solution leaves the data unsecured, if users access tables directly rather than through the given application. A security layer best enforce the security rules in the database level. Moreover, forcing the security rules in the database level has minimal impact on the application layer, and it is behave like a “black box”.
In this article we will focus on the new feature that was added to SQL Server 2016, named Dynamic Data Masking. This solution based on policy-based security Feature at Database level.
Preparation
Step 1: Creating new database
Let's create a new database named MaskingDemo
/****************************************************  */
/************************************* CREATE DATABASE */
/****************************************************  */

-- drop database MaskingDemo - if already exists
IF DB_ID('MaskingDemo') IS NOT NULL
BEGIN
    ALTER DATABASE [MaskingDemo] SET SINGLE_USER WITH ROLLBACK IMMEDIATE
    DROP DATABASE [MaskingDemo]
END
GO

-- create new database called MaskingDemo
CREATE DATABASE MaskingDemo
GO
Step 2: Create New Database USER
In order to implement policy-based security we need to create a new database user. It is highly recommended for most cases to use operating system user (WINDOWS USER), but for the sake of this example we will start with creating new CREDENTIAL which use IDENTITY that we did not created.
If there is no login mapped credential for the provider, the credential mapped to SQL Server service account is used.
Next, we will create new SQL Server LOGIN, which associated to the CREDENTIAL. And last, we will creates a new Database User for our LOGIN.
/****************************************************  */
/*********************************** SECURITY Elements */
/****************************************************  */

/*------------------------------------------- WINDOWS USER */
-- Step 1: create WINDOWS USER named WinUser
-- It is highly recommended to create a specific windows user for each application,
-- in order to isolate the application requirements (isolate operating system resources).

/*------------------------------------------- CREDENTIAL */
-- Step 2: create CREDENTIAL

-- A credential is a record that contains the authentication information (credentials)
-- required to connect to a resource outside SQL Server.
-- The information stored in a credential enables a user who has connected to SQL Server by way of SQL Server Authentication
-- to access resources outside the server instance.

-- If there is no login mapped credential for the provider, the credential mapped to SQL Server service account is used.
CREATE CREDENTIAL MaskingCredential WITH IDENTITY = 'MaskingWinUser',
    SECRET = 'StrongPasswordHere';
GO

select * from sys.credentials
GO

/*------------------------------------------- LOGIN */
-- Step 3: create SQL Server LOGIN
CREATE LOGIN MaskingLogin
   WITH PASSWORD = 'Strong!Login@Password',
   CREDENTIAL = MaskingCredential;
GO

SELECT * FROM sys.server_principals
GO

SELECT * FROM syslogins
where loginname = 'MaskingLogin'
GO

/*------------------------------------------- USER */
-- step 4: create database USER
USE MaskingDemo;
GO

---- Instead of steps 1-2 we can create user which IMPERSONATE to a OS user directly
--CREATE USER MaskingUser WITHOUT LOGIN ;
--GRANT IMPERSONATE ON USER::MaskingUser TO [adventure-works\tengiz0] ;
--GO

CREATE USER MaskingUser FOR LOGIN MaskingLogin
    WITH DEFAULT_SCHEMA = dbo;
GO

SELECT * from sys.database_principals
where name = 'MaskingUser'
GO
Step 3: Create table and insert some sample data
Now we can create our testing table and insert some sample data
/****************************************************  */
/********************************************* DDL+DML */
/****************************************************  */

-- Create table with different data type columns
CREATE TABLE MyContacts (
     ID             INT            IDENTITY(1, 1) PRIMARY KEY
    ,fName          NVARCHAR(30)   NOT NULL
    ,lName          NVARCHAR(30)   NOT NULL
    ,CreditCard     VARCHAR(20)    NULL
    ,SalaryINR      INT            NULL
    ,Email          NVARCHAR(60)   NULL
    ,BirthDate      DATETIME       NULL
)
GO

-- insert sample data
INSERT INTO [dbo].[MyContacts]
    ([fName],[lName] ,[CreditCard],[SalaryINR],[Email], [BirthDate])
VALUES
    ('Ronen','Ariely','1111-1234-1234-1111',999999,'Not@MyEmail.com'          , '20150227'),
    ('R'    ,'A'     ,'2222-1234-1234-2222',999999,'DefinitelyNot@MyEmail.com', '20160227')
GO

select * from dbo.MyContacts
GO
SQL Server 2016 New feature, Dynamic Data Masking
Some of these details may change by the time SQL Server 2016 is released. Please follow the Comments & Conclusions section, for updates.
Implementing DDM feature in SQL 2016
There are 4 types of built-in masking functions that we can use:
1. Default: default option use the built-in masking according to the data type
> Uses zeros for numeric data types.
> Uses xxxx for string data types.
> Uses 01.01.2000 for date and time data types.
2. partial: Exposed several letters in the start and in the end, according to the length that we chose, and added a custom padded string or masks all the rest of the data in the middle.
3. email: Exposed the first letter and 4 last letters. The middle is masked by XXX@XXXX
4. Random: Can be used on any numeric type in order to return a random value within the range of the first parameter to the second parameter.
let's see it in practice:
/****************************************************  */
/******************** implementing Masking in SQL 2016 */
/****************************************************  */

DBCC TRACEON(209,219,-1)
GO

SET NOCOUNT ON
GO

ALTER TABLE  MyContacts
    ALTER COLUMN  fname        ADD  MASKED WITH  (FUNCTION  = 'default()')      -- default on varchar
ALTER TABLE  MyContacts
    ALTER COLUMN  CreditCard   ADD  MASKED WITH  (FUNCTION  = 'partial(2,"XX-XXXX-XXXX-XX",2)')
ALTER TABLE  MyContacts
    ALTER COLUMN  SalaryINR    ADD  MASKED WITH  (FUNCTION  = 'default()')      -- default on int
ALTER TABLE  MyContacts
    ALTER COLUMN  [Email]      ADD  MASKED WITH  (FUNCTION  = 'email()')
ALTER TABLE  MyContacts
    ALTER COLUMN  [BirthDate]  ADD  MASKED WITH  (FUNCTION  = 'default()')      -- default on date
GO

GRANT SELECT  ON MyContacts TO MaskingUser;
GRANT INSERT  ON MyContacts TO MaskingUser;
GRANT UPDATE  ON MyContacts TO MaskingUser;
GO
Permissions
- Adding, replacing, or removing the mask of a column, requires the ALTER ANY MASK permission and ALTER permission on the table. The CONTROL permission on the database includes both.
- Grant the UNMASK permission to a user to enable them to retrieve unmasked data.
Play Time, testing :-)
In order to show the power of Dynamic Data Masking you can open two connection to the database, one connection with your main user (the user that have full permissions), and one connection using the new LOGIN that we created in this article. Another option is just using your main user and execute first test as current user and use impersonating to the new user that we created using "EXECUTE AS" For the second test.
/**************************************************** */
/**************************** Testing Masking SQL 2016 */
/**************************************************** */
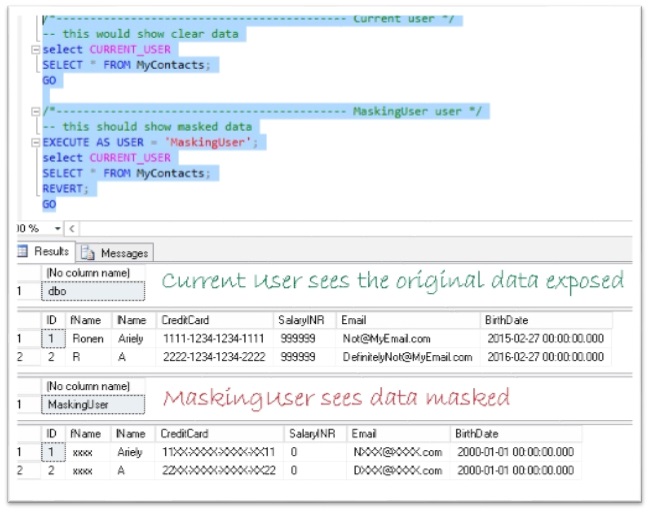
/*------------------------------------------- Current user */
-- this would show clear data
select CURRENT_USER
SELECT * FROM MyContacts;
GO
/*------------------------------------------- MaskingUser user */
-- this should show masked data
EXECUTE AS USER = 'MaskingUser';
select CURRENT_USER
SELECT * FROM MyContacts;
REVERT;
GO
-- Even if the data is masked we can insert/update a row
EXECUTE AS USER = 'MaskingUser';
select CURRENT_USER
INSERT INTO [dbo].[MyContacts]
([fName],[lName] ,[CreditCard],[SalaryINR],[Email], [BirthDate])
VALUES
('RR','AA','4444-1234-1234-4444',999999,'YetNot@MyEmail.com' , '20180227')
SELECT * FROM MyContacts;
REVERT;
GO
/*------------------------------------------- Current user */
select CURRENT_USER
SELECT * FROM MyContacts; -- this would show clear data
GO
Comments & Conclusions
We can implement Database level policy-based security Dynamic Data Masking on older versions using Views, Functions, Stored Procedures, and triggers. For full example you can check this article: T-SQL: Dynamic Data Masking. Moreover, The built-in masking functions that we can use, are very limited. If we need more flexibility we can use security layer in order to implement masking
At CTP 2.0 this feature is NOT A SECURITY feature and you should not use it for security masking !!! You can use simple CONVERT on masked column without permissions and you will get the data fully exposed! For security issue you should work with security layer. In any case according to Microsoft BOL, this feature is not intended to hide data from people who have ad hoc query access, so don't rely on it to do so.
EXECUTE AS  USER = 'MaskingUser';
SELECT *, CONVERT(nchar(100),[Email]) FROM  MyContacts;
REVERT;
GO
Updates
This article is based on SQL Server CTP 2.0. We will update it as new CTP versions will be released till the official final SQL Server 2016 will be released. If you have any information regarding this feature that was updated in the new CTP, please feel free to edit this article and add it as a comment in this section.
CTP 2.1 release
No need to activate TRACEON (209,219,-1).
Actually if you will activate it, then you might get error. Keep it off.CONVERT the data, on types that are supported will no longer fully exposed the original data.
But the masking does not apply exactly as specified! Using CONVERT on masked data, will revert the data to the default four-character masking XXXX. This will probably lead to application failure, if our application needs to get a specific format!
For example, if we use email then we expect to get @ but our query using CONVERT will return XXXX instead. Moreover if we expect to get integer from the integer column, we will get a string XXXX that will lead to application failure.
- Simple workaround INT can be achieved using CONVERT(nchar(100),[SalaryINR]) + 1 instead of CONVERT(nchar(100),[SalaryINR]). At this version this will return 0 instead of XXXX (same as [SalaryINR] + 1).
Unsupported Data types in CTP2.1 are:
sql_variant, uniqueidentifier, xml, cursor, timestamp table, hierarchyid, binary, image, varbinary Spatial Types.
Summary
SQL Server 2016 introduces a new security feature called Dynamic Data Masking (DDM). In this article we explained what is DDM in general, and how we can use the new feature in order to implement DDM on column's levels.
Resources and more information
- T-SQL: Dynamic Data Masking
http://social.technet.microsoft.com/wiki/contents/articles/31418.t-sql-dynamic-data-masking.aspx - BOL: Dynamic Data Masking
https://msdn.microsoft.com/en-us/library/mt130841.aspx?f=255&MSPPError=-2147217396 - Lecture presantation & codes: INSTEAD of TRIGGER (he-IL)
https://gallery.technet.microsoft.com/INSTEAD-of-TRIGGER-he-IL-d5a0a6cb