ASP.Net: How to connect Web Forms to SQL Server Database?
- First, make a Database on Microsoft SQL Server.
- Now open Visual Studio 2013.
- Select >new Project from web option use ASP.NET empty Web Application.
- After loading project, select click Tools at top then select connect to Database option.
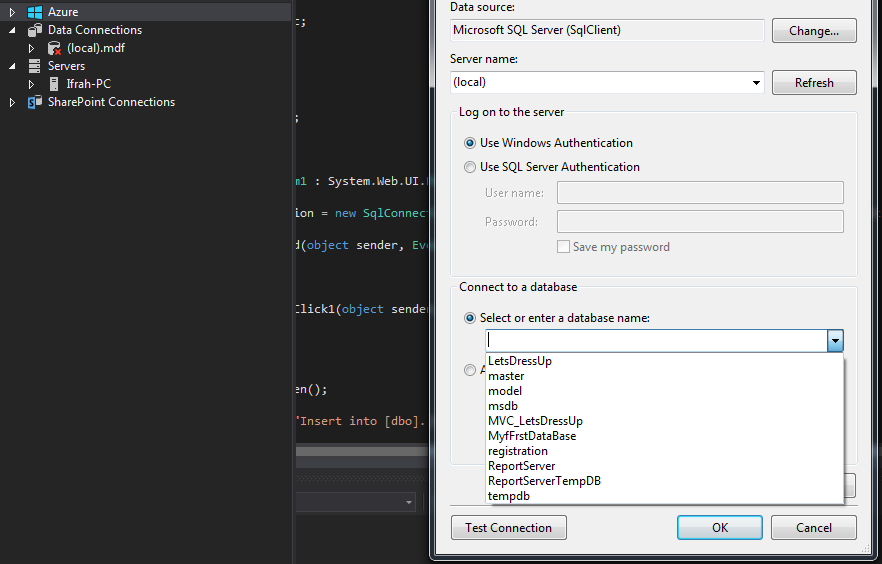
- Add connection dialogue box will appear click at change option and select the Microsoft SQL Server.
- Now enter your server name. If you not remember your server name write dot .' or (local) than your databases from SQL Server loaded.
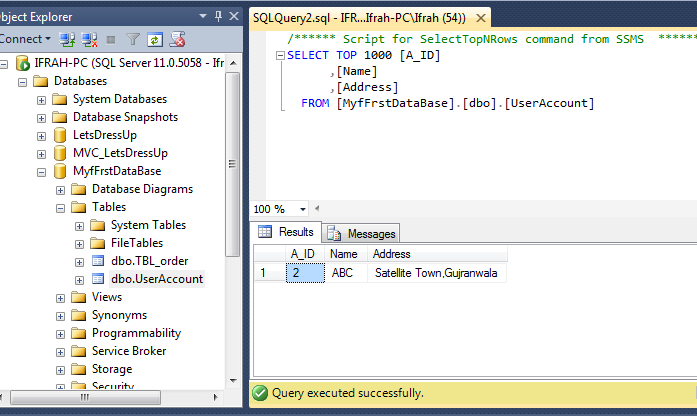
- From select or enter a Database option. Do select your Database name, as (MyFirstDataBase), then click at Test Connection and close.
- Now right click on your solution and select Add than New item then add a Web Form.
- One file Webform.aspx and second for code Webform.cs is created.
- Click at design and select from top Table option and used Insert Table.
- Open file Webform.aspx and select toolbox. Take TextBox and drag them and many other tools required for your application and in toolbox properties, you made changes according to your choice and select specific properties, as shown you below :
<!DOCTYPE html>
<html xmlns="http://www.w3.org/1999/xhtml">
<head runat="server">
 <title></title>
 <style type="text/css">
 .auto-style1 {
 width: 50%;
 height: 13px;
 border: 2px solid #FFFFFF;
 margin-left: 0px;
 margin-right: 56px;
 background-color: #0000FF;
 }
 .auto-style7 {
 height: 52px;
 width: 121px;
 }
 .auto-style8 {
 height: 52px;
 width: 397px;
 }
 .auto-style10 {
 height: 71px;
 }
 .auto-style11 {
 height: 74px;
 width: 121px;
 }
 .auto-style12 {
 height: 74px;
 width: 397px;
 }
 </style>
</head>
<body>
 <form id="form1" runat="server">
 <div>

 <table align="center" class="auto-style1">
 <tr>
 <td class="auto-style10"><h1>   USER ACCOUNT</h1></td>
 </tr>
 </table>


 <table align="center" class="auto-style1">
 <tr>
 <td class="auto-style11" style="font-family: Verdana; font-size: medium; font-weight: bold; font-style: inherit; font-variant: inherit; text-transform: uppercase; color: #FFFFFF">  NAME</td>
 <td class="auto-style12">
  <asp:TextBox ID="TextBox1" runat="server" BackColor="#00CCFF" BorderColor="White" BorderStyle="Solid" Height="46px" Width="350px"></asp:TextBox>
 </td>
 </tr>
 <tr>
 <td class="auto-style11" style="font-family: Verdana; font-size: medium; font-weight: bold; font-style: inherit; font-variant: inherit; text-transform: uppercase; color: #FFFFFF">  ADDRESS</td>
 <td class="auto-style12">
  <asp:TextBox ID="TextBox2" runat="server" BackColor="#00CCFF" BorderColor="White" BorderStyle="Solid" Height="46px" Width="350px"></asp:TextBox>
 </td>
 </tr>
 <tr>
 <td class="auto-style7"></td>
 <td class="auto-style8">

  <asp:Button ID="Button1" OnClick="SaveBtn_Click1" runat ="server" BackColor="#00CCFF" BorderColor="White" BorderStyle="Solid" BorderWidth="3px" CssClass="auto-style1" ForeColor="White" Height="30px" Text="Send" Width="101px" />

  <br />
 </td>
 </tr>
 </table>
 </div>
 </form>
</body>
</html>
Now Html view is created run this application it looks like:

- Now made a connection string to add in Web.Config file write this code in Webform.aspx at the end inside the body tag as show you:<
<asp:SqlDataSource ID="Sample" runat="server"></asp:SqlDataSource>
- Now click at SqlDataSource Come to Design view and select SqlDataSource than click on Configure Data Source.
- Name connection string as MyFirstDataBaseConnectionString click on Next select UserAccount table click next and then finish.
- Now the connection string is established.
- The above code will be like after this steps are:
<asp:SqlDataSource ID="Sample" runat="server" ConnectionString="<%$ ConnectionStrings:MyfFrstDataBaseConnectionString %>" SelectCommand="SELECT * FROM [UserAccount]"></asp:SqlDataSource>
- See at Web.config file connection string will be automatically added as:
<connectionStrings>
 <add name="MyfFrstDataBaseConnectionString" connectionString="Data Source=(local);Initial Catalog=MyfFrstDataBase;Integrated Security=True"
 providerName="System.Data.SqlClient" />
 </connectionStrings>
- Now come at Webform.cs file and write the code behind OnClick operation. SQL Connection and SQL Command object is created ,Open and close the connection and the query of insert data is written to add data in SQL Server Database.As source code show you below:
using System;
using System.Collections.Generic;
using System.Configuration;
using System.Data.SqlClient;
using System.Linq;
using System.Web;
using System.Web.UI;
using System.Web.UI.WebControls;

namespace WebApplication23
{
 public partial  class WebForm1 : System.Web.UI.Page
 {
 SqlConnection myConnection = new  SqlConnection(ConfigurationManager.ConnectionStrings["MyfFrstDataBaseConnectionString"].ConnectionString);

 protected void  Page_Load(object sender, EventArgs e)
 {

 }
 protected void  SaveBtn_Click1(object sender, EventArgs e)
 {

 {
 myConnection.Open();

 string query = "Insert into [dbo].[UserAccount] (Name,Address) Values (@name,@add)";

 SqlCommand insertCommand = new  SqlCommand(query, myConnection);
 insertCommand.Parameters.AddWithValue("@name", TextBox1.Text);
 insertCommand.Parameters.AddWithValue("@add", TextBox2.Text);
 insertCommand.ExecuteNonQuery();
 myConnection.Close();

 }
 }
 }
}
- Now run this application fill the UserAccount form and click send button,the data will be stored on SQL Server Database.