Microsoft Azure: Deploying Site to Site VPN Connection with Citrix NetScaler CloudBridge
Introduction
Since the emergence of public cloud, there is constantly a demand for enterprise on-premise private cloud infrastructure connect with public cloud and this article is an introduction of using existing Citrix NetScaler VPX to establish a site to site secure connectivity between private cloud and public cloud.
Basic Requirements
You will need the followings to setup a Site to Site VPN Connection between Microsoft Azure and your On-Premise Infrastructure;
- Microsoft Azure Account (Create an Azure Account here.)
- Microsoft Azure Resource Manager Virtual Network environment
- Your On-Premise Network environment
- Microsoft Azure PowerShell 1.0 (Download it here.)
- Citrix NetScaler VPX 10.5 (SaHa) Build 56.22
- Citrix NetScaler Platinum Edition License*
- Allow UDP 500 and UDP 4500 traffic on Firewall
*Refer to Citrix NetScaler Data Sheet
Proof of Concept Network Diagram
In this article, we will try to simulate accordingly to this network diagram so that we can have a better understanding on how the configuration achieve the Site to Site connectivity between On-Premise and Microsoft Azure.

Getting Started with Azure Resource Manager Virtual Network
After installing Microsoft Azure PowerShell 1.0, launch the Microsoft Azure PowerShell console with Elevated Privileges to begin.
Connecting to Microsoft Azure using Microsoft Azure PowerShell
Firstly, we need to login to Microsoft Azure using the Microsoft Azure PowerShell with the following commands below.
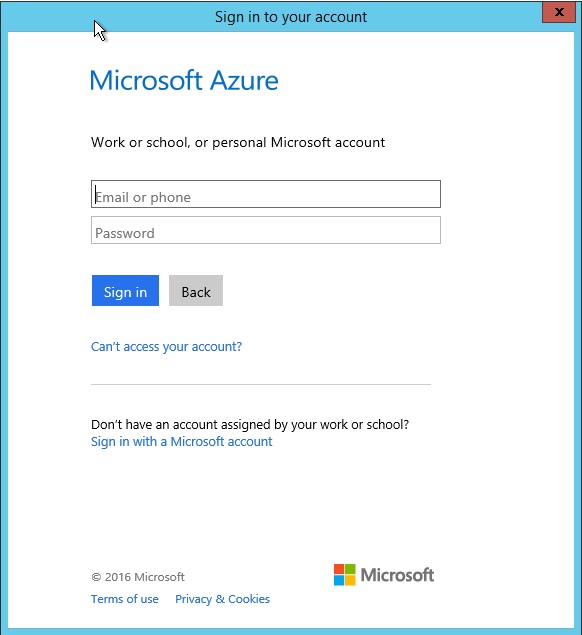
# Login to Azure using Azure PowerShell Cmdlet
Login-AzureRmAccount ;

Login using your Microsoft Azure credential and select Sign in.
Choosing a Microsoft Azure Subscription
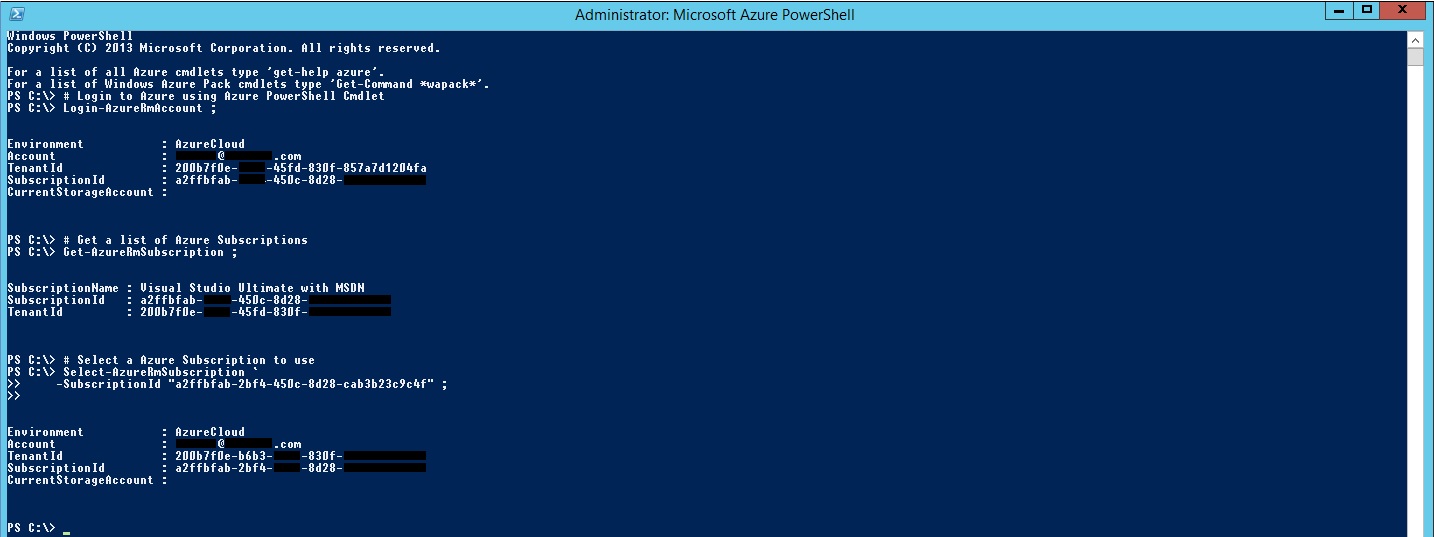
If you have multiple Microsoft Azure Subscription such as MSDN, ClientA, Client B and ClientC, it would be best for you to find out which Azure subscription that you will using to create the Virtual Network and select the desired Azure subscription with the commands example below.
# Get a list of Azure Subscriptions
Get-AzureRmSubscription ;
# Select a Azure Subscription to use
Select-AzureRmSubscription `
-Subscriptionid "GUID of subscription" ;
Creating a Microsoft Azure Resource Manager Group
With the selected Azure subscription, we will create an Azure Resource Manager Group and define the desired Azure datacenter geographical location with the commands example below.
# Create a new Azure Resource Manager Resource Group
New-AzureRmResourceGroup `
-Name "ARM-MyLAB-DEV" `
-Location "Australia Southeast" ;

Creating a Microsoft Azure Resource Manager Virtual Network
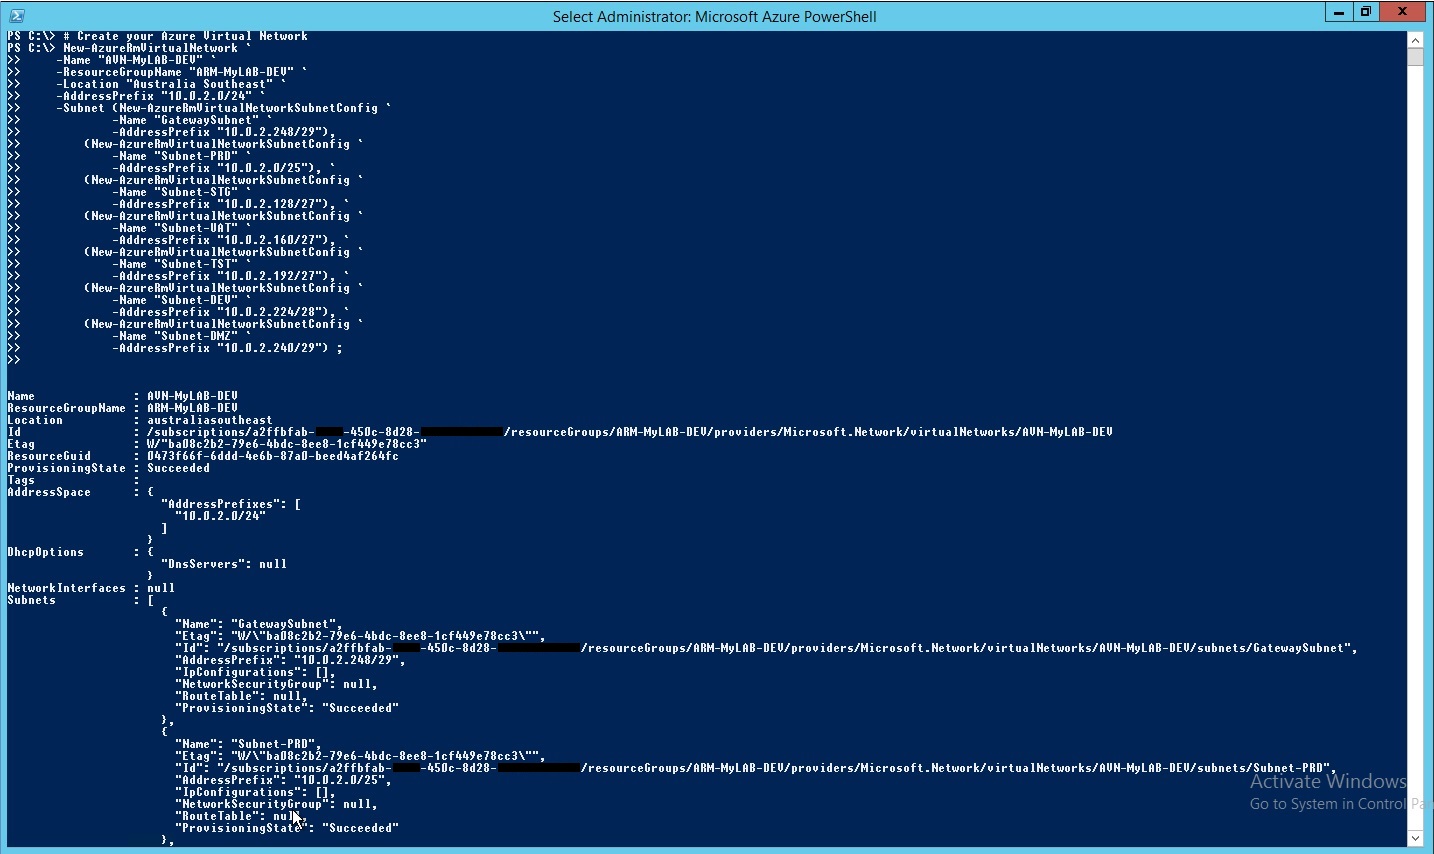
With Azure Resource Manager Group defined, we will create the Virtual Network with multiple environment subnets that belongs to the Resource Manager with the commands example below. Take note that GatewaySubnet name is a reserved name within Microsoft Azure environment representing the gateway.
# Create your Azure Virtual Network
New-AzureRmVirtualNetwork `
-Name "AVN-MyLAB-DEV" `
-ResourceGroupName "ARM-MyLAB-DEV" `
-Location "Australia Southeast" `
-AddressPrefix "10.0.2.0/24" `
-Subnet (New-AzureRmVirtualNetworkSubnetConfig `
-Name "GatewaySubnet" `
-AddressPrefix "10.0.2.248/29"),
(New-AzureRmVirtualNetworkSubnetConfig `
-Name "Subnet-PRD" `
-AddressPrefix "10.0.2.0/25"), `
(New-AzureRmVirtualNetworkSubnetConfig `
-Name "Subnet-STG" `
-AddressPrefix "10.0.2.128/27"), `
(New-AzureRmVirtualNetworkSubnetConfig `
-Name "Subnet-UAT" `
-AddressPrefix "10.0.2.160/27"), `
(New-AzureRmVirtualNetworkSubnetConfig `
-Name "Subnet-TST" `
-AddressPrefix "10.0.2.192/27"), `
(New-AzureRmVirtualNetworkSubnetConfig `
-Name "Subnet-DEV" `
-AddressPrefix "10.0.2.224/28"), `
(New-AzureRmVirtualNetworkSubnetConfig `
-Name "Subnet-DMZ" `
-AddressPrefix "10.0.2.240/29") ;
Add or define your On-Premise Local Network for Azure
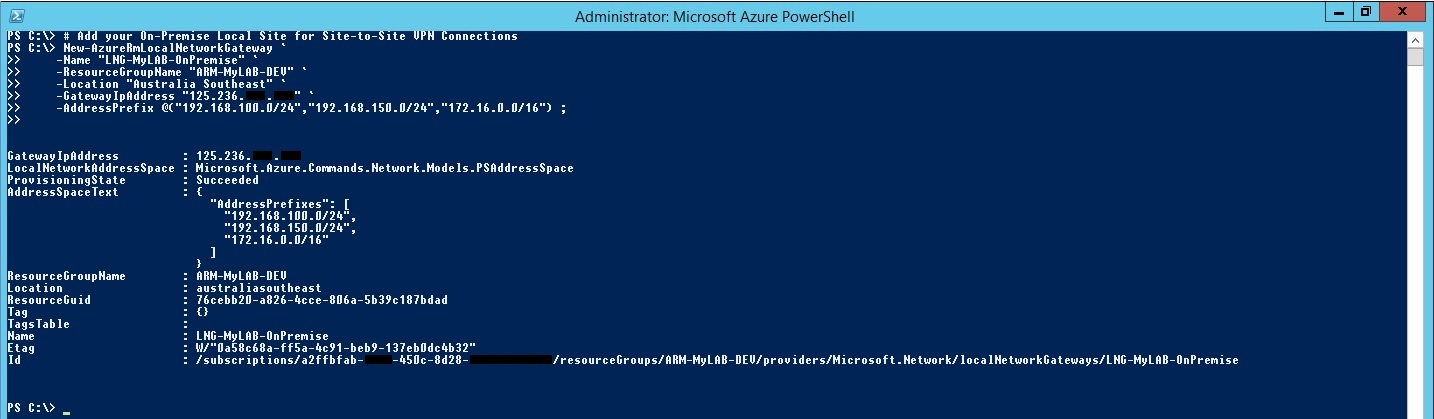
With the Virtual Network created in Azure, we will need to define the On-Premise Public IP Address and Local Network Subnets with the commands example below. This will ensure that the Virtual Network in Azure will know the routes to your On-Premise local network.
# Add your On-Premise Local Site for Site-to-Site VPN Connections
New-AzureRmLocalNetworkGateway `
-Name "LNG-MyLAB-OnPremise" `
-ResourceGroupName "ARM-MyLAB-DEV" `
-Location "Australia Southeast" `
-GatewayIpAddress "125.236.XXX.XXX" `
-AddressPrefix @("192.168.100.0/24","192.168.150.0/24","172.16.0.0/16") ;
Create the Azure Virtual Network Gateway for VPN
Once the On-Premise Local Network is defined, we will create the Virtual Network Gateway, Virtual Network Gateway IP Configuration and request for a Public IP Address with Azure to create a PolicyBased VPN Gateway using the commands example below. Let the command execution running and have a 5-15 minutes coffee break while waiting for Azure to do some magic. The wait is caused by the request for a Public IP Address since Microsoft Azure requires to determine which Public IP Address can be allocated to you and setup their infrastructure backend.
# Create a VPN Gateway for Site-to-Site VPN Connection
New-AzureRmVirtualNetworkGateway `
-Name "AGW-MyLAB-DEV" `
-ResourceGroupName "ARM-MyLAB-DEV" `
-Location "Australia Southeast" `
-IpConfigurations (New-AzureRmVirtualNetworkGatewayIpConfig `
-Name "AGW-MyLAB-DEV-Conf" `
-SubnetId (Get-AzureRmVirtualNetworkSubnetConfig `
-Name "GatewaySubnet" `
-VirtualNetwork (Get-AzureRmVirtualNetwork `
-Name "AVN-MyLAB-DEV" `
-ResourceGroupName "ARM-MyLAB-DEV")).Id `
-PublicIpAddressId (New-AzureRmPublicIpAddress `
-Name "PIP-MyLAB-DEV" `
-ResourceGroupName "ARM-MyLAB-DEV" `
-Location "Australia Southeast" `
-AllocationMethod "Dynamic").Id) `
-GatewayType "Vpn" `
-VpnType "PolicyBased" ;

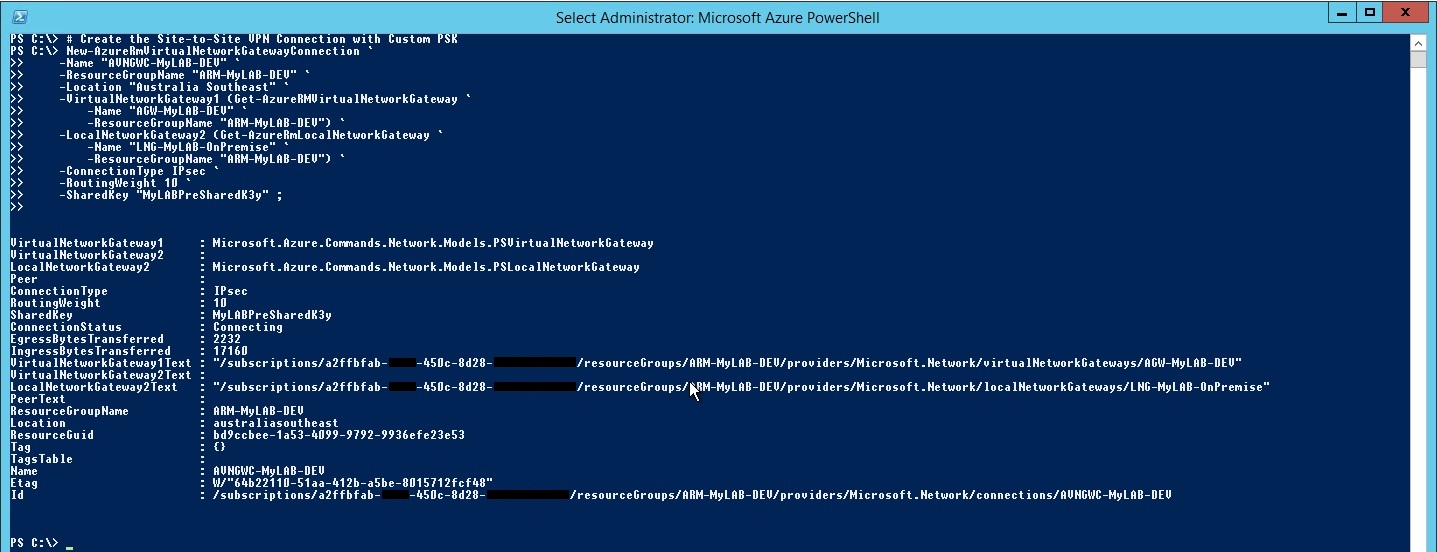
Create the Site to Site VPN Connection with Custom Pre-Shared Key
After Azure Virtual Network Gateway has completed, we will create the Virtual Network Gateway Connection by defining the Virtual Network Gateway, Local Network Gateway and the connection type with a Pre Shared Key for authentication.
# Create the Site-to-Site VPN Connection with Custom PSK
New-AzureRmVirtualNetworkGatewayConnection `
-Name "AVNGWC-MyLAB-DEV" `
-ResourceGroupName "ARM-MyLAB-DEV" `
-Location "Australia Southeast" `
-VirtualNetworkGateway1 (Get-AzureRMVirtualNetworkGateway `
-Name "AGW-MyLAB-DEV" `
-ResourceGroupName "ARM-MyLAB-DEV") `
-LocalNetworkGateway2 (Get-AzureRmLocalNetworkGateway `
-Name "LNG-MyLAB-OnPremise" `
-ResourceGroupName "ARM-MyLAB-DEV") `
-ConnectionType IPsec `
-RoutingWeight 10 `
-SharedKey "MyLABPreSharedK3y" ;
Obtain your Public IP Address for On-Premise NetScaler configuration
Hooray! We are half way there to establish a Site to Site connectivity. Use the commands example below to obtain your Microsoft Azure allocated Public IP Address for your On-Premise NetScaler configuration.
# Get Gateway Public IP Address for Site-to-Site configuration
# on NetScaler CloudBridge IPSEC IP Tunnel
Get-AzureRmPublicIpAddress `
-Name "PIP-MyLAB-DEV" `
-ResourceGroupName "ARM-MyLAB-DEV" | `
Select IPAddress ;

Getting Started with your On-Premise Citrix NetScaler Cloudbridge
Enable Cloudbridge feature on Citrix NetScaler
Before we begin any configuration, we will need to ensure that Cloudbridge feature is enabled. If you are unable to enable Cloudbridge feature on your NetScaler, please verify you have the appropriate license with Citrix for your appliance.
# Enable Cloudbridge feature
enable ns feature Cloudbridge
# Verify Cloudbridge feature is Enabled / ON
show ns feature
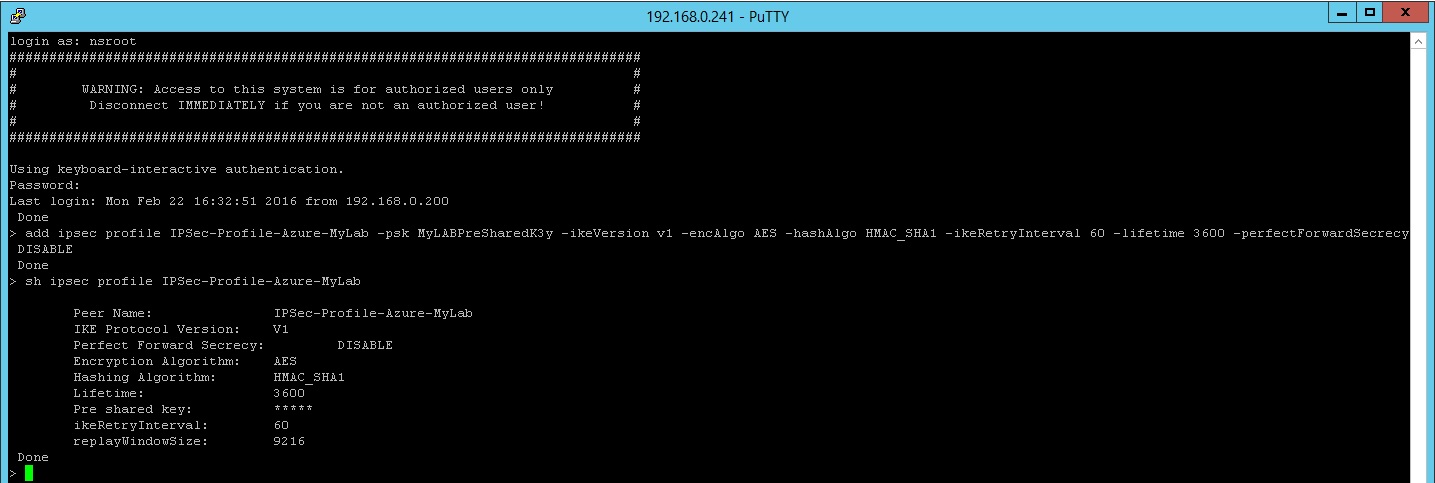
Create IPSEC Profile with Pre-Shared Key for Microsoft Azure Virtual Network Gateway
In order for the tunnel to be establish, we will need to create an IPSEC Profile with the Pre Shared Key (PSK) to authenticate with Microsoft Azure and ensure that the specified encryption parameters comply with Microsoft Azure requirements.
# Add an IPSEC profile with the PSK for authentication with Microsoft Azure
add ipsec profile IPSec-Profile-Azure-MyLab -psk MyLABPreSharedK3y -ikeVersion v1 -encAlgo AES -hashAlgo HMAC_SHA1 -ikeRetryInterval 60 -lifetime 3600 -perfectForwardSecrecy DISABLE
Create a tunnel to Microsoft Azure Virtual Network Gateway
Let's create a tunnel to Microsoft Azure, we will have to specify the Public IP Address and the next hop within your on-premise network environment with the defined IPSEC profile for authentication with Microsoft Azure. The next hop could be the default gateway to your firewall before exiting out of your network.
# Add an IPTunnel that connects to Microsoft Azure Public IP Address with the IPSEC profile for authentication
add iptunnel IPSec_Azure-to-MyLab 40.127.XXX.XXX 255.255.255.255 192.168.150.3 -protocol IPSEC -ipsecProfileName IPSec-Profile-Azure-MyLab

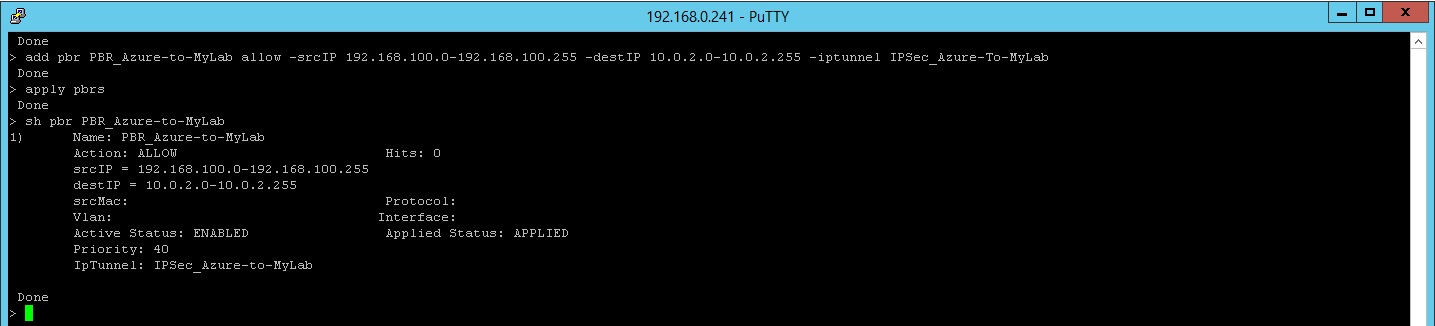
Add Policy Based Route for the Tunnel
Now, we just need to shape the route with a policy based route configuration to specify which subnet on local on-premise should be reachable to the subnet on Microsoft Azure.
# Add a policy based route (PBR) for On-Premise subnet range to Microsoft Azure subnet range
add pbr PBR_Azure-to-MyLab allow -srcIP 192.168.100.0-192.168.100.255 -destIP 10.0.2.0-10.0.2.255 -iptunnel IPSec_Azure-To-MyLab
apply pbrs
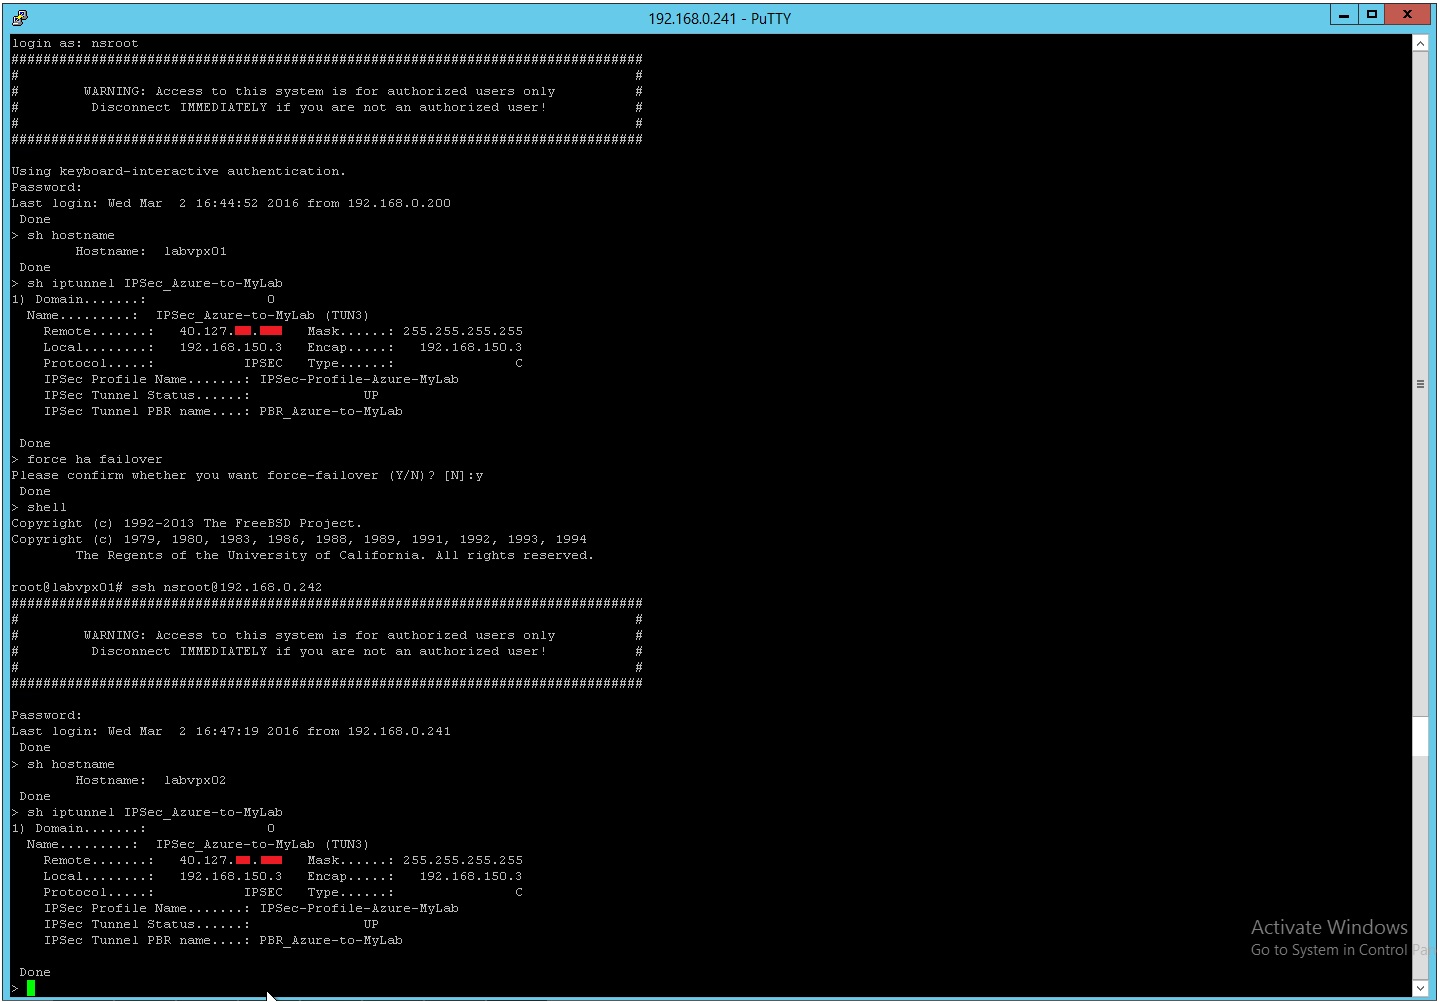
Conclusion
In this example after synchronisation of the NetScaler configuration between primary NetScaler VPX and secondary NetScaler VPX below, we will view if the Tunnel Status is UP and demonstrate NetScaler High Availability failover on Cloudbridge Site to Site IPSEC VPN IPTunnel from primary to secondary. During the failover, you will see that the tunnel will terminate on the primary setting the Tunnel Status to be DOWN and re-establish on the secondary based on the retry interval. There you go. You now have a Site to Site connectivity between On-Premise and Microsoft Azure.
References
- Microsoft Azure Documentation - How to install and configure Azure PowerShell
- Microsoft Azure Documentation - Using Azure PowerShell with Azure Resource Manager
- Microsoft MSDN - Azure Networking Cmdlets
- Microsoft Azure Documentation - About VPN devices for Site-to-Site VPN Gateway connections
- Microsoft Azure Documentation - Create a virtual network with a site-to-site VPN connection using PowerShell
- GitHub - Azure / azure-content / articles / vpn-gateway - Create a virtual network with a site-to-site VPN connection using PowerShell
- Citrix Product Documentation - NetScaler 10.5 - Configuring CloudBridge Connector Tunnel between two Datacenters
- Citrix Product Documentation - NetScaler 10.5 Commands - add ipsec profile
- Citrix Product Documentation - NetScaler 10.5 - Configuring IP Tunnels
- Citrix Product Documentation - NetScaler 10.5 Commands - add ipTunnel
- Citrix Product Documentation - NetScaler 10.5 - Configuring a Policy-Based Routes (PBR) for IPv4 Traffic
- Citrix Product Documentation - NetScaler 10.5 Commands - add ns pbr
- Citrix Product Documentation - NetScaler 10.5 Commands - apply ns pbrs
See Also
- Microsoft TechNet Office Library - Connect an on-premises network to a Microsoft Azure virtual network
- Microsoft Azure Documentation - Configure a Point-to-Site connection to a virtual network using PowerShell
- Citrix Product Documentation - Configuring a CloudBridge Connector Tunnel Between a Datacenter and Azure Cloud