Using Grunt Task Runner with Visual Studio and ASP.NET Core
Tasks and Task Runners
In our day to day web development, we have to do many tasks to keep our web app's performance up and running in production. Some of these tasks are:
- Minifying our HTML, CSS or JavaScript files
- Compiling our TypeScript or CoffeeScript to JavaScript
- Compiling LESS, SASS or Stylus to CSS
- Minifying images to smaller in size without affecting the quality
These are some of the common tasks that we have to do before moving your application to production for better performance. Running these tasks manually by ourselves can be tedious and time consuming. This is where we use Task Runners.
Task Runners helps you to keep your tasks maintainable and run your tasks using Command-Line Interface (CLI) that they provide. Each task (such as minifying JavaScript) has a plugin that you have to install and configure to run your task. There are several plugins available for different tasks at their website.
Primarily, 2 popular Task Runners available today, Grunt and Gulp.


Grunt and Gulp are both competitors. In this article, we will talk about Grunt and the plugins that it provides.
To help understand better use of Grunt. Lets setup a simple example in which we will an HTML file "Index.html" at the root and create 2 sub-folders namely "src" and "dist" and create a JavaScript file "site.js" in "src" folder. As said, we will use just 2 Grunt plugins for the sake of simplicity these are "grunt-contrib-uglify" and "grunt-contrib-watch". Here, "grunt-contrib-uglify" will minify our JavaScript and "grunt-contrib-watch" will watch for changes in JavaScript file and run the required task upon save. (In this case "grunt-contrib-uglify" as we'll see shortly).
Note: Make sure that you've installed the NPM and Grunt-CLI on your local machine.
Grunt plugins are managed via Node modules. We reference the plugins which we need using NPM (Node Package Manager). Create a "package.json" file at the root, open up a terminal and type "npm init". This command will ask for some information about the Node modules such as name, version, description, and more.
After successfully creating a "package.json" file, type the following commands in the terminal to install Grunt and Grunt plugins.
        npm install grunt --save-dev


        npm install grunt-contrib-uglify --save-dev


        npm install grunt-contrib-watch --save-dev
Note the "--save-dev" flag. This will add your Node modules in "package.json" file as dependencies.
In "src" folder, create a JavaScript file and and reference it in "Index.html" from "dist" folder (It does not exist yet, but will be created by the plugin). We add and configure Grunt plugins in a file known as "Gruntfile". This is a JavaScript file we reference the required plugins and configure them in this file. So create a JavaScript file namely "Gruntfile.js" and add the following code in the file.
        module.exports = function(grunt) {

        };
This is the basic syntax of a Gruntfile. We configure plugins in Grunt's initConfig() method which takes an object. We pass the required configuration of our plugins with the object. So add the following code lines of code in the file:
        module.exports = function(grunt) {
            grunt.initConfig({

            });
        };
Now we are about to configure our tasks. First we'll configure our Uglify task which will minify our JavaScript file in "src" folder. We will provide the path of the JavaScript file and the output (Minified) file in "dist" with some other options.
Lets add the following bolded lines of code in the initConfig() function to configure "Uglify" task.
        module.exports = function(grunt) {
            grunt.initConfig({
                uglify: {
                    options: {
                        mangle: true, //Shorten variable names, where possible
                        compress: true, //Remove Unnecessary whitespaces
                        banner: "/*Minified version of site.js*/\n" //Banner Property at the top of minified version
                    },
                    target: {
                        src: "src/site.js",
                        dest: "dist/site.min.js",
                    }
                }
            });
        };
Here, we're configuring our "Uglify" plugin with some options and with a source and a destination folder. The purpose of each option is shown in comments. Now finally load and register the "Uglify" task with the following bolded lines of code at the bottom.
        module.exports = function(grunt) {
            grunt.initConfig({
                uglify: {
                    options: {
                        mangle: true, //Shorten variable names, where possible
                        compress: true, //Remove Unnecessary whitespaces
                        banner: "/*Minified version of site.js*/\n" //Banner Property at the top of minified version
                    },
                    target: {
                        src: "src/site.js",
                        dest: "dist/site.min.js",
                    }
                }
            });

            grunt.loadNpmTasks("grunt-contrib-uglify");

            grunt.registerTask("default","uglify");
        };
Here, we are assigning the Grunt "default" task to "Uglify" by default so that we don't have to prefix our "grunt" command with any plugin name in order run our task. Just type in "grunt" in the terminal and you'll see that the "site.min.js" file is created in "dist" folder.
If you type "grunt uglify" in the terminal, the "site.min.js" minified file will be created for you in "dist" folder.
The final plugin that we will configure is "Grunt Watch" task, which will watch for changes in "src/site.js" and run the required task (in this case Uglify) for you hitting upon save. Just add and change the following bolded lines of code for "watch" task:
        module.exports = function(grunt) {
            grunt.initConfig({
                uglify: {
                    options: {
                        mangle: true, //Shorten variable names, where possible
                        compress: true, //Remove Unnecessary whitespaces
                        banner: "/*Minified version of site.js*/\n" //Banner Property at the top of minified version
                    },
                    target: {
                        src: "src/site.js",
                        dest: "dist/site.min.js",
                    }
                },
                watch: {
                    files: ["src/site.js"],
                    tasks: ["uglify"]
                }
            });

            grunt.loadNpmTasks("grunt-contrib-uglify");
            grunt.loadNpmTasks('grunt-contrib-watch');

            grunt.registerTask("default","watch");
        };
If you run "grunt" command in the terminal you'll see that "grunt watch" is now running and watching for changes in "src/site.js" file. Each time you make a change in the "src/site.js" file and hit save, the "uglify" is run for you.
Running Tasks in Visual Studio and ASP.NET Core
In Visual Studio 2015, there is a nice Task Runner window which shows and run tasks through GUI. Every loaded and configured task will appear in this window. The same example in Task Runner window is shown below:
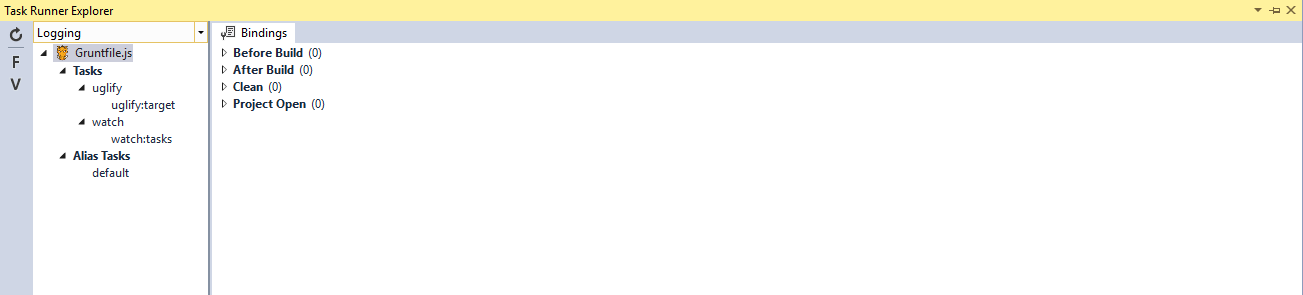
Just Right-Click the required task and click "Run". This will run the task for you.

Note: Alternative plugins configurations are available at my website at:
http://kjanshair.azurewebsites.net/web/grunt