Lync 2013/ Skype For Business: Office Web Apps high availability
Topology
https://thiagobeier.files.wordpress.com/2013/08/080513_1921_owaofficewe1.png?w=614
Prerequisites
- ADDS – Active Directory Domain Services.
- Lync Server 2013 or Skype For Business deployed in the environment
- ADCS – Active Directory Certificate service for certificates request based on predefined templates
Do the same below to all servers that will run WAC (OWA – office web apps)
- Open a PowerShell as Administrator and then copy and paste
- Add-WindowsFeature NET-HTTP-Activation,NET-Non-HTTP-Activ,NET-WCF-HTTP-Activation45,Web-Includes,Web-Static-Content,Web-Windows-Auth,Web-Mgmt-Console,InkAndHandwritingServices -source r:\sources\sxs -restart
- Download Office Web Apps from http://www.microsoft.com/en-us/download/details.aspx?id=35489
- Download Office Web Apps updates from http://support.microsoft.com/kb/2760445
- Install also NLB feature on all servers that will run WAC (OWA – Office web apps)
Configuration
Requesting needed certificates for WAC (Office Web Apps)
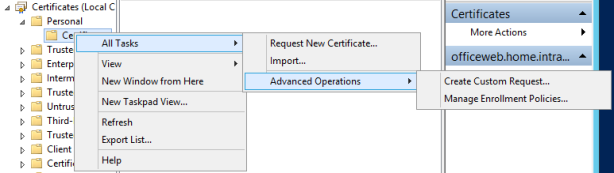
In the first node of this FARM generate the certificate request using mmc.exe , Certificates, Personal and then go to all tasks, advanced operations and select “Create Custom Request”
Windows + R \ mmc.exe <enter>
https://thiagobeier.files.wordpress.com/2013/08/080513_1921_owaofficewe2.png?w=614
Follow the instructions below.
Select Custom Request and click Next
https://thiagobeier.files.wordpress.com/2013/08/080513_1921_owaofficewe3.png?w=614
At Custom Request select the “web server” template, and at “request format” check PKCS #10 and click Next
https://thiagobeier.files.wordpress.com/2013/08/080513_1921_owaofficewe5.png?w=614
Select properties once you have “web server” at Active Directory Enrollment Policy and click Properties
https://thiagobeier.files.wordpress.com/2013/08/080513_1921_owaofficewe6.png?w=614
Select Custom Request and click next
At general TAB name the certificate “officeweb” and click Apply
At the subject, TAB select “common name” at type and give the CN name to this certificate
Hm11.home.intranet and click ADD
https://thiagobeier.files.wordpress.com/2013/08/080513_1921_owaofficewe7.png?w=614
At “Alternative name” select DNS as type
Fill with the following names:
Officeweb.home.com.br (your external URL that is going to be used to answer the request for WAC)
Officeweb.home.intranet (your internal URL that is used to answer for internal request inside your ADDS network/netbios domain)
And also add the hostnames of the servers where WAC FARM is running.
Hm11.home.intranet
Hm12.home.intranet
https://thiagobeier.files.wordpress.com/2013/08/080513_1921_owaofficewe9.png?w=614
At the “Private Key” TAB select the key size as 2048.
Check “Make private key exportable” and click OK or Apply.
https://thiagobeier.files.wordpress.com/2013/08/080513_1921_owaofficewe10.png?w=614
After this, click Next and select the folder to save the request file yourcertreqname.req and click Save.
https://thiagobeier.files.wordpress.com/2013/08/080513_1921_owaofficewe11.png?w=614
https://thiagobeier.files.wordpress.com/2013/08/080513_1921_owaofficewe12.png?w=614
https://thiagobeier.files.wordpress.com/2013/08/080513_1921_owaofficewe13.png?w=614
Be sure that your folder path is correct and the file has its own name and file extension .REQ and click FINISH
Now you can request your certificate at your internal CA (certificate authority) in AD forest.
Access your internal CA URL to request the certificate.
Select “Request a certificate”.
Select “Advanced certificate request”.
Select the option “Submit a certificate request by using a base-64 encoded CMC or PKCS #10, or submit a renewal request by using a base-64 encoded PKCS #7 file”.
Open the certificate request file in Notepad, copy the entire data and paste it into the “saved request” \ Base-64-encoded certificate request.
https://thiagobeier.files.wordpress.com/2013/08/080513_1921_owaofficewe14.png?w=614
https://thiagobeier.files.wordpress.com/2013/08/080513_1921_owaofficewe15.png?w=614
https://thiagobeier.files.wordpress.com/2013/08/080513_1921_owaofficewe16.png?w=614
https://thiagobeier.files.wordpress.com/2013/08/080513_1921_owaofficewe17.png?w=614
https://thiagobeier.files.wordpress.com/2013/08/080513_1921_owaofficewe18.png?w=614
Wait until processed and then select DER encoded or Base 64 encoded and click “download certificate”. If you prefer you can click “download certificate chain” and this file contains the CA root certificates of your CA tree.
https://thiagobeier.files.wordpress.com/2013/08/080513_1921_owaofficewe19.png?w=614
Import the certificate in the 1st server of the FARM
After that, you can export this certificate with its private key to use it (import it) at the 2nd FARM server.
ATTENTION: for each server joined at this FARM you need to name it at the DNS type at the requested certificate done in the first steps of this article.
Deploying the WAC FARM
At the first server of the FARM run the following command in the PowerShell as administrator
New-OfficeWebAppsFarm -InternalUrl https://officeweb.contoso.net –ExternalUrlhttps://officeweb.contoso.com -CertificateName "office" –AllowHttp
where “office” in red is the “subject name” used during the certificate request.
https://thiagobeier.files.wordpress.com/2013/08/080513_1921_owaofficewe20.png?w=614
For each new server joined at this FARM execute the following command
New-OfficeWebAppsMachine –MachineToJoin "hm11.home.intranet"
If everything is ok at this moment you can run the “get-officewebappsfarm” command to verify the servers that are joined at this FARM.
https://thiagobeier.files.wordpress.com/2013/08/080513_1921_owaofficewe21.png?w=614
*sometimes you won’t resolve the server’s name of all servers joined at the FARM and a good Solution is to import again the certificate at IIS or direct using MMC.exe \ certificates \ personal.
** **
Validation tasks
At the first server joined at the FARM, open a browser and hit the following addresses:
https://hm11.home.intranet/hosting/discovery/ - local server name
https://officeweb.home.com.br/hosting/discovery/ - external url
From a remote server (not a FARM server)
https://<server_XXX>.home.intranet/hosting/discovery/ (server name/hosting/discovery/)
https://officeweb.home.com.br/hosting/discovery/ (external url name/hosting/discovery/) -> this is the name used at the Lync and Skype 4 Business topology publishing.
Validate the NLB function
Shutdown one of the servers joined at this FARM (or only disconnect the NIC or virtual NIC)
Hit the external URL from internet of a remote host https://officeweb.home.com.br/hosting/discovery/
The answer should be of the following.
https://thiagobeier.files.wordpress.com/2013/08/080513_1921_owaofficewe22.png?w=614
Configuring (Office Web Apps) at Lync 2013/Skype 4 Business
At the Lync/Skype For Business front-end server
Use the topology builder at shared components (office web apps servers)
Set it to officeweb.home.com.br, your external URL (visible internally and externally)
https://thiagobeier.files.wordpress.com/2013/08/080513_1921_owaofficewe23.png?w=614
https://thiagobeier.files.wordpress.com/2013/08/080513_1921_owaofficewe24.png?w=614
Publish the topology and follow the instructions
*for LAB please create a DNS zone named home.com.br for internal resolution, at this lab we have two DNS zones in ADDS home.intranet (ADDS integrated zone) and home.com.br (your external valid DNS zone).
** **