Windows 10 IoT: Getting started with the Raspberry Pi - A walk-through
Introduction
The Raspberry Pi is one device which provides you a plethora of cool things to do in only a little cost. Today, I’m going to walk you through the purchase of items to the installation and your first program running on Raspberry Pi 2.
By the end of this post, you will know the following,
- Where to get your device and accessories from
- How to successfully install and boot up your Raspberry Pi
- Pushing your first program to the Pi using Visual Studio 2015
What is Raspberry Pi?
It’s a tiny, credit-card sized single-board ARM based computer also known as a developer board. They are low power and cost-friendly devices which now play an important role in the collection and exchange of data between objects, devices and other items such as sensors and actuators etc. which encompasses technologies like smart homes. Thus contributing to the network of Internet of Things (IoT).
The picture below shows the Raspberry Pi 2 Model B, and it has the following components (in order of the labels in the image):
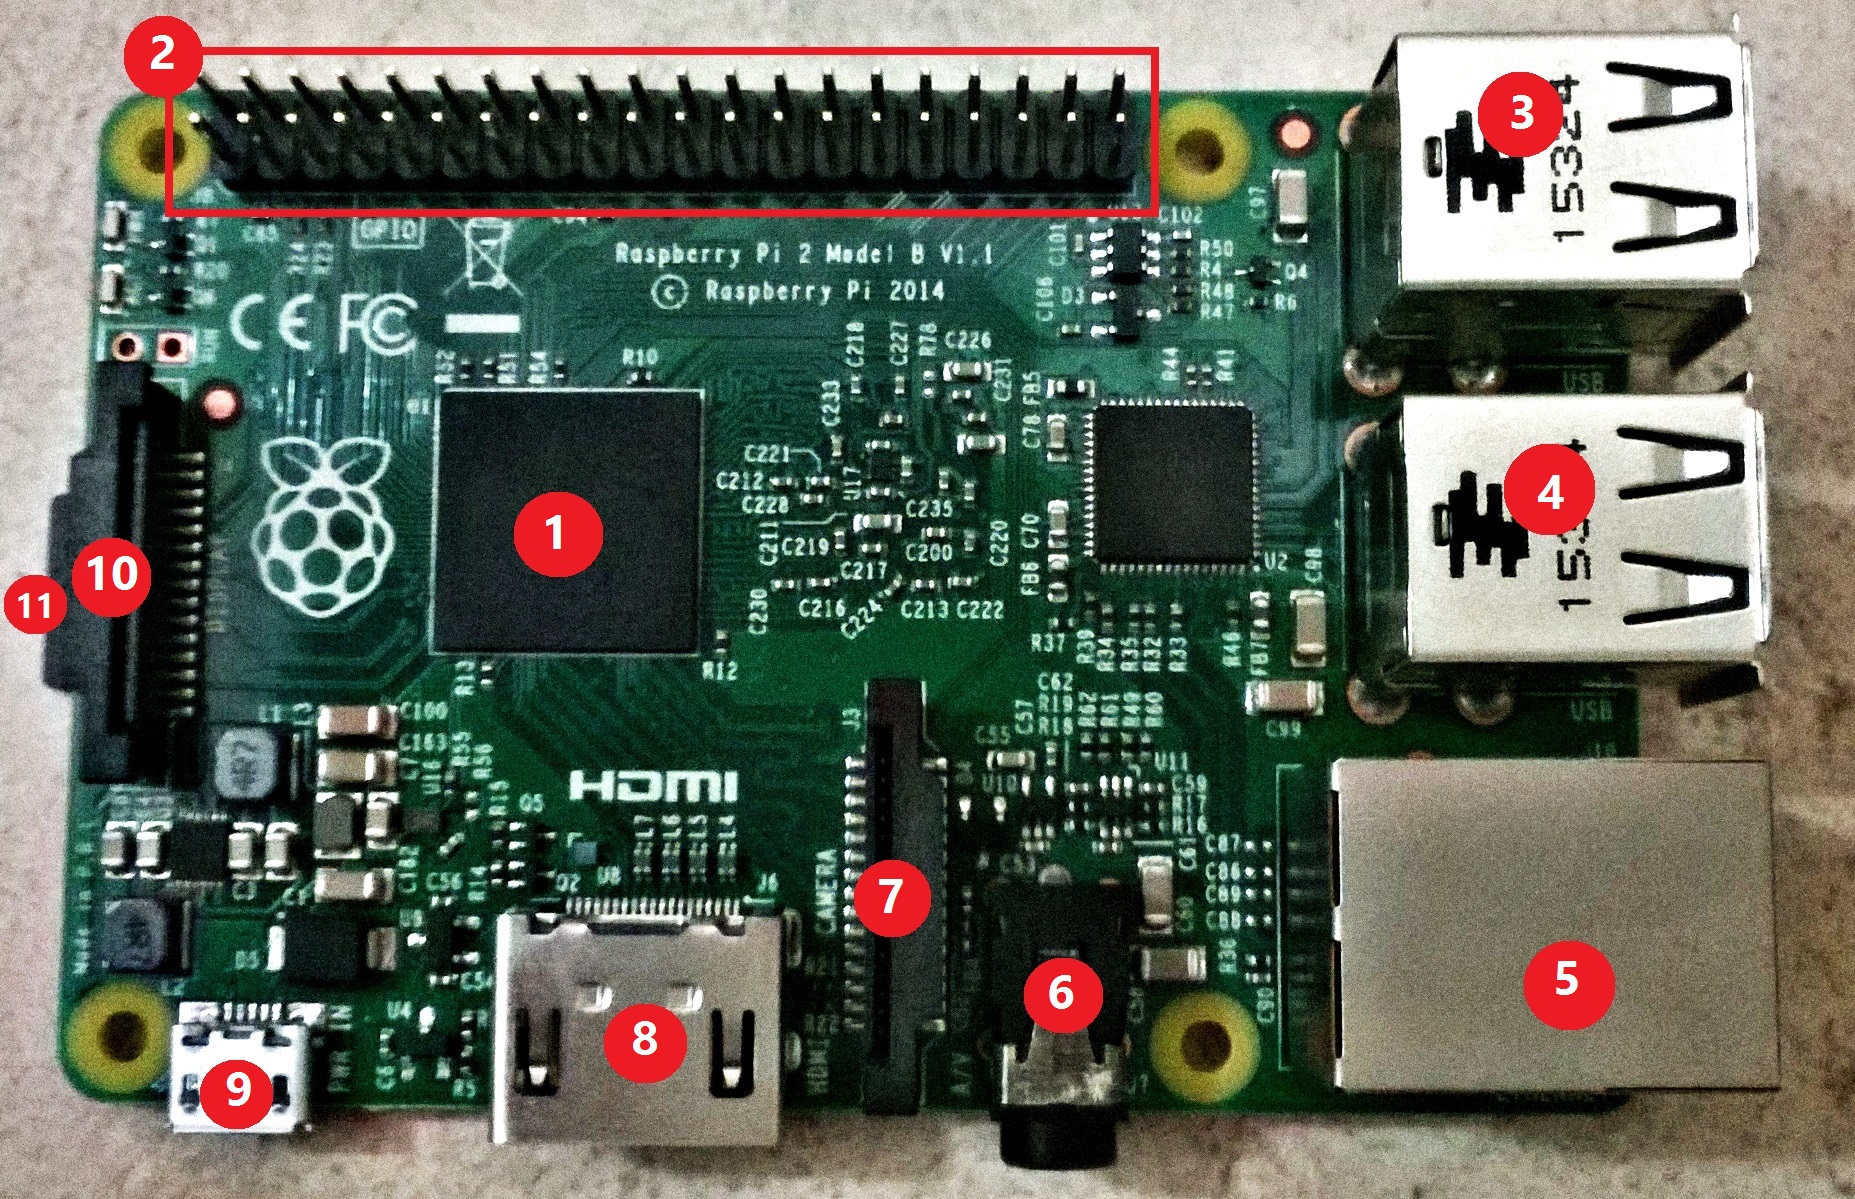
- Broadcom ARMv7 processor
- 40 GPIO (General Purpose Input Output) Pins
- 2 USB Ports
- 2 USB Ports
- Ethernet Port
- Combined 3.5mm audio jack and composite video
- Camera Interface (CSI)
- HDMI Port
- Micro USB Power
- Display Interface (DSI)
- Micro SD Card Slot (on the back side)
How can I get one at Home?
Since I am from Pakistan and went through a great hassle in getting hold of hardware, I am primarily focusing on the audience from Pakistan for the purpose of purchasing the Pi and its accessories. So, you can have access to the Raspberry Pi and all the accessories you require from this website http://www.ewallpk.com. They are based in the city of Peshawar and ship your goodies the next day after order confirmation via TCS courier. You have to pay them in advance via an online transfer and other options that they provide though prior the delivery of your order. They also have sensors and boards other than the Pi too that you can purchase. Do check them out. There is another online store (I haven’t tried it though) which has a good range of sensors, motors, capacitors and resistors etc. that you can buy at http://www.embeddedpak.com. Do explore these links as you will also learn about all sorts of hardware items that can be used which you haven’t heard of prior this time.
Also, if you’re someone from outside Pakistan then I’m sure there are a whole lot of online stores that provide you this including eBay and Amazon and there is this website with packages of starter kits including accessories with your device, hit on to http://www.12voltnet.com to find out more. There must be many more websites and official list of vendors so I suggest to perform a little search.
Essential Requirements for Pi
I guess that’s about it for where you can buy this stuff. To get started with the Raspberry Pi, you need some hardware items and a couple of software for installation, so get going and gather all these things. For hardware:
- Raspberry Pi 2/3 (I’m using Pi 2 Model B)
- MicroSD Card (16GB recommended)
- HDMI Cable for external display
- External 5V 2.5A Power Supply
- Ethernet cable for remote access
For software:
- Windows 10 installed on your system
- Windows 10 IoT Core
- Visual Studio 2015 (Community edition is free)
- Windows 10 Developer Tools (included in the community edition)
That’s about it for the essential requirements. Now all you need to do is, have these installations in your system along with the hardware and you can start your journey to the world of Pi in no time at all. Let’s start with the installation process now.
First of all, you need a system running on Windows 10 to be able to complete the installation process for the raspberry pi.
Windows 10 IoT Core Installation
- Click on the hyperlink provided above for downloading the .iso for Windows 10 IoT Core for RPi 2.
- Once the download is complete, double-click on the .iso image and it will automatically be mounted as a virtual drive.
- Open the drive just created.
- Double click on “Windows_10_IoT_Core_RPi2” to install it.
- Now open the location on your system: “C:\Program Files (x86)\Microsoft IoT\FFU\RaspberryPi2” and check that flash.ffu is installed there.
- Now go back to your explorer and right-click on the virtual drive, click on eject.
- Now plug in your MicroSD card through the card reader into your computer.
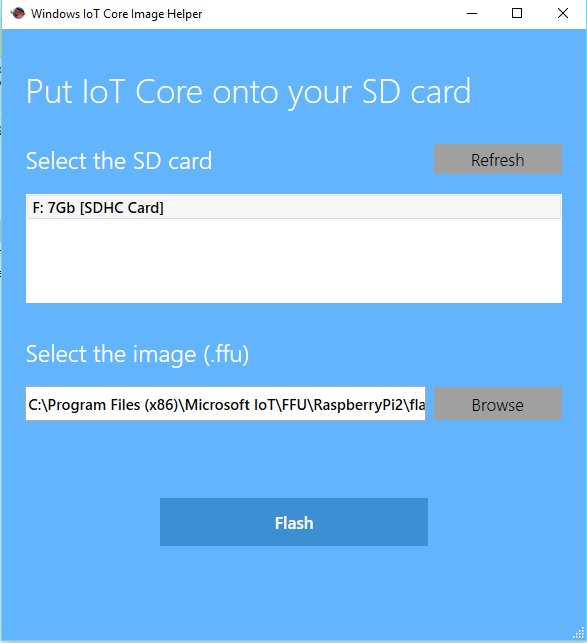
- Open “C:\Program Files (x86)\Microsoft IoT” and click on “IoTCoreImageHelper” to install Windows 10 IoT on your microSD card.
- Your SD card would be showing if you have inserted it in. Select the card and then browse to the flash.ffu file and select it. Now click on the Flash button.
- Once the setup is completed, the program is going to notify it to you.
- Remember to safely remove your SD card or you may end up corrupting it.
- Your card is now ready to be plugged in to the Raspberry Pi.
Booting up
Now take your SD card and insert it into the micro SD card slot in your Raspberry Pi. Connect the mini USB power port and also connect your Pi to an external monitor/screen through the HDMI Port. Also plug in your network cable into the Ethernet port. An important thing to note here is that you might have a Wi-Fi dongle but there are high chances that it might not work with your device. I tried my luck too and it didn’t work. Turns out that only a few Wi-Fi dongles are supported by RPi 2 which includes the original Wi-Fi dongle for Raspberry Pi which is not available to me locally here. To save yourself from all that hassle I would advise you to connect it via Ethernet port unless of course you have the RPi 3 which has built-in Wi-Fi and Bluetooth.
So, once you have everything plugged in and in place turn the power on for the Pi and see it booting up for the first time. Windows 10 IoT Core will boot up automatically which will take a few minutes. Once it boots up you will be asked to select your language and if you don’t select one and leave the screen as it is, it will skip this step in a couple of minutes and take you to the default application (as seen below in the picture).
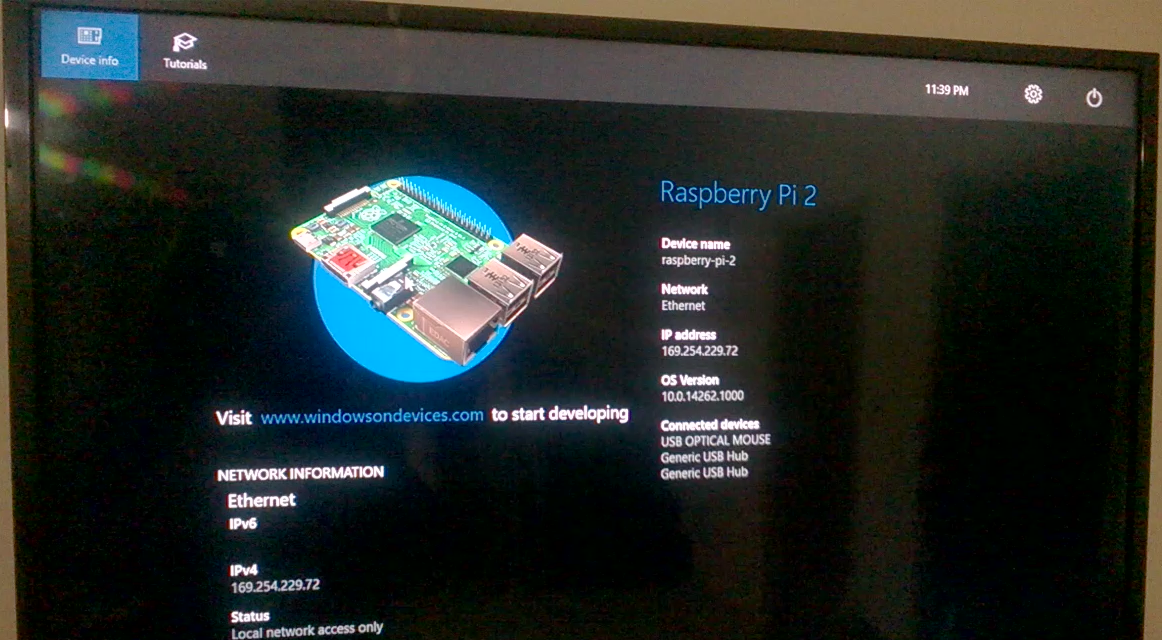
Once you see this screen, it means that your installation is now complete. You will also see your device name (which can be changed via remote access), IP Address and all/any devices connected via USB Ports on the screen display. Now I ll guide you in getting remote access to your Pi via your browser so that you can start building your apps for Windows 10 IoT.
Remote Access via Browser
You need to know your IP Address in order to have remote access to your raspberry pi. You can also get access to the IP Address by navigating to “C:\Program Files (x86)\Microsoft IoT” and clicking on the “WindowsIoTCoreWatcher” icon. A small window will open displaying your board name, MAC Address, IP Address, Last Ping and Online status (as seen in the image below).
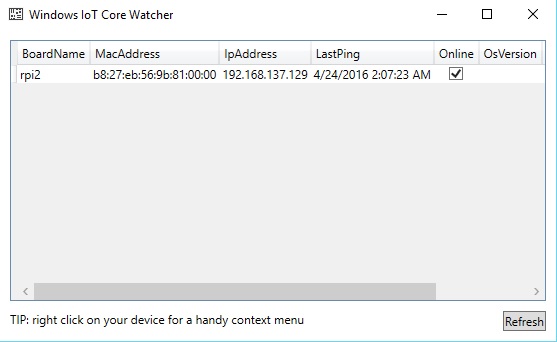
Make you’re the online check box is checked as this tells you that your device is active. Go to your browser and type in the IP Address along with the port 8080 at the end of your IP address. The format would be (putting in mine): 192.168.137.129:8080 which will open up a window asking you for the username and password.
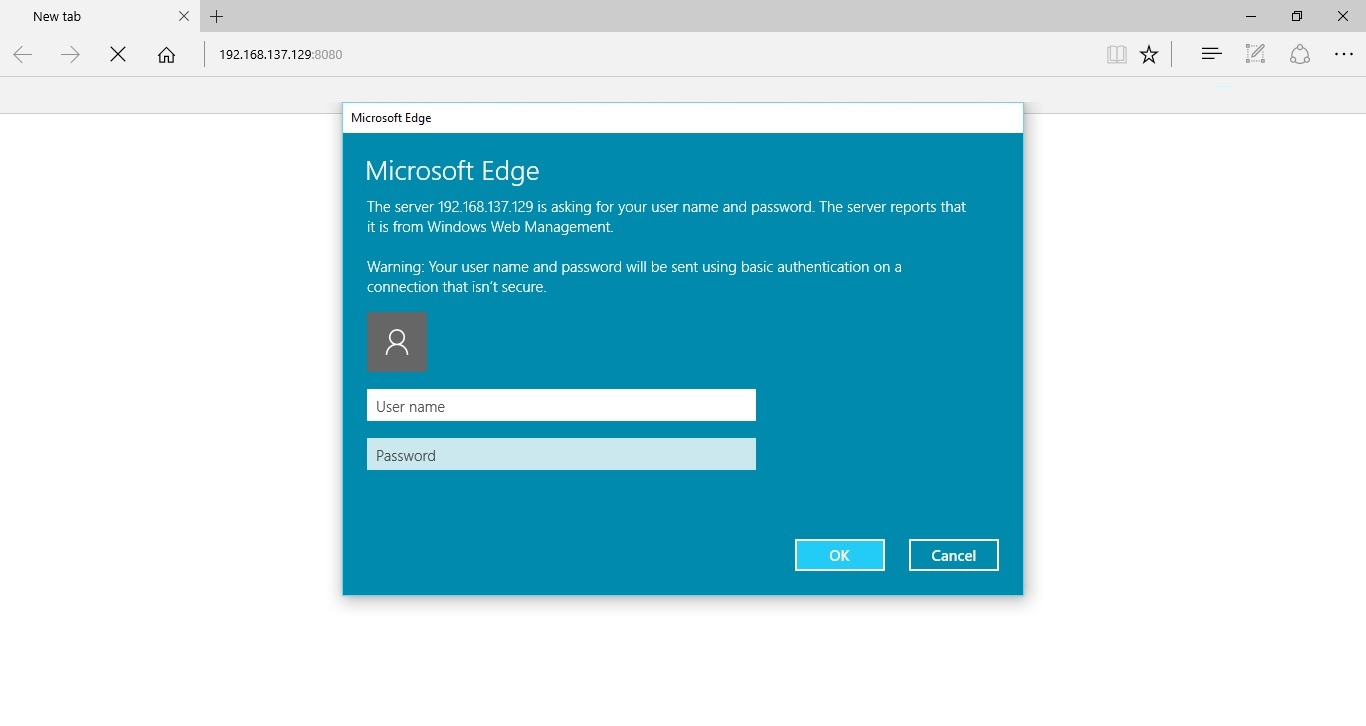
Your username will be “administrator” and the password is “p@ssw0rd”. This is the default username and password however the password can be changed once you have established remote access. You can also change your device name from there.
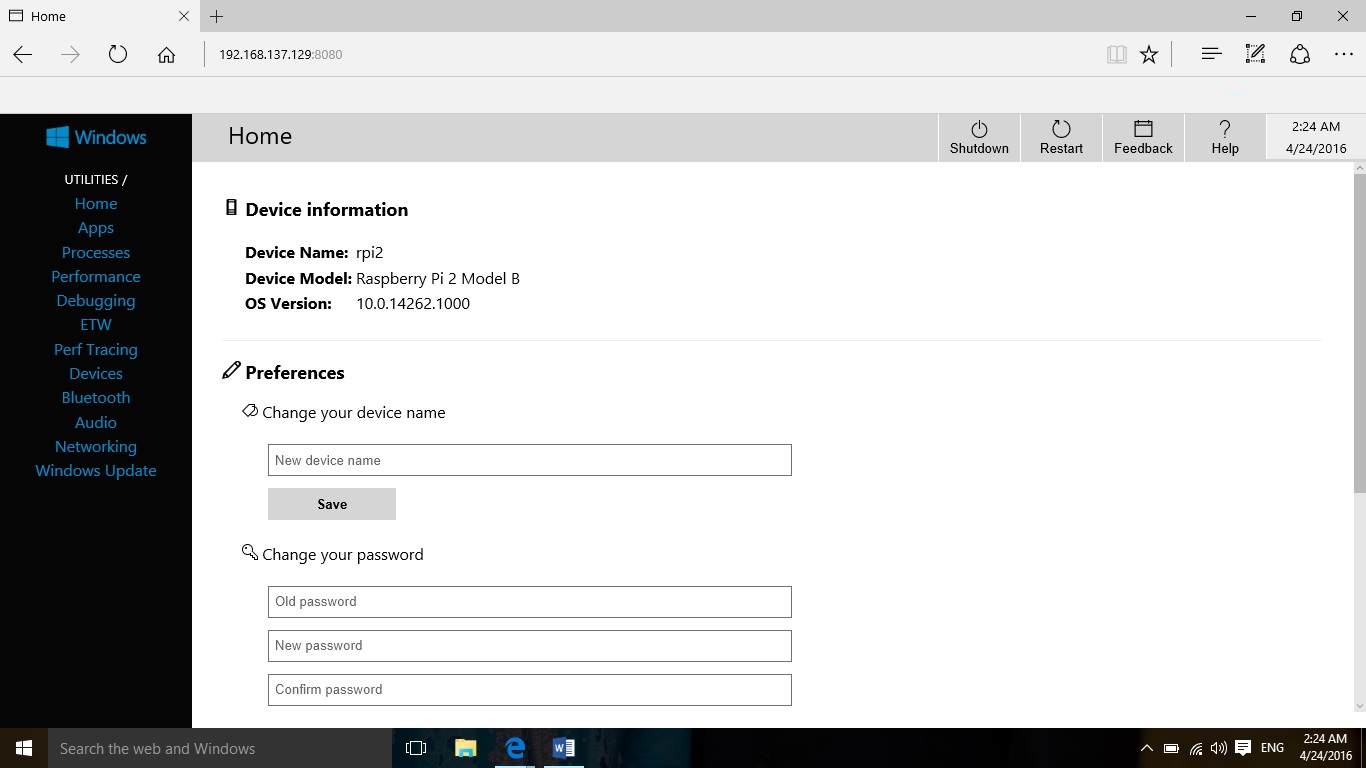
This is the main page that opens up when you get remote access to your device. As you can see, it displays your device and OS information and also has the option of changing your device name and password. You will have to enter your new password the next time you will access you Pi via Remote Access through the browser.
I would recommend you to explore this more and check out all the option that you have on the left side column of the browser. The Apps page will show you the current running apps in your system and will also allow you to install and uninstall AppX packages and bundles. The debugging option will navigate you to the page where you can start remote debugging for the apps that you’re going to build. Do check out and explore all the options for the purpose of learning.
VS2015 Installation
To be able to develop apps for Windows 10 IoT Core, you need Visual Studio 2015 installed in your system.
- Download and install the Visual Studio 2015 Community Edition from the link provided in the beginning. (Note: Installation can take up to several hours)
- Now launch the application with all the default settings.
- In templates select Visual C# > Windows > Universal and select Blank App (Universal Windows) template from the options given.
- Give your app a name, for example: MyFirstPiApp or any other, and the location that you want to save it to (I like to keep it to the default location for VS projects).
- It might ask you for the minimum and target version, keep that to the default too, as it is.
- If the developer mode is not enabled, it will prompt you to turn it on Just follow through it and you will be navigated to the settings.
- You are now ready to code your first application.
Pushing your first application to RPi
We’re going to keep the first app very basic and simple. It’s just going to be a Hello World! Application pushed to the device and will be displayed on your external screen/monitor connected with the Pi.
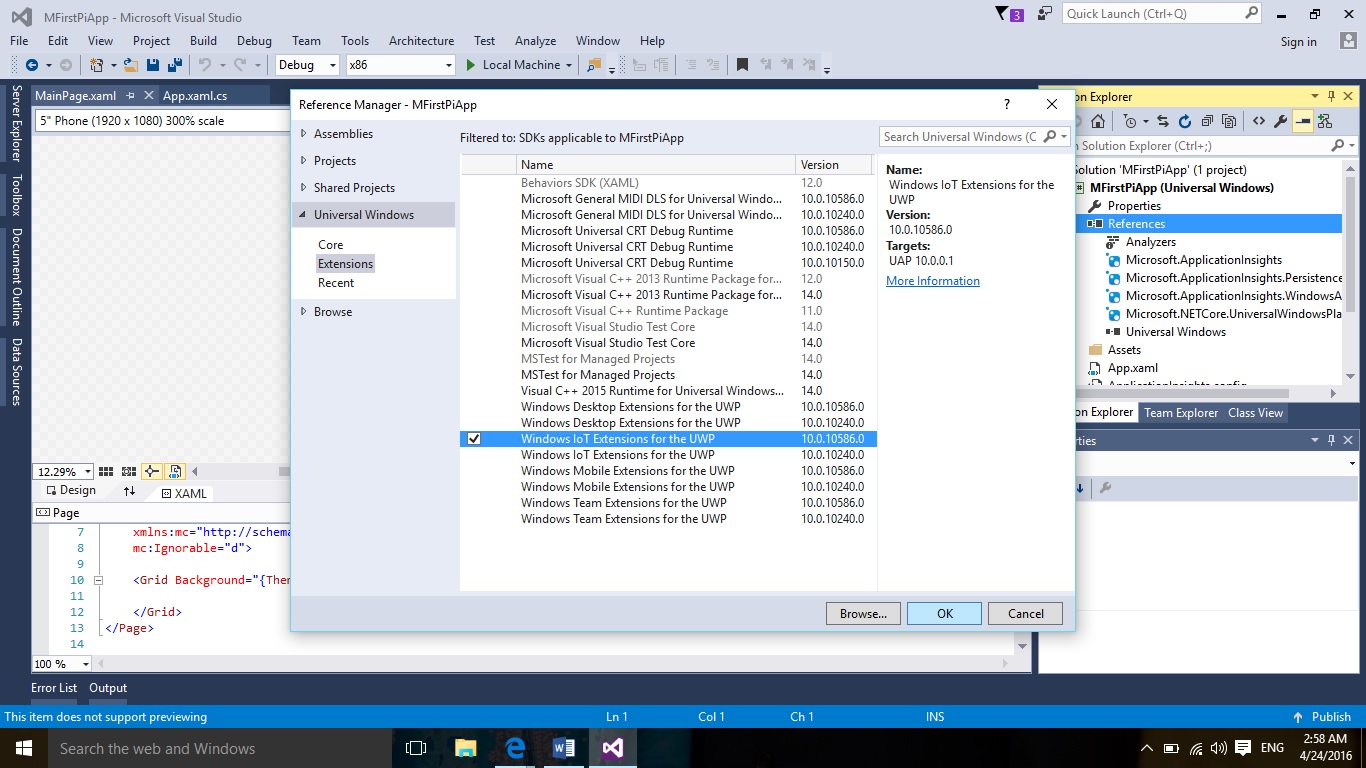
In the right upper corner is your Solution Explorer. Make sure you check the References that “Windows IoT SDK” or “Windows IoT extensions for UWP” is added in it. If not, you can easily add it by right clicking References and click on Add a reference. They check in the extensions and you’ll find one of them. I use the latter.
Now open up MainPage.xaml. The designer will take some time to load. In the meanwhile you can start coding right away or wait for it to load up. We are going to add a textblock and a button in the Grid:
<Grid Background="DarkBlue">
        <TextBlock FontSize="34" Foreground="White" Text="Hello World!" TextWrapping="Wrap" HorizontalAlignment="Center" VerticalAlignment="Center"></TextBlock>
        <Button Name="btn_TextChange" Click="btn_TextChange_Click" Content="Change Text" Foreground="Black" Background="Ivory" HorizontalAlignment="Center" VerticalAlignment="Center" Margin="125,405,134,203" RenderTransformOrigin="0.921,1.667"></Button>
    </Grid>
Now let’s navigate to MainPage.xaml.cs to code what the Button will do on the click event:
private void  btn_TextChange_Click(object sender, RoutedEventArgs e)
        {
            txt_Line.Text = "This is my first app for Windows 10 IoT Core using RPi 2";
        }
Before deploying the app, make sure that you have selected the Solutions Platform as ARM and the green play button has Remote Machine selected on it. When you’ll make this selection you’ll see a small window pop up, it will show you your active device. Click on it. Don’t worry if it doesn’t show, you can input your IP Address instead.
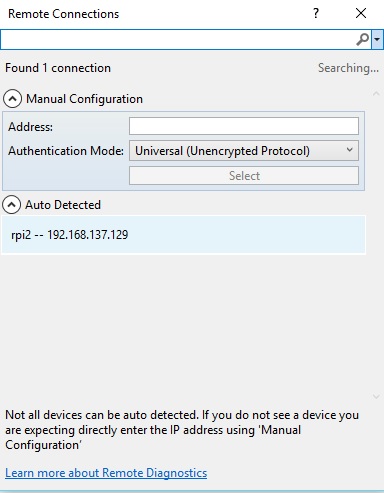
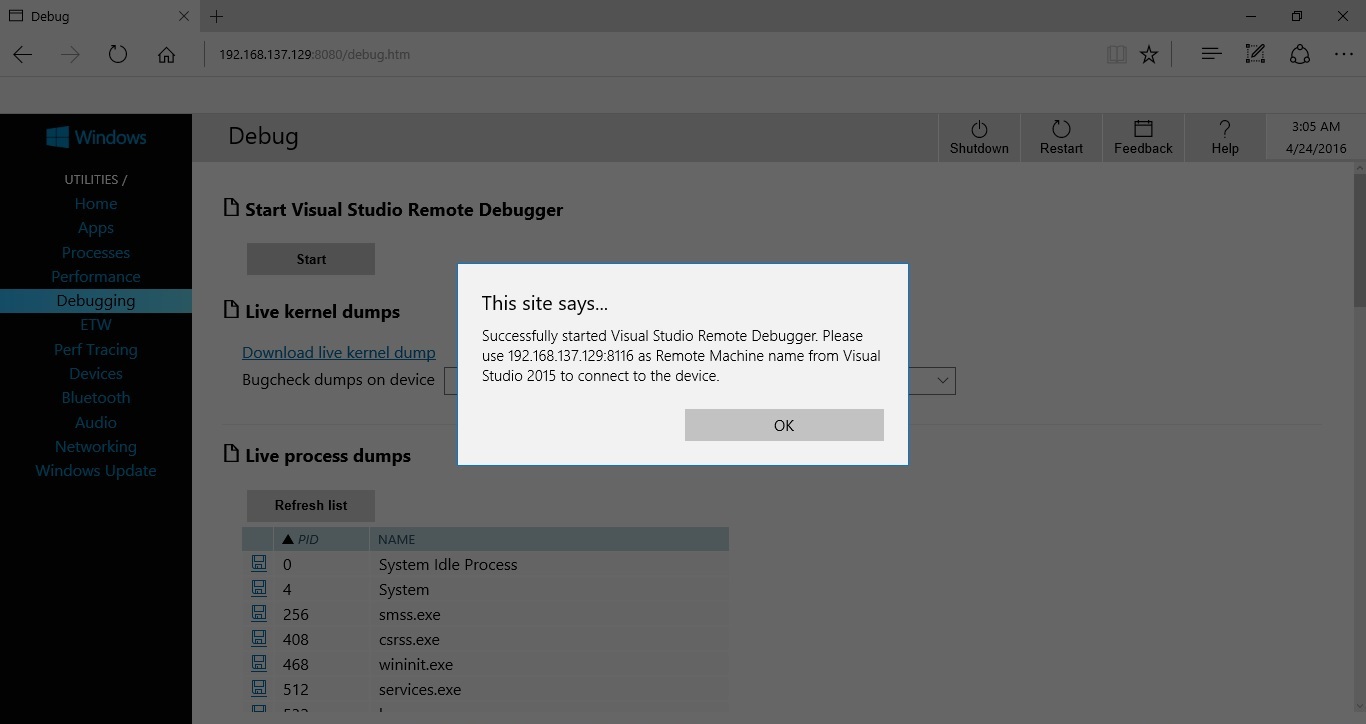
Select your device and you are now almost ready to deploy your app. In your remote access browser, go to debugging and click on the start button for Visual Studio Remote Debugger. If your device was not shown in Remote Connections in Visual Studio, please use the IP Address and port provided by the remote debugger for establishing the remote connection on deployment as shown below.
You are now ready to deploy your app. Click on the green button or right click your project and click on Deploy. The screen displays the following:
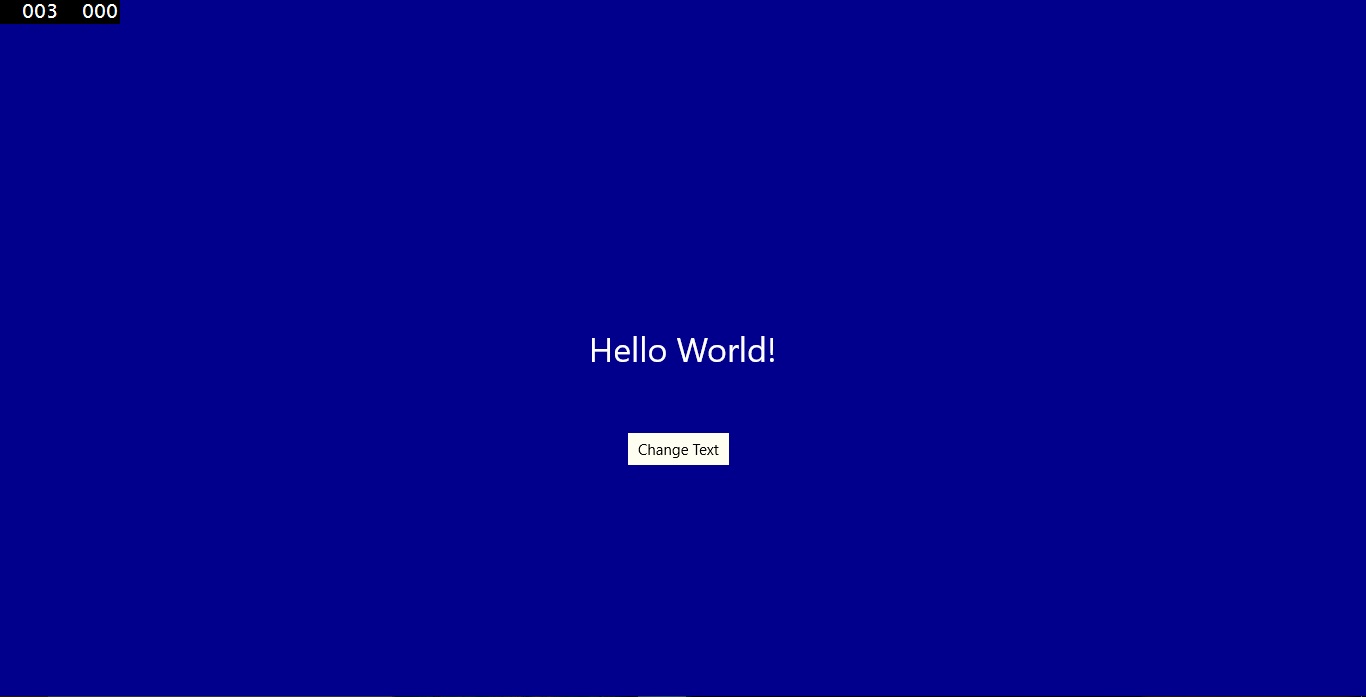
Now click on the Change Text button (you need to connect a USB mouse to the raspberry pi to be able to make that selection):
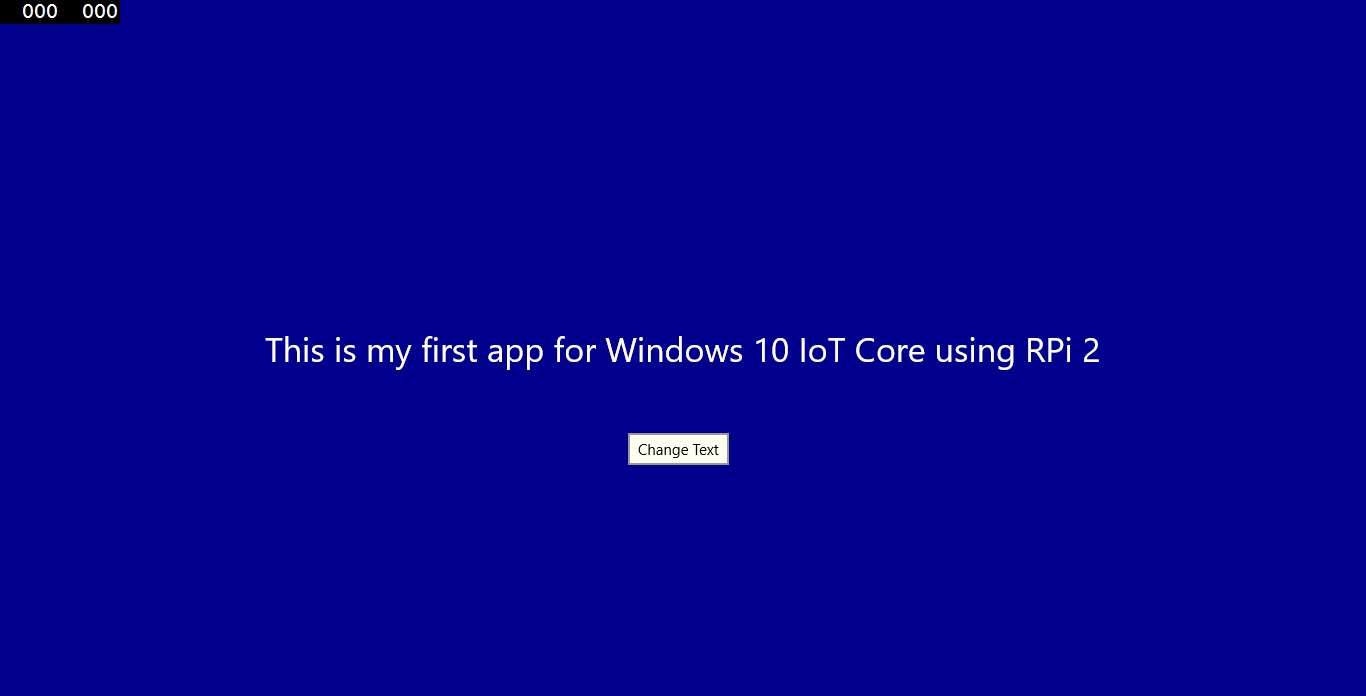
Clicking on the button will change your text on the screen.
Congratulations
Congratulations on successfully deploying your very first app for Windows 10 IoT Core using the Raspberry Pi. It was as easy as a breeze. There are so many things that can be done with the Pi and Windows 10 IoT Core and you can browse the samples list that Microsoft has provided. There are some really cool and simple projects in there to start off with.
Happy coding!