AD FS 4.0 : Discover, Setup and Publish Application: Part2
Introduction
In the previous part, we have setup a new AD FS 4.0 external farm and see some configuration changes with this new version.
Now we will see how publish Application using both the AD FS Server and the Web Application Proxy role.
- Part 1 : Discover & Setup an external AD FS 4.0 Farm
- Part 2 : Configure and Publish Application using AD FS 4.0
- Part 3 : Advanced Publishing of Application
-
Configure and Publish Application using AD FS 4.0: Part 2 - Publish
Example used :
- IIS Anonymous WebSite - HTTP-TO-HTTPS + X-Forwarded-For
- SharePoint Server - WebApplication
Publication methods:
There is now more Preauthentication method in AD FS 4.0. Each have different objective and can be used on different purpose.
Hereunder a table showing these usage:
| Pass-through |
No Authentication Forward Authentication |
Anonymous Website or Legacy Application |
Public Website |
| Active Directory Federation Services(AD FS) Supported Client |
|||
| Web and MSOFBA |
PreAuthentication |
WebApplication Rich Office Client |
SharePoint, Office Server Custom WebApp |
| HTTP Basic |
PreAuthentication |
Rich Client without HTTP Redirection |
Exchange Active Sync Remote Desktop Gateway |
| OAuth2 |
PreAuthentication |
Application with OAuth2 |
Windows Store Apps Custom Application |
These new methods include also new PowerShell CMDLet and new options in Publish New Application Wizard
1. Example: Publish an Anonymous IIS WebSite in Pass-through (HTTP-to-HTTPS)
For this demonstration, we have setup an Anonymous IIS website with a default.HTML in our Internal Network.
The website has no certificate and no binding : http://web.contoso.local:4001

Objectives :
- Publish an Internal hosted application
- Force HTTP>HTTPS > HTTP
- Use only certificate on WebApplicationProxy
- Get the "Real Client IP"
Before Steps :
- Add to the WAP host file : 192.168.0.X internal.contoso.local
- Add to public DNS : WAN_IP_WAP public.contoso.com
- Run the Publish New Application Wizard in Remote Access or run this Powerhell:
Add-WebApplicationProxyApplication `
-BackendServerUrl 'http://internal.contoso.local:8888' `
-ExternalCertificateThumbprint '057D644B7721BEEBD93C9E051200DE53C53F4D82' `
-EnableHTTPRedirect:$true `
-ExternalUrl 'https://public.contoso.com' `
-Name 'Contoso - Web Anonymous HTTP'  `
-ExternalPreAuthentication PassThrough

By default, the port 80 will not be authorized externally for a Workgroup computer. Only the appproxysvc can query this URL.
> Netsh http show urlacl
Reserved URL : http://public.contoso.com:80/
User: NT SERVICE\appproxysvc Listen: Yes Delegate: No
HTTP-to-HTTPS redirection
If you want to use the HTTP-to-HTTPS redirection in WAP 4.0, you will need to configure the Windows Firewall with a new rule:
(don't completely disable the firewall, it's dangerous out there). Maybe this will be automatic in future release of Windows Server 2016.
- Open Windows Firewall with Advanced Security
- Add a New Inbound Rule
- Select "Program"
- Enter "System" in the Program Path
- Allow the connection
- Name the rules "Allow WAP TCP 80 for HTTP to HTTPS Redirection"
- Edit the new rule and set Protocols and Ports TCP : 80
[
](resources/4024.WAP80_5F00_HTTP_5F00_Adv_5F00_Firewall.png)
- Test the HTTP-to-HTTPS redirection of the published app : http://public.contoso.com
- and observe the 307 Temporary Redirect :

HTTP-to-HTTP
If you have no SSL Requirement, you can also publish HTTP content with the WebApplication Proxy 4.0. (http://public.contoso.com)
Add-WebApplicationProxyApplication `

-BackendServerUrl 'http://internal.contoso.local:8888' `
-ExternalUrl 'http://public.contoso.com' `
-Name 'Contoso - Web Anonymous HTTP Only'  `

-ExternalPreAuthentication PassThrough
Doing this will trigger warning messages:
WARNING: Publishing an application over HTTP might be a security risk.
WARNING: You shall be aware that you are publishing over the internet using HTTP all application data will be passed through un encrypted
Propagate client IP address to backend application
One of the missing feature using the previous WebApplicationProxy role was the missing "End-Client IP" in logs files.
For example, IIS logs files receive by default the Client-IP As the Reverse Proxy sending the web request. It's usual when using a Reverse Proxy. It's a different behavior when you publish a website through Network Address Translation as the Client IP is the real "Client IP".
So, when the security guy was asking : "Can you give me which Client IP made a request on our public website on %date%? You were looking at your shoes and say : The Reverse Proxy IP of course !
Today, WebApplicationProxy send by default the X-Forwarded-For to the backend application. So you should look after this header in the backend Application.
However, you still need to capture this header ! Here an example with our previous IIS Anonymous Website :
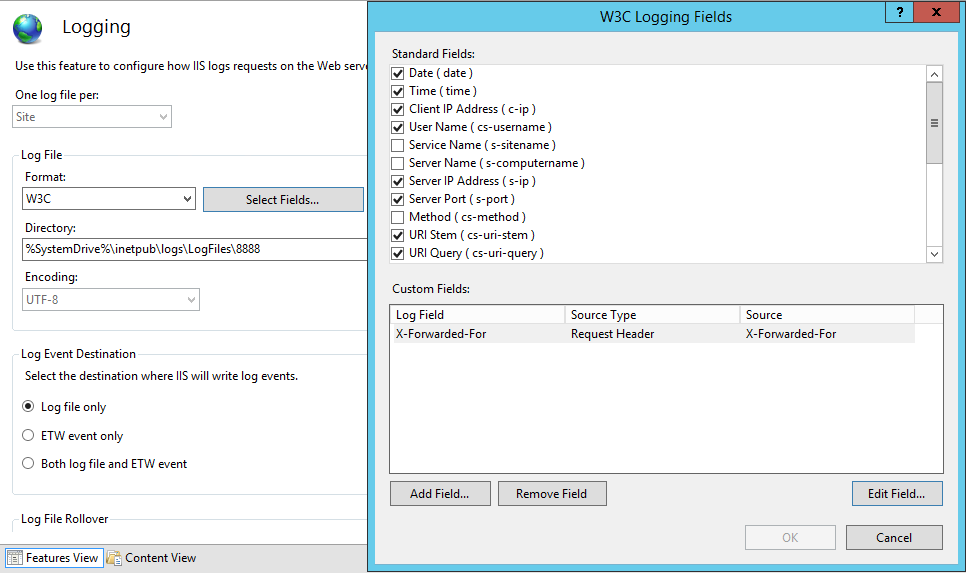
First, you will need to ask IIS to monitor this Header "X-Forwarded-FOR"
-
Go to IIS Website > Logging
Log Files > Select Fields
Add Custom Field :
-
- Name: X-Forwarded-For (as you prefer)
- Source Type: Request Header
- Source: X-Forwarded-For
Apply the logging configuration
Note : This is only available to IIS 8.5 and above (Enhanced Logging)
For testing, make some request to https://public.contoso.com (Published with WAP); and restart IIS for the log drop.
2016-04-30 00:00:00 192.168.0.150 / - 8888 - 192.168.1.250 Mozilla/5.0+(Windows+NT+10.0;+WOW64;+Trident/7.0;+rv:11.0)+like+Gecko - 200 0 0 0 194.88.160.45
You will now have :
- 192.168.0.150 as the Server-IP(Aka IIS)
- 192.168.1.250 as the Client-IP (Aka the Reverse Proxy)
- 194.88.160.45 as the Real-Client-IP (Aka X-Forwarded-For)
2. Example: Publish a SharePoint WebApplication
For this example, nothing is very new if you have already used the WebApplicationProxy Role for publishing a SharePoint Server
Note : We assume you have configured SharePoint for Claims Based Authentication and it work with AD FS.
Default Zone : (Internal & Public URL) : https://extranet.contoso.com with Claims Authentication
(in-brief)
- Add to the WAP host file : 192.168.0.X extranet.contoso.com
- Add to Public DNS : (a) WAN_IP_WAP .contoso.com
- Add a new Relying Party for Extranet.contoso.com
- Run the Publish New Application Wizard in Remote Access or run this powerhell:
Add-WebApplicationProxyApplication `

-BackendServerUrl 'https://extranet.contoso.com' `

-ExternalCertificateThumbprint '057D644B7721BEEBD93C9E051200DE53C53F4D82'  `
-EnableHTTPRedirect:$true `
-ExternalUrl 'https://extranet.contoso.com' `
-Name "CONTOSO_SharePoint_Extranet'  `
-ExternalPreAuthentication 'ADFS' `
-ADFSRelyingPartyName 'SharePoint 2013 - Extranet HTTPS'