Live Environment For ASP.NET MVC Application in Development
Introduction
This article introduces how to set up server environment for MVC application on local development machine. As a web application hosted on a server accessible by end user so, it is good practice that we develop application in the same live environment on a local system so that we don’t need to do more changes at the time it goes live. An MVC application may host and test one of the two web servers.
IIS Express
Its default internal web server in Visual Studio is typically used to build and run our application during development for us to test and debug codes. It is a lightweight, self-contained version of IIS optimized for developers. IIS Express makes it easy to use the most current version of IIS to develop and test websites. It has all the core capabilities of IIS 7 and above.
IIS Web Server
It comes built-into Windows. It provides server environment that is closest to what the live site will run under, and it is practical for us to install and work with IIS on our development machine.
This article will walk us through how to publish and host our ASP.NET MVC application in our local IIS Web Server and debug hosted application in Visual Studio.
Install IIS Web Server
As IIS Web Server built-into Windows OS so it’s easy to install in few steps which are as follows in Windows 8.1:
- Open the ‘Control Panel’ and click on Programs Setting.
- There is another new ‘Program’ window opens and click on ‘Turn Windows feature on or off’ under Programs and Features section.
- Now ‘Windows Features’ window opens and expands ‘Internet Information Services’ node.
- After that expands child ‘World Wide Web Services’ node and check/enable all components under ‘Application Development Features’.
- After that click ‘OK’ button to let Windows install the required files. Once installed we may now close the dialog. Now open an internet browser and type-in “localhost” to verify that IIS was indeed installed. It should bring up the following page below:
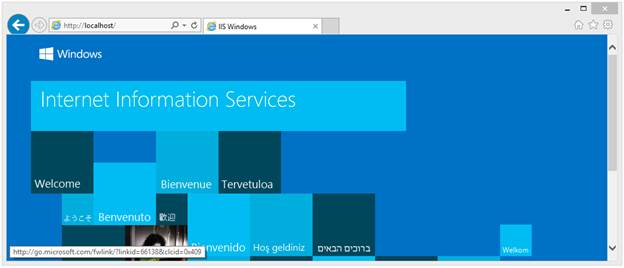 Figure 1: IIS Web Server on local machine
Star Rating in MVC Application
We create an ASP.NET MVC application which we used to set up on IIS web server. We develop star rating using css in this example so we create an empty MVC project in Visual Studio. We create a view model to pass data from view to controller and vice-versa as per following code snippet.
namespace StarRating.Models
{
    public class  RatingViewModel
    {
        public int  Rating { get; set; }
    }
}
We create a Rating controller which has GET and POST action method as per following code snippet:
using StarRating.Models;
using System.Web.Mvc;

namespace StarRating.Controllers
{
    public class  RatingController : Controller
    {
        [HttpGet]
        public ActionResult Index()
        {
            RatingViewModel model = new  RatingViewModel();
            return View(model);
        }

        [HttpPost]
        public ActionResult Index(RatingViewModel model)
        {
            // Validation & Database operations goes here
            return View(model);
        }
    }
}
We write css for rating star design on UI as following code snippet:
.rating {
    unicode-bidi: bidi-override;
    direction: rtl;
    font-size: 30px;
}

.rating span.star, .rating span.star {
    font-family: FontAwesome;
    font-weight: normal;
    font-style: normal;
    display: inline-block;
}

.rating span.star:hover, .rating span.star:hover {
    cursor: pointer;
}

.rating span.star:before, .rating span.star:before {
    content: "★";
    padding-right: 5px;
    color: #BEC3C7;
}

.rating span.star:hover:before, .rating span.star:hover:before, .rating span.star:hover ~ span.star:before, .rating span.star:hover ~ span.star:before {
    content: "★";
    color: #41CAC0;
}

.rating span.star.active::before, .rating span.star.active::before, .rating span.star.active ~ span.star::before, .rating span.star.active ~ span.star::before {
    color: #41cac0;
    content: "★";
}
Now write the view on which rating star shows as per following code snippet:
@model StarRating.Models.RatingViewModel
<div class="row">
    <div class="col-lg-6">
        @using (Html.BeginForm("Index", "Rating", FormMethod.Post, new { @class = "form-horizontal", role = "form" }))
        {
            <h4>Star Rating</h4>
            <hr />
            <div class="form-group">
                <label class="col-lg-2 col-sm-2 control-label" for="Rating">Rating</label>
                <div class="col-lg-8">
                    <span class="rating">
                        @for (int i = 1; i <= 5; i++)
                        {
                            var starClass = "star";
                            if (Model.Rating == 6 - i)
                            {
                                starClass += " active";
                            }
                            <span data-value="@(6 - i)" class="@starClass"></span>
                        }
                    </span>
                </div>
                @Html.HiddenFor(m => m.Rating)

            </div>
            <div class="form-group">
                <div class="col-md-offset-2 col-md-10">
                    <input type="submit" class="btn btn-primary" value="Submit" />
                </div>
            </div>
        }
    </div>
</div>
@section Scripts{
    @Scripts.Render("~/Scripts/rating-index.js")
}
We write a JavaScript function to assign selected star value to hidden field so that we get this value on POST action on controller. The following code snippet is for the same.
(function ($) {
    function RatingIndex() {
        var $this = this;
        function initialize() {
            $(".star").click(function () {
                $(".star").removeClass('active');
                $(this).addClass('active');
                var starValue = $(this).data("value");
                $("#Rating").val(starValue);
            })
        }
        $this.init = function  () {
            initialize();
        }
    }
    $(function () {
        var self = new RatingIndex();
        self.init();
    })
}(jQuery))
Now we open project properties by right clicking on project. The default web server is set IIS Express with URL in the Web tab of properties as shown in figure 2. It means when we run this application from the Visual Studio then it build and run at local IIS Express server.
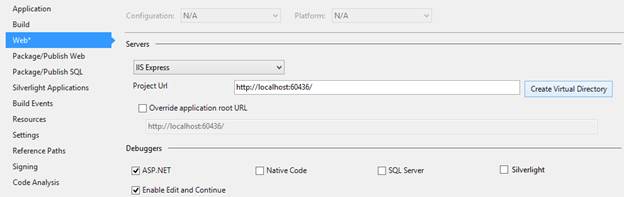
Figure 2: IIS Express setting for web
After that we run the application from the visual studio and output shows as per figure 3.
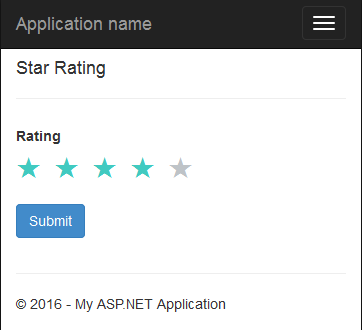
Figure 3: Output of the Star Rating Application
Deploy Application on IIS Web Server
We publish and host the web application on our development machine IIS Web Server so that we can set up same live environment on local development machine. To deploy an application on IIS Web Server we divide process in two parts one is publish and another is host.
Publish ASP.NET MVC Application from Visual Studio
To publish ASP.NET MVC project from Visual Studio, we follow following steps one by one.
- Build ASP.NET MVC project /solution in Release mode.
- Right click on ASP.NET MVC project and click on "Publish" menu.
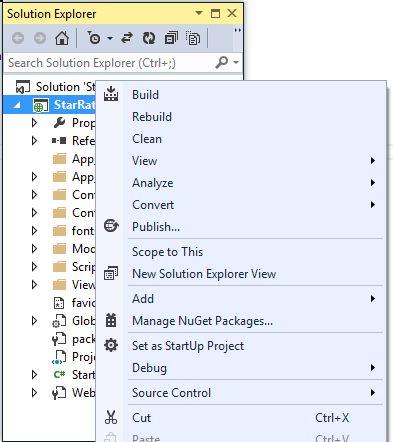 Figure 4: Publish ASP.NET MVC Application
 - Now Publish Web pane opens, and choose profile tab from left tab. There is a "Select or import a public profile" in which we can either choose existing one or create new publish profile as shown in following image:
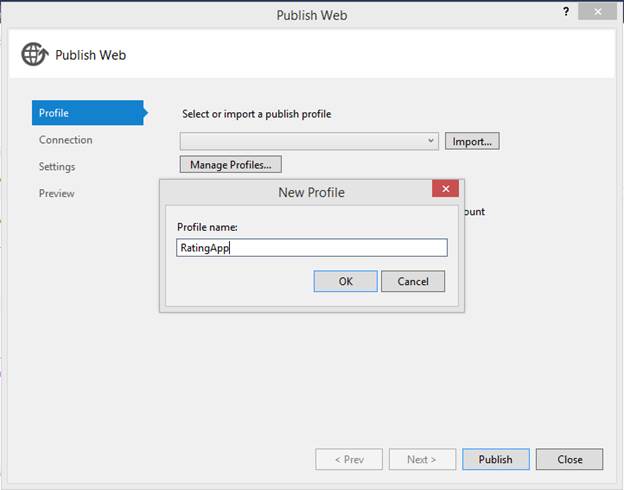 Figure 5: Publish Profile for ASP.NET MVC Application
Now clicks on "Ok" and move on Connection tab in Publish Web
Figure 5: Publish Profile for ASP.NET MVC Application
Now clicks on "Ok" and move on Connection tab in Publish Web - Now we choose File System in publish method and choose desired location in Target Location which we will be used to map IIS.
 Figure 6: File System to publish ASP.NET MVC Application
 - Now we choose configuration mode Release as shownin the below figure and click on Next button. There are some options such as Delete all existing files prior to publish which means delete all existing files in target location, publish folder, and create new files.
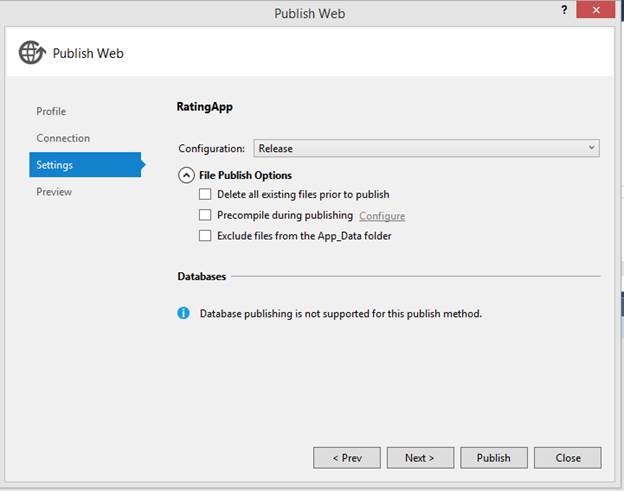 Figure 7: Configuration mode for ASP.NET MVC setting
 - Now we get publish preview which shows publish path and profile name. Now we click on publish button and all published files created at target location.
Host ASP.NET MVC Application on IIS Web Server
As we have published code so now we host this code on IIS step by step.
- Search inetmgr in search box and click on IIS manager icon.
- In the IIS manager, Right clicks on Sites under Connections pane as show in following image.
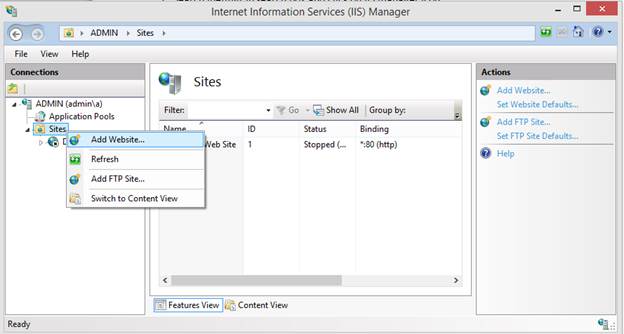 Figure: 8. IIS Manager
 - Now we have following where we fill up all the information which is required to host ASP.NET MVC application on IIS Web Server.
Site name : Name of site
Application pool :.NETv4.5 (version of .net framework on which application run)
**Physical path:**Path of the published ASP.NET MVC application code and map to directory which have Web.config file.
 Figure 9: Application host on IIS server.
 - Now we set up binding for hosted application so that it can run on the 4.5 .NET Framework. We need to right click on hosted Website and expand Manage Website and click on Advanced Setting. The following image shows options for same.
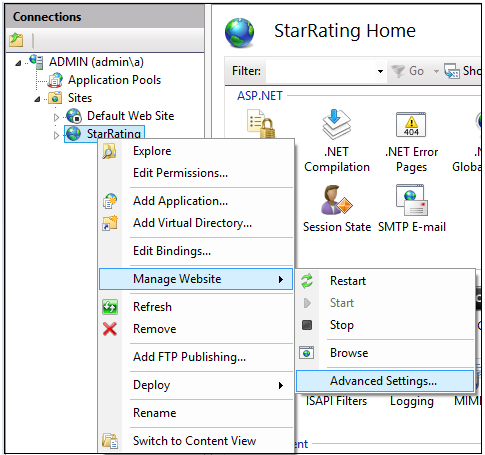 Figure 10: Advance Setting for Web
Now we set application pool for the application as shown in the following image.
Figure 10: Advance Setting for Web
Now we set application pool for the application as shown in the following image.  Figure 11: Application pool setting in IIS
An IIS application pool is a grouping of URLs that is routed to one or more worker processes. Because application pools define a set of Web applications that share one or more worker processes, they provide a convenient way to administer a set of Web sites and applications and their corresponding worker processes.Now we run the application using URL http://localhost/rating and get output same as figure 3.
Figure 11: Application pool setting in IIS
An IIS application pool is a grouping of URLs that is routed to one or more worker processes. Because application pools define a set of Web applications that share one or more worker processes, they provide a convenient way to administer a set of Web sites and applications and their corresponding worker processes.Now we run the application using URL http://localhost/rating and get output same as figure 3.
As we can see we have still localhost in web URL to access the application so we make some more changes in configuration so that we can access it same as live site. There are follows:
Right click on hosted web application.
Click on the Edit Binding option in the pane and opens Site Binding popup.
Select the website from Site Binding pop up and clicks on Edit button.
Edit Site Binding popup opens and we assign a value ‘dev.rating.com’ to Host name field in it as shown in following figure.
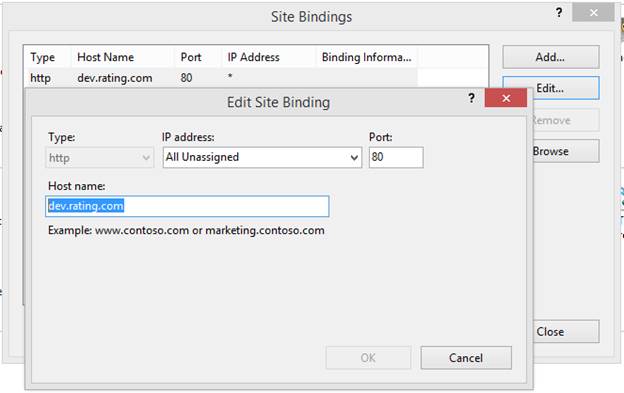 Figure 12: Assign Host name
Now open our system hosts file from C:\Windows\System32\drivers\etc and make an entry for site host name as below
127.0.0.1 dev.rating.com
Now we run the application using URL http://dev.rating.com/rating and get output same as figure 3.
Debug ASP.NET MVC Application
When we run application from the Visual Studio with IIS Express then debug process auto attach and hits breakpoint accordingly. Now we run hosted application from IIS Web Server using above mentioned URL. To debug the application we follows following steps:
- Click Debug option in Visual Studio menu.
- Select ‘Attach to Process’ option from drop down pane as shown in following figure 13.
 Figure 13: Debug process option
 - We attach w3wp.exe process to debug application as shown in below figure. Make sure application build configuration set is Debug. Set the breakpoint in application and debug accordingly.
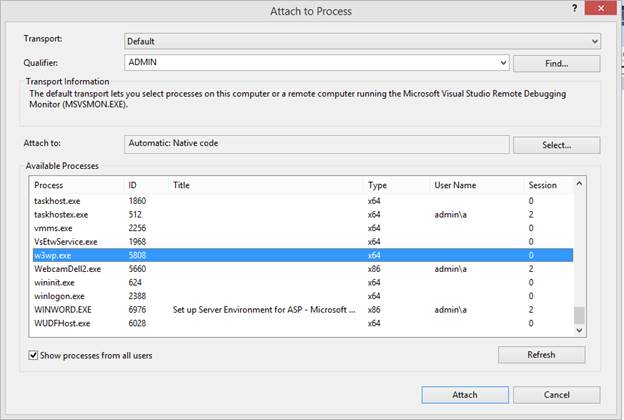 Figure 14: Attach Debug process