Microsoft Azure: Managing Nano Server with Server Management Tools
1. Introduction
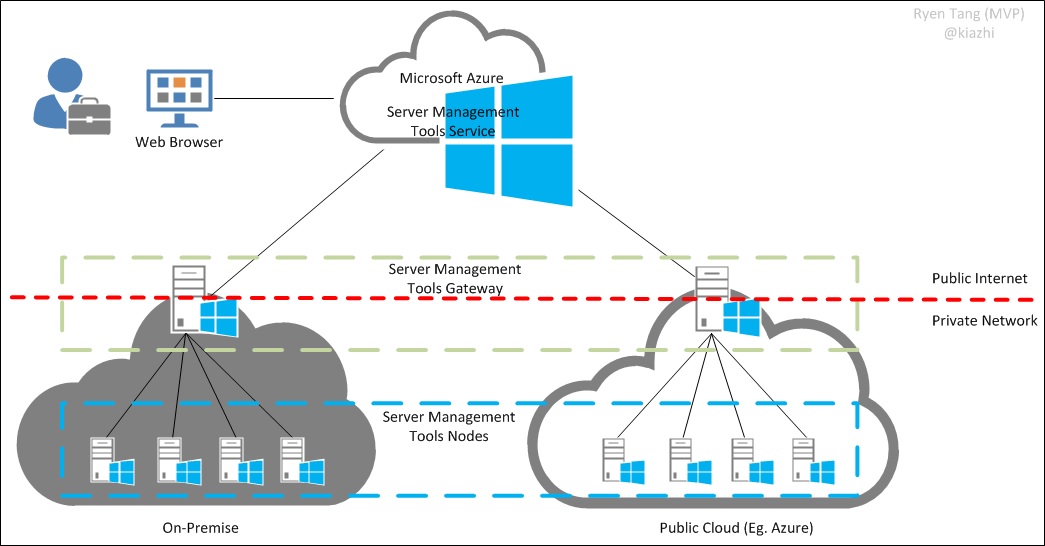
In this article with Server Management Tools Service from Azure is still in Preview, we will demonstrate on how to deploy an Azure Resource Manager network environment and an Azure Management Server (AZUMGTSVR01) in Azure to be the Server Management Tools Gateway server that will communicate with Server Management Tools Service from Microsoft Azure to get started with Server Management Tools. In order to demonstrate the functionalities of Server Management Tools, we will also deploy a Nano Server (NANOSERVER01) in Azure that will be managed by the Server Management Tools Service in Microsoft Azure to complete the demonstration.
As a proof of concept in managing any Windows Server or Nano Server hosted in a Public Cloud (Eg. Azure or maybe Amazon AWS) instead of On-Premise Datacenter, we will demonstrate how to deploy Server Management Tools Gateway in a Virtual Machine and manage those nodes located in the Public Cloud.
With that concept in mind and a high level diagram illustration below displaying on the possibilities of having Server Management Tools Gateway for On-Premise or Public Cloud environment tapping on Server Management Tools Service provided by Microsoft Azure, let us get started.
2. Requirements
In order to begin the deployment, we will requires the followings:
- Microsoft Azure Subscription
- Server Management Tools Gateway¹
- Azure Resource Group in the following Locations² (as of August 2016):
- Central US
- East US
- North Europe
- West Europe
¹ Once you added a Server to be a Server Management Tools Gateway, you will generate a package link to obtain the package to be installed on that server.
² Server Management Tools Service from Microsoft Azure are only available in those listed locations and may be only available in other locations at a later phase.
3. Getting Started with Server Management Tools in Azure
In this section, we will start off with how to deploy an Azure Resource Manager Resource Group and Virtual Network for our public cloud environment in the respective Server Management Tools available location.
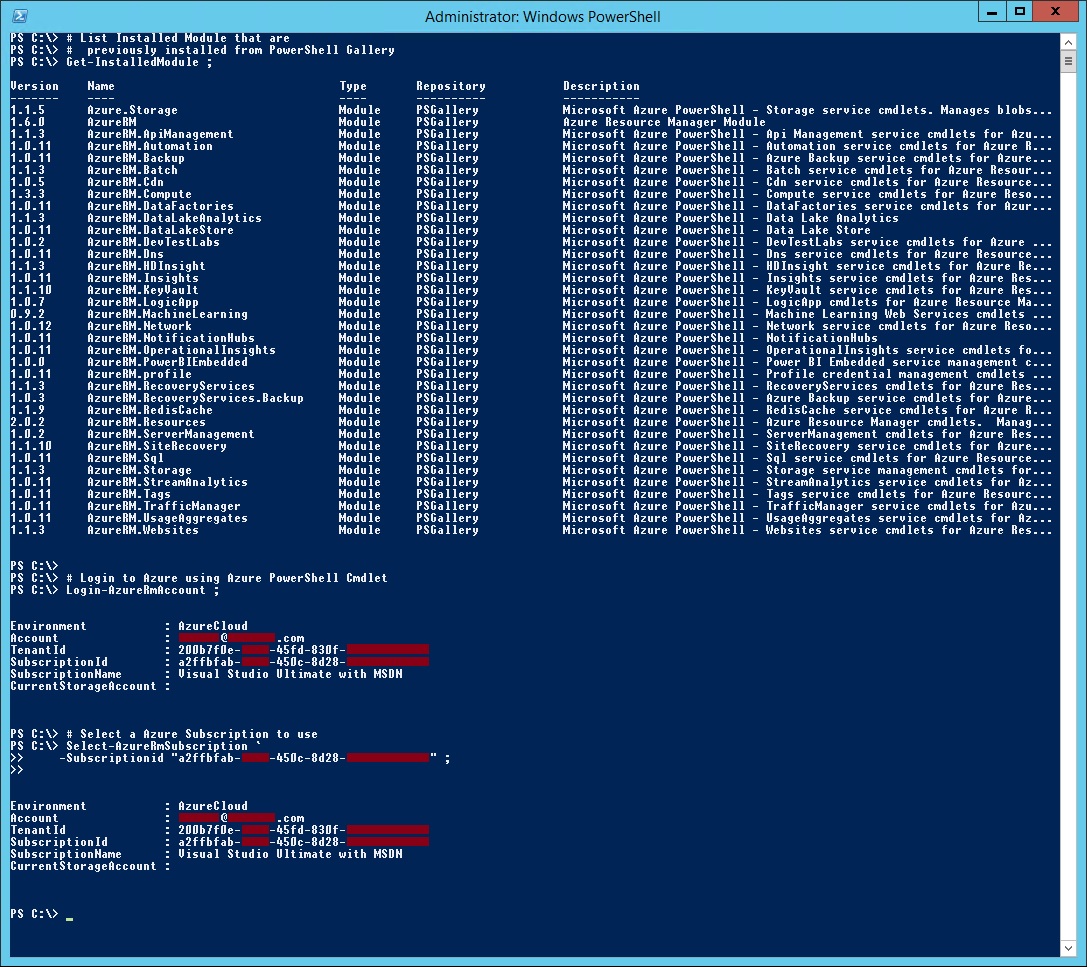
3.1. Login to Microsoft Azure using AzureRM PowerShell
In this section, we will begin our journey in deploying a virtual machine to be the Server Management Tools Gateway and a virtual machine to be the headless Nano Server that will be managed by the Server Management Tools Service in Azure. Therefore, let's start by logging into Microsoft Azure using AzureRM PowerShell.
# Login to Azure using Azure PowerShell Cmdlet
Login-AzureRmAccount ;
# Select a Azure Subscription to use
Select-AzureRmSubscription `
-Subscriptionid "GUID of subscription" ;
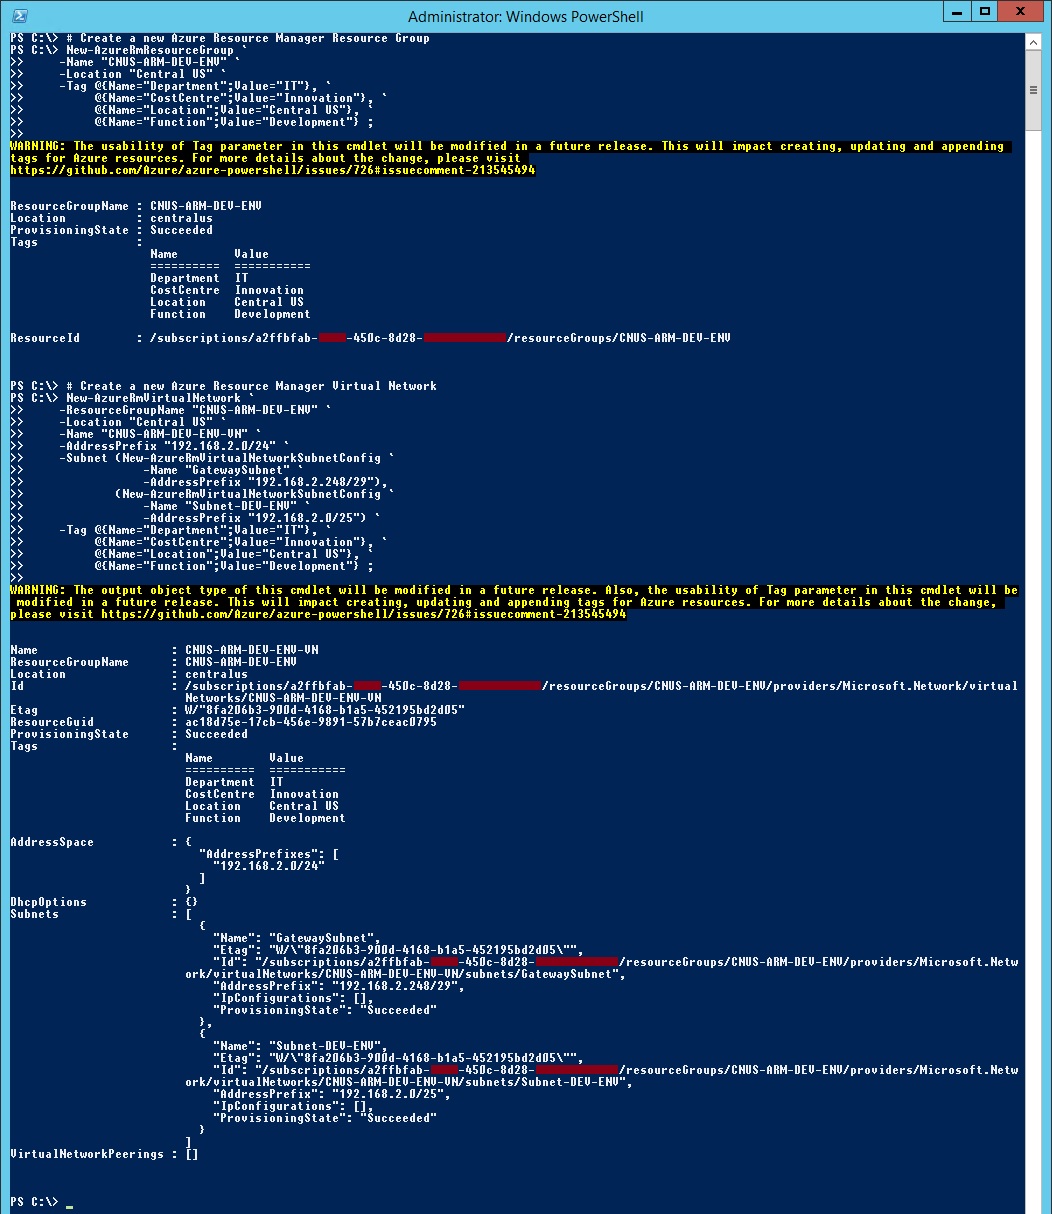
3.2. Create an Azure Resource Manager Resource Group
In this section, we will create a Resource Group located in Central US where Server Management Tools Service is available.
# Create a new Azure Resource Manager Resource Group
New-AzureRmResourceGroup `
-Name "CNUS-ARM-DEV-ENV" `
-Location "Central US" `
-Tag @{Name="Department";Value="IT"}, `
@{Name="CostCentre";Value="Innovation"}, `
@{Name="Location";Value="Central US"}, `
@{Name="Function";Value="Development"} ;
3.3. Create an Azure Resource Manager Virtual Network
Based on the Resource Group location that we previously created, we will create a Virtual Network located in Central US where Server Management Tools Service is available.
# Create a new Azure Resource Manager Virtual Network
New-AzureRmVirtualNetwork `
-ResourceGroupName "CNUS-ARM-DEV-ENV" `
-Location "Central US" `
-Name "CNUS-ARM-DEV-ENV-VN" `
-AddressPrefix "192.168.2.0/24" `
-Subnet (New-AzureRmVirtualNetworkSubnetConfig `
-Name "GatewaySubnet" `
-AddressPrefix "192.168.2.248/29"),
(New-AzureRmVirtualNetworkSubnetConfig `
-Name "Subnet-DEV-ENV" `
-AddressPrefix "192.168.2.0/25") `
-Tag @{Name="Department";Value="IT"}, `
@{Name="CostCentre";Value="Innovation"}, `
@{Name="Location";Value="Central US"}, `
@{Name="Function";Value="Development"} ;
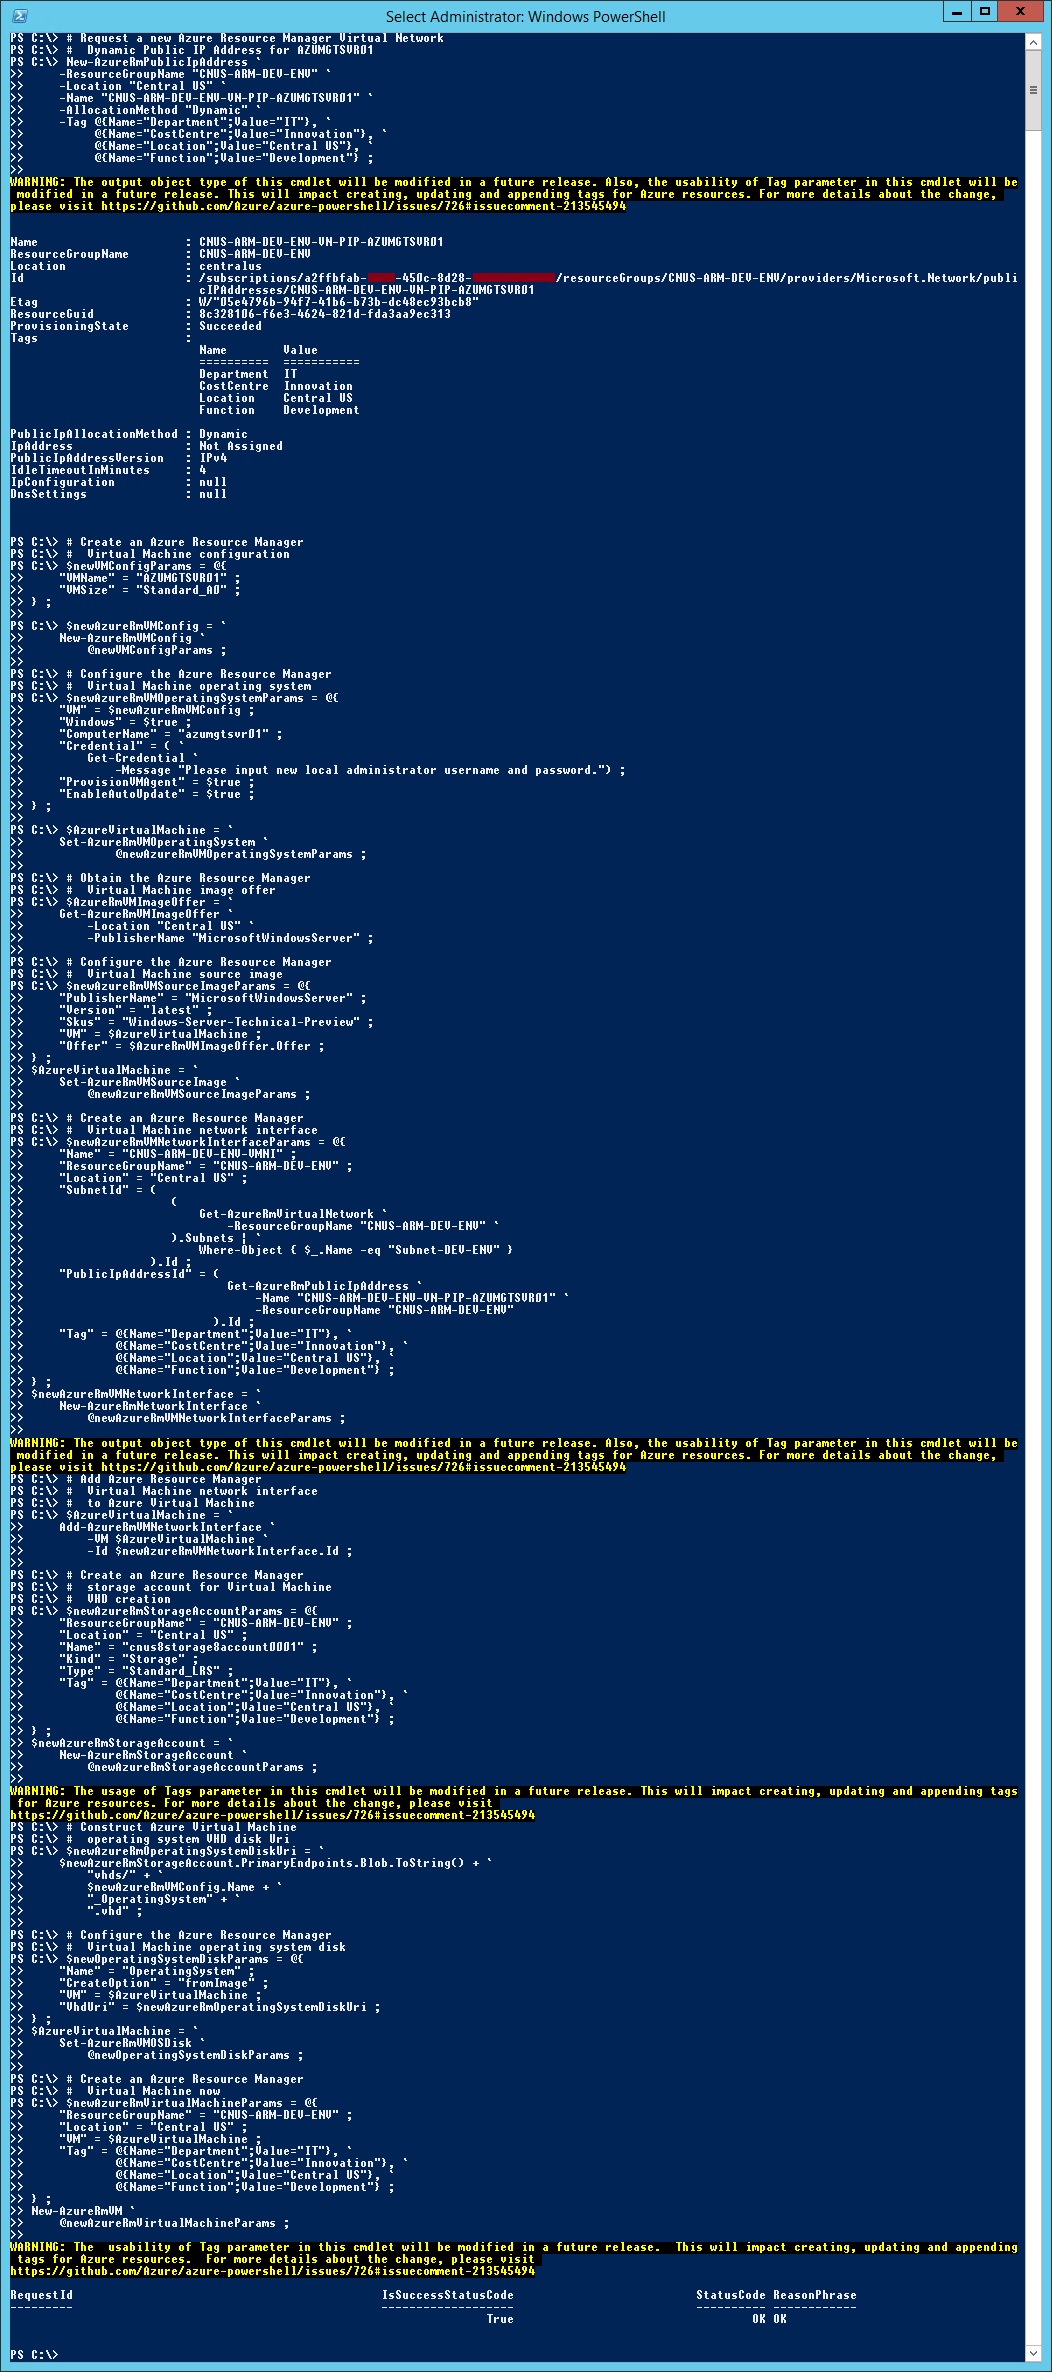
3.4. Create a Server Management Tools Server in Azure
Now that we have our Resource Group and Virtual Network created in Central US, we will request a Public IP Address for our Azure Management Server (AZUMGTSVR01) that will be the Server Management Tools Gateway server that will communicate with Server Management Tools Service in Azure.
# Request a new Azure Resource Manager Virtual Network
# Dynamic Public IP Address for AZUMGTSVR01
New-AzureRmPublicIpAddress `
-ResourceGroupName "CNUS-ARM-DEV-ENV" `
-Location "Central US" `
-Name "CNUS-ARM-DEV-ENV-VN-PIP-AZUMGTSVR01" `
-AllocationMethod "Dynamic" `
-Tag @{Name="Department";Value="IT"}, `
@{Name="CostCentre";Value="Innovation"}, `
@{Name="Location";Value="Central US"}, `
@{Name="Function";Value="Development"} ;
# Create an Azure Resource Manager
# Virtual Machine configuration
$newVMConfigParams = @{
"VMName" = "AZUMGTSVR01" ;
"VMSize" = "Standard_A0" ;
} ;
$newAzureRmVMConfig = `
New-AzureRmVMConfig `
@newVMConfigParams ;
# Configure the Azure Resource Manager
# Virtual Machine operating system
$newAzureRmVMOperatingSystemParams = @{
"VM" = $newAzureRmVMConfig ;
"Windows" = $true ;
"ComputerName" = "azumgtsvr01" ;
"Credential" = ( `
Get-Credential `
-Message "Please input new local administrator username and password.") ;
"ProvisionVMAgent" = $true ;
"EnableAutoUpdate" = $true ;
} ;
$AzureVirtualMachine = `
Set-AzureRmVMOperatingSystem `
@newAzureRmVMOperatingSystemParams ;
# Obtain the Azure Resource Manager
# Virtual Machine image offer
$AzureRmVMImageOffer = `
Get-AzureRmVMImageOffer `
-Location "Central US" `
-PublisherName "MicrosoftWindowsServer" ;
# Configure the Azure Resource Manager
# Virtual Machine source image
$newAzureRmVMSourceImageParams = @{
"PublisherName" = "MicrosoftWindowsServer" ;
"Version" = "latest" ;
"Skus" = "Windows-Server-Technical-Preview" ;
"VM" = $AzureVirtualMachine ;
"Offer" = $AzureRmVMImageOffer.Offer ;
} ;
$AzureVirtualMachine = `
Set-AzureRmVMSourceImage `
@newAzureRmVMSourceImageParams ;
# Create an Azure Resource Manager
# Virtual Machine network interface
$newAzureRmVMNetworkInterfaceParams = @{
"Name" = "CNUS-ARM-DEV-ENV-VMNI" ;
"ResourceGroupName" = "CNUS-ARM-DEV-ENV" ;
"Location" = "Central US" ;
"SubnetId" = (
(
Get-AzureRmVirtualNetwork `
-ResourceGroupName "CNUS-ARM-DEV-ENV" `
).Subnets | `
Where-Object { $_.Name -eq "Subnet-DEV-ENV" }
).Id ;
"PublicIpAddressId" = (
Get-AzureRmPublicIpAddress `
-Name "CNUS-ARM-DEV-ENV-VN-PIP-AZUMGTSVR01" `
-ResourceGroupName "CNUS-ARM-DEV-ENV"
).Id ;
"Tag" = @{Name="Department";Value="IT"}, `
@{Name="CostCentre";Value="Innovation"}, `
@{Name="Location";Value="Central US"}, `
@{Name="Function";Value="Development"} ;
} ;
$newAzureRmVMNetworkInterface = `
New-AzureRmNetworkInterface `
@newAzureRmVMNetworkInterfaceParams ;
# Add Azure Resource Manager
# Virtual Machine network interface
# to Azure Virtual Machine
$AzureVirtualMachine = `
Add-AzureRmVMNetworkInterface `
-VM $AzureVirtualMachine `
-Id $newAzureRmVMNetworkInterface.Id ;
# Create an Azure Resource Manager
# storage account for Virtual Machine
# VHD creation
$newAzureRmStorageAccountParams = @{
"ResourceGroupName" = "CNUS-ARM-DEV-ENV" ;
"Location" = "Central US" ;
"Name" = "cnus8storage8account0001" ;
"Kind" = "Storage" ;
"Type" = "Standard_LRS" ;
"Tag" = @{Name="Department";Value="IT"}, `
@{Name="CostCentre";Value="Innovation"}, `
@{Name="Location";Value="Central US"}, `
@{Name="Function";Value="Development"} ;
} ;
$newAzureRmStorageAccount = `
New-AzureRmStorageAccount `
@newAzureRmStorageAccountParams ;
# Construct Azure Virtual Machine
# operating system VHD disk Uri
$newAzureRmOperatingSystemDiskUri = `
$newAzureRmStorageAccount.PrimaryEndpoints.Blob.ToString() + `
"vhds/" + `
$newAzureRmVMConfig.Name + `
"_OperatingSystem" + `
".vhd" ;
# Configure the Azure Resource Manager
# Virtual Machine operating system disk
$newOperatingSystemDiskParams = @{
"Name" = "OperatingSystem" ;
"CreateOption" = "fromImage" ;
"VM" = $AzureVirtualMachine ;
"VhdUri" = $newAzureRmOperatingSystemDiskUri ;
} ;
$AzureVirtualMachine = `
Set-AzureRmVMOSDisk `
@newOperatingSystemDiskParams ;
# Create an Azure Resource Manager
# Virtual Machine now
$newAzureRmVirtualMachineParams = @{
"ResourceGroupName" = "CNUS-ARM-DEV-ENV" ;
"Location" = "Central US" ;
"VM" = $AzureVirtualMachine ;
"Tag" = @{Name="Department";Value="IT"}, `
@{Name="CostCentre";Value="Innovation"}, `
@{Name="Location";Value="Central US"}, `
@{Name="Function";Value="Development"} ;
} ;
New-AzureRmVM `
@newAzureRmVirtualMachineParams ;
3.5. Create a Nano Server in Azure
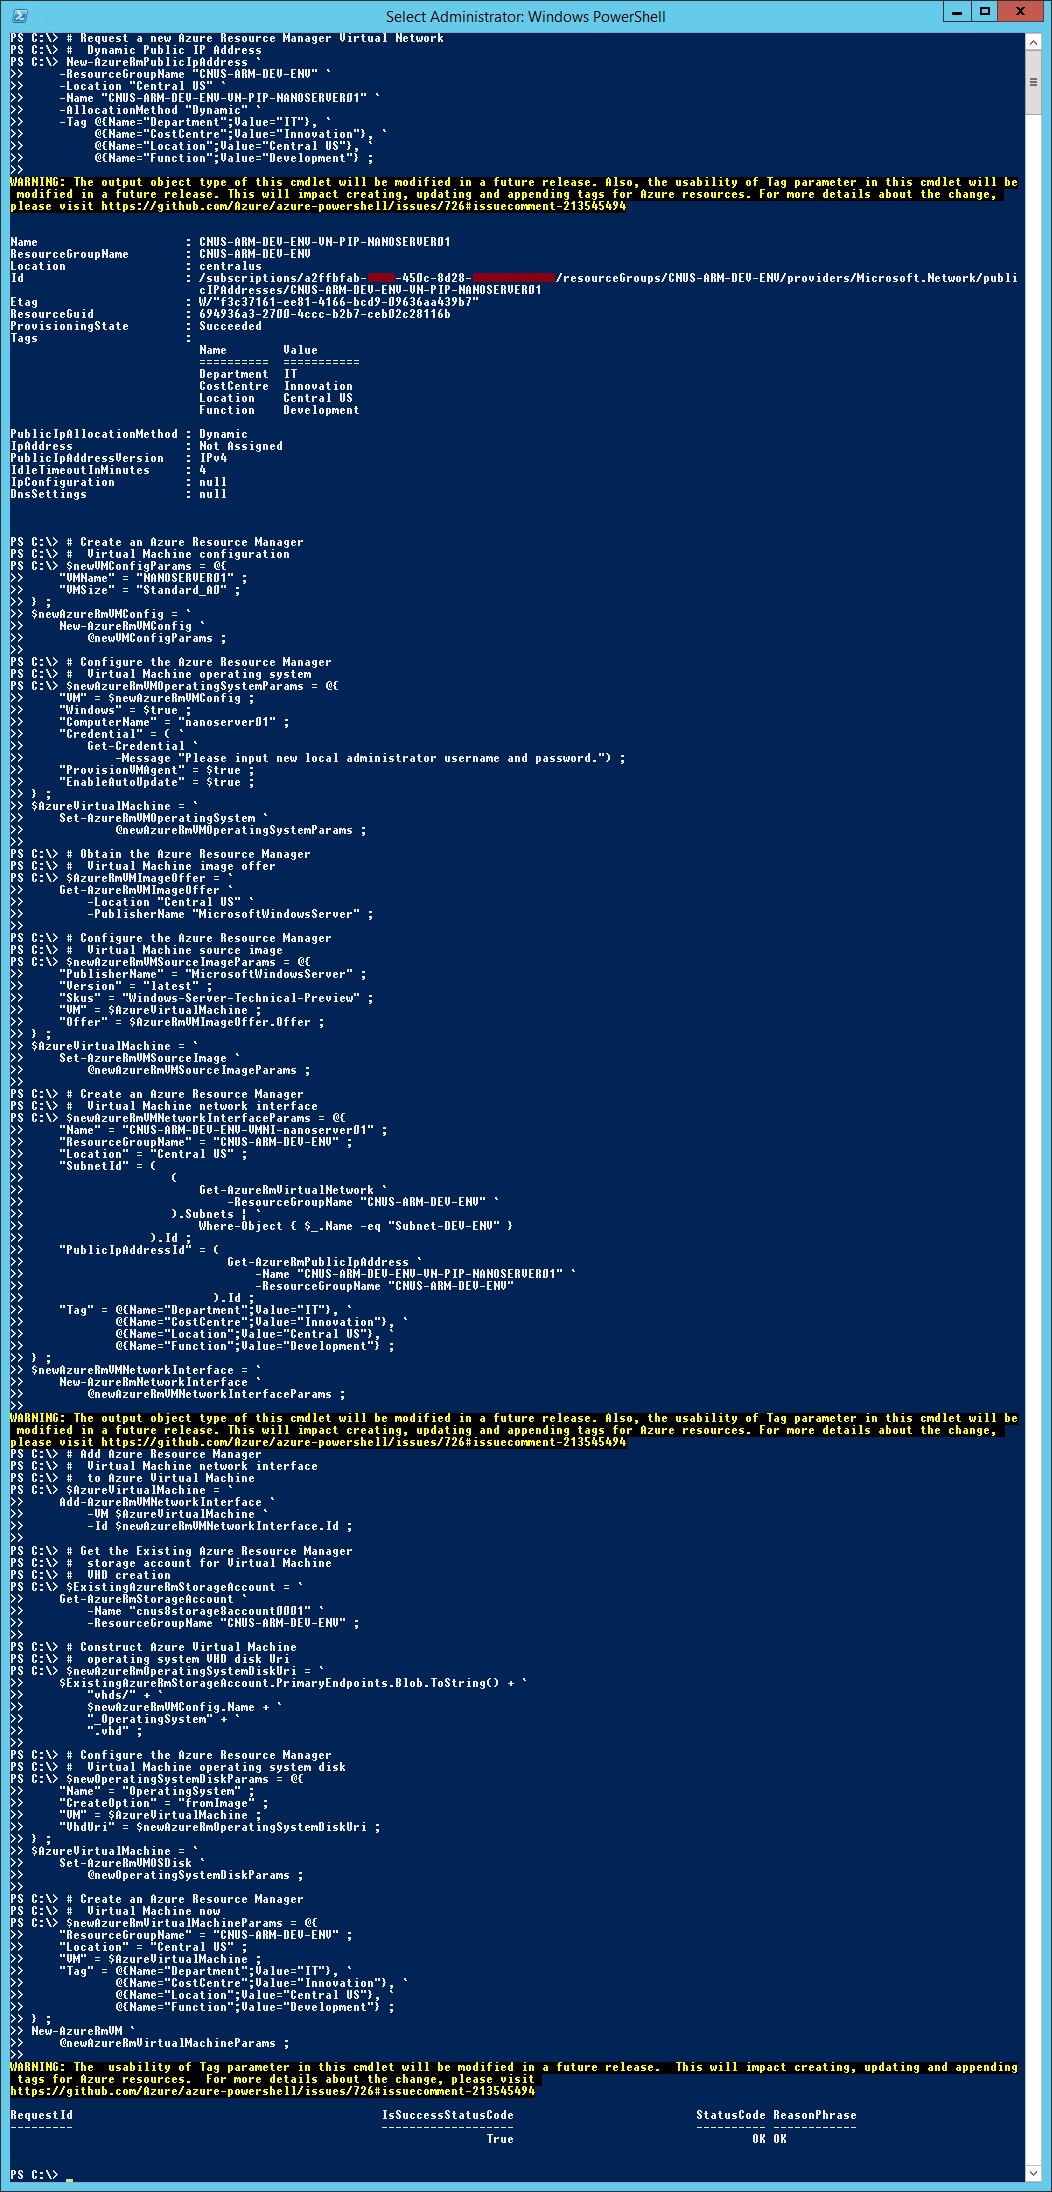
Before we start with Server Management Tools setup process, we need to have some servers to be in the environment that will be managed and therefore we will deploy a headless Nano Server into Azure.
# Request a new Azure Resource Manager Virtual Network
# Dynamic Public IP Address
New-AzureRmPublicIpAddress `
-ResourceGroupName "CNUS-ARM-DEV-ENV" `
-Location "Central US" `
-Name "CNUS-ARM-DEV-ENV-VN-PIP-NANOSERVER01" `
-AllocationMethod "Dynamic" `
-Tag @{Name="Department";Value="IT"}, `
@{Name="CostCentre";Value="Innovation"}, `
@{Name="Location";Value="Central US"}, `
@{Name="Function";Value="Development"} ;
# Create an Azure Resource Manager
# Virtual Machine configuration
$newVMConfigParams = @{
"VMName" = "NANOSERVER01" ;
"VMSize" = "Standard_A0" ;
} ;
$newAzureRmVMConfig = `
New-AzureRmVMConfig `
@newVMConfigParams ;
# Configure the Azure Resource Manager
# Virtual Machine operating system
$newAzureRmVMOperatingSystemParams = @{
"VM" = $newAzureRmVMConfig ;
"Windows" = $true ;
"ComputerName" = "nanoserver01" ;
"Credential" = ( `
Get-Credential `
-Message "Please input new local administrator username and password.") ;
"ProvisionVMAgent" = $true ;
"EnableAutoUpdate" = $true ;
} ;
$AzureVirtualMachine = `
Set-AzureRmVMOperatingSystem `
@newAzureRmVMOperatingSystemParams ;
# Obtain the Azure Resource Manager
# Virtual Machine image offer
$AzureRmVMImageOffer = `
Get-AzureRmVMImageOffer `
-Location "Central US" `
-PublisherName "MicrosoftWindowsServer" ;
# Configure the Azure Resource Manager
# Virtual Machine source image
$newAzureRmVMSourceImageParams = @{
"PublisherName" = "MicrosoftWindowsServer" ;
"Version" = "latest" ;
"Skus" = "Windows-Server-Technical-Preview" ;
"VM" = $AzureVirtualMachine ;
"Offer" = $AzureRmVMImageOffer.Offer ;
} ;
$AzureVirtualMachine = `
Set-AzureRmVMSourceImage `
@newAzureRmVMSourceImageParams ;
# Create an Azure Resource Manager
# Virtual Machine network interface
$newAzureRmVMNetworkInterfaceParams = @{
"Name" = "CNUS-ARM-DEV-ENV-VMNI-nanoserver01" ;
"ResourceGroupName" = "CNUS-ARM-DEV-ENV" ;
"Location" = "Central US" ;
"SubnetId" = (
(
Get-AzureRmVirtualNetwork `
-ResourceGroupName "CNUS-ARM-DEV-ENV" `
).Subnets | `
Where-Object { $_.Name -eq "Subnet-DEV-ENV" }
).Id ;
"PublicIpAddressId" = (
Get-AzureRmPublicIpAddress `
-Name "CNUS-ARM-DEV-ENV-VN-PIP-NANOSERVER01" `
-ResourceGroupName "CNUS-ARM-DEV-ENV"
).Id ;
"Tag" = @{Name="Department";Value="IT"}, `
@{Name="CostCentre";Value="Innovation"}, `
@{Name="Location";Value="Central US"}, `
@{Name="Function";Value="Development"} ;
} ;
$newAzureRmVMNetworkInterface = `
New-AzureRmNetworkInterface `
@newAzureRmVMNetworkInterfaceParams ;
# Add Azure Resource Manager
# Virtual Machine network interface
# to Azure Virtual Machine
$AzureVirtualMachine = `
Add-AzureRmVMNetworkInterface `
-VM $AzureVirtualMachine `
-Id $newAzureRmVMNetworkInterface.Id ;
# Get the Existing Azure Resource Manager
# storage account for Virtual Machine
# VHD creation
$ExistingAzureRmStorageAccount = `
Get-AzureRmStorageAccount `
-Name "cnus8storage8account0001" `
-ResourceGroupName "CNUS-ARM-DEV-ENV" ;
# Construct Azure Virtual Machine
# operating system VHD disk Uri
$newAzureRmOperatingSystemDiskUri = `
$ExistingAzureRmStorageAccount.PrimaryEndpoints.Blob.ToString() + `
"vhds/" + `
$newAzureRmVMConfig.Name + `
"_OperatingSystem" + `
".vhd" ;
# Configure the Azure Resource Manager
# Virtual Machine operating system disk
$newOperatingSystemDiskParams = @{
"Name" = "OperatingSystem" ;
"CreateOption" = "fromImage" ;
"VM" = $AzureVirtualMachine ;
"VhdUri" = $newAzureRmOperatingSystemDiskUri ;
} ;
$AzureVirtualMachine = `
Set-AzureRmVMOSDisk `
@newOperatingSystemDiskParams ;
# Create an Azure Resource Manager
# Virtual Machine now
$newAzureRmVirtualMachineParams = @{
"ResourceGroupName" = "CNUS-ARM-DEV-ENV" ;
"Location" = "Central US" ;
"VM" = $AzureVirtualMachine ;
"Tag" = @{Name="Department";Value="IT"}, `
@{Name="CostCentre";Value="Innovation"}, `
@{Name="Location";Value="Central US"}, `
@{Name="Function";Value="Development"} ;
} ;
New-AzureRmVM `
@newAzureRmVirtualMachineParams ;
3.6. Create a Server Management Tools Gateway in Azure
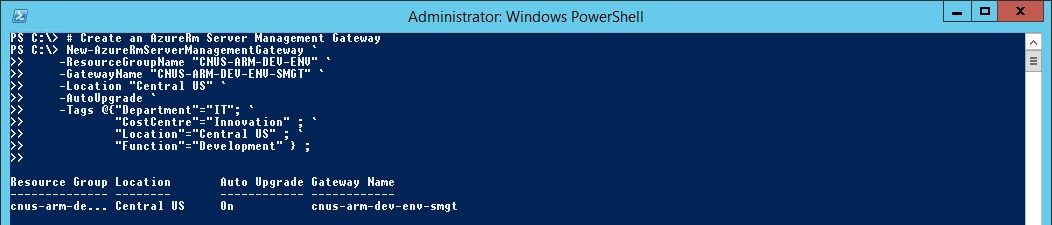
With the Management Server and Nano Server deployed in Azure, we can start the Server Management Tools setup process by configuring the Management Server in Azure to be the Server Management Tools Gateway server.
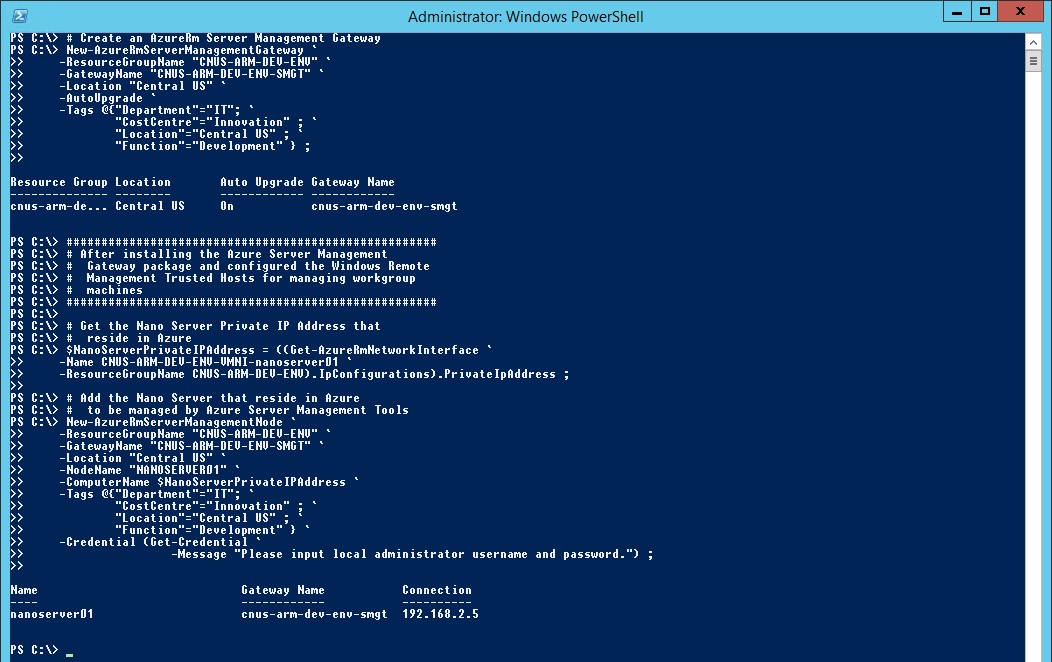
# Create an AzureRm Server Management Gateway
New-AzureRmServerManagementGateway `
-ResourceGroupName "CNUS-ARM-DEV-ENV" `
-GatewayName "CNUS-ARM-DEV-ENV-SMTG" `
-Location "Central US" `
-AutoUpgrade `
-Tags @{"Department"="IT"; `
"CostCentre"="Innovation" ; `
"Location"="Central US" ; `
"Function"="Development" } ;
3.7. Generate and Download Server Management Tools Gateway package
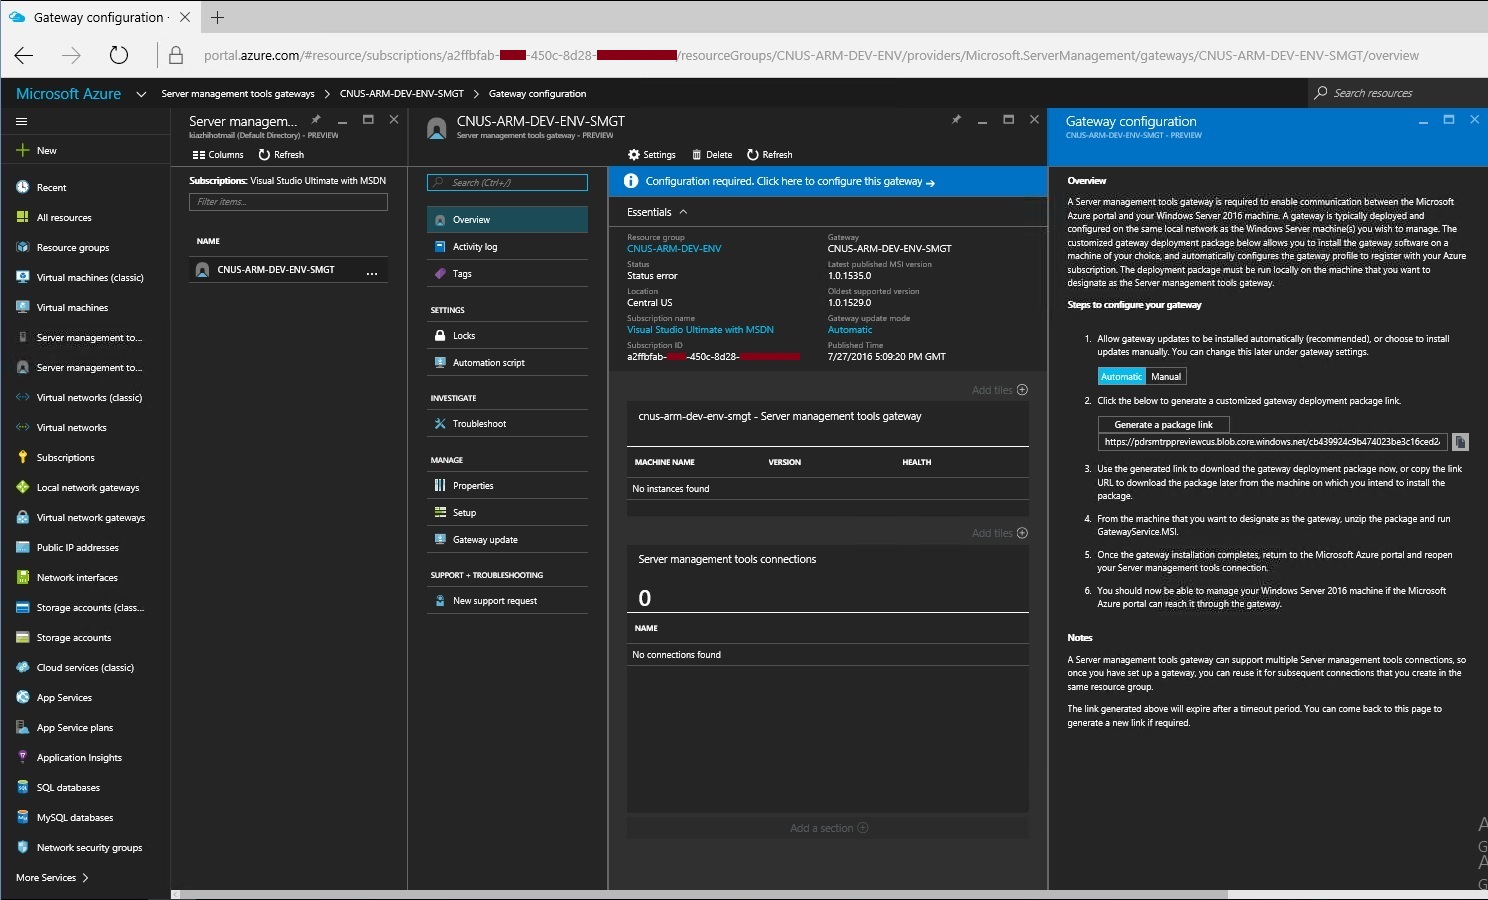
Once you have executed New-AzureRmServerManagementGateway AzureRM PowerShell Command, you can validate the setup in the Azure Portal using your web browser and obtain the Server Management Tools Gateway package for the installation in the Management Server.
- Login to Microsoft Azure Portal
- Select Server Management Tools Gateway
- Select the Server Management Gateway Name
- Select Overview
- Select Generate a package link
- Copy the URL
Once you have copied the URL, you will have to establish Remote Desktop Connection to the Management Server and download the package for installation. In the example below, we will launch PowerShell Console with Elevated Privileges to initiate the download, uncompress the package and start the Server Management Tools Gateway installation using PowerShell commands.
# Create a Temp folder
New-Item `
-Path "C:\Temp" `
-Type directory ;
# Download the Compressed Server Management
# Gateway Deployment Package
Invoke-WebRequest `
-Uri "<# Input copied Server Management Tools Gateway package URL #>"`
-OutFile "C:\Temp\gateway.cnus-arm-dev-env-smgt.zip" ;
# Extract Compressed Server Management
# Gateway Deployment Package
Add-Type -Assembly “System.IO.Compression.FileSystem” ;
[IO.Compression.ZipFile]::ExtractToDirectory("C:\Temp\gateway.cnus-arm-dev-env-smgt.zip", "C:\Temp\Server-Management-Gateway") ;
# Install Server Management Gateway
# Deployment Package
Start-Process `
-FilePath "C:\Temp\Server-Management-Gateway\GatewayService.msi" `
-ArgumentList "/l*v C:\Temp\install_GatewayService.log" ;
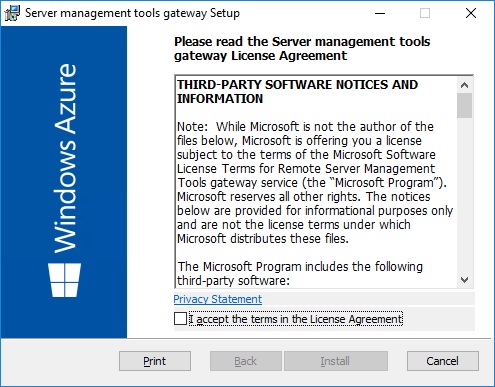
With those commands executed, the Server Management Tools Gateway Setup will prompt on the screen where you will have to accept the terms in the License Agreement and select the Install button.
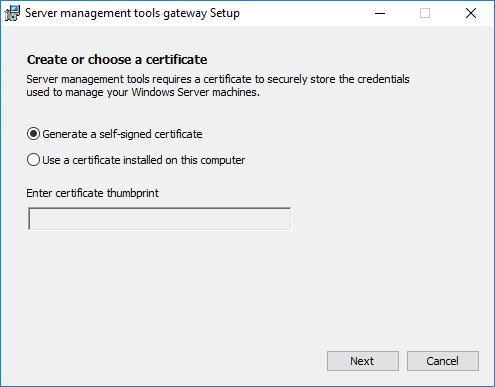
Next, Server Management Tools Gateway Setup will request for a Server Certificate that it will use to establish a secure connection with the Server Management Tools Service in Azure. For this demonstration, we will be generating a self-signed certificate because we do not have a certificate authority that is available to issue a Server Certificate for the Management Server.
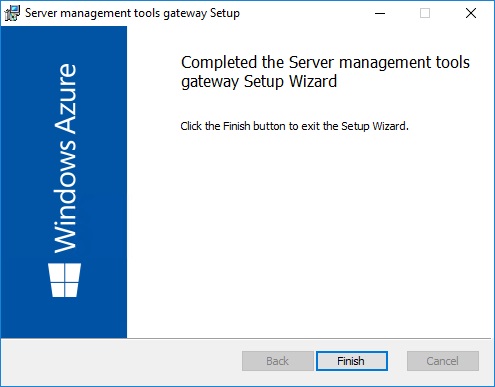
Finally, you will have to select the Finish button to exit out of the Server Management Tools Gateway Setup prompt.
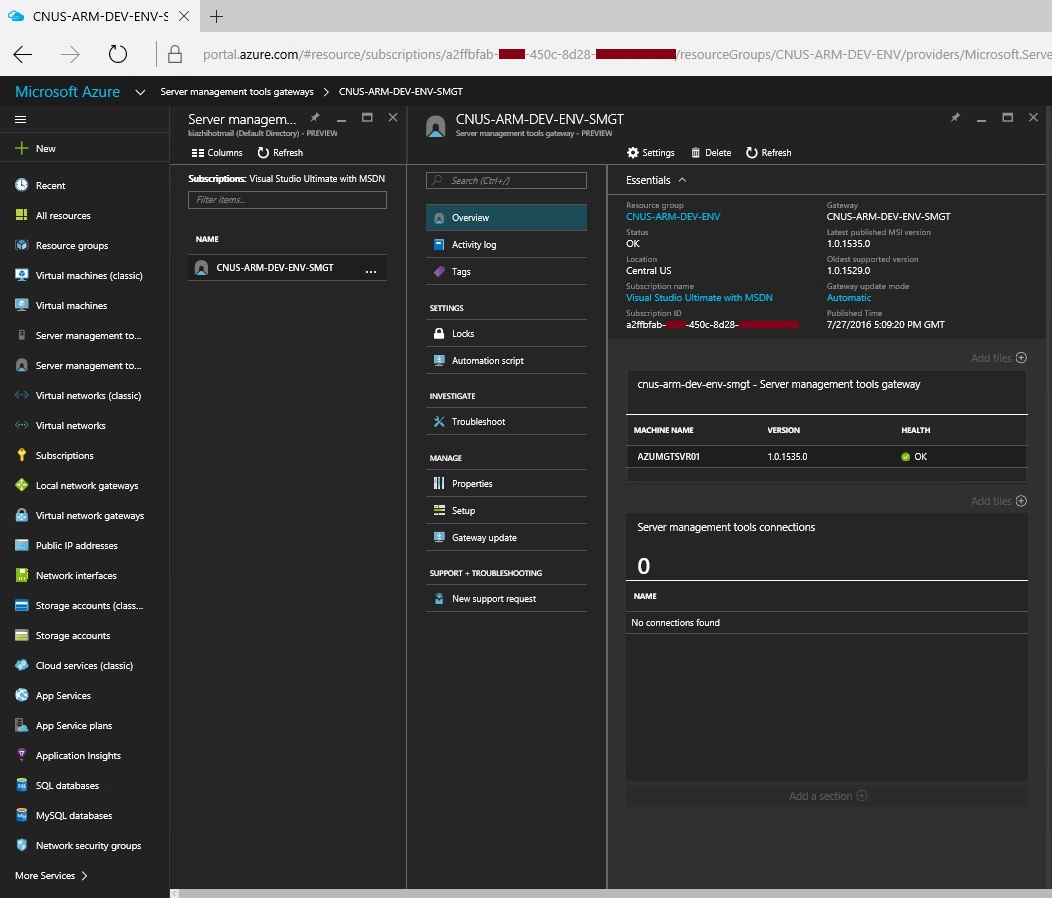
Once that is done, we can launch the web browser, navigate back to the Server Management Tools Gateway Overview blade page and view the health state. If the configuration are all correct and communication is properly established, you should at least view a green icon with a OK on the Health column.
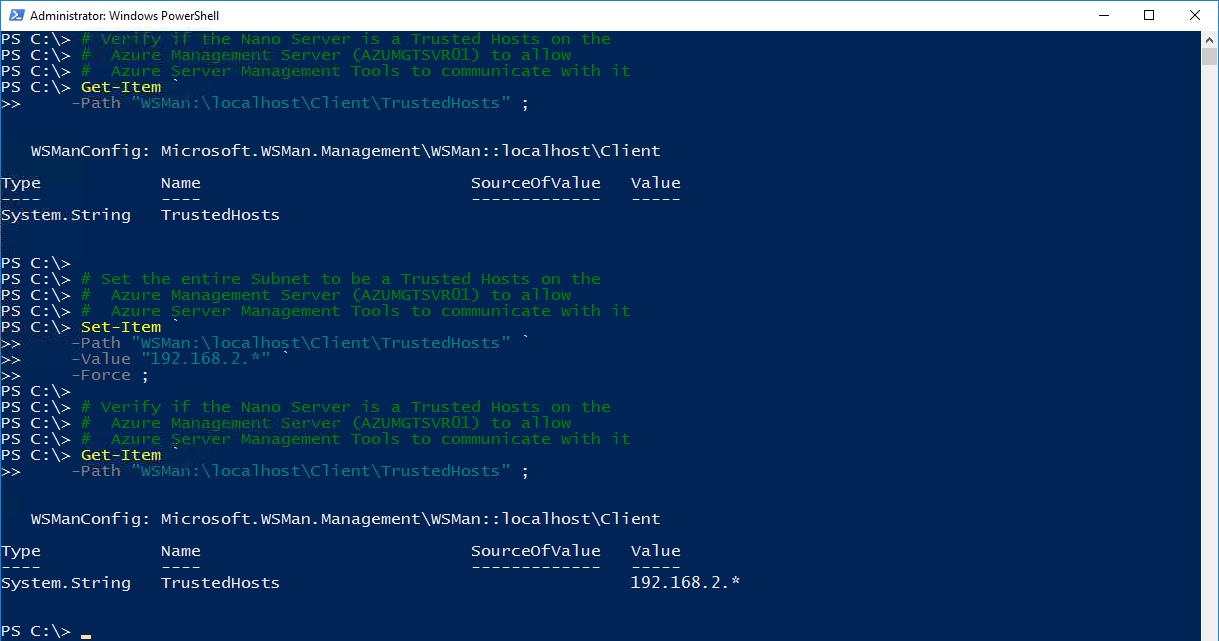
3.8. Adding Non-Domain or Workgroup Subnet to WinRM Trusted Hosts
In this section, we will demonstrate on how we can have the Server Management Tools Gateway communicates with all the servers that are non-domain joined or workgroup and still have them managed by the Server Management Tools Service in Azure. If all your servers in the environment are domain joined, you can skip this section.
# Verify if the Nano Server is a Trusted Hosts on the
# Azure Management Server (AZUMGTSVR01) to allow
# Azure Server Management Tools to communicate with it
Get-Item `
-Path "WSMan:\localhost\Client\TrustedHosts" ;
# Set the entire Subnet to be a Trusted Hosts on the
# Azure Management Server (AZUMGTSVR01) to allow
# Azure Server Management Tools to communicate with it
Set-Item `
-Path "WSMan:\localhost\Client\TrustedHosts" `
-Value "192.168.2.*" `
-Force ;
# Verify if the Nano Server is a Trusted Hosts on the
# Azure Management Server (AZUMGTSVR01) to allow
# Azure Server Management Tools to communicate with it
Get-Item `
-Path "WSMan:\localhost\Client\TrustedHosts" ;
3.9. Add a Server to Server Management Tools Nodes in Azure
Once we have the Server Management Tools Gateway setup properly, we can starting adding any servers that is in the environment into the Server Management Tools Service to have them managed as Server Management Tools Nodes.
# Get the Nano Server Private IP Address that
# reside in Azure
$NanoServerPrivateIPAddress = ((Get-AzureRmNetworkInterface `
-Name CNUS-ARM-DEV-ENV-VMNI-nanoserver01 `
-ResourceGroupName CNUS-ARM-DEV-ENV).IpConfigurations).PrivateIpAddress ;
# Add the Nano Server that reside in Azure
# to be managed by Azure Server Management Tools
New-AzureRmServerManagementNode `
-ResourceGroupName "CNUS-ARM-DEV-ENV" `
-GatewayName "CNUS-ARM-DEV-ENV-SMGT" `
-Location "Central US" `
-NodeName "NANOSERVER01" `
-ComputerName $NanoServerPrivateIPAddress `
-Tags @{"Department"="IT"; `
"CostCentre"="Innovation" ; `
"Location"="Central US" ; `
"Function"="Development" } `
-Credential (Get-Credential `
-Message "Please input local administrator username and password.") ;
3.10. Configure the Administrative Credential for the Node
After we have added the Nano Server to be managed in the Server Management Tools, we will have to return back to the Azure Portal and input the Administrative Credential that the Server Management Tools will utilize to manage the node.
- Login to Microsoft Azure Portal
- Select Server Management Tools Connections
- Select the Server Management Tools Connections Name
- Select Overview
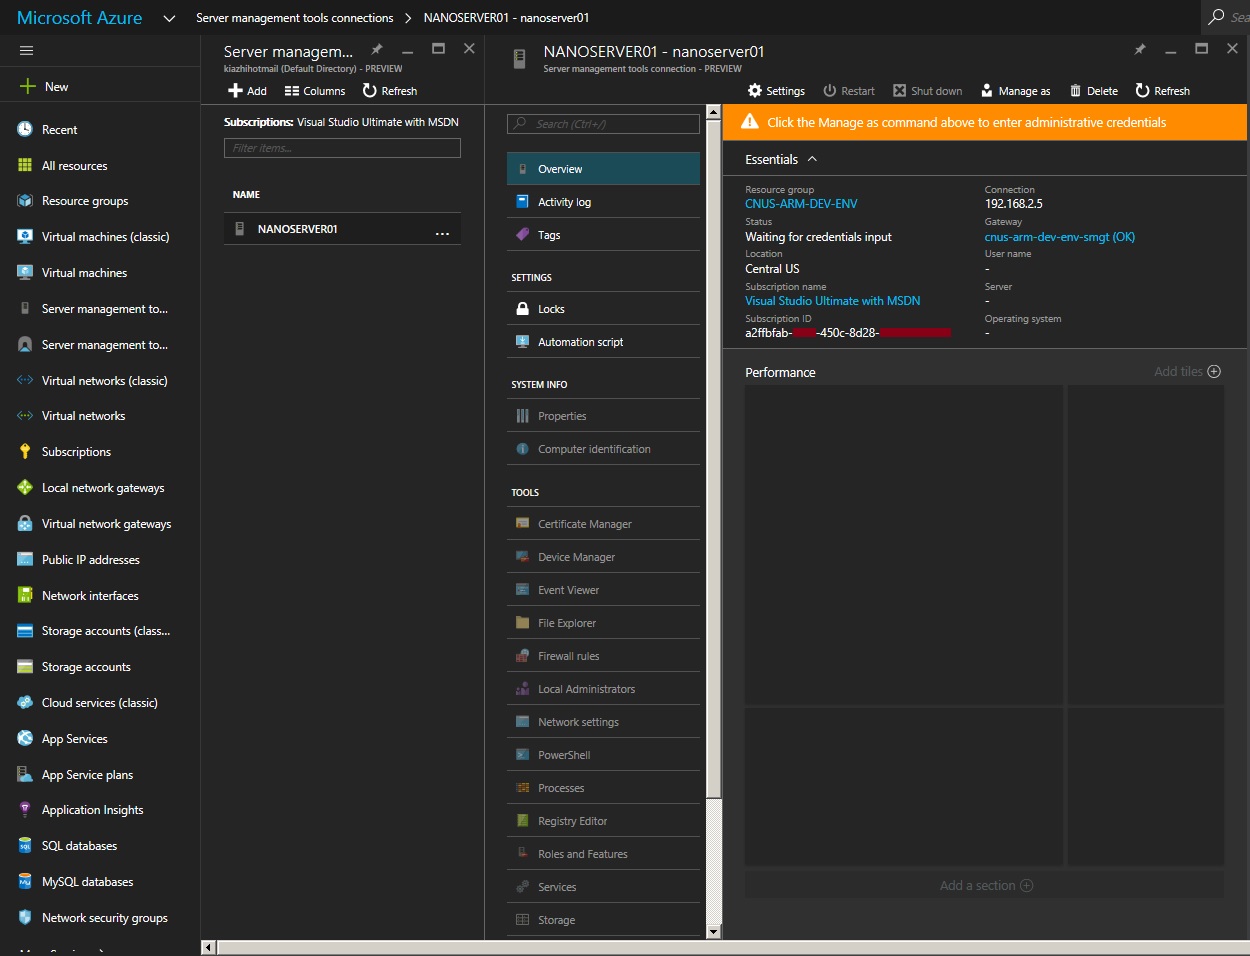
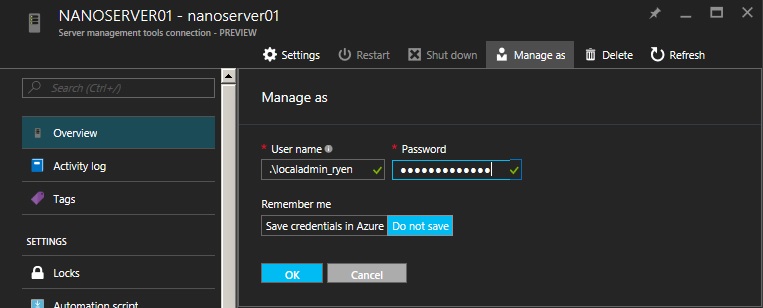
- Select Manage as
- Input the Local Administrator Username
- Input the Local Administrator Password
- Select OK
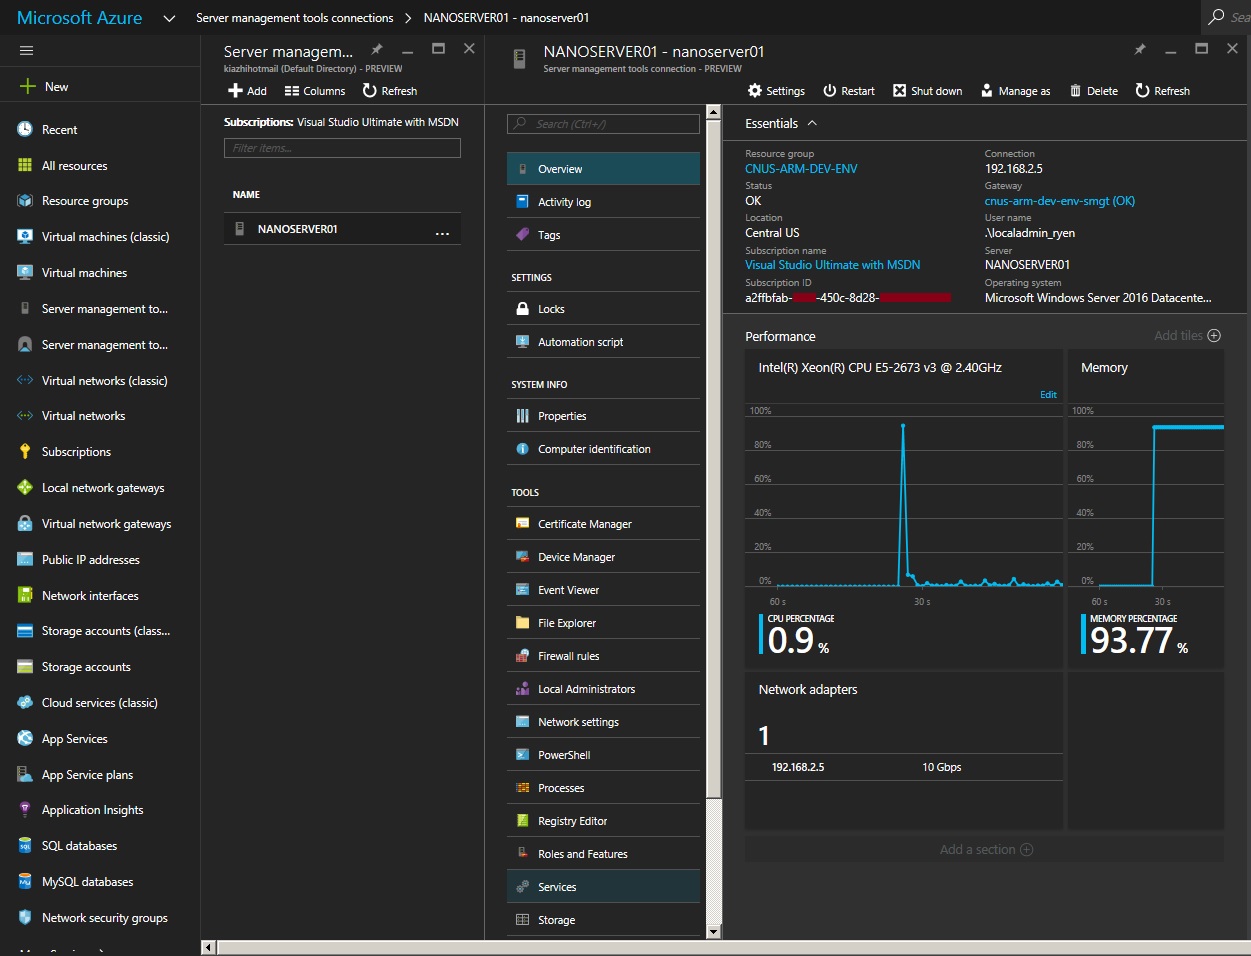
After the Manage as Administrative Credential have been provided, you will notice that the Status will be at a Connecting state and eventually reach the OK state if your credential is correct. Viola! Immediately, you will start to see the CPU Processor and Memory metric tiles responding live on the browser.
4. Conclusion
What is actually intriguing about the development of Server Management Tools Service in Microsoft Azure is the fact that it provides so much functionalities in managing servers remotely through the web browser. With the future of headless Nano Server, this Server Management Tools Service in Microsoft Azure will be a great tool set for any administrators to dream for. Not forgetting that it also has the capability to allow administrator to execute PowerShell commands remotely to the server from the web browser.
Below is a list of the available tools that any administrator can perform through the Server Management Tools Service offered from Microsoft Azure:
- Certificate Manager
- Device Manager
- Event Viewer
- File Explorer
- Firewall Rules
- Local Administrators
- Network Settings
- PowerShell
- Processes
- Registry Editor
- Roles and Features
- Services
- Storage
- Windows Update

5. Reference
- Microsoft Blogs - Introducing Server management tools by Kriti Jindal
- Microsoft MSDN Channel9 - Remote Server Management Tools on Nano Server
- Microsoft MSDN - New-AzureRmServerManagementNode
- Microsoft MSDN - New-AzureRmServerManagementGateway
6. See Also
- Nano Server Survival Guide by Ryen Tang
- Microsoft Azure: Deploying Windows Server 2016 Nano Server by Ryen Tang
- Windows Nano Server: Virtualization with VMware vSphere by Ryen Tang
- Nano Server: Getting Started with Image Builder by Ryen Tang
- Nano Server: Using New-NanoServerImage with Show-Command to deploy Nano Server by Ryen Tang
- Nano Server: Viewing Application, Security and System Event Logs using WMI by Ryen Tang
- Nano Server: Deploying an Internet Information Services (IIS) Web Server by Ryen Tang
- Nano Server: Deploying ASP.NET 5 site on Internet Information Services (IIS) Web Server by Ryen Tang
- Nano Server: Deploying PHP 7.0.6 on Internet Information Services (IIS) Web Server by Ryen Tang
- Nano Server: Deploying MySQL Database Server by Ryen Tang
- Nano Server: Deploying Python 3.x interpreter by Ryen Tang
- Nano Server: Getting Started in Container with Docker by Ryen Tang