Azure Functions: Getting Started
A few months back the Azure team announced a new service offering known as Azure functions, which we are going to see in this article. (As of writing this post, Azure functions are publicly available)
Introduction to Azure Functions
Before understating Azure functions, let’s first understand the concept of ‘Event driven programming’. It is exactly what it sounds like, i.e. in a nutshell, writing a piece of code which will be executed whenever any particular event occurs.
Quick example of this could be, for folks who have worked on SharePoint technologies or with server object model can relate it very easily to concept of the SP event receivers where, whenever an item is added, updated or deleted in any SharePoint list then you have Item Added, Adding, Updated, Updating or Deleted, Deleting events to respond to.
Similarly, Azure functions is a concept where you will write a piece of code which will be responding to events originated either from Azure or from other external sources and the code itself will be executed on the cloud. Sounds like a game change isn’t it? But wait, if you have ever worked with other clouds than Azure then you would know that this has been there with Amazon where they call it as AWS lambda and Google cloud too has something similar known as Google Cloud Functions.
This whole idea basically revolves around the key concept of ‘Server-less Computing’, i.e. your piece of code responding to events and running in the cloud does not need to worry about the infrastructure giving you as a developer freedom to concentrate on your application logic rather than worrying about infrastructure maintenance, scalability and deployments.
Concepts
Azure functions runtime
For developer’s community, next question could be – dude if my code is going to be executed on cloud and you tell me that I should not worry about infrastructure then how does azure know what run-time is required there? Definitely a great question – and the answer to this is Azure functions run-time.
Similar to .NET run-time (CLR) which is responsible for making everything available to run any .NET program there is Azure functions run-time which takes care of executing your code. As of writing this article, you are allowed to write your code in C#, Node.js, PowerShell, Python or PHP.
Note that Azure functions run-time is open sourced and the source is available on github.
Magic Infrastructure
All right now we know that what run-time is, but now tell me where exactly azure will execute this function code, it will of course need some infrastructure to execute the code right? Yes, absolutely. Do you remember Azure web apps? If yes, then we have a concept of Azure web jobs which runs within the context of a web app which in turn is dependent on app service plan where we can define the size of required infrastructure.
Azure functions are nothing but an extension to Azure web jobs meaning that azure functions are based on web jobs SDK. With this knowledge, probably now you know from where the infrastructure requirements are catered and how scalability would have been handled.
Function dependencies
If I were to write down triggered based code and run it in Azure, but what about dependencies on which my code count on? E.g. we all are a big fan of nuggets and mostly employ various nuggets while writing the code then will we be able to run our functions on Azure with all these dependencies? The answer is yes, Azure functions does support all your dependencies and you can bring in all your custom assemblies or nuggets which are required to run your functions.
Function security
You can secure your trigger based functions using OAuth providers such as Azure AD, Facebook, Google, Twitter or Microsoft live accounts.
Significance
Now are talking! I have tried to explain everything to the simplest but how can I relate it to the real world scenarios? How would one be using these offering?
Well, Azure functions are really a comprehensive solution to cater your various needs such as integrating multiple systems together, especially in IoT scenarios, building micro-services or even for scheduled background jobs.
Let’s take a hypothetical scenario using IoT and see how it can be implemented using Azure functions.
Recently, In India traffic police department has taken a great initiative to monitor highway traffic on Mumbai-Pune expressway way using drones which will report high speeding vehicles or ‘un-mannered’ drivers to them. If we were to consider this scenario and implement it using Azure functions this is how it could look like
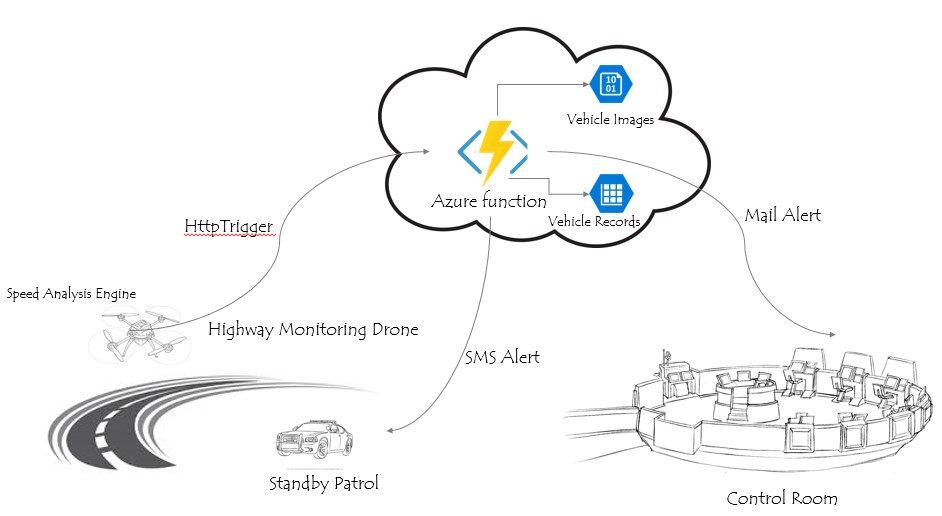
Drones with camera and speed analysis engine will be triggering Http request to the Azure functions with captured vehicle image and other metadata information required to be feed into the system.
The Azure function will be invoked once it receives the Http request. It will not only publish mail alerts to control room as well as SMS alert to the nearest patrolling vehicle but it also creates entries of the vehicle in table and blob storage for future reference.
Function Templates
Note that this example is just to illustrate the use of Azure functions with IoT applications, I have not put lots of efforts in designing best architecture for above system and improvisations to it are of course possible.
The HTTP trigger is just one kind of trigger to which azure functions can respond. As I mentioned previously, azure functions can respond to any event triggered within Azure or from outside Azure. As of writing this article, there are lots of azure functions templates available some of those are
- Blob trigger – triggered when the blob is added in the container.
- Event hub trigger – Respond to events added in event hubs.
- Service Bus topic trigger – execute functions whenever the message is added to service bus topic.
- Timer trigger – execute functions on scheduled basis.
Demo
With this knowledge, let’s jump into the action and being by creating our first Azure function.
Note that, in this example, we will be building Azure function using HTTP trigger template so that we can trigger it manually.
Simplest way to get started is by going to Azure functions web site i.e. https://functions.azure.com or you can create it using the Azure portal.
This article uses a process of creating functions using Azure portal.
Let’s start by creating a brand new resource group by clicking on create new resource group button. We will name it as ‘SampleAzureFunctions’ and create in Southeast Asia region.
Once the resource group is created, let’s click on Add and search with ‘Function App’. Click on Function App option from the list and click create.
As mentioned earlier, Azure functions are extensions to web jobs so it needs service name aka app name and app service plan along with storage account.
Let’s create a new app service plan with name ‘AzureFunctionPlan’ and new storage account ‘sampleazurefunc’
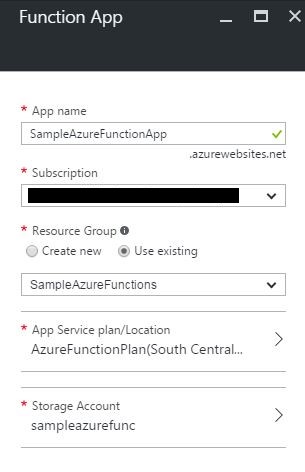
Click create and it will create all required infrastructure to run your azure functions.
Now let’s browse to the functioning app which got created in our resource group.
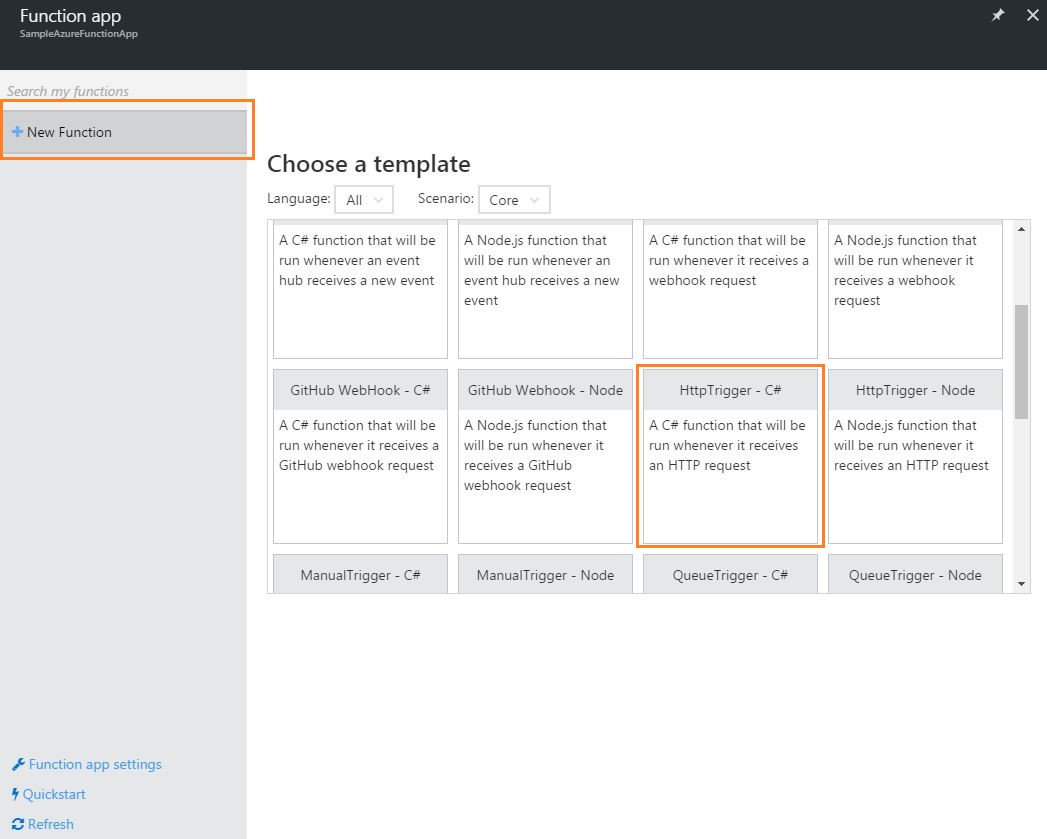
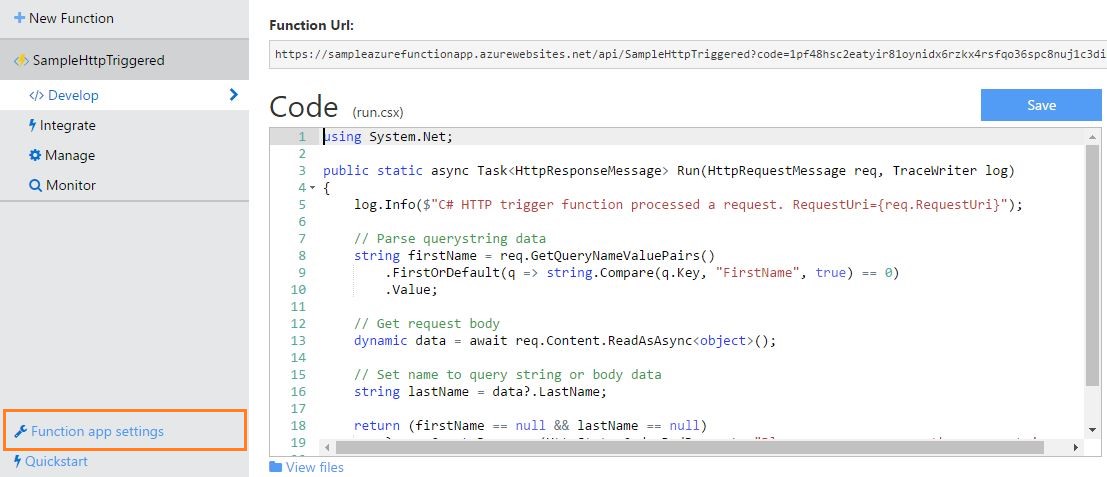
You will be presented with nice welcoming UI which provides lots of quick options to create your functions. At the bottom left of the screen, you will see an option for Function app settings. We will see details of it later in this article.
For now, let’s click on the New Function option on left and create the first function by selecting template HTTP Trigger C#.
You can observe that there are lots of other template provided to get us started, e.g. Queue trigger, GitHub webbook etc.
Once you select the template, you will be asked to give a name to your function and select the level of authorisation.
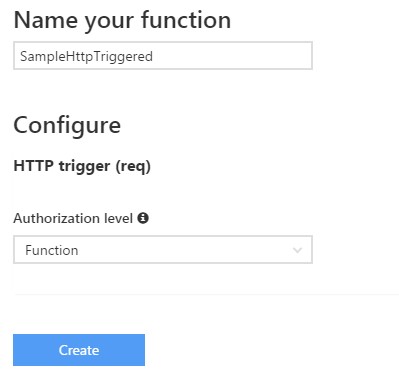
The level of authorization decides the way you are going to access this function. If you declare the authorization level as a function, then you will need to use the API key to access this function over HTTP.
API keys can be found in host secret files and level can be changed later once the function is created.
These keys will be included in a query string while accessing the function over URL e.g.
https://{function_app_name}.azurewebsites.net/api/{function_name}?code=api_function/master_key
The difference in function key and master key is that function key can trigger non-disabled functions while master key can be used to trigger enabled as well as disabled functions. If you wish that your functions can be triggered by master key then you will need to change the authorization level to ‘Admin’.
You can check both function and master key in host.json file by browsing to the path below
“D:\home\data\functions\secrets\
{

  "masterKey": "lEq7rFskywC6xVK7tlj73OmpUefnsx9bnSBiT1lWVRgq/me4jepP3g==",

  "functionKey": "9NBnl5fES9ZjvSa12IyDG4OOs14eWRJIWT763rMiQIBwKZvEZA2qAA=="

}
How to reach to that path is simple – open your web app in kudu i.e. open URL below
**https://your_function_app_name.scm.azurewebsites.net/DebugConsole **
And you will see the directory structure in the browser, you can navigate to host.json file mentioned above.
If the secrets folder contains a JSON file with the same name as a function, the key property in that file can also be used to trigger the function, and this key will only
work with the function it refers to.
Now once you click create, it will create the function for you and you should see a screen similar to this
Note that at the top it shows how to access this function with URL over HTTP and on the left it shows various tabs to work with this function.
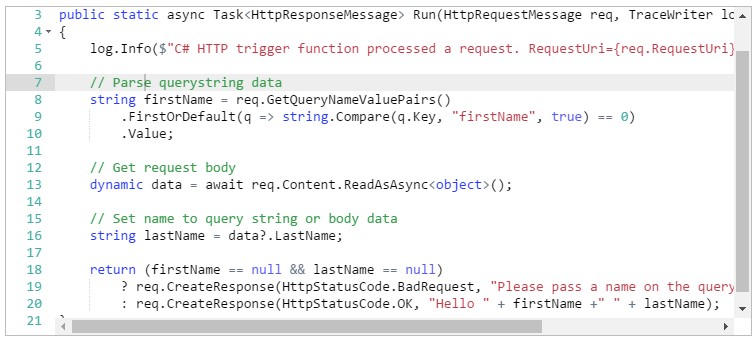
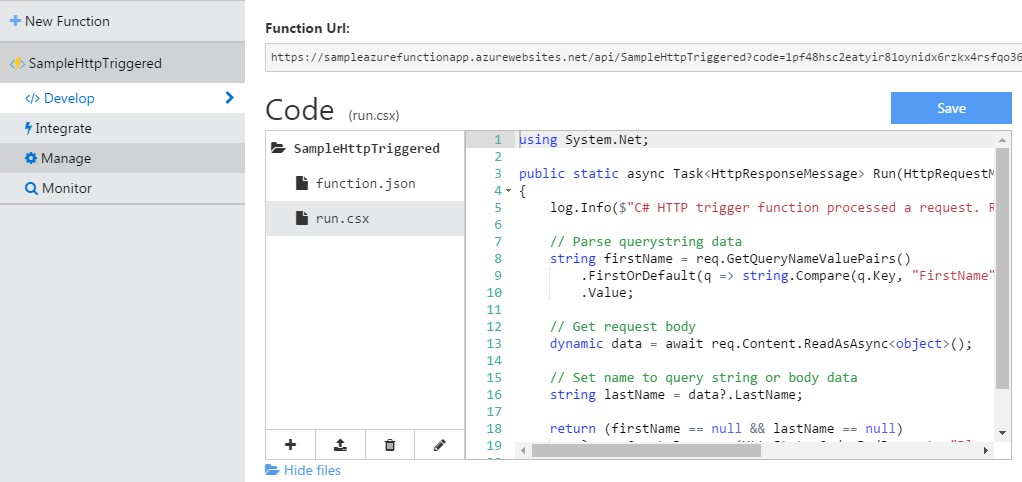
The code editor at center has implemented a version of Run method which will be invoked whenever any Http request will be triggered for this function.
You can modify this code as per your needs and hit save button. It will first compile the code and related message will be shown in logs windows below code editor.

Let’s understand the bindings of input in auto generated code
It is taking two input arguments i.e. HttpRequestMessage and TraceWriter. The TraceWriter is used to log the inline processing messages to the logs screen shown below code editor.
HttpRequestMessage is standard object and source code above is trying to extract the value of the parameter with ‘name’. But from where did this name came from? We will see that in a bit.
Let’s understand the bindings to the input first and for that, we will need to navigate to the next tab from options available in left pane i.e. Integrate.
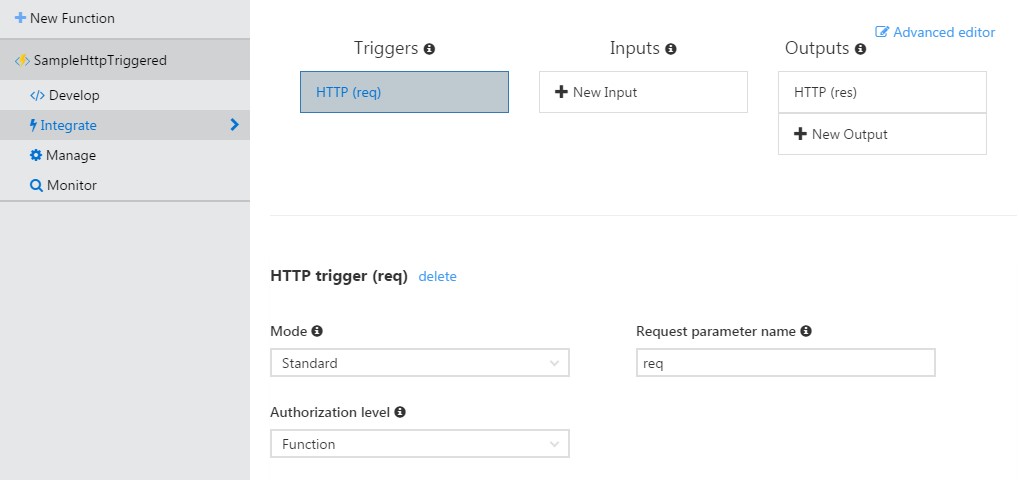
You can observe that it is going to run with standard mode with request parameter name required. Note that name of request parameter should match exactly in the source code’s parameter name. Observe images above.
Currently, this function is going to generate the standard Http response and which is selected in outputs option in above image.
You can choose to change these bindings simply by clicking on options and you will be presented with various other available options like If I click on new output I will be shown screen like this
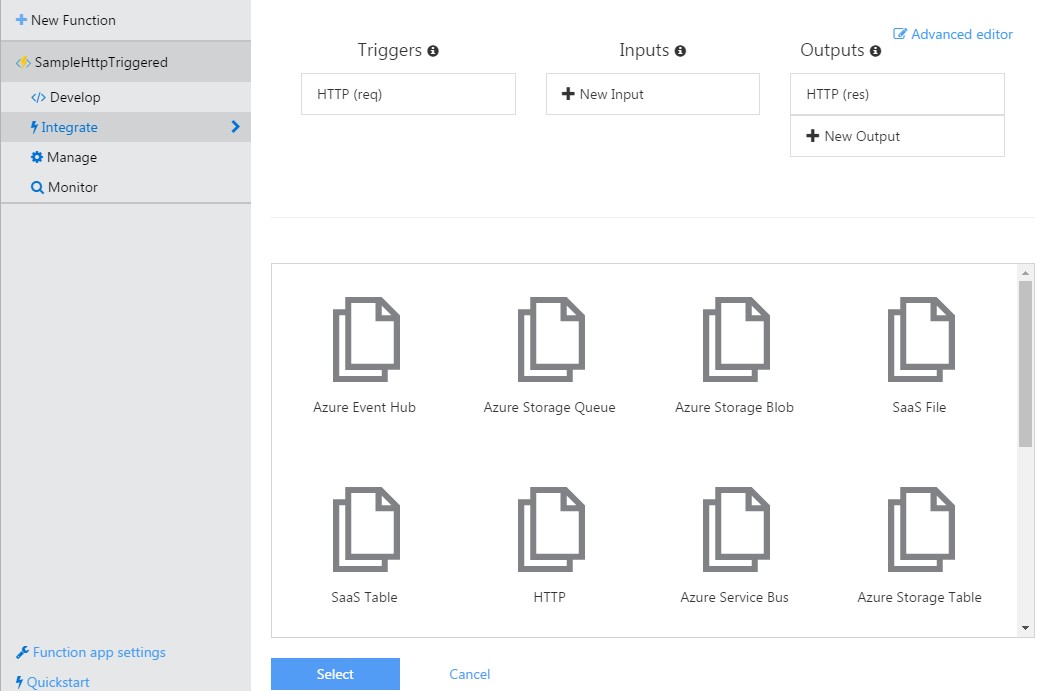
Which means I can directly decide that what I need as output whenever this function is executed, interesting isn’t it? E.g. I can directly generate the document using this function and store it in azure blob storage or create azure table storage entry.
For now, let’s not modify the output option and continue with a standard HTTP response.
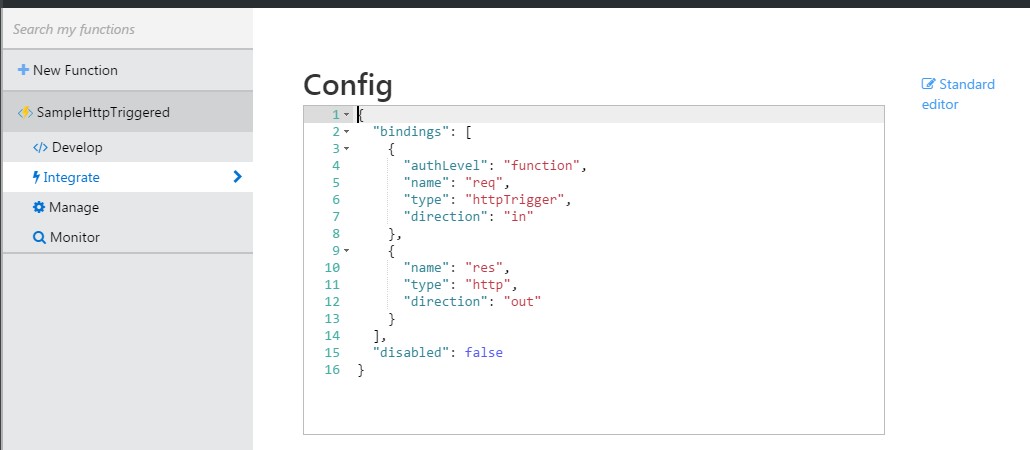
Apart from this, if you are a big fan of JSON editing then there is an advanced editor option to manage your input-output bindings. All you need to do is simply click on advanced editor option and you will be shown a tiny JSON which looks like this, you can choose to modify and save it.
Let’s go back to the develop tab and let’s take a closer look at source code.
All it is doing is, extracting the value of input parameter name either from query string or from request body contents, meaning that we can pass parameters to this function either from query string or from request body.
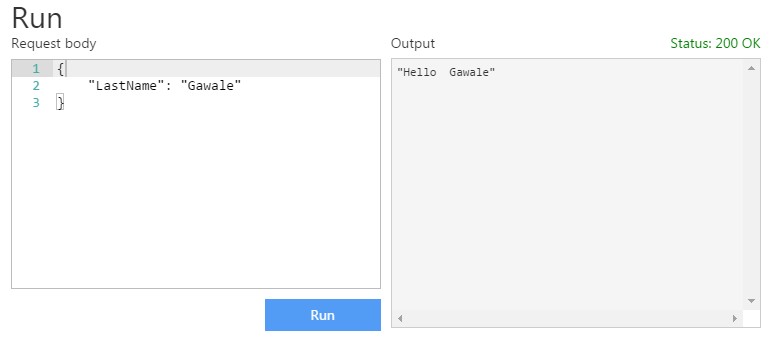
Let’s modify the code quickly to print the first and last name of the user. Note that first name is passed from the query string while the last name is passed via request body.
To validate if what is written above is working correctly, Azure functions provide you with a great option. i.e. you can run your code after saving it directly from within the portal.
There is an option to run it below the logs screen.
Observe that I have sent the value of the LastName parameter and only it was returned as HttpResponse output.
Now to test how we can pass the value of FirstName parameter is easy, simply copy the function URL mentioned at the top and paste it in new browser tab with FirstName as query string parameter.
And here is the response

Sounds simple, right? Great!
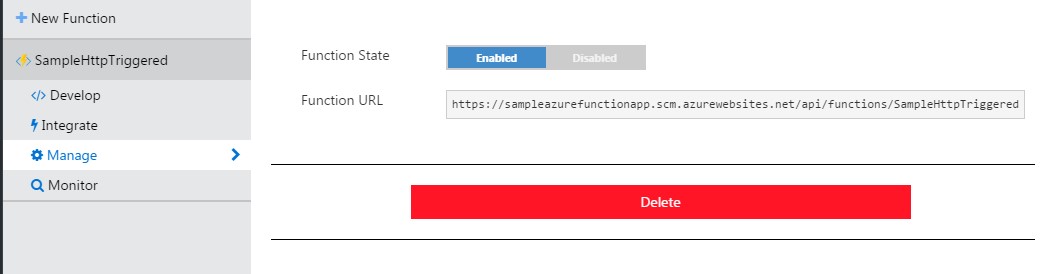
Now the management and monitoring part of this function.
Click on the manage tab, this provides you with an interface to manage your azure function. You can choose to disable or enable your function from here or even delete it.
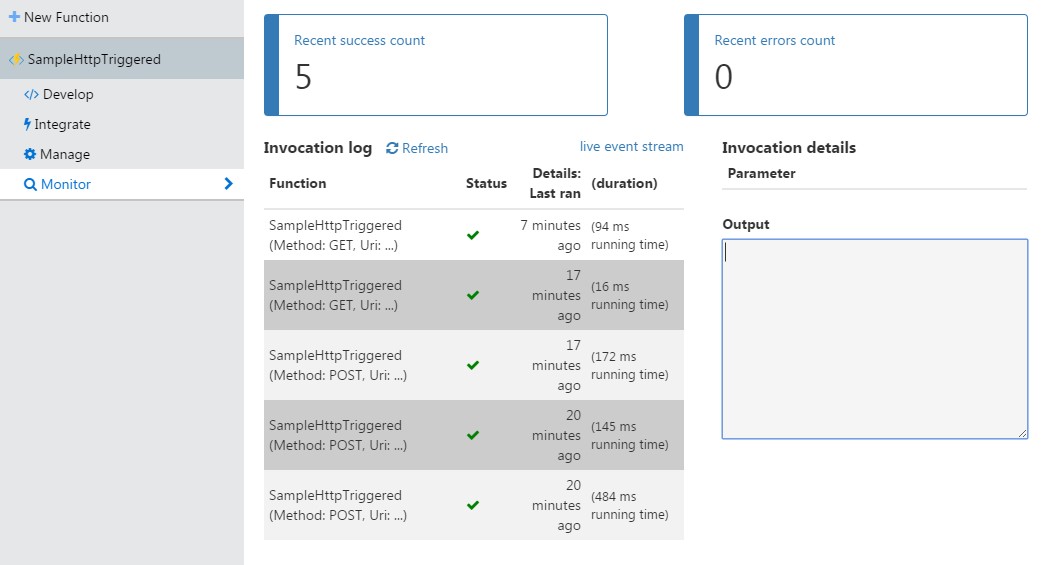
Next tab is Monitor using which you can track the usage of your function in terms of successful requests, recent errors, invocation logs etc.
Entire monitoring is done through the concept of Pulse. Pulse is the live event stream of your function and shows you the success and failures of it.
Previously in this article, it was mentioned that you can bring in all your external dependencies in azure functions and it also supports nuggets, let’s see where I can do it.
If you have observed few screenshots above, there is this link in Develop tab which says ‘view files’. If you click on it, you can see the source code files and required metadata of your azure function.
You can add, upload, edit or delete your dependent assemblies using this editor and refer those in the code.
Function and app settings
As mentioned earlier in this article, azure functions are the extensions of the web jobs and runs in the context of app service backed by app service plan. Let’s take a closer look at settings which can be controlled.
Click on it to take a closer look.

As seen in the image above, there are almost everything we can control for function apps.
The option of continuous integration lets you enable to continuous deployment scenario of your Azure functions and it can easily integrate with various options like VSTS, One drive, Github, Dropbox etc.
As mentioned in the security section in this article, you can configure authentication and authorization settings of your function app and multiple identity management providers including Azure AD is available for the integration.
Next is the CORS settings, CORS stands for cross origin resource sharing meaning that you can control invocation of your functions from browser beyond domain boundaries.
API Metadata setting allows you to specify the swagger 2.0 metadata so that other applications can easily find your function and your function becomes easy to consume.
App setting configuration is almost similar to what you see in azure web app configurations. You can specify settings like environmental variables, connection strings, framework version, platform etc.
Portal console and Kudu options let you interact with API file system and provides access to advanced features like uploading zips.
Advance settings options are your gateway using which you can configure your app service settings like custom domains, scale settings, SSL etc.
Visual Studio Tooling Support
[Update] Visual studio tools team has recently released the tooling support for Azure functions for Visual Studio, which provides debugging capabilities for your functions. (a significant and a must have feature for all developer community).
You will need to download the Azure SDK version 2.9.6 before you download and install Azure functions tools for visual studio.
Pricing
Azure functions pricing depends upon code execution time and number of executions of your functions. Execution time is metered as GBs.
Refer to this excellent article to get detailed information for Azure functions pricing. This is all about Azure functions which can help you to get started.
Glossary
| Item | Description |
| HTTP | Cross-site scripting |
| URL | Change mode |
| JSON | SSH File Transfer Protocol |
| API | Application Programming Interface |
References
This article was originally published here at Understanding Azure Functions. This link is external to TechNet Wiki. It will open in a new window. Please feel free to improve this article by adding new missing or important content, fix spell and so on.
Below are few links which helped a lot while drafting this article and few links for self-learning