ASP.NET Core, Angular 2 Master Detail HTML Grid using Web API and EF 1.0.1
Introduction
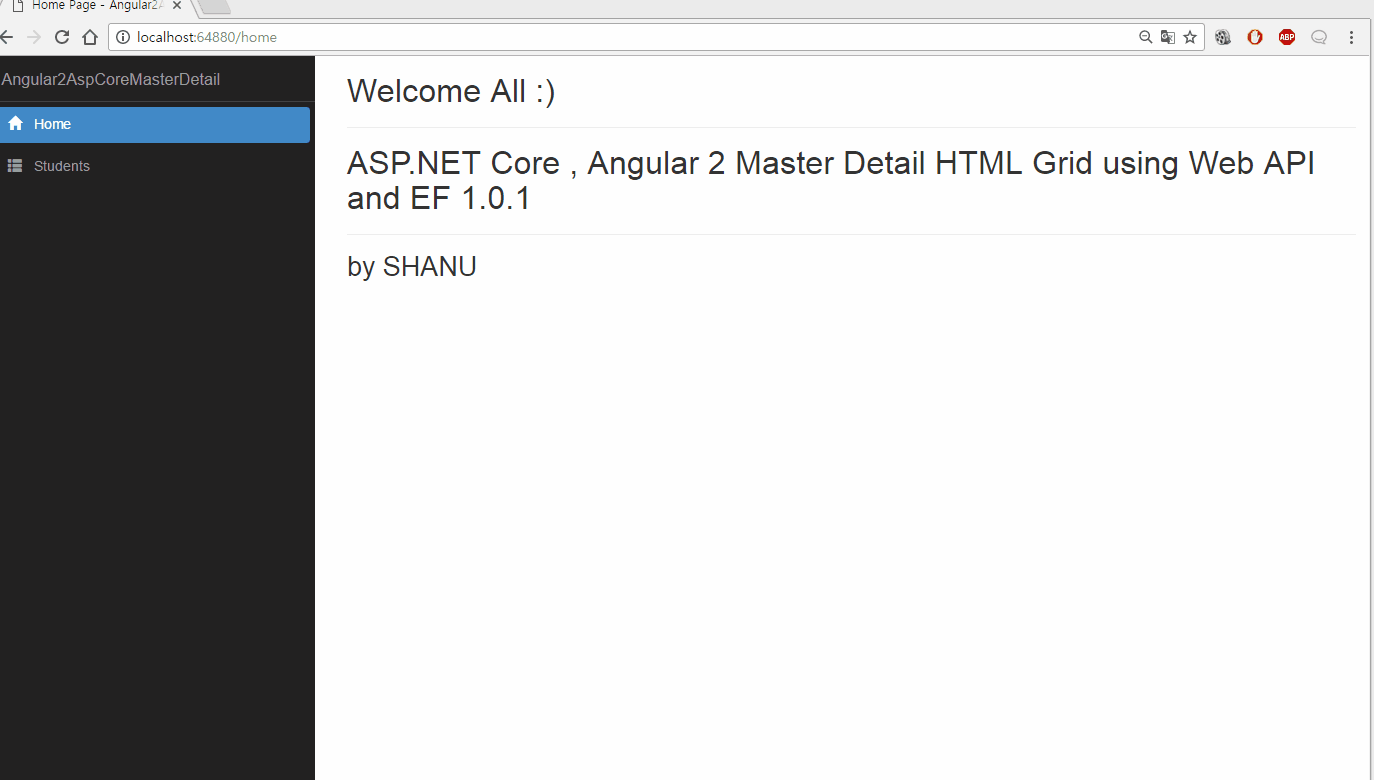
In this article, let’s see how to create our own ASP.NET Core, Angular 2 Master Detail HTML grid using Template pack, Entity Framework 1.0.1 and Web API.
Note: Kindly read our previous articles which deeply explains about Getting Started with ASP.NET Core Template Pack
In this articles let’s see:
- Creating sample Database and Student Master and Detail Table in SQL Server to display in our web application.
- How to create ASP.NET Core Angular 2 Starter Application (.NET Core) using Template pack.
- Creating EF, DBContext Class and Model Class.
- Creating a WEB API.
- Creating our First Component TypeScript file to get WEB API JSON result using Http Module.
- Creating our first Component HTML file to bind data to Master and Detail HTML Grid.
This article will explain in detail about how to create a Master/Detail Table and bind the Master related details in an inner HTML table to show the output as Master/Detail Grid. Here in this article, we have used the Student Master and Student Detail relation to show the Master/Detail grid. In Student Master, we store student ID, Name, Email, Phone and Address. In Student Details, we store the student’s exam final result for displaying Student Major, Studying Year with Term and Grade details.
Here in the below image we can see when the user clicked on the Student ID “2”. Then we can see next the details grid was being displayed to show student results in detail by Major, Year, Term and Grade.
Here we display the student details by each Student Id.

Prerequisites
Make sure you have installed all the prerequisites in your computer. If not, then download and install all of them, one by one.
- First, download and install Visual Studio 2015 with Update 3 from this link.
- If you have Visual Studio 2015 and have not yet updated with update 3, download and install the Visual Studio 2015 Update 3 from this link.
- Download and install .NET Core 1.0.1
- Download and install TypeScript 2.0
- Download and install Node.js v4.0 or above. Here we have installed V6.9.1 (Download link).
- Download and install Download ASP.NET Core Template Pack .visz file from this link.
Code Part
Step 1: Create a Database and Table
We will create a Student Master and Student Detail table to be used for the Master and Detail Grid data binding.
The following is the script to create a database, table and sample insert query.
Run this script in your SQL Server. Here we have used SQL Server 2014.
Return to Top
USE MASTER
GO
--1) Check
-- for the Database Exists.If the database is exist then drop and create new DB
IF EXISTS(SELECT[name] FROM  sys.databases WHERE  [name] = 'StudentsDB')
DROP DATABASE  StudentsDB
GO
--CREATEDATABASEStudentsDB
GO
USE StudentsDB
GO
--1) //////////// StudentMasters
IF EXISTS(SELECT[name] FROM  sys.tables WHERE[name] = 'StudentMasters')
DROP TABLE  StudentMasters
GO
CREATE TABLE[dbo].[StudentMasters](
        [StdID] INT  IDENTITY PRIMARY  KEY,
        [StdName][varchar](100) NOT NULL,
        [Email][varchar](100) NOT NULL,
        [Phone][varchar](20) NOT NULL,
        [Address][varchar](200) NOT NULL
    )
    --insert sample data to Student Master table
INSERT INTO[StudentMasters]([StdName], [Email], [Phone], [Address])
VALUES('Shanu', 'syedshanumcain@gmail.com', '01030550007', 'Madurai,India')
INSERT INTO[StudentMasters]([StdName], [Email], [Phone], [Address])
VALUES('Afraz', 'Afraz@afrazmail.com', '01030550006', 'Madurai,India')
INSERT INTO[StudentMasters]([StdName], [Email], [Phone], [Address])
VALUES('Afreen', 'Afreen@afreenmail.com', '01030550005', 'Madurai,India')

select * from[StudentMasters]

IF EXISTS(SELECT[name] FROM  sys.tables WHERE[name] = 'StudentDetails')
DROP TABLE  StudentDetails
GO
CREATE TABLE[dbo].[StudentDetails](
        [StdDtlID] INT  IDENTITY PRIMARY  KEY,
        [StdID] INT  ,
        [Major][varchar](100) NOT NULL,
        [Year][varchar](30) NOT NULL,
        [Term][varchar](30) NOT NULL,
        [Grade][varchar](10) NOT NULL
    )

INSERT INTO[StudentDetails]([StdID], [Major], [Year], [Term],[Grade])
VALUES(1,'Computer Science','First Year','First Term','A')
INSERT INTO[StudentDetails]([StdID], [Major], [Year], [Term],[Grade])
VALUES(1,'Computer Science','First Year','Second Term','B')
INSERT INTO[StudentDetails]([StdID], [Major], [Year], [Term],[Grade])
VALUES(1,'Computer Science','Second Year','First Term','C')
INSERT INTO[StudentDetails]([StdID], [Major], [Year], [Term],[Grade])
VALUES(2,'Computer Engineer','Third Year','First Term','A')
INSERT INTO[StudentDetails]([StdID], [Major], [Year], [Term],[Grade])
VALUES(2,'Computer Engineer','Third Year','Second Term','A')
INSERT INTO[StudentDetails]([StdID], [Major], [Year], [Term],[Grade])
VALUES(3,'English','First Year','First Term','C')
INSERT INTO[StudentDetails]([StdID], [Major], [Year], [Term],[Grade])
VALUES(13,'Economics','First Year','First Term','A')
select * from StudentDetails
Step 2: Create ASP.NET Core Angular 2 application
After installing all the prerequisites listed above and ASP.NET Core Template, click Start >> Programs >> Visual Studio 2015 >> Visual Studio 2015, on your desktop. Click New >> Project. Select Web >> ASP.NET Core Angular 2 Starter. Enter your project name and click OK.


We will be using all this in our project to create, build and run our Angular 2 with ASP.NET Core Template Pack, WEB API and EF 1.0.1
Step 3: Creating Entity Framework
Add Entity Framework Packages
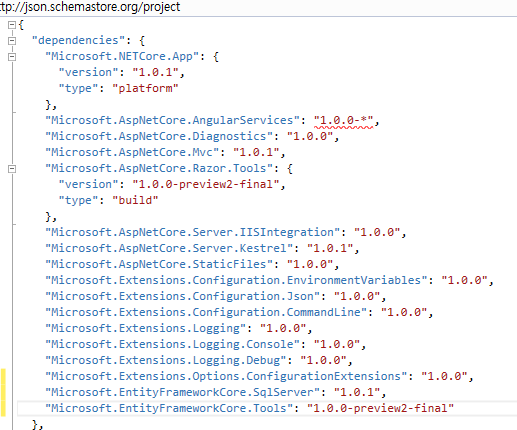
To add our Entity Framework Packages in our ASP.NET Core application, open the Project.JSON File and in dependencies add the below line to it.
Note: Here we have used EF version 1.0.1.
Return to Top
"Microsoft.EntityFrameworkCore.SqlServer": "1.0.1",
 "Microsoft.EntityFrameworkCore.Tools": "1.0.0-preview2-final"
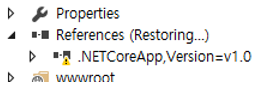
When we save the project,.json file we can see the Reference is Restoring.
Return to Top
After a few seconds we can see the Entity Framework package has been restored and all references have been added.

Adding Connection String
To add the connection string with our SQL connection, open the “appsettings.json” file. Yes, this is the JSON file and this file looks like the below image by default.
Return to Top

In this appsettings.json file add our connection string.
"ConnectionStrings": {
    "DefaultConnection": "Server=YOURDBSERVER;Database=StudentsDB;user id=SQLID;password=;Trusted_Connection=True;MultipleActiveResultSets=true;"
  },
Note: Change the SQL connection string as per your local connection.
Next step is we create a folder named “Data” to create our model and DBContext class.
Return to Top

** Model Class for Student Master **
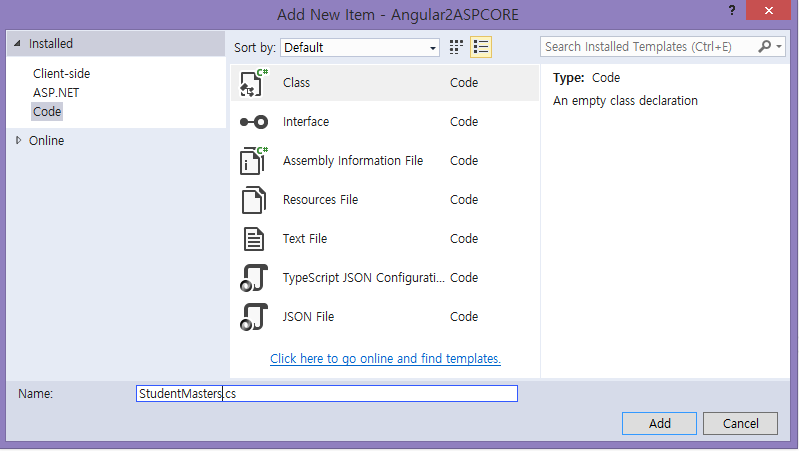
We can create a model by adding a new class file in our Data Folder. Right-click Data folder and click Add>Class. Enter the class name as StudentMasters and click Add.
Return to Top
Now in this class we first create a property variable, add studentMaster. We will be using this in our WEB API controller. ** **
**Return to Top
**
using System;
using System.Collections.Generic;
using System.Linq;
using System.Threading.Tasks;
using System.ComponentModel.DataAnnotations;

namespace Angular2ASPCORE.Data
{
    public class  StudentMasters
    {
        [Key]
        public int  StdID { get; set; }
        [Required]
        [Display(Name = "Name")]
        public string  StdName { get; set; }
        [Required]
        [Display(Name = "Email")]
        public string  Email { get; set; }
        [Required]
        [Display(Name = "Phone")]
        public string  Phone { get; set; }
        public string  Address { get; set; }
    }
}
**Model Class for Student Detail **
We can create a model by adding a new class file in our Data Folder. Right-click Data folder and click Add>Class. Enter the class name as StudentDetails and click Add.
Return to Top

Now in this class we first create property variable, add StudentDetails. We will be using this in our WEB API controller.
public class  StudentDetails
    {
        [Key]
        public int  StdDtlID { get; set; }

        [Required]
        [Display(Name = "StudentID")]
        public int  StdID { get; set; }

        [Required]
        [Display(Name = "Major")]
        public string  Major { get; set; }

        [Required]
        [Display(Name = "Year")]
        public string  Year { get; set; }

        [Required]
        [Display(Name = "Term")]
        public string  Term { get; set; }

        public string  Grade { get; set; }
    }
Creating Database Context
DBContext is Entity Framework Class for establishing a connection to a database.We can create a DBContext class by adding a new class file in our Data Folder. Right-click Data folder and click Add>Class. Enter the class name as StudentContext and click Add.
Return to Top

In this class we inherit DbContext and created Dbset for our studentMasters and StudentDetails table.** **
using System;
using System.Collections.Generic;
using System.Linq;
using System.Threading.Tasks;
using Microsoft.EntityFrameworkCore;

namespace Angular2ASPCORE.Data
{
    public class  studentContext : DbContext
    {
        public studentContext(DbContextOptions<studentContext> options)
            : base(options) { }
        public studentContext() { }
        public DbSet<StudentMasters> StudentMasters { get; set; }
        public DbSet<StudentDetails> StudentDetails { get; set; }
    }
}
Startup.CS
Now we need to add our database connection string and provider as SQL SERVER. To add this we add the below code in Startup.cs file under ConfigureServices method.** **
Return to Top
// Add Entity framework .
            services.AddDbContext<studentContext>(options =>
             options.UseSqlServer(Configuration.GetConnectionString("DefaultConnection")));
Step 4: Creating Web API
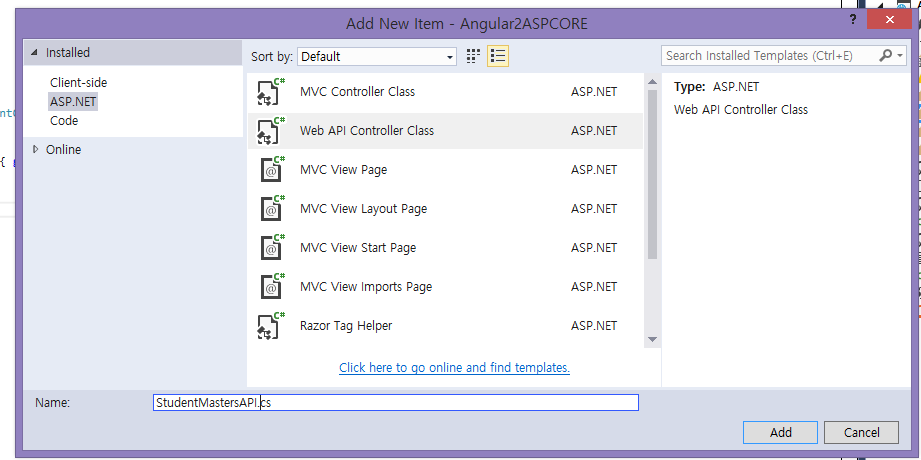
To create our WEB API Controller, right-click Controllers folder. Click Add and click New Item.

Click ASP.NET in right side > Click Web API Controller Class. Enter the name as “StudentMastersAPI.cs” and click Add.
Return to Top
In this we are using only the Get method to get all the students result from the database and bind the final result using Angular2 to HTML file.
Here in this Web API we get both Student Master, Student Details and Student Details load by condition student ID.
Return to Top
[Produces("application/json")]
    [Route("api/StudentMastersAPI")]
    public class  StudentMastersAPI : Controller
    {
        private readonly  studentContext _context;

        public StudentMastersAPI(studentContext context)
        {
            _context = context;
        }

        // GET: api/values
// For Student Master
        [HttpGet]
        [Route("Student")]
        public IEnumerable<StudentMasters> GetStudentMasters()
        {
            return _context.StudentMasters;

        }

        // GET: api/values
// For Student Detail

        [HttpGet]
        [Route("Details")]
        public IEnumerable<StudentDetails> GetStudentDetails()
        {
            return _context.StudentDetails;

        }

// For Student Detail with studentid to load by student ID

        // GET api/values/5
        [HttpGet]
        [Route("Details/{id}")]
        public IEnumerable<StudentDetails> GetStudentDetails(int id)
        {
            return _context.StudentDetails.Where(i => i.StdID == id).ToList();
        }
    }
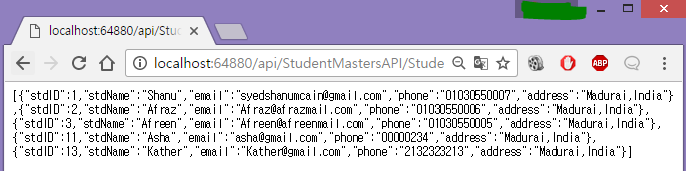
To test it we can run our project and copy the get method API path here we can see our API path for Get is api/StudentMastersAPI/Student. Run the program and paste the above API path to test our output.
Return to Top
To get the Student Details by Student ID. Here we can see all the Student Details for Student ID=1 has been loaded. api/StudentMastersAPI/Details/1

Working with Angular2
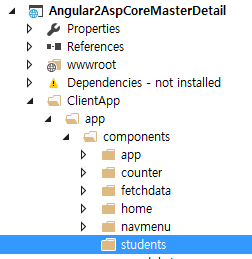
We create all Angular2 related App, Module, Services, Component and HTML template under ClientApp/App folder.
We create “students” folder under app folder to create our typescript and HTML file for displaying Student details.
Return to Top
Step 5: Creating Component TypeScript
Right-click on Students folder and click on add new Item. Select Client-side from the left side and select TypeScript File. Name the file as “students.component.ts” and click Add.
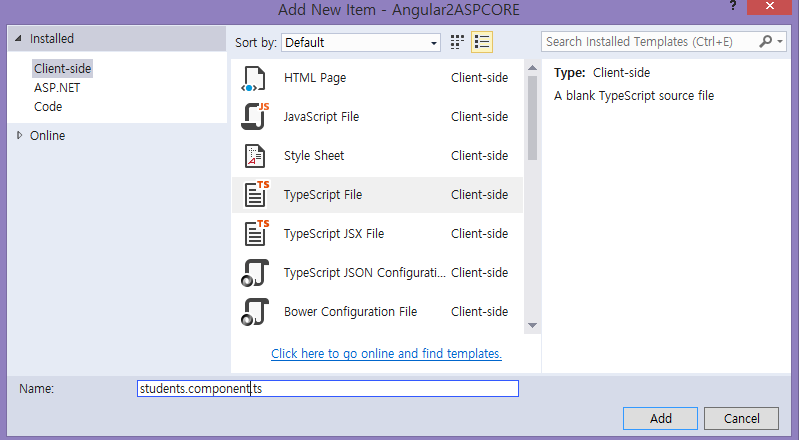
Return to Top
In students.component.ts file we have three parts. First is the:
- Import part
- Next is component part
- Lastly, we have the class for writing our business logic. First, we import Angular files to be used in our component. Here we import HTTP for using HTTP client in our Angular2 component.
In component, we have a selector and template. Selector is to give a name for this app and in our HTML file we use this selector name to display in our HTML page.
In template, we give our output HTML file name. Here we will create on HTML file as “students.component.html”.
Export Class is the main class where we do all our business logic and variable declaration to be used in our component template. In this class, we get the API method result and bind the result to the student array.
Here we get first all the Student Master data from Web API to bind in our HTML page. We have created one more function named “getStudentsDetails” to this function we pass the Student ID to load only the selected Student ID related data from Student Detail tables. We call this function from button click of each Student Master.
import { Component } from '@angular/core';
import { Http } from "@angular/http";

@Component({
    selector: 'students',
    template: require('./students.component.html')
})

export class studentsComponent {
    public student: StudentMasters[] = [];
    public studentdetails: StudentDetails[] = [];
    myName: string;
    activeRow: string = "0";
    constructor(public http: Http) {
        this.myName = "Shanu";
        this.getStudentMasterData();
    }

    getStudentMasterData() {

        this.http.get('/api/StudentMastersAPI/Student').subscribe(result => {
            this.student = result.json();
        });
    }

    getStudentsDetails(StudID) {
        this.http.get('/api/StudentMastersAPI/Details/' + StudID).subscribe(result => {
            this.studentdetails = result.json();
        });
        this.activeRow = StudID;
    }
}

//// For Student Master
export interface StudentMasters {
    stdID: number;
    stdName: string;
    email: string;
    phone: string;
    address: string;
}
// For Student Details
export interface StudentDetails {
    StdDtlID: number;
    stdID: number;
    Major: string;
    Year: string;
    Term: string;
    Grade: string;
}
Step 6: Creating Component HTML File
Right-click on students folder and click on add new Item. Select Client-side from left-side and select HTML File. Name the file as “students.component.html” and click Add.
Return to Top

Write the below HTML code to bind the result in our HTML page.
Here we have first created HTML Table for loading the Student Master data with Detail Button.
In the Detail Button, click we load the Student Details for selected Student and bind the result according to the table row.
<h1>Angular 2 with ASP.NET Core Template Pack, WEB API and EF 1.0.1 </h1>
<hr />
<h2>My Name is : {{myName}}</h2>
<hr />
<h1>Students Details :</h1>

<p *ngIf="!student"><em>Loading Student Details please Wait ! ...</em></p>
<!--<pre>{{ studentdetails | json }}</pre>-->
<table class='table' style="background-color:#FFFFFF; border:2px #6D7B8D; padding:5px;width:99%;table-layout:fixed;" cellpadding="2" cellspacing="2" *ngIf="student">

    <tr style="height: 30px; background-color:#336699 ; color:#FFFFFF ;border: solid 1px #659EC7;">
        <td  width="80" align="center"></td>
        <td width="80" align="center">Student ID</td>
        <td width="240" align="center">Student Name</td>
        <td width="240" align="center">Email</td>
        <td width="120" align="center">Phone</td>
        <td width="340" align="center">Address</td>


    </tr>
    <tbody *ngFor="let StudentMasters  of student">
        <tr><td align="center" style="border: solid 1px #659EC7; padding: 5px;table-layout:fixed;">
                <button (click)=getStudentsDetails(StudentMasters.stdID) style="background-color:#334668;color:#FFFFFF;font-size:large;width:80px;
                              border-color:#a2aabe;border-style:dashed;border-width:2px;">
                    Detail
                </button>

            </td>
            <td align="center" style="border: solid 1px #659EC7; padding: 5px;table-layout:fixed;">
                <span style="color:#9F000F">{{StudentMasters.stdID}}</span>
            </td>

            <td align="left" style="border: solid 1px #659EC7; padding: 5px;table-layout:fixed;">
                <span style="color:#9F000F">{{StudentMasters.stdName}}</span>
            </td>

            <td align="left" style="border: solid 1px #659EC7; padding: 5px;table-layout:fixed;">
                <span style="color:#9F000F">{{StudentMasters.email}}</span>
            </td>

            <td align="center" style="border: solid 1px #659EC7; padding: 5px;table-layout:fixed;">
                <span style="color:#9F000F">{{StudentMasters.phone}}</span>
            </td>

            <td align="left" style="border: solid 1px #659EC7; padding: 5px;table-layout:fixed;">
                <span style="color:#9F000F">{{StudentMasters.address}}</span>
            </td>
        </tr>
        <tr *ngIf="activeRow==StudentMasters.stdID">
            <td colspan="6" style="border: solid 1px #659EC7; padding: 5px;table-layout:fixed;">

                <table class='table' style="background-color:#ECF3F4; border:2px #6D7B8D; padding:5px;width:99%;table-layout:fixed;" cellpadding="2" cellspacing="2" *ngIf="studentdetails">

                    <tr style="height: 30px; background-color:#659EC7 ; color:#FFFFFF ;border: solid 1px #659EC7;">

                        <td width="100" align="center"><Strong>Student Detail --></Strong>   </td>
                        <td width="240" align="center">Major</td>
                        <td width="240" align="center">Year</td>
                        <td width="120" align="center">Term</td>
                        <td width="340" align="center">Grade</td>


                    </tr>
                    <tbody *ngFor="let stddetails  of studentdetails">
                        <tr>
                            <td width="100" align="center"></td>
                            <td width="240" align="center">{{stddetails.major}}</td>
                            <td width="240" align="center">{{stddetails.year}}</td>
                            <td width="120" align="center">{{stddetails.term}}</td>
                            <td width="340" align="center">{{stddetails.grade}}  </td>
                        </tr>
                    </tbody>
                </table>
            </td>
        </tr>
    </tbody>
</table>
Step 7: Adding Navigation menu
We can add our newly created student details menu in an existing menu.
To add our new navigation menu, open the “navmenu.component.html” under navmenu menu. Write the below code to add our navigation menu link for students. Here we have removed the existing Count and Fetch menu.** **
**Return to Top
**
<li [routerLinkActive]="['link-active']">
  <a [routerLink]="['/students']">
    <span class='glyphicon glyphicon-th-list'></span> Students
  </a>
</li>
Step 8: App Module
App Module is the root for all files and we can find the app.module.ts under ClientApp\app, and import our students component. App Module is root for all file and we can find the app.module.ts under ClientApp\ app.Import our students component.
import { NgModule } from '@angular/core';
import { RouterModule } from '@angular/router';
import { UniversalModule } from 'angular2-universal';
import { AppComponent } from './components/app/app.component'
import { NavMenuComponent } from './components/navmenu/navmenu.component';
import { HomeComponent } from './components/home/home.component';
import { FetchDataComponent } from './components/fetchdata/fetchdata.component';
import { CounterComponent } from './components/counter/counter.component';
import { studentsComponent } from './components/students/students.component';

@NgModule({
    bootstrap: [ AppComponent ],
    declarations: [
        AppComponent,
        NavMenuComponent,
        CounterComponent,
        FetchDataComponent,
        HomeComponent,
        studentsComponent
    ],
    imports: [
        UniversalModule, // Must be first import. This automatically imports BrowserModule, HttpModule, and JsonpModule too.
        RouterModule.forRoot([
            { path: '', redirectTo: 'home', pathMatch: 'full' },
            { path: 'home', component: HomeComponent },
            { path: 'counter', component: CounterComponent },
            { path: 'fetch-data', component: FetchDataComponent },
            { path: 'students', component: studentsComponent },
            { path: '**', redirectTo: 'home' }
        ])
    ]
})
export class AppModule {
}
Step 9: Build and run the Application
Build and run the application and you can see our Students Master/Detail page will be loaded with all Student Master and Detail information.
Return to Top

Conclusion:
First, create the Database and Table in your SQL Server. You can run the SQL Script from this article to create StudentsDB database and StudentMasters and StudentDetails Table. Also don’t forget to change the Connection string from “appsettings.json”.
Return to Top
Download Code
You can download the Source Code from this link
Download Source Code