Azure: Converting VM Unmanaged Disks To Managed Disks
Preface
Before starting up with the actual demo, let's spare few minutes understanding the basics of what exactly we are going to do and definitions of the terms being used in this article.
What are managed disks
Well, as the name suggests – managed disks are nothing but the disks which someone is managing for you. So since we are talking about offering called as 'Azure managed disks' then it is Azure who is managing your VM’s disks for you.
Well, let's hold on for a second since question(s) might be popping up and the obvious one would be - what is the advantage of letting someone manage our VM’s disks and why would we do that? The answer is quite simple and predictable. i.e., peace of mind and the ease of management. Isn’t it? True up-to some extent, however, let’s try to understand additional bells and whistles of its advantages.
Each HDD disk has max 500 IOPS limitation, same applies for the disks which are stored inside Azure storage accounts. Now, each storage account in Azure has limitation of 20000 IOPS. This means that, mathematically each storage account can host up to maximum 40 disks before it reaches its threshold limit. In certain situations, e.g. scaling up you might want to make sure that you don’t end up reaching these limitations and do not get in a tricky situation for your production environments. To address this issue, we usually create multiple storage accounts and distribute our disks in these storage accounts. This might solve the issue however the management of these multiple storage accounts could become cumbersome at times.
Let's try and think about another scenario, when you have your VHD image and you are provisioning your VMs using it. Now, to do that, you would have needed to upload the same VHD multiple times in multiple storage accounts which simply does not sound that great since you are replicating same data multiple times and paying for its storage cost.
Now All of such issues are addressed by Azure managed disks offerings. We do not really need to worry about IOPS limitations and placements of the disks to multiple storage account. Also, we can simply upload our custom VHD image centrally to one location and use it to create multiple VMs.
Prerequisites for conversion
Only those unmanaged disk VMs are supported whose disks are stored inside the storage account on which storage encryption services have never been enabled. In order to carry out the conversion of the disks stored in storage accounts with enabled storage encryption then the VHD files need to be copied using AzCopy to another storage account on which SSE is never enabled.
Demo (VM without availability set)
In this scenario, we have previously created ARM VM which has an OS disk and three data disks attached (1GB each), out of which two are standard HDD disks and one is premium (SSD) disk stored in premium storage account. Also, note that this article demonstrates the conversion of the VM which is not part of any availability set.

You might have noticed that all these disks are not encrypted. Now in order to convert the standard disks to managed disks – the below PowerShell command needs to be executed
ConvertTo-AzureRmVMManagedDisk
If you are unable to see the command mentioned above, then you will probably need to update the Azure PowerShell modules and this can be done using simply command
Install-Module AzureRM -AllowClobber
Note that, in order to perform this disk conversion, the virtual machine needs to be turned off. If the command is run directly on a running VM, it throws an exception clearly mentioning that the operation cannot be performed since the VM is not de-allocated.
Let’s go ahead and turn our VM off using the portal. (Since this is the quicker way to do it else same could have been achieved using the below Azure PS command too)
Stop-AzureRmVM -Name "ServerVM" -ResourceGroupName "Research" -Verbose -Force
Once the PS modules are updated, we will go ahead launch Azure PowerShell and run below commands
Install-Module AzureRM
Login-AzureRmAccount
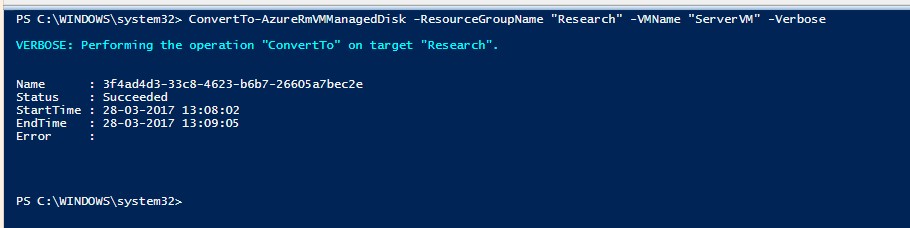
ConvertTo-AzureRmVMManagedDisk -ResourceGroupName "Research" -VMName "ServerVM" -Verbose
Once the command runs successfully, it gives summary of the execution.
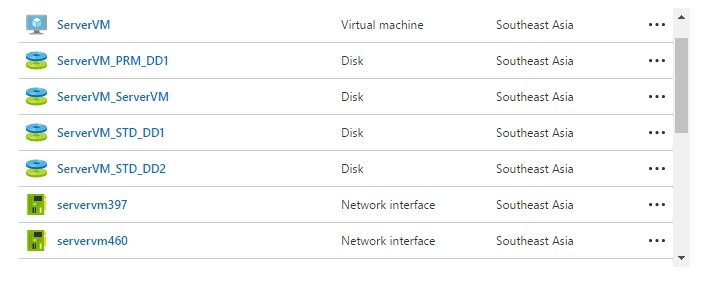
We should be able to see the managed disks created in the same resource group where VM is provisioned. Also, on successful completion the VM is automatically started.
The disk volumes created from attached data disks and all the data can also be seen on the VM and this can be validated by RDP’ing to the VM.
What about the old disks?
Well, if the conversion is successful and all the data is still intact then we can simply go ahead and delete the original disks associated with the VM. In our scenario, since our storage account which were dedicatedly created for provisioning VM disks and after the conversion of disks, those becomes of no use for us and hence can be deleted and some cost can be saved there.
Editing or Adding new disks to VM
At any point of time, we can go ahead and resize the disks using Azure portal.

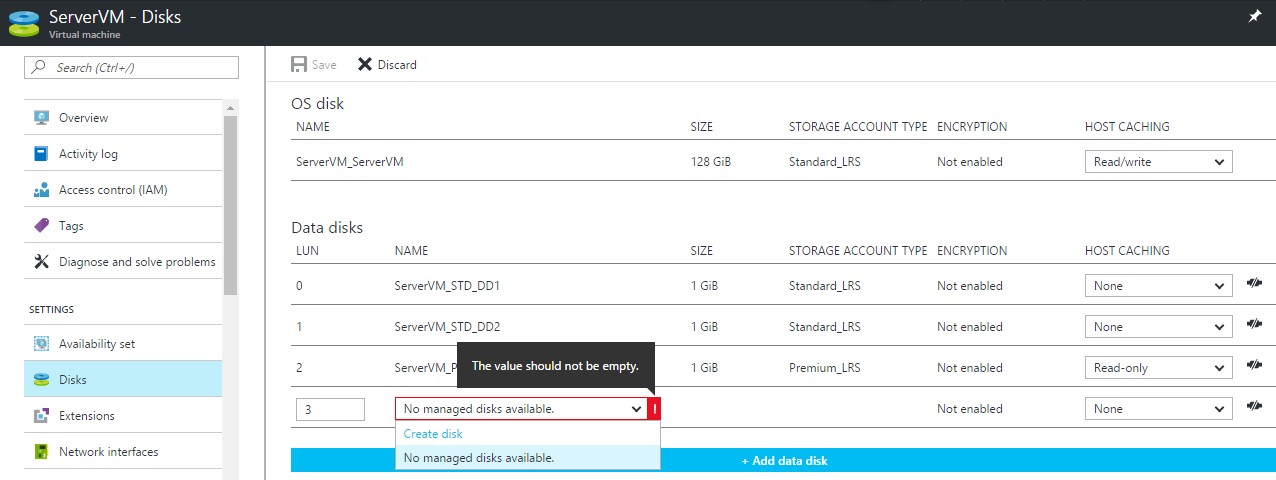
For adding new disks, we simply need to select the VM and select Disks option from the settings blade and click on Add data disk option.
As seen in the image below, it shows options to create the disk.
Select it and go ahead with the disk creation wizard (this process still remains almost same except the storage account selection part).
So, in this way we have just seen the impressive way to convert the VM with unmanaged disks to VM with managed disks with just one powerful PowerShell command.
References
This article was originally published at Converting Azure VM Unmanaged Disks To Managed Disks . This link is external to TechNet Wiki. It will open in a new window. Please feel free to improve this article by adding new missing or important content, fixing spellings and so on.
Apart from this, the MSDN documentation here helped quite a lot while drafting this article. You can learn about details of this conversion procedure with various scenarios here.
Since this article does not focuses on details of Azure VMs such as provisioning and managing Azure VMs, it is recommended to go through this link here. Similarly for the detailed understanding Azure Managed Disks, comprehensive documentation can be visited here.
Download
The sample script / PowerShell source code has been uploaded to the gallery. You can go ahead and download it here, Please note that the uploaded source code is just for the reference and is tested with limited scenarios. Feel free to update the script as per your requirements.