Cloud Distribution Point (Part-1)
In this section we'll learn about installing and configuring a cloud based distribution point.
Prerequisites for cloud-based distribution points:
A cloud-based distribution point requires the following prerequisites:
- A Windows Azure subscription.
- A self-signed or public key infrastructure (PKI) management certificate for communication from a Configuration Manager primary site server to the cloud service in Azure
- A service certificate (PKI) that Configuration Manager clients use to connect to cloud-based distribution points and download content from them by using HTTPS.
- A device or user must have Allow Access to cloud distribution points set to Yes in the client setting of Cloud Services before a device or user can access content from a cloud-based distribution point. By default, this value is set to No.
- A client must be able to resolve the name of the cloud service, which requires a Domain Name System (DNS) alias and a CNAME record in your DNS namespace.
- A client must be able to access the Internet to use the cloud-based distribution point.
Certificates**:**
- On the server that is running the Certification Authority console, right-click Certificate Templates, and then click Manage to load the Certificate Templates management console.
- Select the Web Server Template and click Duplicate Template
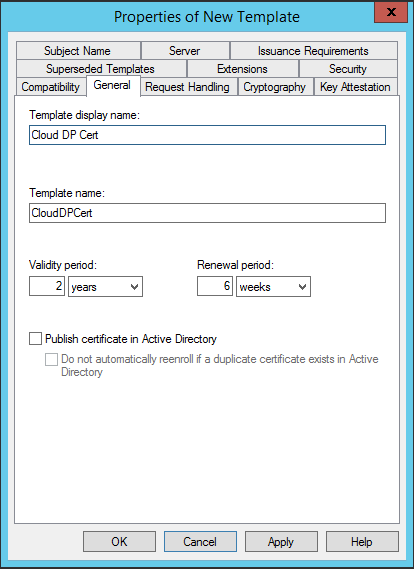
- In General tab, Display Template Name: Cloud DP Cert
[
](resources/0045.P1.png)
[
](resources/7115.P2.png)
- Click OK and close Certificate Templates Console.
- In the Certification Authority console, right-click Certificate Templates, click New, and then click Certificate Template to Issue.
- In the Enable Certificate Templates dialog box, select the new template that you have just created, ConfigMgr Cloud-Based Distribution Point Certificate, and then click OK.
To request the custom web server certificate
Perform the following steps on to the member server that will run the site server.
- Open an MMC and add the Certificates snap-in, select the Local Computer.
- Open the Personal store, right click Certificates and select all Tasks, Request New certificate.
- On the before you begin page, click Next.
- On the Select Certificate Enrollment Policy page, select Active Directory Enrollment Policy and click next.
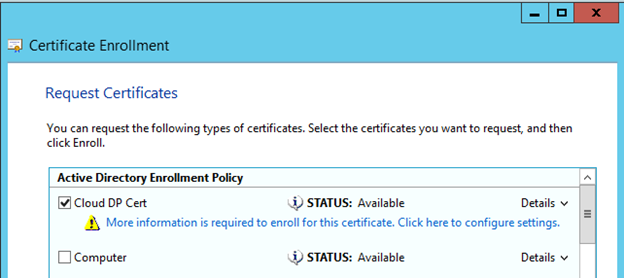
- On the Request Certificates page, select the Cloud DP Cert certificate and click the link more information is required to enroll this certificate.
- In the Subject name, select **Common name **and type CloudDP.domain.com and click Add (where Domain.com is the name of your domain)
- In Alternative name, select DNS, type CloudDP.Domain.com and click Add

6. Click OK and finish the enrollment.
Now we need to perform, two export operations on this certificate:
- Get a .cer file that we’ll upload to Windows Azure,
- Right-click on the certificate, select All Tasks –> Export.
- On the Certificate Export Wizard welcome page, click Next.
- On the Export Private Key page, select No do not export the private key and click Next.
- On the Export file format, select CER and click Next.
- Save the file as CloudDP.cer and finish the wizard.
- Now create a password-protected .pfx file that we’ll use to configure the connection from our local Configuration Manager to create the cloud-based distribution point.
- Export the certificate once more and this time select Yes, I want to export the private key.
- Finish the export and save the certificate using the default settings
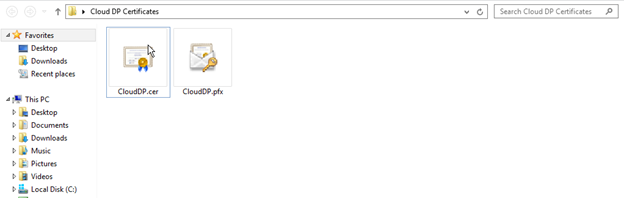
- Now you will have two certificates, one with .Cer format and other with .Pfx format
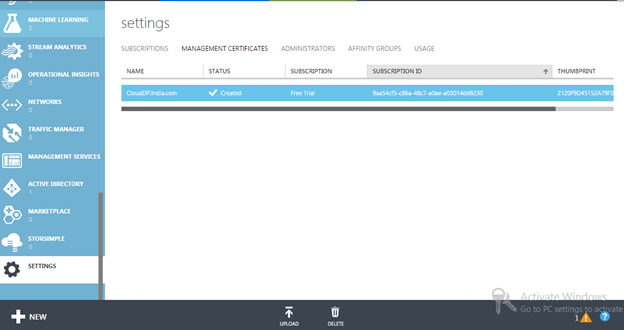
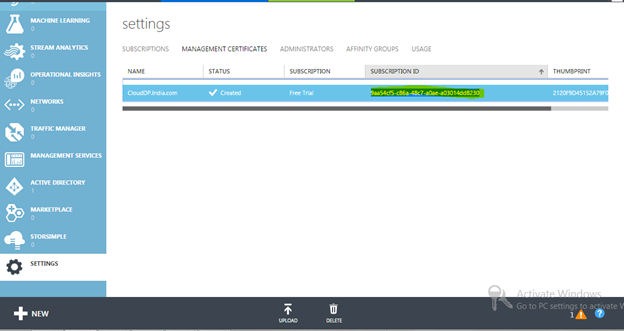
Importing the Management certificates in Windows Azure
- Login into Windows Azure Portal https://manage.windowsazure.com
- Navigate to the Settings from the menu on the left-hand side.
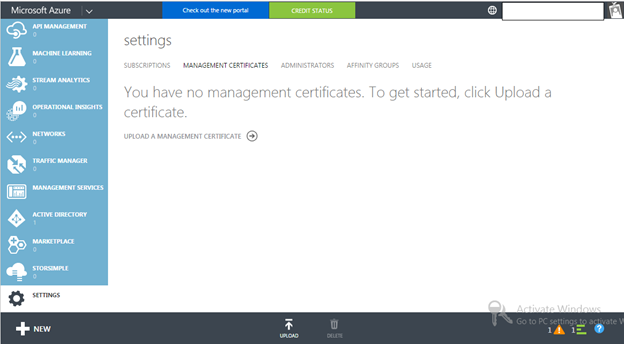
- Click on upload Management certificate and Upload the management certificate that you created for the site server with .cer format
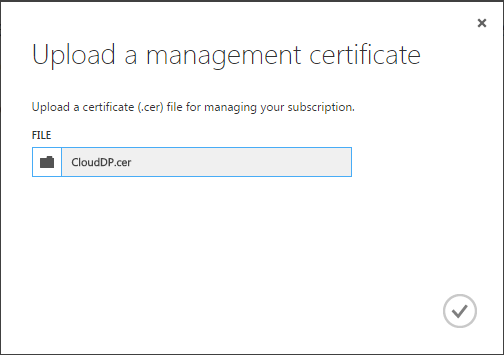
- After successful upload, you will be able to see the certificate in the list of imported management certificate
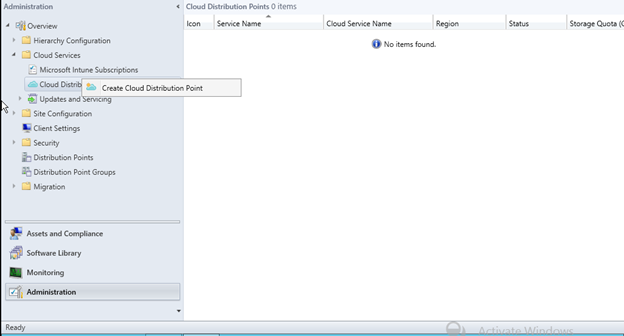
Installing the Cloud Distribution Point
- Open Configuration Manager Console, select the Hierarchy Configuration -> Cloud Services -> Cloud Distribution Points Click Create Cloud Distribution Point.
- On the General page, enter the following information.
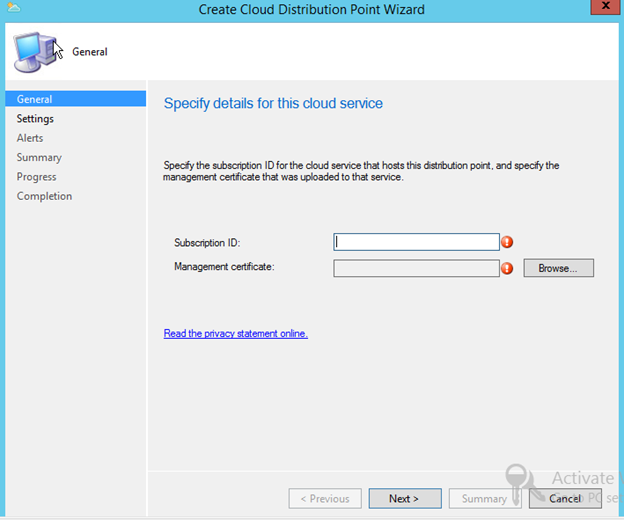
- You can find your Windows Azure subscription ID in the Settings section of the Windows Azure management portal.
Click on Browse and upload the management certificate with .Pfx format.
Click **Next – **it might take a little while to verify the subscription ID.
Select the region, and Click on browse and import the cloud distribution point service certificate with .Pfx format again and click next.
** Note:** Service FQDN will be automatically populated after uploading the certificate.

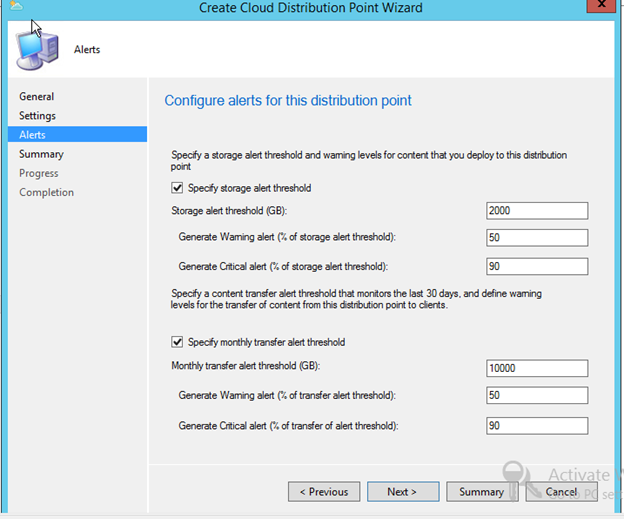
- On the Configure alerts for this distribution point page, make note of the different alert thresholds that can be set. We’ll leave the defaults and click Next.
- On the Summary page, review the Details, and then click Next.
** **
Verifying Cloud Distribution Point Installation
- In the background the CloudDP manager component will connect to Azure and start creating the service.
- It can take up to 30 minutes to provision a new distribution point in Azure. Till then Cloud Distribution Point will be in provisioning status
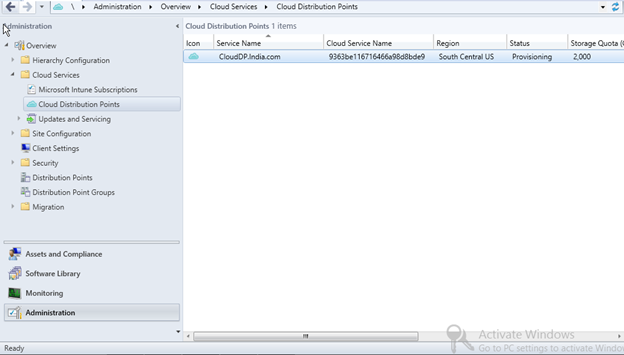
- Cloud Distribution Point state can be monitored using CloudMgr.log
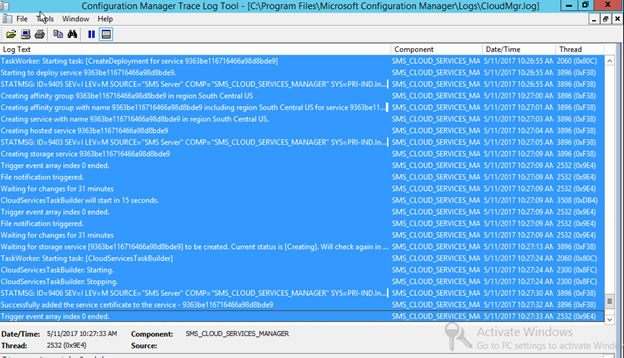
- Once the Cloud Distribution Point is ready, Configuration Manager displays a status message ID 9409 for the SMS_CLOUD_SERVICES_MANAGER component.
- We’ll also see that a Site System Server is created for Cloud Distribution Point under Servers and Site Systems Role.

- In Windows Azure Portal, we’ll see two cloud services created with running and online status.
- Storage Account Service
- Cloud Service
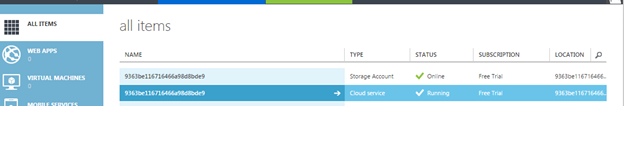
That's all !! Your Cloud Distribution Point is ready for content Distribution to Azure.
References:
/en-us/sccm/core/plan-design/hierarchy/use-a-cloud-based-distribution-point
/en-us/sccm/core/servers/deploy/configure/install-cloud-based-distribution-points-in-microsoft-azure