Microsoft Bot Framework : Getting Started - Building the first Hello Bot
Microsoft Bot Framework was introduced in Microsoft Build 2016 event. This empowers developers to build conversational interfaces or chat Bots. Microsoft Bot Framework is bundled as a SDK and is an open source offering from Microsoft. This supports both .Net and Node.js. Developers can use Microsoft Cognitive services along with Microsoft Bot Framework to build intelligent Bots that can exhibit artificial intelligence.
Introducing Bots
Bots are workers of this new age digital workforce and perform automated tasks. Bots are capable of doing mundane rule based tasks to complex tasks that incorporatemachine learning and artificial intelligence.
Microsoft Bot framework helps developers to build conversational bots that can interact with end users using Facebook, Skype and many other such chat services. Developers can use Microsoft Cognitive services to make these Bots or Internet Robots intelligent enough to interact with end users like human does.
An example of a Bot can be a feedback bot for a restaurant registered with skype. User can dine in the restaurant and can connect to the skype, add id of feedback bot over skype to his contact list and chat with it. Feedback bot will ask a series of questionnaires that the user will respond to and finally save the user responses in the database for further actions and analytics. The end user will communicate with the bot over skype as if he is connecting with a hotel executive having a skype Id. Here in this example instead of a hotel executive responding to customer a bot will communicate with customer and collect data.
Activity and Connector Service
Before we start building a Bot it is highly essential that we understand the concept of Activities and Connector Services that can be termed as the basic building block of the Bot built using Microsoft Bot Framework.
Users can communicate with Bots built using Microsoft Bot Framework using variety of channels like Skype, Facebook, email, SMS and many others. Connector service acts an interface between the Bots and channels. Users send communications to Bot using the channel in which the Bot is registered. Connector service sits between the Channel and the Bot and facilitates communications between them. It helps in routing appropriate communication to appropriate channel.
Bot Connector Service sends communication between Bot and the channel using the Activity object. Below listed are different types of Activity objects.
message – This refers to actual communication or message exchanges that happens between Bot and end user/channel
converstationUpdate – This represents when a bot or a user is added to the conversation or removed from a conversation.
contactRelationUpdate – This represents when a Bot is removed or added in user’s contact list.
ping – This represents whether the end point of the Bot is reachable or not.
deleteUserData - This indicates Bot to delete any saved user data that it may have stored.
endOfConversation – This indicates Bot to wind up conversation and marks end of conversation.
Building the first Bot using Microsoft Bot Framework
Now that we have understood the basics of Bot Framework we can start building a simple Bot. This would help understanding the details we discussed above.
Building a Bot using Bot Framework is easy and can be done using below steps.
Step 1
Download the Visual Studio Template for the Bot Framework from here and copy it to %USERPROFILE%\Documents\Visual Studio 2017\Templates\ProjectTemplates\Visual C#\
Step 2
Create a new project of type Bot Application. Name it as HelloBot.
http://i.imgur.com/kKAtx1x.jpg
Step 3
Microsoft Bot Framework is available as SDK and that can be installed from NuGet package manager. Open NuGet package manager console and run Install-Package Microsoft.Bot.Builder
http://i.imgur.com/fhIJ1NU.jpg
Step 4
Now we are all set for developing our HelloBot application. Bot Framework Emulator provides an interface to debug our application. Let us download this from here and install.
Step 5
Now open Controllers\MessagesController.cs in the below solution and replace Post method with below. In the Post method, we first created a ConnectorClient object that would facilitate sending message back to the user. Text property of Activity object gives the message sent by the user. This message is interpreted and a reply message text is prepared. Activity object is used to build a reply message and the message is sent using ConnectorClient object created earlier.
      public async Task<    HttpResponseMessage    > Post([FromBody]Activity activity)
                 {
                 if (activity.Type == ActivityTypes.Message)
                 {
                 string messageText = string.Empty;
                 //Create a connector client
                 ConnectorClient connector = new ConnectorClient(new Uri(activity.ServiceUrl));
                 // Reply user with message - Hello {Name of User}
                 if (activity.Text.Contains("Hello") || activity.Text.Contains("Hi"))
                 {
                 messageText = "Hello!!!! How are you doing today";
                 }
                 else
                 {
                 messageText = "Sorry. I do not understand you. I am trained to reply you if you greet me Hello or Hi";
                 }
                 Activity message = activity.CreateReply(messageText);
                 await connector.Conversations.ReplyToActivityAsync(message);
                 }
                 else
                 {
                 HandleSystemMessage(activity);
                 }
                 var response = Request.CreateResponse(HttpStatusCode.OK);
                 return response;
                 }
Step 6
Build and run the application. HelloBot endpoint is now up and running.
http://i.imgur.com/3E1Iz2J.jpg
Step 7
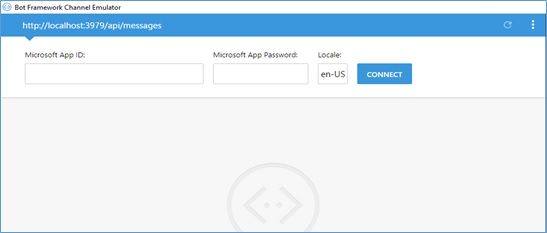
Now let us open Bot Framework Emulator so that we will be able to send messages to the Bot. Provide Bot endpoint as http://[Your Bot Hostname]/api/messages
You can see that Bot Framework Emulator asks for Microsoft App ID and Microsoft App Password. To connect Bot in a secured way these values should be provided in the web.config file of the Bot. As of now these are kept as blank in the config file. Se we need not provide any value here and we can hit on Connect button.
http://i.imgur.com/eOfuMsY.jpg
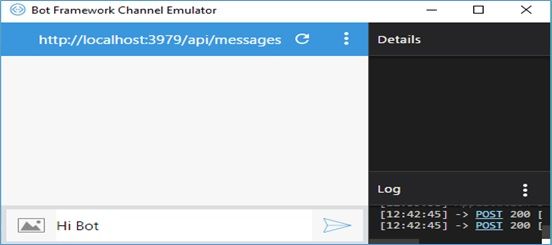
Once we have hit Connect button we can start interacting with the Bot. Let us send a message – Hi Bot
http://i.imgur.com/F0ZVPcc.jpg
The Bot responds to our ping as shown below.
http://i.imgur.com/UvULx3H.jpg
The Bot we built is a simple one and is rule based. The Bot checks for text sent by the user and based on the text it responds back. This Bot can be made intelligent by using Microsoft Cognitive Services.
Source Code
This solution is built using Visual Studio 2017 Community Edition. You can get the source from GitHub repository here
Next Steps
Now let us dig more deep into the Bot Framework in the next articles of this series.
Microsoft Bot Framework: Getting Started – Making the Bot Intelligent using Text Analytics Sentiment API from Microsoft Cognitive Services
Microsoft Bot Framework: Getting Started – Understanding Dialogs and Maintaining states between conversations
Microsoft Bot Framework: Getting Started – Sending a File to the Bot
Microsoft Bot Framework: Getting Started – Bot sends an attachment file to the end user