Windows 10: Enabling Telnet Client
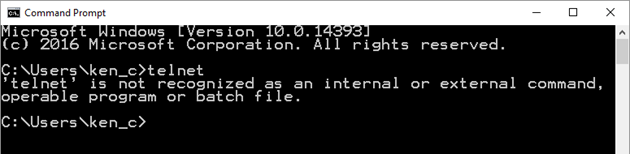
The Telnet Client is a great tool for developers and administrators to help manage and test network connectivity. However, the Telnet Client application is disabled by default in Microsoft Windows 10. Attempts to use it before activation returns the error message ’not recognized as an internal or external command, operable program or batch file’.
The following step-by-step shows you how to enable Telnet.
Enabling The Telnet Client
To enable Telnet Client on Windows 10, follow these steps:
Right-click the Start button and select Programs and Features.

Click Turn Windows features on or off from the left-hand menu.

The Windows Features dialog box appears. Scroll down and select Telnet Client. Click OK.

The Telnet Client installations begins.

Once complete, a success message appears.

Click Close. There’s no need to restart your computer.
Verifying The Install
Once the installation completes, we can use the Telnet Client.
Launch the Command Prompt by typing Command Prompt into the search box on the menu bar and clicking the app returned.
Alternatively, you can also type Windows Key + R to open the Run command dialog. Type cmd and hit the Enter key.
Type telnet and hit Enter to access the Telnet Client.
Type help to see the supported Telnet commands.

Type q or quit to exit Telnet.
Type telnet google.com 80 to Telnet into Google on port 80.

Summary
In this article, we have seen how to enable and use the Telnet Client in Windows 10.