AD FS - Testing claims rules without deploying a sample app
Introduction
In federated identity, claims are statements used to identify a user and authorize access. Active Directory Federation Services provides a claims engine that can use rule-based processing to determine which claim types and value to accept, issue, or use for authorization decisions. There are 3 claims sets used in the claims rule engine:
- Acceptance Transform Rules describe how AD FS processes incoming claims
- Authorization Rules - describe how AD FS should authorize a user for accessing the relying party
- Issuance Rules - describe how claims are issued to the relying party
When on-boarding applications with Active Directory Federation Services, it may be necessary to write complex claims rules. The claims rule language is not overly difficult to work with, but testing such rules can be cumbersome. A common way to test rules involves deploying a sample application to a lab environment. There are a lot of great resources out there for doing this. Here's my favorite sample.
But what if you don't want to deploy an application just to test claims rules? Is there another way? Yes! Glad you asked...
First, a warning: ALWAYS TEST IN A LAB ENVIRONMENT. There is nothing that can replace a good lab, and there is no excuse not to have at least one lab environment available. With that out of the way, let's begin.
UPDATE - Use the ADFSHelp Claims X-Ray!
Shortly after I wrote this article, Microsoft put out a tool called the Claims X-Ray: https://adfshelp.microsoft.com/ClaimsXray/TokenRequest
I highly recommend using this tool for troubleshooting claims issuance. It supports SAML-P, WS-Fed, and OAuth flows. If you still want to check out the "old" way of doing this, proceed with the steps below.
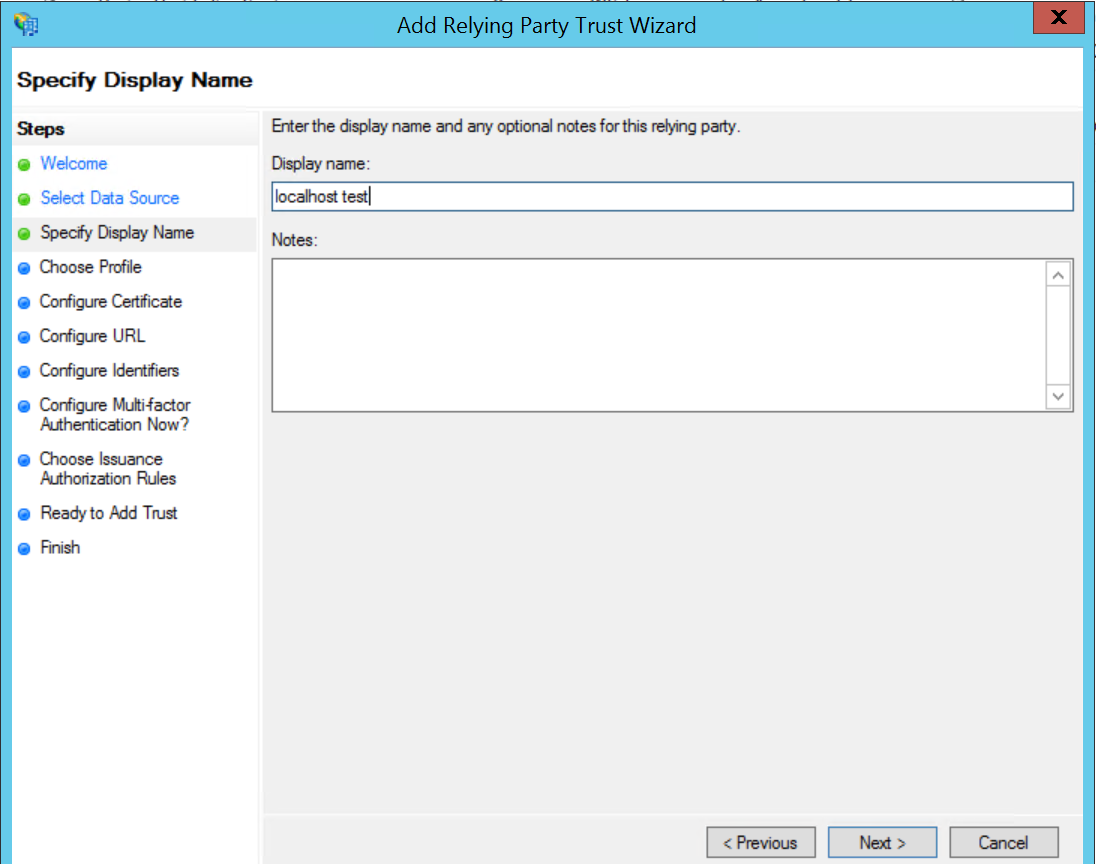
Create a Relying Party Trust for localhost
Log on to your AD FS server and create a new Relying Party trust.
In the Add Relying Party trust wizard, choose a display name.
Choose AD FS Profile.
Leave the defaults on Configure Certificate.
Leave the defaults on Configure URL (we'll take care of this later).
Add an identifier for http://localhost.
Leave the defaults for the remainder of the wizard.
Do not edit claims rules - finish the wizard..
Add a SAML Endpoint
Open Properties for http://localhost Relying Party Trust.
Click on Endpoints.
Add a SAML endpoint for Redirect binding for Trusted URL https://localhost
Note: We choose SAML so we can use IdP-Initiated sign-on flow. The Redirect binding means the token will be contained in the query string of the URL, which makes it easy to extract.It should look like this:
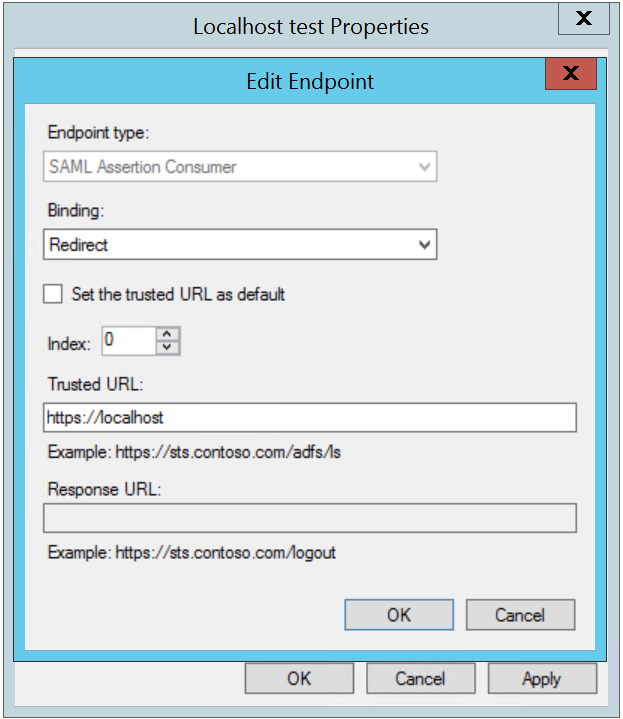
Click OK, Apply, and close the Properties dialog
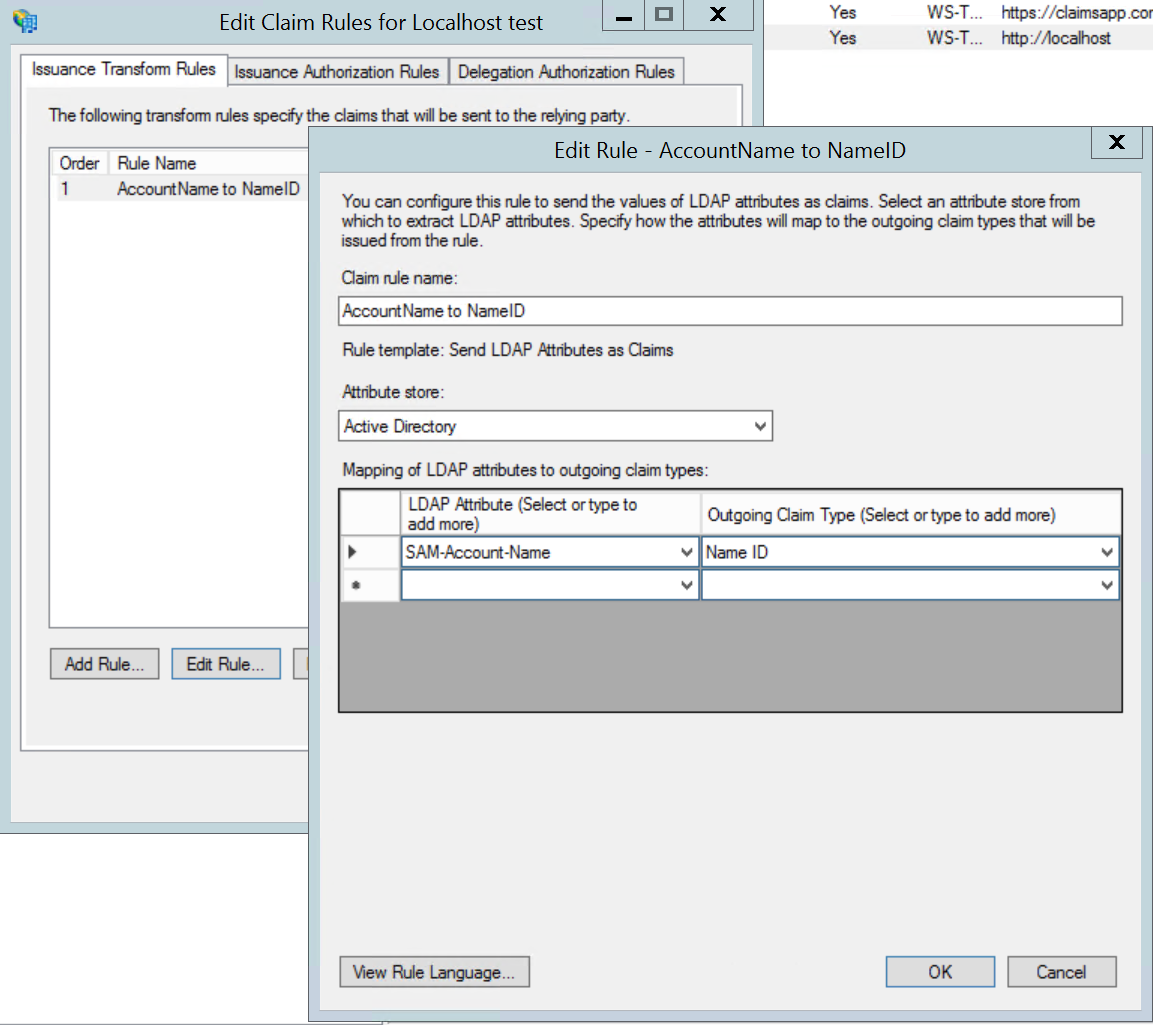
Add an Issuance Transform Claims Rule
Edit Claims Rules for http://localhost Relying Party Trust.
Create a claim rule for NameID (or whatever else you want to see in the SAML token).
Test with IdP-Initiated Signon
Open a web browser and navigate to the idpinitiatedsignon page (https://sts.example.com/adfs/ls/idpinitiatedsignon).
**Note: **If you are using AD FS 2016, this page is disabled by default. To enable it, run .Set-AdfsProperties–EnableIdpInitiatedSignonPage$TrueSelect Sign In and choose the localhost test app in the dropdown

Click Sign In
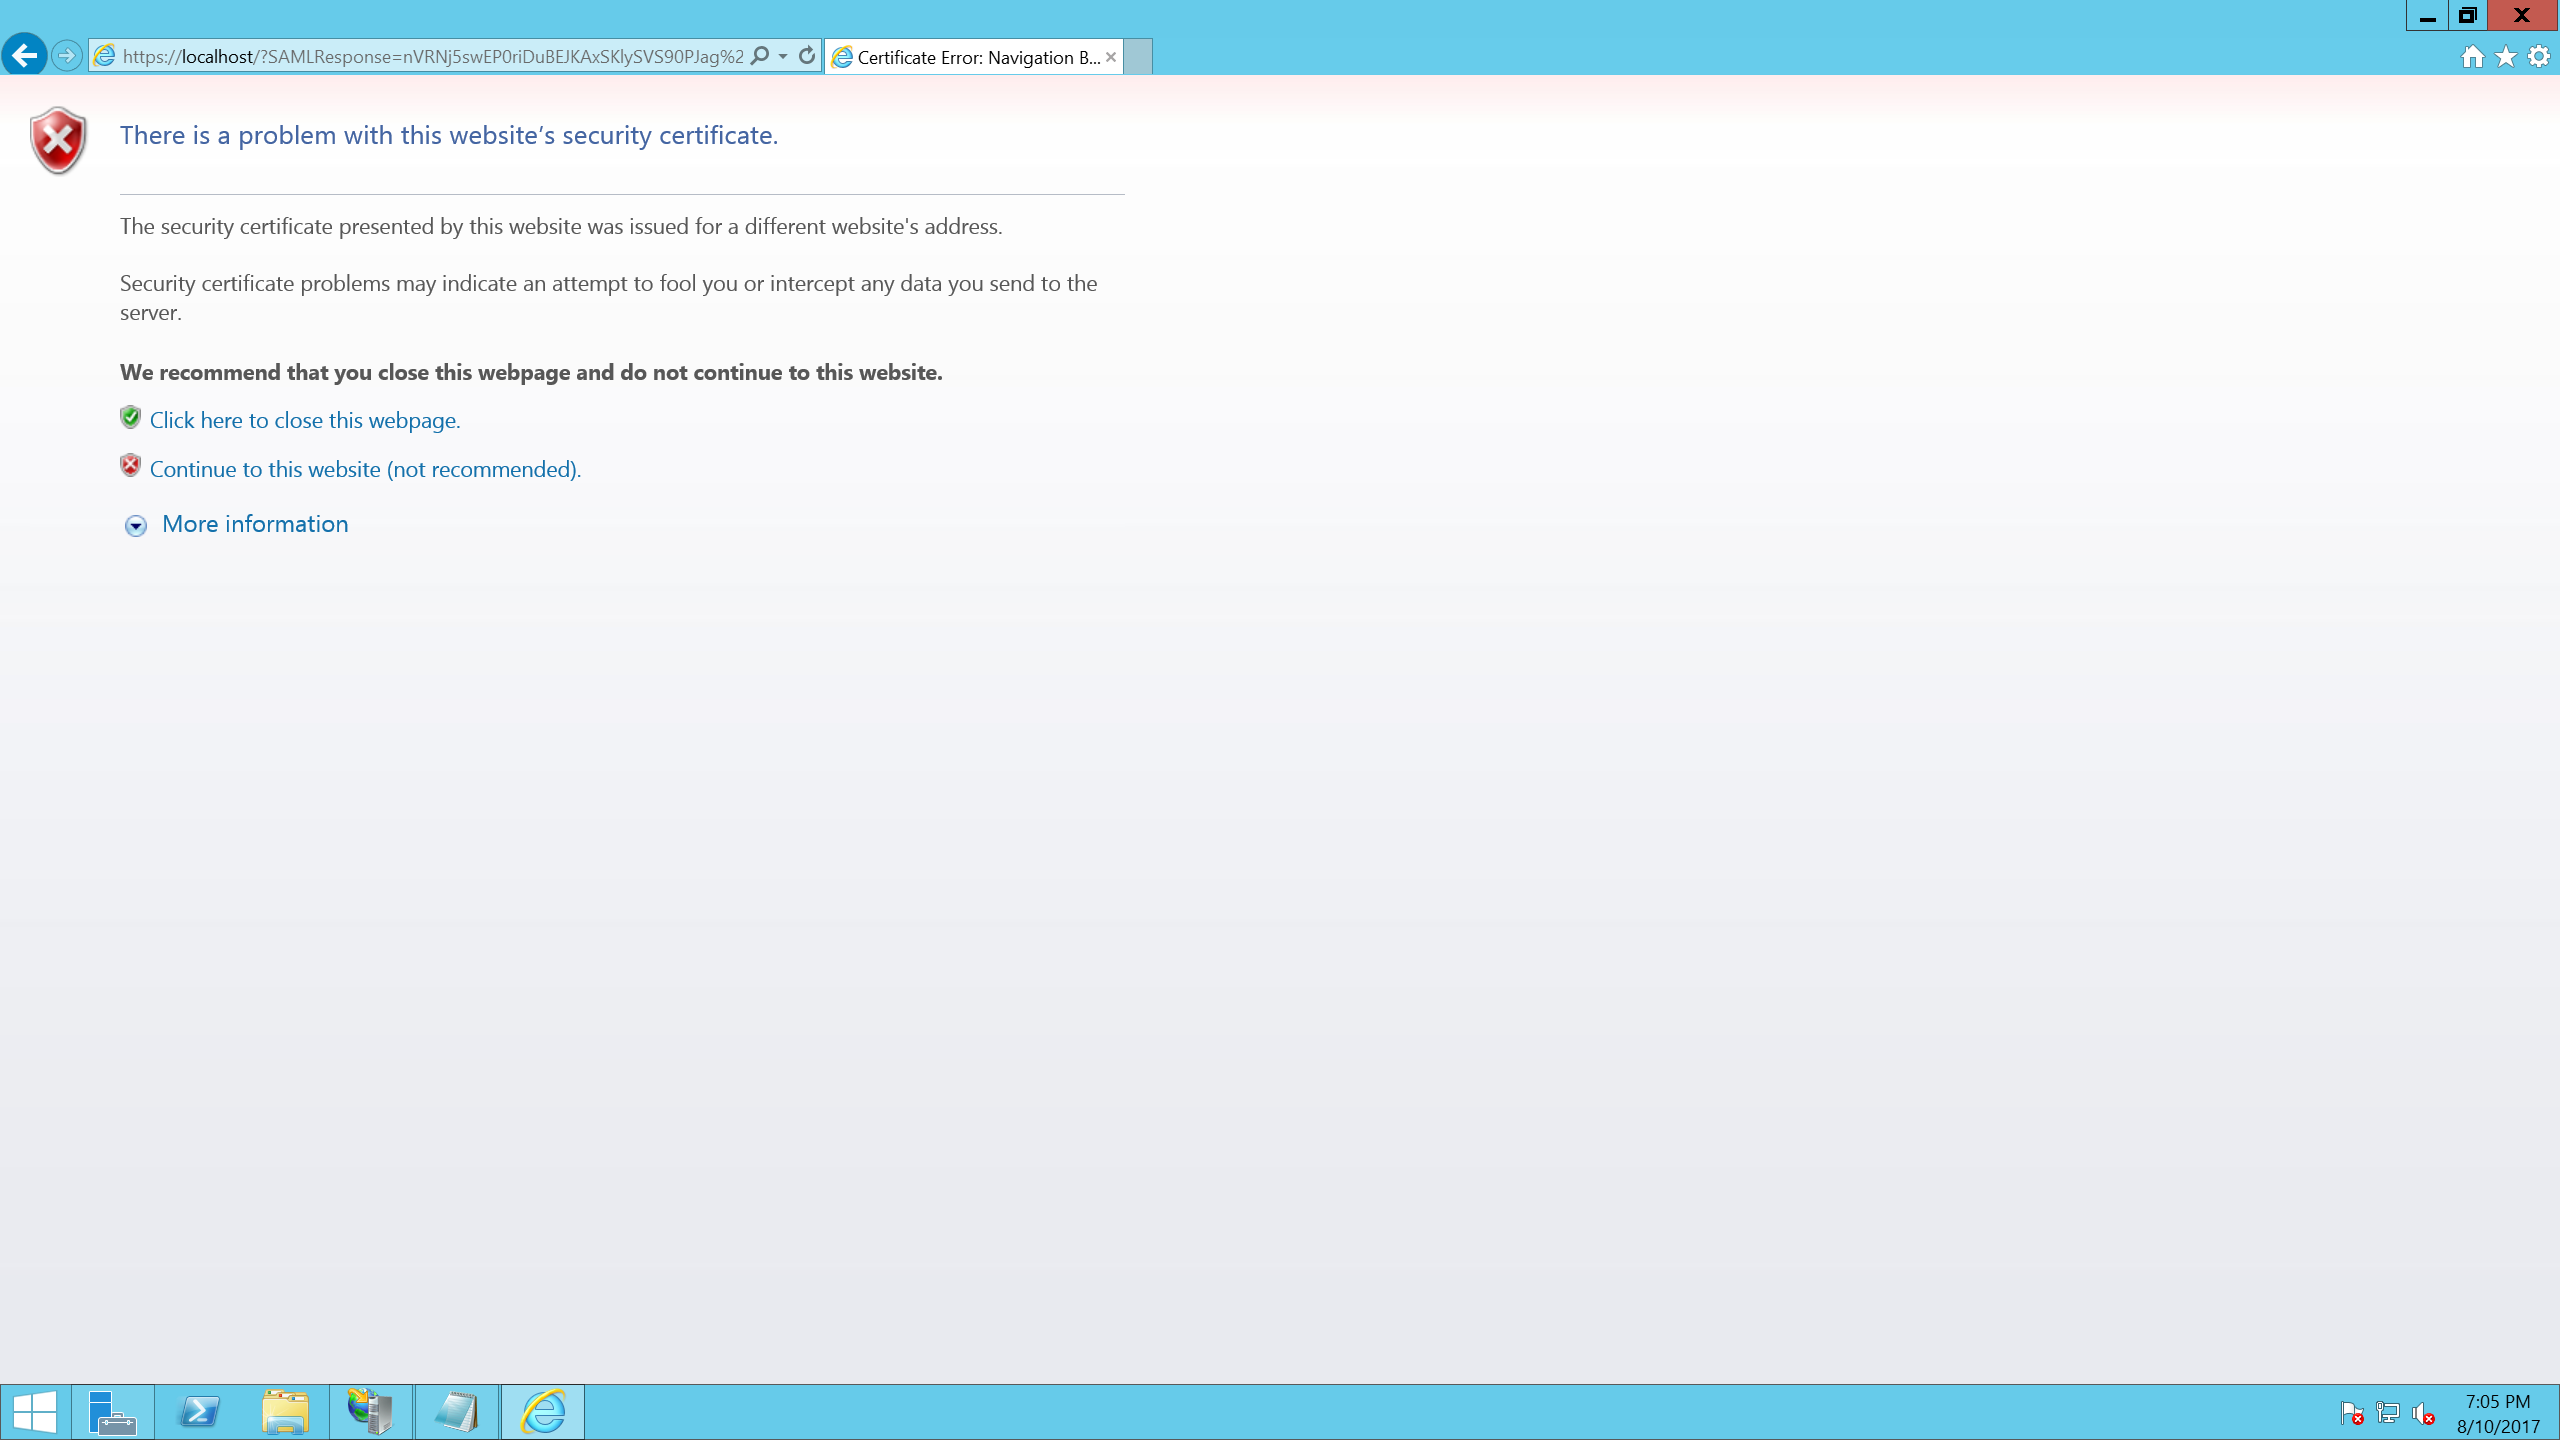
At first, it looks like something went wrong...But it didn't. The SAML token is contained within the address bar. Typically, SAML assertions are sent to a POST endpoint, which would require developer tools in web browser (or fiddler) to see. Read this if you are interested in learning about the different SAML bindings.
Copy the URL and paste into notepad. It should look like:
https://localhost/?SAMLResponse=nVRNj5swEP0riDuBEJKAxSKlySVS<snipped for brevity>%3d%3d&SigAlg=http%3a%2f%2fwww.w3.org%2f2001%2f04%2fxmldsig-more%23rsa-sha256Copy the part after "SAMLResponse=" and paste it into your favorite SAML decoder. I like to use https://www.ssocircle.com/en/1203/saml-request-online-decoder-encoder/
Examine the token. Here you can see we only issue a single claim of NameID containing the sAMAccountName for the authenticating user (testuser01)
<samlp:Response xmlns:samlp="urn:oasis:names:tc:SAML:2.0:protocol" ID="_84597030-bef0-457b-8a60-d3bbd42025c6"Version="2.0" IssueInstant="2017-08-10T19:04:57.029Z" Destination="https://localhost"Consent="urn:oasis:names:tc:SAML:2.0:consent:unspecified">
<Issuer xmlns="urn:oasis:names:tc:SAML:2.0:assertion">http://adfs.contoso.lab/adfs/services/trust<;/Issuer>
<samlp:Status>
<samlp:StatusCode Value="urn:oasis:names:tc:SAML:2.0:status:Success"/>
</samlp:Status>
<Assertion xmlns="urn:oasis:names:tc:SAML:2.0:assertion" ID="_7fd31580-d2aa-42b8-9808-83c41b78ccdb"IssueInstant="2017-08-10T19:04:57.029Z" Version="2.0">
<Issuer>http://adfs.contoso.lab/adfs/services/trust<;/Issuer>
<Subject>
<NameID>testuser01</NameID>
<SubjectConfirmation Method="urn:oasis:names:tc:SAML:2.0:cm:bearer">
<SubjectConfirmationData NotOnOrAfter="2017-08-10T19:09:57.029Z" Recipient="https://localhost"/>
</SubjectConfirmation>
</Subject>
<Conditions NotBefore="2017-08-10T19:04:57.024Z" NotOnOrAfter="2017-08-10T20:04:57.024Z">
<AudienceRestriction>
<Audience>http://localhost<;/Audience>
</AudienceRestriction>
</Conditions>
<AuthnStatement AuthnInstant="2017-08-10T19:04:56.993Z" SessionIndex="_7fd31580-d2aa-42b8-9808-83c41b78ccdb">
<AuthnContext>
<AuthnContextClassRef>
urn:oasis:names:tc:SAML:2.0:ac:classes:PasswordProtectedTransport
</AuthnContextClassRef>
</AuthnContext>
</AuthnStatement>
</Assertion>
</samlp:Response>
Bonus: Issuance Authorization Rules
Issuance Authorization Rules can be tested with this method as well. A trick is to issue claims within the Issuance Authorization Rules that have values you are looking to use within your Authorization policy. Here's an example rule set within Issuance Authorization Rules:
@RuleName = "Issue Client Application"
 => issue(Type = "http://schemas.microsoft.com/2012/01/requestcontext/claims/x-ms-client-application", Value = "Microsoft.Exchange.ActiveSync");

@RuleName = "Issue Forwarded Client Ip"
 => issue(Type = "http://schemas.microsoft.com/2012/01/requestcontext/claims/x-ms-forwarded-client-ip", Value = "192.168.0.1");

@RuleName = "Issue Absolute Path"
 => issue(Type = "http://schemas.microsoft.com/2012/01/requestcontext/claims/x-ms-endpoint-absolute-path", Value = "/adfs/ls");

@RuleName = "Issue Inside Corporate Network"
 => issue(Type = "http://schemas.microsoft.com/ws/2012/01/insidecorporatenetwork", Value = "false");

@RuleName = "Test AuthZ Rule"
c1:[Type == "http://schemas.microsoft.com/ws/2012/01/insidecorporatenetwork",
Value == "false"] && c2:[Type == "http://schemas.microsoft.com/2012/01/requestcontext/claims/x-ms-endpoint-absolute-path", Value == "/adfs/ls"]
 && c3:[Type == "http://schemas.microsoft.com/2012/01/requestcontext/claims/x-ms-forwarded-client-ip", Value =~ "\b192\.168\.0\.([0-9]|1[0-9]|2[0-9]|3[0-2]\b"]
 && c4:[Type == "http://schemas.microsoft.com/2012/01/requestcontext/claims/x-ms-client-application", Value =~ "^Microsoft.Exchange"]
 => issue(Type = "http://schemas.microsoft.com/authorization/claims/permit", Value = "true");
Here, the rule to be tested (Test AuthZ Rule) is verified by forcing the values you are trying to test earlier in the pipeline.
And that's it! Happy testing.
P.S. This type of trick works with any federated identity provider.