Azure Cognitive Services - Computer Vision - Image Recognition API - iSpy plug-in code example
Introduction
Azure Cognitive Services provide some amazing machine learning API tools to add powerful analysis to your applications. All you need to do is register for an API key and you can get started straight away!
This article will show you how the "Analyse" API works and how easy it is to integrate.
To demonstrate, we will make a plug-in (class library) for the popular open source camera monitor software iSpy.
This article focuses on the API service. For more details on how to use the plug-in in iSpy, please read this write-up on MSDN, where the code is available, as well as on GitHub.
What is Azure Cognitive Services?
At the time of writing this, there are five amazing services that you can play with and use for FREE, up to a certain usage level.
We have collated the text from here into a single list below:
Vision - Image-processing algorithms to smartly identify, caption and moderate your pictures.
- Computer Vision API - Distill actionable information from images
- Content moderator - Automated image, text and video moderation
- Video API - Intelligent video processing
- Video Indexer - Unlock video insights
- Face API - Detect, identify, analyse, organised and tag faces in photos
- Emotion API - Personalize user experiences with emotion recognition
- Custom Vision Service - Easily customize your own state-of-the-art computer vision models for your unique use case
Speech - Convert spoken audio into text, use voice for verification or add speech recognition to your app.
- Computer Vision API - Distill actionable information from images
- Translator Speech API - Easily conduct real-time speech translation with a simple REST API call
- Speaker Recognition API - Use speech to identify and authenticate individual speakers
- Bing Speech API - Convert speech to text and back again to understand user intent
- Custom Speech Service - Overcome speech recognition barriers like speaking style, background noise and vocabulary
Language - Allow your apps to process natural language with pre-built scripts, evaluate sentiment and learn how to recognize what users want.
- Language Understanding Intelligent Service - Teach your apps to understand commands from your users
- Bing Spell Check API - Detecting and correcting spelling mistakes in your app
- Web Language Model API - Use the power of predictive language models trained on web-scale data
- Text Analytics API - Easily evaluate sentiment and topics to understand what users want
- Translator Text API - Easily conduct machine translation with a simple REST API call
- Web Language Model API - Use the power of predictive language models trained on web-scale data
- Linguistic Analysis API - Simplify complex language concepts and parse text with the Linguistic Analysis API
Knowledge - Map complex information and data in order to solve tasks such as intelligent recommendations and semantic search.
- Recommendations API - Predict and recommend items your customers want
- Academic Knowledge API - Tap into the wealth of academic content in the Microsoft Academic Graph
- Knowledge Exploration Service - Enable interactive search experiences over structured data via natural language inputs
- QnA Maker API - Distill information into conversational, easy-to-navigate answers
- Entity Linking Intelligence Service API - Power your app’s data links with named entity recognition and disambiguation
- Custom Decision Service - A cloud-based, contextual decision-making API that sharpens with experience
Search - Add Bing Search APIs to your apps and harness the ability to comb billions of web pages, images, videos and news with a single API call.
- Bing Autosuggest API - Give your app intelligent auto-suggest options for searches
- Bing Image Search API - Search for images and get comprehensive results
- Bing News Search API - Search for news and get comprehensive results
- Bing Video Search API - Search for videos and get comprehensive results
- Bing Web Search API - Get enhanced search details from billions of web documents
- Bing Custom Search API - An easy-to-use, ad-free, commercial-grade search tool that lets you deliver the results you want
What is an API and how do you use it?
API stands for Application Programming Interface. It is a bunch of web "endpoints" (URLs) that you can reach out to, just like a web browser request. But instead of returning an HTML page, you get JSON encoded data. You can then use this data in your own application.
For this demonstration, we have used the Computer Vision API. All you need to know to get started is HERE.
You will need to register with Cognitive Services, to obtain an instant API key.
Insert your key into the code shown in the link above and you're good to go!
A Demonstration
We won't post too much code here. Just relevant bits and then refer you to the following sources, where we have posted everything you need to get up and running in minutes.
MSDN Samples has a copy of the project, with a good write-up on how to use it in iSpy
GitHub also has a copy of the project. I'd love it if you helped improve the code, or added to its features!
To call the API, you simply need to send an HTTP POST request to the API endpoint, with your API key and the function parameters that you want.
Below is the important code snippet from that link above, plus an explanation of the important bits, below:

This method takes a file path as a parameter, but you can just as easily pass through images as byte streams, as we demonstrate in the MSDN/GitHub project.
This API function has a visual Features parameter, so you can reduce bandwidth by selecting only features you want.
The HTTP request header must have "Ocp-Apim-Subscription-Key", with your API key. This authorizes your use of the API.
The response from the service is taken as a string, but it is actually JSON encoded data. How you then process it is up to you. Either with conversion to strongly typed objects, or as dynamic variables. For this quick demo, we show the latter method.
// Categories
if (r.categories != null)
{
    Newtonsoft.Json.Linq.JArray cats = r.categories;
    foreach (dynamic cat in cats)
    {
        var name = (string)cat.name;
        report.Reports.Add($"Category: {name} ({cat.score}))");

        // Check for person
        if (name.ToLower().Contains("people"))
        {
            report.HasPerson = true;
        }
    }
}
else
{
    report.Reports.Add("Uncategorised");
}
Above shows the returned "categories" property.
We have found that when this has a person in it, it has so far always been correct.
// Tags
if (r.description.tags != null)
{
    var tags = "Tags: ";
    foreach (string tag in r.description.tags)
    {
        tags += "[" + tag +  "] ";
        if (tags.Length > MaxTextCharWidth)
        {
            report.Reports.Add(tags);
            tags = "";
        }

        // Check for person
        if (personTags.Contains(tag))
        {
            report.HasPerson = true;
        }
    }
    if (tags != "")
        report.Reports.Add(tags);
}
else
{
    report.Reports.Add("No tags");
}
Above shows the returned "tags" property.
This feature is quite chatty and random.
It often comes back with one of the trigger words below.
static List< string > personTags = new List< string > { "man", "woman", "person", "people", "boy", "girl" };
Finally, below is the returned "captions" property.
This can often be uncannily accurate, but sometimes hilariously off the mark!
// Captions
if (r.description.captions != null)
{
    report.Reports.Add("Captions: ");
    foreach (dynamic caption in r.description.captions)
    {
        report.Reports.Add($"\"{caption.text}\" ({caption.confidence})");
    }
}
else
{
    report.Reports.Add("No captions");
}
How to get the best out of the service
If we just sent it the whole frame every time we wanted the doorstep analysis, I'd quite often get the same reply back, about the surrounding scenery from the image. As this camera pointed to our front drive, we'd often just get "A close-up of a car", so not about the subject that was actually moving, beside the car.
So we need to add a way to crop just the relevant "action window" out of the image.
iSpy just provides raw frames to plugins, so we have to find the action window ourselves. In this case, this plug-in was a great test-bed to develop the code we would later use for a Windows Universal IP Camera app, which we can run on a Raspberry Pi. Therefore, I've also added my own movement detection algorithm.
Added movement detection means the plug-in can be run in iSpy in "continuous" mode, completely replacing the built-in movement detection.

Here is a screenshot of the "Configure" pop-up, which highlights each step the plug-in takes.
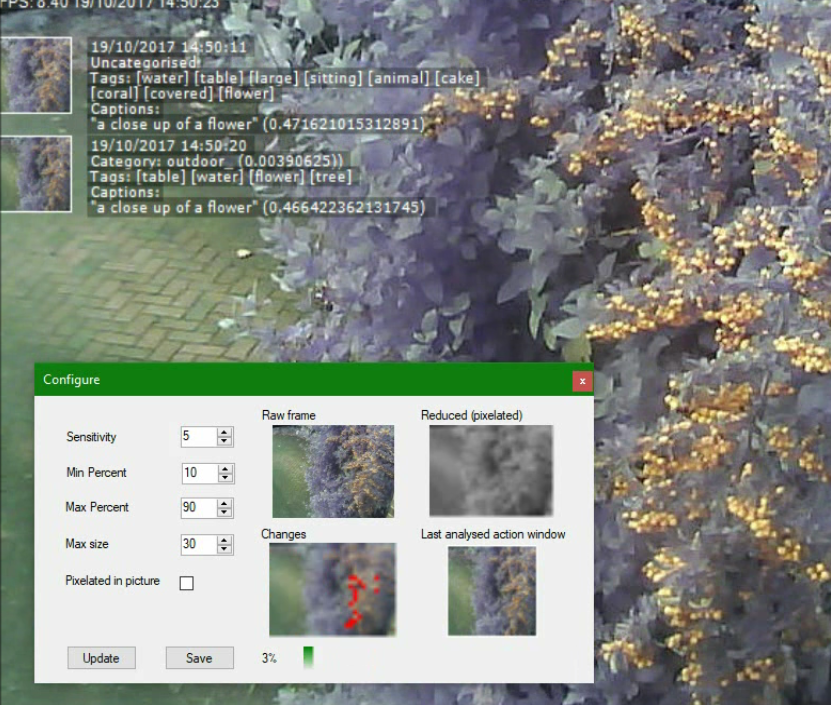
1) Take the raw frames from the iSpy input stream
2) Reduce the raw frame to a much smaller number of pixels (pixelated)
3) Change the pixels to greyscale
4) Compare pixels to the last frame, highlight/count pixels that change
5) Detect shade changes that are more than the allowed sensitivity range
6) Calculate total percent of changed pixels between old and new pixelated frames
7) If percentage is within a trigger range (min/max), then trigger an alert
8) The actual "action window" is taken (rectangle containing the only area with movement, not the static scenery)
9) Send just that "action window" section of the image to Cognitive Services, for analysis!
10) Trigger alerts based on the category or tags that are returned!
Below is the code that keeps track of the boundaries of the action window, while checking the pixels for change:
// Compare to last frame same pixel
try
{
    var lastPixel = lastBmp.GetPixel(x, y);
    if (avg < lastPixel.R - sensitivity || avg > lastPixel.R + sensitivity)
    {
        changedPixels++;

        // Determine action window boundaries
        if (x < imageToAnalyse.BoundaryStartPoint.X)
            imageToAnalyse.BoundaryStartPoint.X = x;
        if (x > imageToAnalyse.BoundaryEndPoint.X)
            imageToAnalyse.BoundaryEndPoint.X = x;

        if (y < imageToAnalyse.BoundaryStartPoint.Y)
            imageToAnalyse.BoundaryStartPoint.Y = y;
        if (y > imageToAnalyse.BoundaryEndPoint.Y)
            imageToAnalyse.BoundaryEndPoint.Y = y;

        imageToAnalyse.ChangeThumbnail.SetPixel(x, y, Color.Red);
    }
}
catch (Exception exc)
{
    Logger.LogError(exc);
}
It is then just a matter of clipping out the action window from the frame into a new Bitmap, whichwe can then send to Cognitive Services.
public static  void CopyRegionIntoImage(Bitmap srcBitmap, Rectangle srcRegion, ref  Bitmap destBitmap, Rectangle destRegion)
{
    using (Graphics grD = Graphics.FromImage(destBitmap))
    {
        grD.DrawImage(srcBitmap, destRegion, srcRegion, GraphicsUnit.Pixel);
    }
}
Further Reading
iSpy Connect - The home of iSpy, with free installer and extra online services (paid upgrade)
Microsoft Cognitive Services - Where the magic happens! FREE registration and allowance of x number of calls per minute/month.
Get a FREE API key - Start analyzing within minutes!
iSpy Plugins - Tutorial and downloadable code, showing how to make your own iSpy plug-in
This plug-in on GitHub - Sharing is caring! If you like this, take it further or find a bug/improvement, please add to the repo!