Angular 5, ASP.NET Core CRUD For Inventory Management Using EF And WEB API
Introduction
If you are new to Angular 5 and ASP.NET Core, then kindly read our previous article.
In our previous article, We have explained how to get started with Angular 5 and ASP.NET Core. Now, in this article, let's see in depth how to work with WEB API, EF for performing a CRUD operation for Angular 5 and ASP.NET Core application.
For performing CRUD operation here, We have taken the concept as Inventory Management priority based Reorder level system.
Inventory management and Reorder Level
Inventory management is very important to maintain and manage the stocks in small shops or in a big warehouse. For example, let’s consider a small shop where they sell items like Tooth Paste, Soap, Shampoo, etc. For all the items in the shop, they will make a list with the item name and they will add the total available stock quantity for each item, Total Sales quantity per item and Total Quantity received to be added in the stock. If the items are small in number, it will be easy to find the items needed to be purchased again to maintain the stock quantity, consider if it’s a big factory and needs to maintain all the stock quantity. Using Inventory Management software, the end user can easily track Inventory items, Total available Stock Quantity, Total Arrived and Issued Stock Quantity, Reorder Level for each item, Reorder Date for each Item and priority based reorder for the items which need to be stocked immediately.
Reorder Level
In Inventory Management Reorder Level or Point is an important part which will be used to indicate the customer as this item Stock is going to be finished and need to be purchased or produced for sales or delivered to the end user.
Inventory Management has many processes to be taken care of to maintain the software. In this article, we will make a simple project to display the web-based Monitoring system for indicating the priority based Inventory Management Reorder System.
For Reorder Level there has to be some formula for displaying the indicator on each item which needs to be stocked. In our simple project, We have used the type of Priority-based indication to the customer as manual and automatic.
Note: In Inventory Management we will be having Item Master table, Item Detail Table, Inventory tables and etc. For this simple project, We have used only one table as Inventory table and added the Item Name directly with Stock Qty, Reorder Qty and Priority Status, Using the Priority status user can add or edit the priority for each item which needs to be stocked immediately. Here priority Status is to manually add or edit the priority for each item which needs to be stocked.
Manual Priority setting for Reorder Level
When a customer adds /edits each Inventory item they can set manually priority for reordering the stock. If you ask me what this means, Consider a case where we have 1000 stock in Samsung S7 Edge Item and let's consider this stock can be used for two months. But there is a high demand for the Samsung S7 Edge phone and the price will be increased after a week and now we need to immediately increase the stock quantity. We have many branches around the world by editing the stock priority all our branches can view this from our web application and add the stock to the priority item; or let’s consider one more example as we have 1000 quantity stock and our customer makes a phone call and asks us to deliver 5000 stock quantity within a couple of days, in this case, the manual priority will be more useful. Like this, in many scenarios, it's good to have a manual priority for maintaining each item stock. This is a simple demo project so we didn’t add many field examples. We can also add the field like reorder date until we need to increase the stock quantity and notes for priority etc.
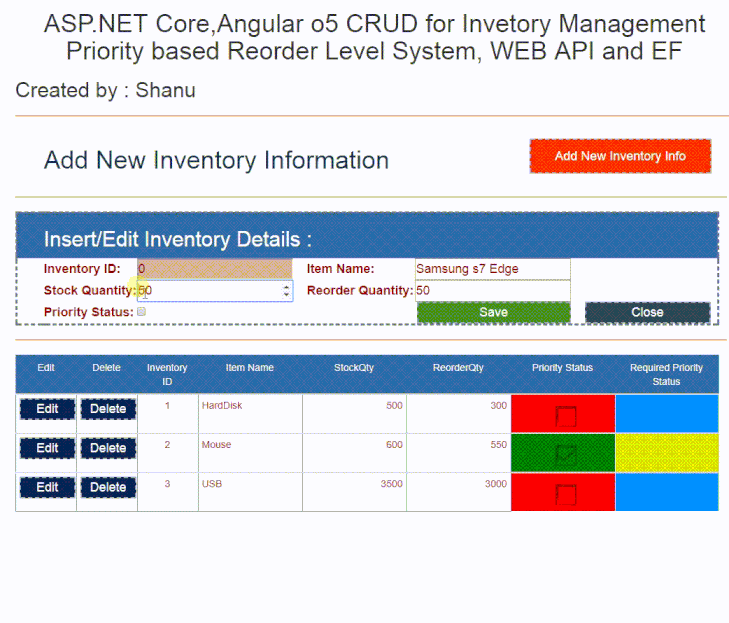
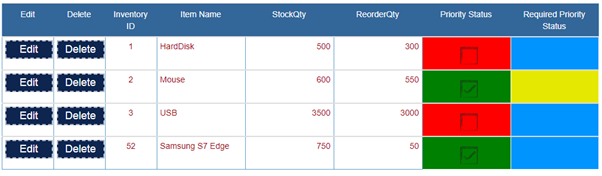
Now let’s add a new Item to our Inventory and click Save. Here we didn’t check the Priority Status while adding new Item, which means this item has good stock Quantity and it's not required for now to add more stock quantity.
We can see as the Priority Status Column with red and green color with Checked and unchecked boxes. When we add or edit the item if we have checked the Priority Status and saved then the item column will be displayed in green along with checkbox image. If the Item is not saved with priority status then it displays with red color. Here we used the green color to indicate the customer as this item has high priority and stock item needs to be increased with new Reorder Qty.
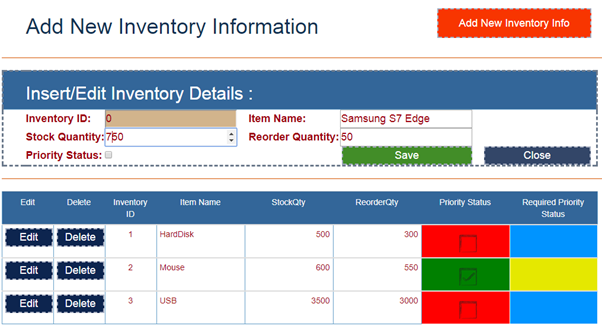
Now let’s edit the item and set the item with priority status.
When we save the same item with Priority Status checked, we can see the indicator with Green Color along with the Checked image.
Automatic Priority Status for Reorder Level
As we already told you, for reorder level we will be using the formula to indicate the customer for increasing the stock quantity with new reorder quantities.
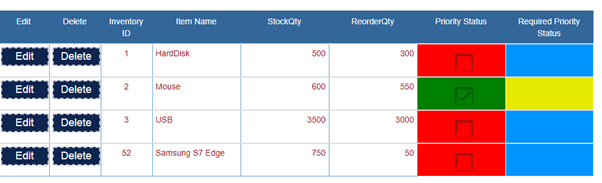
Here we can see the Required Priority Status Column with Sky Blue and Light Green Color. Light Blue color indicates the Item is not needed for reordering and the Green color indicates the Item needs to be reordered.
For the automatic display we have set the formula as if StockQty>ReorderQty+50 then set the Required Priority Status as Light Blue Color which indicates the customer as the item is not needed for reorder and the if StockQty<=ReorderQty+50 then set the Required Priority Status as Light Green Color which indicates the customer as the item needed for immediate stock maintenance.

From the above image for the newly added Samsung S7 Edge Item Stock Qty is 750 and Reorder Qty is 50 so the Required Priority Status is displayed as blue color.
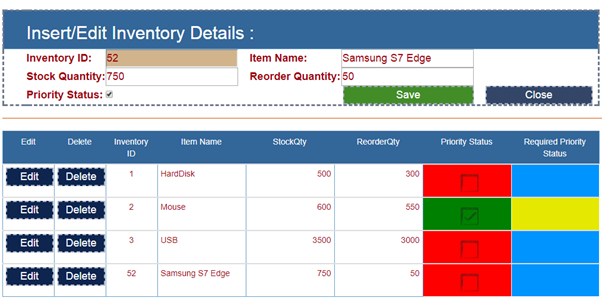
Now let’s edit the item like below and set the Reorder Quantity as 700 and save to check the changes.
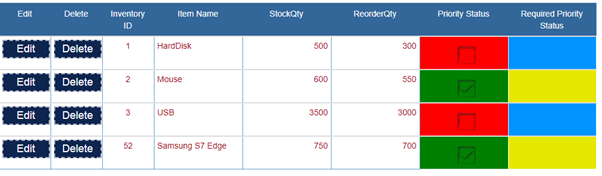
Here now we can see the Required Priority Status color has been automatically changed as the Stock Qty is 750 and the Reorder Qty is 700.
Now let's see how to create this web application using Angular5,ASP.NET Core using EF and Web API.
Prerequisites
Make sure you have installed all the prerequisites on your computer. If not, then download and install all, one by one.
- First, download and install Visual Studio 2017 from this link.
- Download and install .NET Core 2.0
- Download and install Node.js v9.0 or above. I have installed V9.1.0 (Download link).
Code part
Now, it’s time to create our first Angular5 and ASP.NET Core application.
Step 1 - Create a database and a table
We will be using our SQL Server database for our WEB API and EF. First, we create a database named InventoryPDB and a table as InventoryMaster. Here is the SQL script to create a database table and sample record insert query in our table. Run the query given below in your local SQL Server to create a database and a table to be used in our project.
USE MASTER
GO

-- 1) Check for the Database Exists .If the database is exist then drop and create new DB
IF EXISTS (SELECT [name] FROM sys.databases WHERE [name] = 'InventoryPDB' )
DROP DATABASE InventoryPDB
GO

CREATE DATABASE InventoryPDB
GO

USE InventoryPDB
GO


-- 1) //////////// StudentMasters

IF EXISTS ( SELECT [name] FROM sys.tables WHERE [name] = 'InventoryMaster' )
DROP TABLE InventoryMaster
GO

CREATE TABLE [dbo].[InventoryMaster](
        [InventoryID] INT IDENTITY PRIMARY KEY,
        [ItemName] [varchar](100) NOT NULL,
        [StockQty]  int NOT NULL,
        [ReorderQty] int NOT NULL,
        [PriorityStatus] int NOT NULL     -- 0 for low and 1 for High
)

-- insert sample data to Student Master table
INSERT INTO [InventoryMaster]   ([ItemName],[StockQty],[ReorderQty],[PriorityStatus])
     VALUES ('HardDisk',500,300,0)

INSERT INTO [InventoryMaster]   ([ItemName],[StockQty],[ReorderQty],[PriorityStatus])
     VALUES ('Mouse',600,550,1)

     INSERT INTO [InventoryMaster]   ([ItemName],[StockQty],[ReorderQty],[PriorityStatus])
     VALUES ('USB',3500,3000,0)

     select * from InventoryMaster
Step 2- Create Angular5TemplateCore
After installing all the prerequisites listed above and Angular5TemplateCore, click Start >> Programs >> Visual Studio 2017 >> Visual Studio 2017, on your desktop.
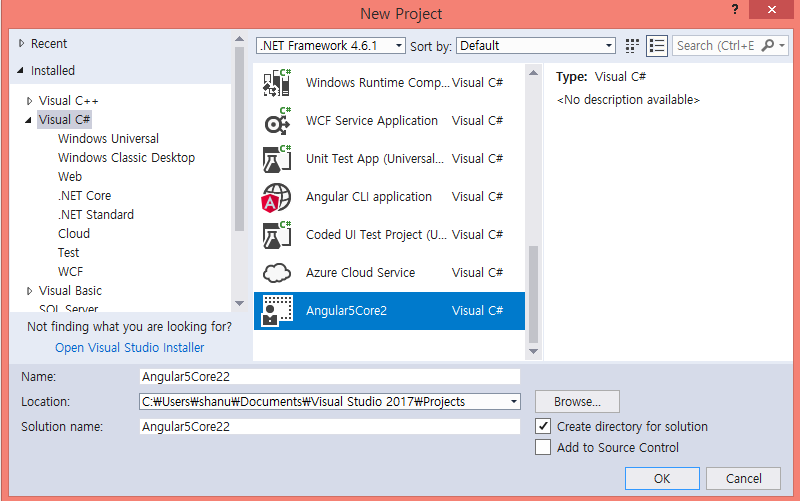
Click New >> Project. Select Visual C# >> Select Angular5Core2. Enter your project name and click OK.
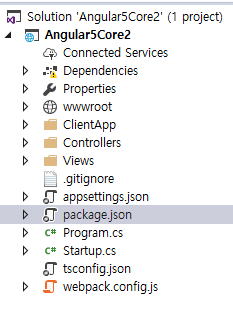
Once our project is created we can see in solution explorer with Angular5 sample components, HTML and app in ClientApp Folder along with Asp.NET Core Controllers and view folder.
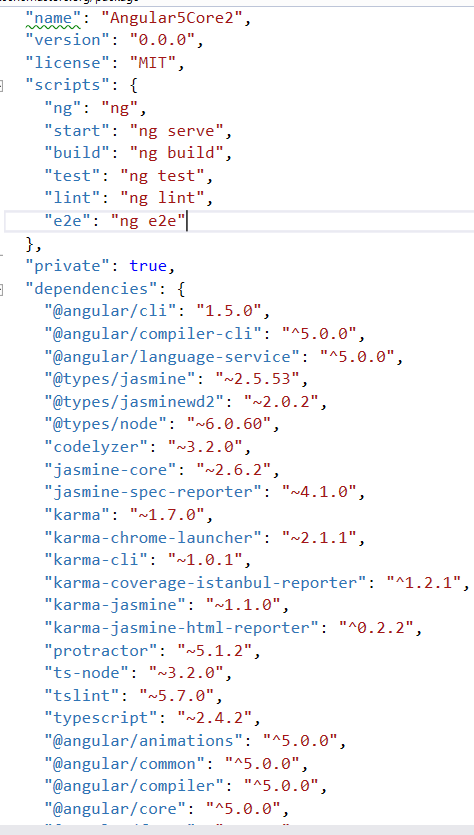
Package.json File
If we open the package.json file, we can see all the dependencies needed for Angular 5 and the Angular CLI has already been added by default.
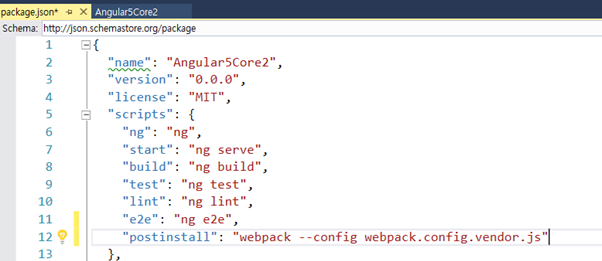
Adding Webpack in Package.json
In order to run our Angular 5 application, we need to install the webpack in our application. If the webpack is by default not added to our package.json file, then we need to add it manually. Webpack is an open-source JavaScript module bundler. It takes modules with dependencies and generates static assets representing those modules. To know more about Webpack, click here  .
.
Open your package.json file and add the below line under scripts.
Step 3 – Working with Model and Context Class
Adding connection string
To add the connection string with our SQL connection, open the “appsettings.json” file. Yes, this is a JSON file and this file looks as shown below.
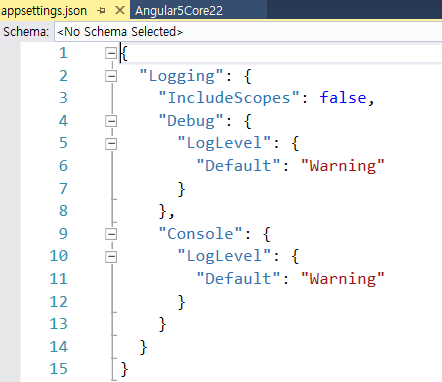
In this appsettings.json file, have added the connection string.
"ConnectionStrings": {
    "DefaultConnection": "Server=SQLSERVERNAME;Database=InventoryPDB;user id=SQLID;password=;Trusted_Connection=True;MultipleActiveResultSets=true;"
  }
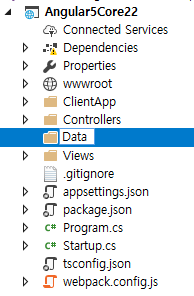
Next: connection Step is to create a folder named Data to create our model and DBContext class.
Creating Model class for Inventory
We can create a model by adding a new class file in our Data folder. Right Click Data folder and click Add>Click Class. Enter the class name as InventoryMasters and click Add. Now, in this class, we first create a property variable, add InventoryMaster. We will be using this in our WEB API controller.Note that here we will be adding the filed name same as our Database table column names.
using System;
using System.Collections.Generic;
using System.ComponentModel.DataAnnotations;
using System.Linq;
using System.Threading.Tasks;

namespace Angular5Core2.Data
{
    public class  InventoryMaster
    {
        [Key]
        public int  InventoryID { get; set; }

        [Required]
        [Display(Name = "ItemName")]
        public string  ItemName { get; set; }

        [Required]
        [Display(Name = "StockQty")]
        public int  StockQty { get; set; }

        [Required]
        [Display(Name = "ReorderQty")]
        public int  ReorderQty { get; set; }

        public int  PriorityStatus { get; set; }
    }
}
Creating Database Context
DBContext is Entity Framework class to establish a connection to the database
We can create a DBContext class by adding a new class file in our Data folder. Right-click Data folder and click Add > click Class. Enter the class name as InventroyContext and click Add. In this class, we inherit DbContext and created Dbset for our students' table.
using Microsoft.EntityFrameworkCore;
using System;
using System.Collections.Generic;
using System.Linq;
using System.Threading.Tasks;

namespace Angular5Core2.Data
{
    public class  InventoryContext : DbContext
    {
        public InventoryContext(DbContextOptions<InventoryContext> options)
            :base(options) { }
        public InventoryContext() { }
        public DbSet<InventoryMaster> InventoryMaster { get; set; }
    }
}
Startup.CS
Now, we need to add our database connection string and provider as SQL SERVER. To add this, we add the code given below in Startup.cs file under ConfigureServices method.
public void  ConfigureServices(IServiceCollection services)
        {
            // Add Entity framework .
            services.AddDbContext<InventoryContext>(options => options.UseSqlServer(Configuration.GetConnectionString("DefaultConnection")));
            services.AddMvc();
        }
Step 4 - Creating Web API for CRUD operation
To create our WEB API Controller, right-click Controllers folder. Click Add >> Click Controller. Select API Controller Empty and click Add button to create our Web API.
Enter the name as “InventoryMasterAPI.cs” and click Add.
As we all know, Web API is a simple and easy way to build HTTP Services for the Browsers and Mobiles.
Web API has four methods given below as Get/Post/Put and Delete.
- Get is to request the data. (Select)
- Post is to create a data. (Insert)
- Put is to update the data.
- Delete is to delete data.
First, we create the object for DBContext in our Web API class.
[Produces("application/json")]
    [Route("api/InventoryMasterAPI")]
    public class  InventoryMasterAPIController : Controller
    {
        private readonly  InventoryContext _context;

        public InventoryMasterAPIController(InventoryContext context)
        {
            _context = context;
        }
Get Method (Select Operation)
Get Method is to request single item or list of items from our selected database. Here, we will get all Inventory information from InventoryMasters table.
// GET: api/InventoryMasterAPI

    [HttpGet]
    [Route("Inventory")]
    public IEnumerable<InventoryMaster> GetInventoryMaster()
    {
        return _context.InventoryMaster;

    }
Post Method (Insert Operation)
Post Method will be used to insert the data into our database. In Post Method, we will also check if Inventory Id is already created and return the message. We will pass all inventory Master Column parameters to be inserted into the Inventory Master table.
// POST: api/InventoryMasterAPI
[HttpPost]
public async Task<IActionResult> PostInventoryMaster([FromBody] InventoryMaster InventoryMaster)
{
    if (!ModelState.IsValid)
    {
        return BadRequest(ModelState);
    }

    _context.InventoryMaster.Add(InventoryMaster);
    try
    {
        await _context.SaveChangesAsync();
    }
    catch (DbUpdateException)
    {
        if (InventoryMasterExists(InventoryMaster.InventoryID))
        {
            return new  StatusCodeResult(StatusCodes.Status409Conflict);
        }
        else
        {
            throw;
        }
    }

    return CreatedAtAction("GetInventoryMaster", new  { id = InventoryMaster.InventoryID }, InventoryMaster);
}
private bool  InventoryMasterExists(int id)
{
    return _context.InventoryMaster.Any(e => e.InventoryID == id);
}
Put Method (Update Operation)
Put Method will be used to update the selected Inventory data to our database. In Put Method, we will pass InventoryID along with all other parameters for an update. We pass the InventoryID to update the InventoryMaster Table by InventoryID.
// PUT: api/InventoryMasterAPI/2
[HttpPut("{id}")]
public async Task<IActionResult> PutInventoryMaster([FromRoute] int  id, [FromBody] InventoryMaster InventoryMaster)
{
    if (!ModelState.IsValid)
    {
        return BadRequest(ModelState);
    }

    if (id != InventoryMaster.InventoryID)
    {
        return BadRequest();
    }

    _context.Entry(InventoryMaster).State = EntityState.Modified;

    try
    {
        await _context.SaveChangesAsync();
    }
    catch (DbUpdateConcurrencyException)
    {
        if (!InventoryMasterExists(id))
        {
            return NotFound();
        }
        else
        {
            throw;
        }
    }

    return NoContent();
}
Delete Method (Delete Operation)
Delete Method will be used to delete the selected inventory data from our database. In Delete Method, we will pass InventoryID to delete the record.
// DELETE: api/InventoryMasterAPI/2
[HttpDelete("{id}")]
public async Task<IActionResult> DeleteInventoryMaster([FromRoute] int  id)
{
    if (!ModelState.IsValid)
    {
        return BadRequest(ModelState);
    }

    InventoryMaster InventoryMaster = await _context.InventoryMaster.SingleOrDefaultAsync(m => m.InventoryID == id);
    if (InventoryMaster == null)
    {
        return NotFound();
    }

    _context.InventoryMaster.Remove(InventoryMaster);
    await _context.SaveChangesAsync();

    return Ok(InventoryMaster);
}
To test Get Method, we can run our project and copy the GET method API path. Here, we can see our API path to get api/InventoryMasterAPI/Inventory/
Run the program and paste API path to test our output.

Step 5: Working with Angular5
We create all Angular5 related Apps, Modules, Services, Components and HTML templates under ClientApp/App folder.
Here I’m using the existing Home Component and HTML for performing our Inventory CRUD operations. It will be always good to create a separate Services, Component and HTML file for each action. For demo project here, I’m using the existing home component and HTML.
Home.component
From the existing home component TypeScript file, I have added all the functions to perform our CRUD operation for Inventory management.
First, in the import section, we have added the HTTP and FormsModule for working with WEB API Get/Post/Put/Delete and Forms to get and set input from the users.
In HomeComponent Class I have declared all the variables needed and created the separate function for Get/Post/put and Delete method. In get method, I have passed the WEB API URL to get all the data from the database and result JSON data to be bound in our HTML page. In Post and Put method I passed all the arguments by the user entered in the form to the WEB API to perform Update and Insert in the database. Same like this we also created the delete method for deleting the inventory list from the database by passing the Inventory ID as a parameter to our Web API.
import { Component, Input, Inject } from '@angular/core';
import { Http,Response, Headers, RequestOptions } from '@angular/http';
import { FormsModule } from '@angular/forms';


@Component({
    selector: 'home',
    templateUrl: './home.component.html'
})
export class HomeComponent {
    // to get the Student Details
    public Inventory: InventoryMaster[] = [];
    // to hide and Show Insert/Edit
    AddTable: Boolean = false;
    // To stored Student Informations for insert/Update and Delete
    public sInventoryID : number = 0;
    public sItemName = "";
    public sStockQty : number  = 0;
    public sReorderQty : number = 0;
    public sPriorityStatus: boolean = false;

    //For display Edit and Delete Images
    public imgchk = require("./Images/chk.png");
    public imgunChk =  require("./Images/unchk.png");
    public bseUrl: string = "";

    public schkName: string = "";
    myName: string;
    constructor(public http: Http, @Inject('BASE_URL')  baseUrl: string) {
        this.myName = "Shanu";
        this.AddTable = false;
        this.bseUrl = baseUrl;
        this.getData();
    }


    //to get all the Inventory data from Web API
    getData() {

        this.http.get(this.bseUrl + 'api/InventoryMasterAPI/Inventory').subscribe(result => {
            this.Inventory = result.json();
        }, error => console.error(error));

    }

    // to show form for add new Student Information
    AddInventory() {
        this.AddTable = true;
        // To stored Student Informations for insert/Update and Delete
        this.sInventoryID = 0;
        this.sItemName = "";
        this.sStockQty = 50;
        this.sReorderQty = 50;
        this.sPriorityStatus = false;
    }

    // to show form for edit Inventory Information
    editInventoryDetails(inventoryIDs : number, itemNames : string, stockQtys : number, reorderQtys : number , priorityStatus : number) {
        this.AddTable = true;
        this.sInventoryID = inventoryIDs;
        this.sItemName = itemNames;
        this.sStockQty = stockQtys;
        this.sReorderQty = reorderQtys;
        if (priorityStatus == 0)
        {
            this.sPriorityStatus = false;
        }
        else {
            this.sPriorityStatus = true;
        }

    }

    // If the InventoryId is 0 then insert the Inventory information using post and if the Inventory id is greater than 0 then edit using put mehod
    addInventoryDetails(inventoryIDs: number, itemNames: string, stockQtys: number, reorderQtys: number, priorityStatus: boolean) {
        var pStatus: number = 0;

        this.schkName = priorityStatus.toString();
        if (this.schkName == "true") {
            pStatus = 1;
        }
        var headers = new Headers();
        headers.append('Content-Type', 'application/json; charset=utf-8');
        if (inventoryIDs == 0) {
            this.http.post(this.bseUrl + 'api/InventoryMasterAPI/', JSON.stringify({ InventoryID: inventoryIDs, ItemName: itemNames, StockQty: stockQtys, ReorderQty: reorderQtys, PriorityStatus: pStatus }),
                { headers: headers }).subscribe(
                response => {
                    this.getData();

                }, error => {
                }
                );

        }
        else {
            this.http.put(this.bseUrl + 'api/InventoryMasterAPI/'  + inventoryIDs, JSON.stringify({ InventoryID: inventoryIDs, ItemName: itemNames, StockQty: stockQtys, ReorderQty: reorderQtys, PriorityStatus: pStatus }), { headers: headers })
                .subscribe(response => {
                    this.getData();

                }, error => {
                }
                );

        }
        this.AddTable = false;
        //
        //
        //this.http.get(this.bseUrl + 'api/InventoryMasterAPI/Inventory').subscribe(result => {
        //    this.Inventory = result.json();
        //}, error => console.error(error));
    }

    //to Delete the selected Inventory detail from database.
    deleteinventoryDetails(inventoryIDs: number) {
        var headers = new Headers();
        headers.append('Content-Type', 'application/json; charset=utf-8');
        this.http.delete(this.bseUrl + 'api/InventoryMasterAPI/'  + inventoryIDs, { headers: headers }).subscribe(response => {
            this.getData();

        }, error => {
        }
        );

        //this.http.get(this.bseUrl + 'api/InventoryMasterAPI/Inventory').subscribe(result => {
        //    this.Inventory = result.json();
        //}, error => console.error(error));
    }

    closeEdits() {
        this.AddTable = false;
        // To stored Student Informations for insert/Update and Delete
        this.sInventoryID = 0;
        this.sItemName = "";
        this.sStockQty = 50;
        this.sReorderQty = 50;
        this.sPriorityStatus = false;
    }
}

export interface InventoryMaster {
    inventoryID: number;
    itemName: string;
    stockQty: number;
    reorderQty: number;
    priorityStatus: number;
}
HTML Template file
Here we are using the home.component.html file to perform our CRUD operation for Inventory Management.
<div align="center">
    <h1> ASP.NET Core,Angular5 CRUD for Inventory Management Priority based Reorder Level System, WEB API and EF   </h1>
</div>
<div class="column">
    <h2>Created by : {{myName}}</h2>

</div>
<hr style="height: 1px;color: #123455;background-color: #d55500;border: none;color: #d55500;" />
<p *ngIf="!Inventory"><em>Loading Inventory Details please Wait ! ...</em></p>
<table id="tblContainer" style='width: 99%;table-layout:fixed;'>
    <tr>
        <td>
            <table style="background-color:#FFFFFF; border: dashed 3px #FFFFFF; padding: 5px;width: 99%;table-layout:fixed;" cellpadding="2"
                   cellspacing="2">
                <tr style="height: 30px;  color:#123455 ;border: solid 1px #659EC7;">
                    <td width="40px"> </td>
                    <td width="50%">
                        <h1> Add New Inventory Information <strong  style="color:#0094ff"> </strong></h1>

                    </td>
                    <td align="right">
                        <button (click)=AddInventory() style="background-color:#f83500;color:#FFFFFF;font-size:large;width:260px;height:50px;
                              border-color:#a2aabe;border-style:dashed;border-width:2px;">
                            Add New Inventory Info
                        </button>

                    </td>
                </tr>
            </table>

        </td>
    </tr>
    <tr>
        <td>
            <hr style="height: 1px;color: #123455;background-color: #d55500;border: none;color: #d55500;" />
        </td>
    </tr>
    <tr *ngIf="AddTable">
        <td >
            <table>
                <tr>
                    <td>
                        <table style="background-color:#FFFFFF; border: dashed 3px #6D7B8D; padding :5px;width :99%;table-layout:fixed;" cellpadding="2" cellspacing="2">
                            <tr style="height: 30px; background-color:#336699 ; color:#FFFFFF ;border: solid 1px #659EC7;">
                                <td width="40">

                                </td>
                                <td>
                                    <h2>Insert/Edit Inventory Details : </h2>
                                </td>
                            </tr>
                            <tr>
                                <td width="100">

                                </td>
                                <td>
                                    <table style="color:#9F000F;font-size:large; padding :5px;" cellpadding="12" cellspacing="16">
                                        <tr>
                                            <td><b>Inventory ID: </b> </td>
                                            <td>
                                                <input type="number" #InventoryID (ngModel)="sInventoryID" value="{{sInventoryID}}" style="background-color:tan" readonly>
                                            </td>
                                            <td width="20"> </td>
                                            <td><b>Item Name: </b> </td>
                                            <td>
                                                <input type="text" #ItemName (ngModel)="sItemName" value="{{sItemName}}" required>
                                            </td>
                                            <td></td>
                                        </tr>
                                        <tr>
                                            <td><b>Stock Quantity: </b> </td>
                                            <td>
                                                <input type="number" #StockQty (ngModel)="sStockQty" value="{{sStockQty}}" min="50" required>
                                            </td>
                                            <td width="20"> </td>
                                            <td><b>Reorder Quantity: </b> </td>
                                            <td>
                                                <input type="number" #ReorderQty (ngModel)="sReorderQty" value="{{sReorderQty}}" min="50" required>
                                            </td>
                                            <td></td>
                                        </tr>
                                        <tr>
                                            <td><b>Priority Status: </b> </td>
                                            <td>
                                                <input type="checkbox" #PriorityStatus (ngModel)="sPriorityStatus" value="{{sPriorityStatus}}" [checked]="sPriorityStatus"
                                                       (change)="sPriorityStatus = !sPriorityStatus" >
                                                <!--<input type="text" #chkName (ngModel)="schkName" value="{{schkName}}">-->
                                            </td>
                                            <td width="20"> </td>
                                            <td align="right" colspan="2">
                                                <button (click)=addInventoryDetails(InventoryID.value,ItemName.value,StockQty.value,ReorderQty.value,PriorityStatus.value) style="background-color:#428d28;color:#FFFFFF;font-size:large;width:220px;
                              border-color:#a2aabe;border-style:dashed;border-width:2px;">
                                                    Save
                                                </button>
                                            </td>
                                            <td>

                                                <button (click)=closeEdits() style="background-color:#334668;color:#FFFFFF;font-size:large;width:180px;
                              border-color:#a2aabe;border-style:dashed;border-width:2px;">
                                                    Close
                                                </button>
                                            </td>
                                        </tr>
                                    </table>
                                </td>
                            </tr>
                        </table>
                    </td>
                </tr>
                <tr>
                    <td colspan="2">
                        <hr style="height: 1px;color: #123455;background-color: #d55500;border: none;color: #d55500;" />
                    </td>
                </tr>
            </table>
        </td>
    </tr>
    <tr>
        <td>

            <table class='table' style="background-color:#FFFFFF; border:2px #6D7B8D; padding:5px;width:99%;table-layout:fixed;" cellpadding="2" cellspacing="2" *ngIf="Inventory">
                <tr style="height: 30px; background-color:#336699 ; color:#FFFFFF ;border: solid 1px #659EC7;">
                    <td width="70" align="center">Edit</td>
                    <td width="70" align="center">Delete</td>
                    <td width="70" align="center">Inventory ID</td>
                    <td width="120" align="center">Item Name</td>
                    <td width="120" align="center">StockQty</td>
                    <td width="120" align="center">ReorderQty</td>
                    <td width="120" align="center">Priority Status</td>
                    <td width="120" align="center">Required Priority Status</td>
                </tr>
                <tbody *ngFor="let INVY  of Inventory">
                    <tr>
                        <td align="center" style="border: solid 1px #659EC7; padding: 5px;table-layout:fixed;">
                            <span style="color:#9F000F">

                                <button (click)=editInventoryDetails(INVY.inventoryID,INVY.itemName,INVY.stockQty,INVY.reorderQty,INVY.priorityStatus)
                                        style="background-color:#0d254f;color:#FFFFFF;font-size:large;width:80px;
                              border-color:#a2aabe;border-style:dashed;border-width:2px;">
                                    Edit
                                </button>
                                <!-- <img src="{{imgEdit}}"  style="height:32px;width:32px" (click)=editStudentsDetails(StudentMasters.stdID,StudentMasters.stdName,StudentMasters.email,StudentMasters.phone,StudentMasters.address)>-->
                            </span>
                        </td>
                        <td align="center" style="border: solid 1px #659EC7; padding: 5px;table-layout:fixed;">
                            <span style="color:#9F000F">
                                <button (click)=deleteinventoryDetails(INVY.inventoryID)
                                        style="background-color:#0d254f;color:#FFFFFF;font-size:large;width:80px;
                              border-color:#a2aabe;border-style:dashed;border-width:2px;">
                                    Delete
                                </button>
                                <!-- <img src="{{imgDelete}}" style="height:32px;width:32px" (click)=deleteStudentsDetails(StudentMasters.stdID)>-->
                            </span>
                        </td>
                        <td align="center" style="border: solid 1px #659EC7; padding: 5px;table-layout:fixed;">
                            <span style="color:#9F000F">{{INVY.inventoryID}}</span>
                        </td>
                        <td align="left" style="border: solid 1px #659EC7; padding: 5px;table-layout:fixed;">
                            <span style="color:#9F000F">{{INVY.itemName}}</span>
                        </td>

                        <td align="right" style="border: solid 1px #659EC7; padding: 5px;table-layout:fixed;">
                            <span style="color:#9F000F">{{INVY.stockQty}}</span>
                        </td>

                        <td align="right" style="border: solid 1px #659EC7; padding: 5px;table-layout:fixed;">
                            <span style="color:#9F000F">{{INVY.reorderQty}}</span>
                        </td>

                        <td align="center" [ngStyle]="INVY.priorityStatus==1 && {'background-color': 'green'}  || INVY.priorityStatus==0 && {'background-color': 'red'} " style="height:42px;width:42px">
                            <!--<span style="color:#FFFFFF">{{INVY.priorityStatus}}</span>-->
                            <div  [ngStyle]="INVY.priorityStatus==1 && {'background-image': 'url(' + imgchk + ')'}  || INVY.priorityStatus==0 && {'background-image': 'url(' + imgunChk + ')'} " style="background-repeat: no-repeat;height:38px;width:38px" >

                            </div>

                        </td>

                        <td align="left" [ngStyle]="INVY.stockQty>INVY.reorderQty+50 && {'background-color': '#0094ff'}  || INVY.stockQty<=INVY.reorderQty+50  && {'background-color': '#e5e800'} " style="border: solid 1px #ffffff; padding: 5px;table-layout:fixed;">
                            <!--<span style="color:#FFFFFF">{{INVY.priorityStatus}}</span>-->
                        </td>
                    </tr>
                </tbody>
            </table>
        </td>
    </tr>
</table>
Manual Priority setting for Reorder Level logic
When a user adds or edits the Inventory Master and if the Priority Status is checked then I will insert the staus as 1 in the database and if the Priority Status is unchecked then I will save the status as 0. In our HTML design I will check for this PriorityStatus value and if the value is returned as 1 then I will set the table TD cell background color as Green and set the image as a Checked image.
<td align="center" [ngStyle]="INVY.priorityStatus==1 && {'background-color': 'green'}  || INVY.priorityStatus==0 && {'background-color': 'red'} " style="height:42px;width:42px">
                            <!--<span style="color:#FFFFFF">{{INVY.priorityStatus}}</span>-->
                            <div  [ngStyle]="INVY.priorityStatus==1 && {'background-image': 'url(' + imgchk + ')'}  || INVY.priorityStatus==0 && {'background-image': 'url(' + imgunChk + ')'} " style="background-repeat: no-repeat;height:38px;width:38px" >
                            </div>
  </td>
Automatic Priority Status for Reorder Level logic
In the Required Priority Status column, I checked for the stockQty>reorderQty+50 and if it’s true then I set the TD background color as LightBlue else set the color as LightGreen.
<td align="left" [ngStyle]="INVY.stockQty>INVY.reorderQty+50 && {'background-color': '#0094ff'}  || INVY.stockQty<=INVY.reorderQty+50  && {'background-color': '#e5e800'} " style="border: solid 1px #ffffff; padding: 5px;table-layout:fixed;">
                            <!--<span style="color:#FFFFFF">{{INVY.priorityStatus}}</span>-->
                        </td>
Build and run the application
Build and run the application and you can see the Home page with Inventory Management CRUD page.
Conclusion
First, create a database and table in your SQL Server. You can run using the above table creation script to create Database and tables with sample Insert. Don’t forget to change the database connection string from “appsettings.json”.
See Also
- Bing text to speech API
- Cognitive Services
- ASP.NET Core Angular 2 EF 1.0.1 Web API Using Template Pack
Download
Angular 5, ASP.NET Core CRUD For Inventory Management Using EF And WEB API