Azure: Create And Deploy An ASP.NET Core Web App
Note : This Article Participated in Technet Guru Competition December 2017 and won Silver Medal.
Introduction
Nowadays, most people are choosing web hosting on a cloud platform. Microsoft lovers like us basically select "Microsoft Azure" as our hosting environment. That’s the reason for this new article defining a simple way of hosting in Azure.
Before reading this article, you must read the articles given below for ASP.NET Core knowledge.
- ASP.NET CORE 1.0: Getting Started
- ASP.NET Core 1.0: Project Layout
- ASP.NET Core 1.0: Middleware And Static files (Part 1)
- Middleware And Staticfiles In ASP.NET Core 1.0 - Part Two
Azure Account
First, we need to create an account on the Azure portal. Only then can we host the application in the cloud environment. So, please check the following steps to create an Azure account.
Azure Account Registration
Create an account through this link to Azure Portal.
Domain Registration
We need to host our application in a particular domain. Check the following steps:
Click "All resources" on the left side menu and it will open a dashboard with an empty or already existing list of resources that we have created earlier.
Click the "Add" button and it will open another window with multiple options. We can choose an appropriate option to host our application.
As per our requirement, we chose "Web + Mobile" and clicked the "Web App" on the right side.

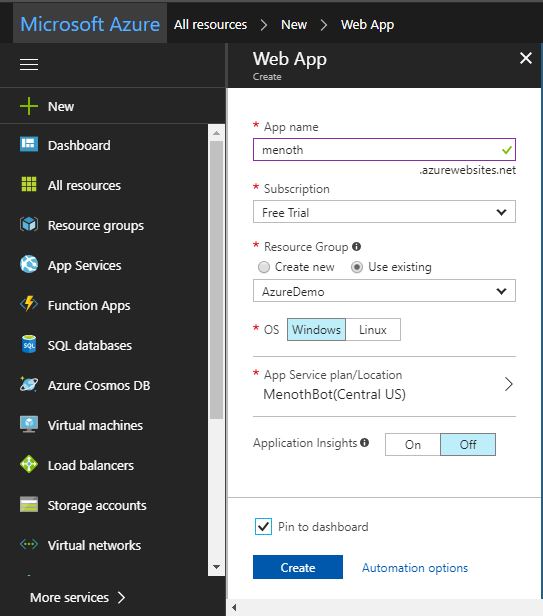
4. It will open another form to fill up our app details to host. We need to give a unique name in the "Appname" section and it will create a subdomain for our ASP.NET Core application.
5. We chose subscription as "Free Trial" because we created a free account on the Azure portal.
6. We need to host our app resources in Resource Group. First, we need to create a Resource Group name in our Azure account. But we chose Existing Resource Group name "AzureDemo" that we are already created in our Azure account.
7. "OS (Operating System)" we selected as "Windows" (as per our requirement).
8. We can create our own App Service Plan name.
9. Application Insights will give you the more clarity about your hosted app like analytics, etc.
10. Click the "Create" button and wait for the build success.
11. Another way to create the Resource Group Name: click "Resource Groups -> Add". 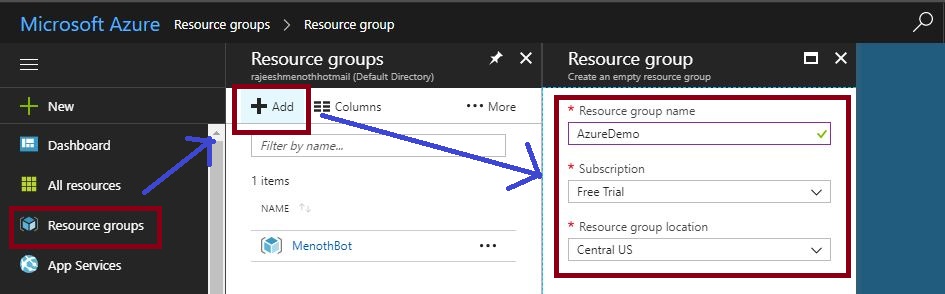
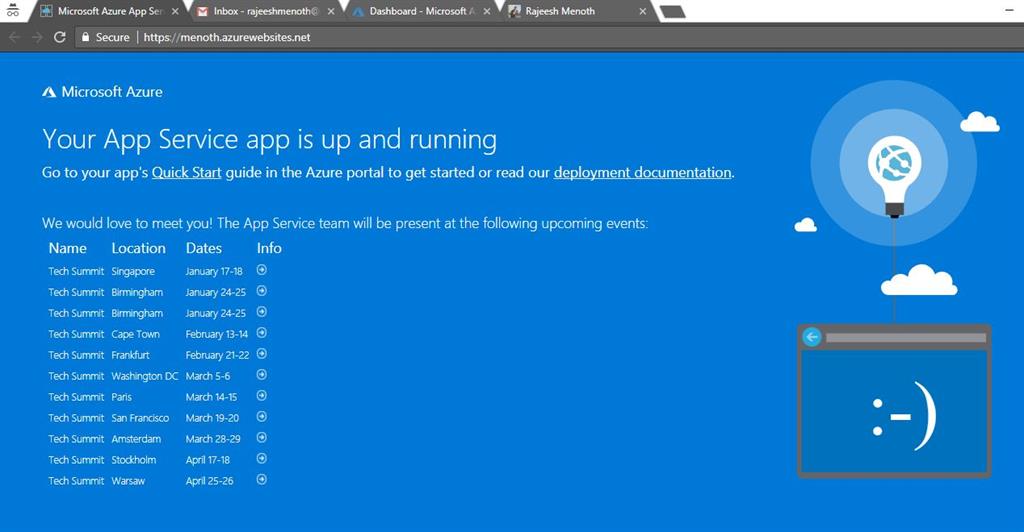
12. Once the build succeeds, then we see this output.
Simple steps to create an ASP.NET Core Application
- Open VisualStudio and click File > New > Project.
- Select Visual C# > Web > ASP.NET Core Web Application.
- We have given our application name as "MyFirstAzureWebApp".
- Click OK.
- Click "Ctrl+F5".
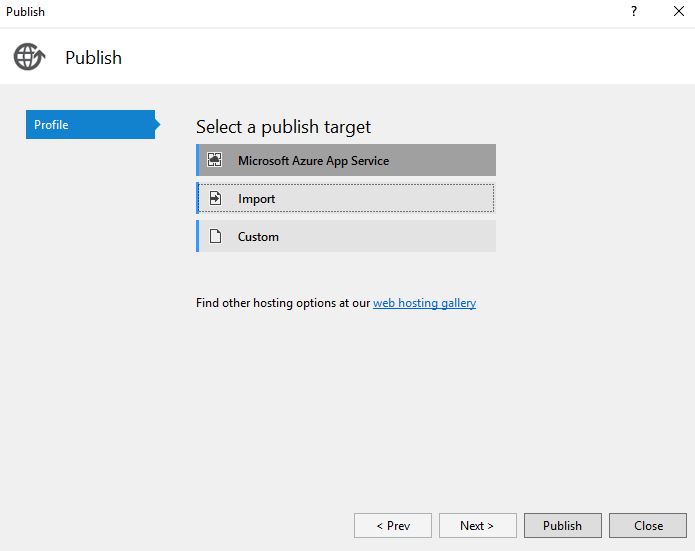
App Publishing into Azure
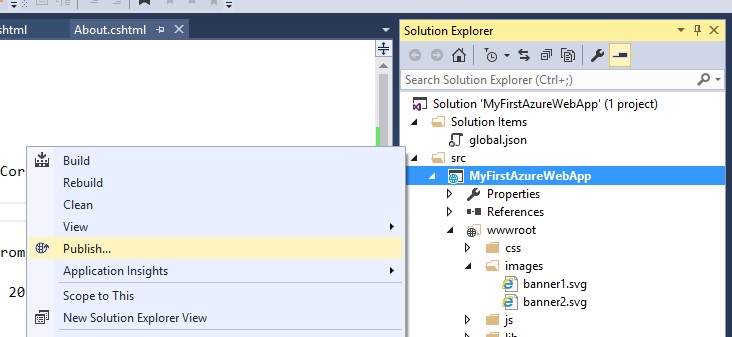
We created a default ASP.NET Core application (we have done some changes in UI Section) for the publishing process.
1. Right-click on the application and click the Publish menu.
2. Click "Microsoft Azure App Service".
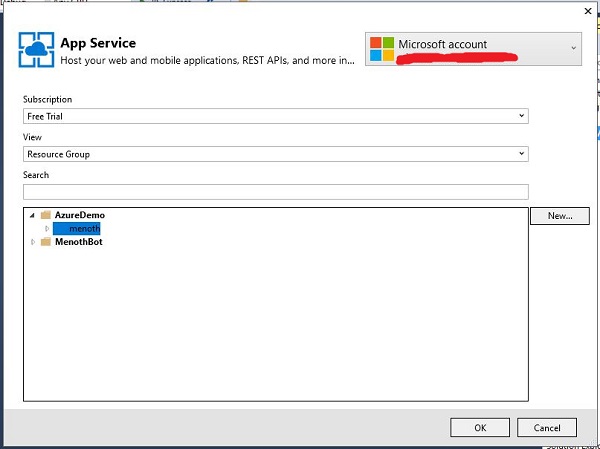
3. We choose our existing resource group name (that we created: "AzureDemo") in our Azure Portal and It will display the App Name inside the "AzureDemo" folder.
This will display only when we login through the Visual Studio using Azure credentials (Email & Password).
Reference
See Also
It's recommended to read more articles related to ASP.NET Core.
- ASP.NET CORE 1.0: Getting Started
- ASP.NET Core 1.0: Project Layout
- ASP.NET Core 1.0: Middleware And Static files (Part 1)
- Middleware And Staticfiles In ASP.NET Core 1.0 - Part Two
- ASP.NET Core 1.0 Configuration: Aurelia Single Page Applications
- ASP.NET Core 1.0: Create An Aurelia Single Page Application
- Create Rest API Or Web API With ASP.NET Core 1.0
- ASP.NET Core 1.0: Adding A Configuration Source File
- Code First Migration - ASP.NET Core MVC With EntityFrameWork Core
- Building ASP.NET Core MVC Application Using EF Core and ASP.NET Core 1.0
- Send Email Using ASP.NET CORE 1.1 With MailKit In Visual Studio 2017
- ASP.NET Core And MVC Core: Session State
- Startup Page In ASP.NET Core
- Sending SMS Using ASP.NET Core With Twilio SMS API
OutPut
The application is hosted in a given domain address http://menoth.azurewebsites.net

Summary
We learned how to create and deploy an ASP.NET Core web app in Azure. Hope this article is useful for all ASP.NET Core and Azure beginners.