Azure Bot Service: Create Chat Bot
Introduction
This article explains how to Create and Connect a chat bot with Azure Bot Service.
Azure Account
First, we need to create an account on the Azure portal. Only then can we host the application in the cloud environment. So, please check the following steps to create an Azure account.
Azure Account Registration
Create an account through this link to click here.
Web App Bot
1. Click “New” on the left side menu and it will open an Azure Marketplace. There we can see list of services so click “AI + Cognitive Services” and then click “Web App Bot” for our bot service app.

BOT Service Registration
Bot name: The display name of our bot service and that appears in channels and directories. We can change this name at any time.
Subscription: We can select our Azure subscription for chat bot service.
Resource group: We can create a new resource group or choose from an existing one (we selected our existing resource group as “AzureDemo”).
Location: We can select the location of the resource group. The best thing is we can choose is a location closest to our customer. The location cannot be changed once the bot is created.
Pricing tier: Select a pricing tier of bot service.
App name: The unique URL name of our bot service. We gave “menothbot” as our App name and the URL looks like this: http://menothbot.azurewebsites.net/
Bot template: There are two templates available in bot C# and Node.js. We can choose any of the templates and that will create an echo bot.
App service plan/ Location: We can choose the best service plan that is closest to our customer.
Azure Storage: We can create a new data storage account or use an existing one. By default, the bot will use Table Storage.
Application Insights: This will provide service-level and instrumentation data like traffic, latency, and integration. We can switch on or off this option.x

11. Click the “Create” button and wait for the build success.
12. Once the build succeeded, click the “Dashboard” and we can see “menothbot” bot is created in the All resources list. Bot is ready for use!

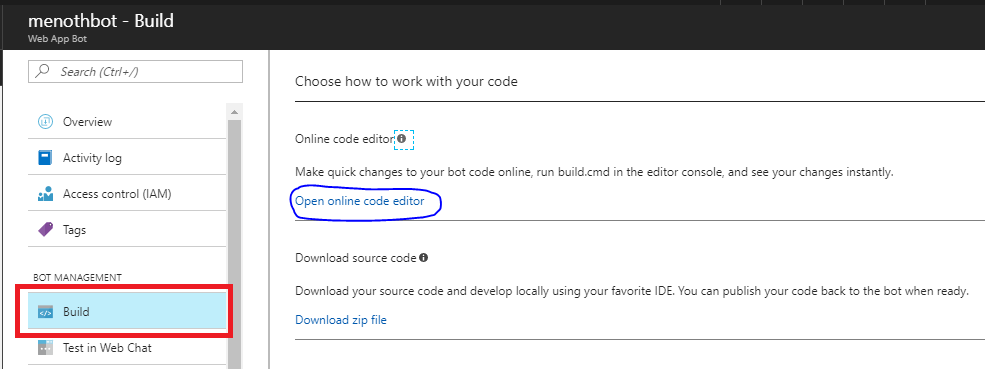
Online Code Editor
1. Click “menothbot” in dashboard window. We can see a list option available for our bot service. So click the “Build” option in the left-side menu and it will open multiple options on right side. Just click “Open online code editor” link.
Online code editor will open a source code window of our bot service app. So we can edit and add code in this section and currently it will display the default “echo bot” code of our bot service. Click “WWWROOT -> Dialogs -> EchoDialog.cs”.

If you made any changes in the online code editor then click the “build console” option on the left side menu and run “build.cmd” command for the execution and deployment of the code.

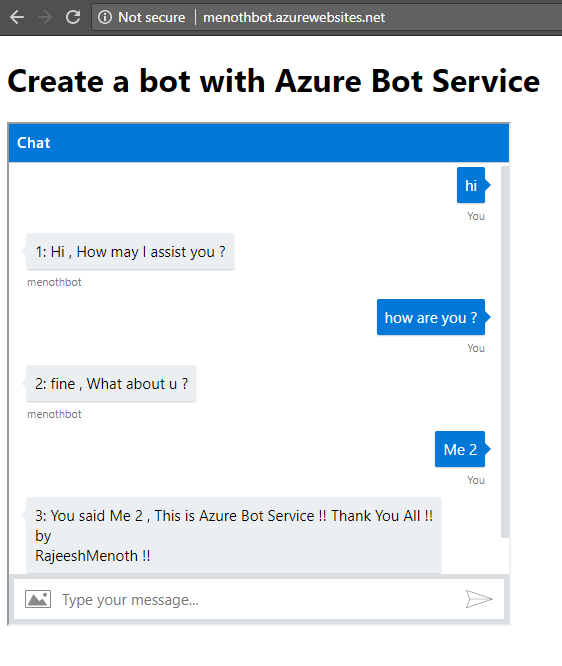
Test in Web Chat
We can quickly test our bot through “Test in Web Chat” option. Just click the “Test in Web Chat” on the left side menu and it will open a chat bot on right side window. Here it will display a few messages that we already added in the “EchoDialog.cs” in online code editor.

Code
using System;
using System.Threading.Tasks;
using Microsoft.Bot.Connector;
using Microsoft.Bot.Builder.Dialogs;
using System.Net.Http;

namespace Microsoft.Bot.Sample.SimpleEchoBot
{
[Serializable]
public class  EchoDialog : IDialog<object>
{
protected int  count = 1;

public async Task StartAsync(IDialogContext context)
{
context.Wait(MessageReceivedAsync);
}

public async Task MessageReceivedAsync(IDialogContext context, IAwaitable<IMessageActivity> argument)
{
var message = await argument;

if (message.Text == "reset")
{
PromptDialog.Confirm(
context,
AfterResetAsync,
"Are you sure you want to reset the count?",
"Didn't get that!",
promptStyle: PromptStyle.Auto);
}
else if  (message.Text == "hi")
{
await context.PostAsync($"{this.count++}: Hi , How may I assist you ?");
context.Wait(MessageReceivedAsync);
}
else if  (message.Text == "how are you ?")
{
await context.PostAsync($"{this.count++}: fine , What about u ?");
context.Wait(MessageReceivedAsync);
}
else if  (message.Text == "hello")
{
await context.PostAsync($"{this.count++}: Hello , Tell Me !!");
context.Wait(MessageReceivedAsync);
}
else
{
await context.PostAsync($"{this.count++}: You said {message.Text} , This is  Azure Bot Service !! Thank You All !!
by
RajeeshMenoth !! ");
context.Wait(MessageReceivedAsync);
}
}

public async Task AfterResetAsync(IDialogContext context, IAwaitable<bool> argument)
{
var confirm = await argument;
if (confirm)
{
this.count = 1;
await context.PostAsync("Reset count.");
}
else
{
await context.PostAsync("Did not reset count.");
}
context.Wait(MessageReceivedAsync);
}

}
}
Connect a bot to Web Chat
This is a very simple way to connect our bot service app to Web Chat in Azure. Please check the following steps.
1. Click the “Channels” menu on the left side option. It will open a window with channel details and you can see edit option in “Web Chat” channel.

2. Click the Edit option on “Web Chat” channel and it will display two “Secret Keys” with IFrame code. Choose the first “Secret Key” and add it on the IFrame code.
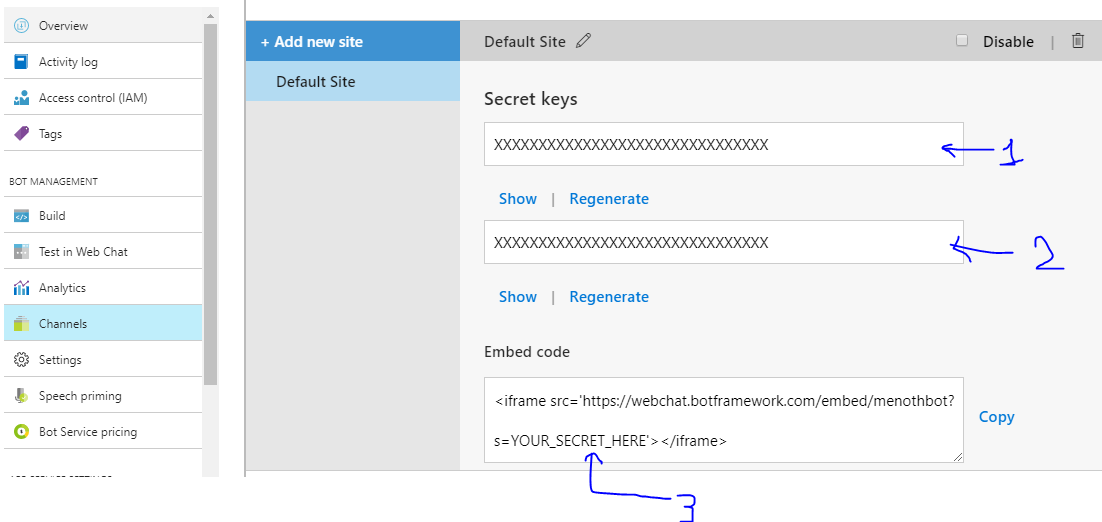
IFrame code
Copy paste your IFrame code in your HTML code and add the secret key available in the web chat edit option . Then it will display the Web chat bot in your app.
<iframe src='https://webchat.botframework.com/embed/menothbot?s=YOUR_SECRET_HERE'></iframe>
Output
Summary
We learned how to create and connect a chat bot with Azure Bot Service. Hope this article is useful for all Azure chat bot beginners.
See Also
It's recommended to read more articles related to ASP.NET Core.
- ASP.NET CORE 1.0: Getting Started
- ASP.NET Core 1.0: Project Layout
- ASP.NET Core 1.0: Middleware And Static files (Part 1)
- Middleware And Staticfiles In ASP.NET Core 1.0 - Part Two
- ASP.NET Core 1.0 Configuration: Aurelia Single Page Applications
- ASP.NET Core 1.0: Create An Aurelia Single Page Application
- Create Rest API Or Web API With ASP.NET Core 1.0
- ASP.NET Core 1.0: Adding A Configuration Source File
- Code First Migration - ASP.NET Core MVC With EntityFrameWork Core
- Building ASP.NET Core MVC Application Using EF Core and ASP.NET Core 1.0
- Send Email Using ASP.NET CORE 1.1 With MailKit In Visual Studio 2017
- ASP.NET Core And MVC Core: Session State
- Startup Page In ASP.NET Core
- Sending SMS Using ASP.NET Core With Twilio SMS API
- Create And Deploy An ASP.NET Core Web App In Azure