Cognitive Service Speech API C#: Text to Speech
Introduction
In this article, we will see in detail about how to create our own Text to Speech Application using Cognitive Services. Cognitive Services are nothing but a set of machine learning algorithm to build a rich Artificial Intelligence application. Hope you all aware about Artificial Intelligence, we can say, iPhone Siri, Windows 10 Cortana and an automatic robotic car which run on its own as an example of Artificial Intelligence.
Microsoft Cognitive Services (formerly Project Oxford) are a set of APIs, SDKs and services available to developers to make their applications more intelligent, engaging and discoverable. Microsoft Cognitive Services expands on Microsoft’s evolving portfolio of machine learning APIs and enables developers to easily add intelligent features – such as emotion and video detection, facial, speech and vision recognition, speech and language understanding into our applications. (click this Reference link)
We will use the Cognitive Service API to develop an artificial Intelligence application.
Cognitive Service API has five Main Categories as
- Vision
- Speech
- Language
- Knowledge
- Search
Main categories
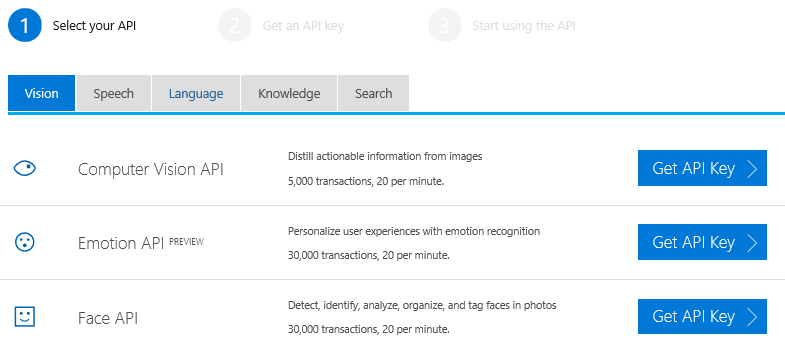
Vision APIs:
In Vision API we have Computer Vision API for Distill actionable information from images, Face API to Detect, identify, analyze, organize, and tag faces in photos, Content Moderator to Automated image, text, and video moderation, Emotion API PREVIEW to personalize user experiences with emotion recognition and Custom Vision Service PREVIEW for easily customize your own state-of-the-art computer vision models for your unique use case.
Speech APIs:
In Speech API we have Translator Speech API to easily conduct real-time speech translation with a simple REST API call, Speaker Recognition API PREVIEW for use speech to identify and authenticate individual speakers, Bing Speech API for Converting speech to text and back again to understand user intent, Custom Speech Service PREVIEW to overcome speech recognition barriers like speaking style, background noise, and vocabulary
Language APIs:
In Language API we have Language Understanding (LUIS) to teach your apps to understand commands from your users, Text Analytics API for easily evaluate sentiment and topics to understand what users want, Bing Spell Check API to detect and correct spelling mistakes in your app, Translator Text API to easily conduct machine translation with a simple REST API call, Web Language Model API PREVIEW to use the power of predictive language models trained on web-scale data, Linguistic Analysis API PREVIEW for simplify complex language concepts and parse text with the Linguistic Analysis API
Knowledge APIs:
In Knowledge API we have Recommendations API PREVIEW to predict and recommend items your customers want, Academic Knowledge API PREVIEW to tap into the wealth of academic content in the Microsoft Academic Graph, Knowledge Exploration Service PREVIEW enable interactive search experiences over structured data via natural language inputs, QnA Maker API PREVIEW distill information into conversational, easy-to-navigate answers, Entity Linking Intelligence Service API PREVIEW will power your app's data links with named entity recognition and disambiguation, Custom Decision Service PREVIEW is a cloud-based, contextual decision-making API that sharpens with experience
Search APIs:
In Search API we have Bing Autosuggest API give your app intelligent autosuggest options for searches, Bing Image Search API is to search for images and get comprehensive results, Bing News Search API is to Search for news and get comprehensive results, Bing Video Search API is to search for videos and get comprehensive results, Bing Web Search API is to get enhanced search details from billions of web documents, Bing Custom Search API is an easy-to-use, ad-free, commercial-grade search tool that lets, Bing Entity Search API PREVIEW to enrich your experiences by identifying and augmenting entity information from the web you deliver the results you want.Ref link:
In this article, we will see in detail how to use the Bing Speech API for to read a text in multiple languages and also save the audio file for later use using the Bing Speech API Cognitive Services.
Building the Sample
Prerequisites:
- Download and install Visual Studio 2017 from this link.
- Register yourself for getting the Cognitive Service API keys. Link
- After Register from this link get your API key link
How to Get Bing Speech API Key
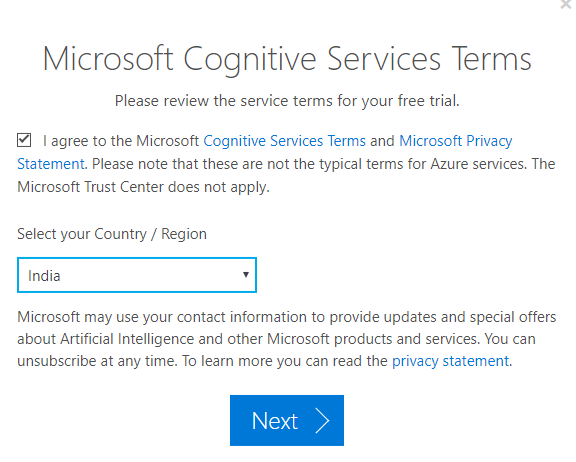
To work with Cognitive Services, we need to use the API key which has been given from our Microsoft web site. Check the prerequisites and follow the steps to register and get the API key. Open this URL and make sure as you have already signed in to the site and If not then sign in with your ID.
As we are going to work with Bing Speech API, Select the Speech API and then click on the get API key for Bing Speech API.
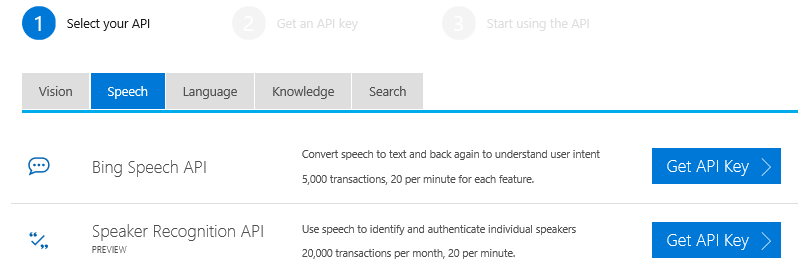
Click on the Get API Key for Bing Speech API.
Sign in with your ID
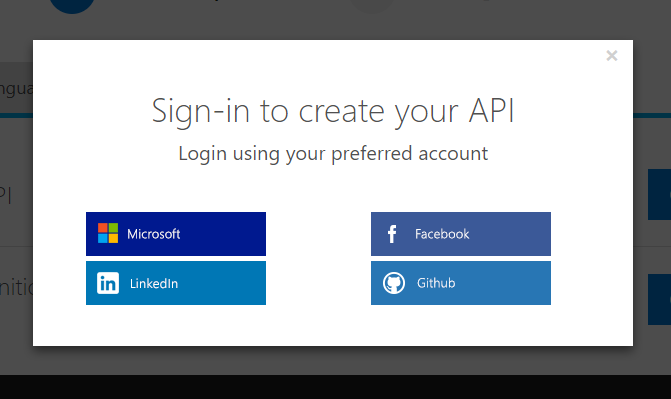
After login, we can see our Bing Speech API key to be used in our Code developing our Text to Speech application.

Description
We will be using Bing text to speech API for developing our Text to Speech application. In this application, we will be using multi-language text to speech by using the locale of the Bing text to speech API. From this link you can get all the information about Bing Text to Speech API. This link also has a simple Console application demo program to explain about how to use the Bing text to speech API, we will be using the “TTSProgram.cs” from the sample solution in our application and this class has all the function to perform the text to speech. You can get the class file from this link. In our application, we will be creating Windows form Application.
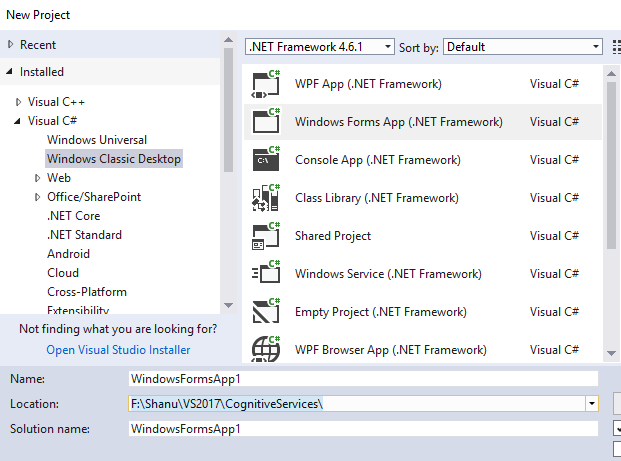
Step 1 – Create Windows Form Application
After installing all the prerequisites listed above, click Start >> Programs >> Visual Studio 2017 >> Visual Studio 2017 on your desktop.
Click New >> Project. Select Visual C# > Select Windows Classic Desktop >> Select Windows Forms App and select your project folder and give your application name and click Ok to create your Windows Form application.
After creating the project now let’s add the “TTSProgram.cs” in our project.Add Existing Item and select the “TTSProgram.cs” from the attached zip file.
Step 2 – Add Controls to your form
In this demo application, we have added two Comboboxes, two textboxes, and one button. In the Combox we have added the Locale and Service name mapping for multi-language text to speech recording. Its good to see more than 30 languages can be used as locale. You can get the complete list of language can be used with Locale and Service name mapping from this link

Here we will be using three Language as English, Tamil, and Korean language. In Locale Combobox we have added the item as “en-US, ko-KR, ta-IN “ and Service name mapping in another combo box item as “Microsoft Server Speech Text to Speech Voice (en-US, ZiraRUS), Microsoft Server Speech Text to Speech Voice (ko-KR, HeamiRUS), Microsoft Server Speech Text to Speech Voice (ta-IN, Valluvar)”. Our Form design look like this

Step 3 – Button Click Event
In the Button Click event we add our API key in Authentication section and check for the key is valid and if the API key is valid then we create an object for the Synthesize all the Authentication and Synthesise class has been used from the “TTSProgram.cs” class. Here we have created to two event: one is to play the Audio after reading the Text and another event to display the error message, then we call the Cortana. Speak method and pass user entered textbox text along with Locale and service name mapping to speck in the user selected language.
private void  btnSpeak_Click(object sender, EventArgs e)
  {
   txtstatus.Text = "Starting Authtentication";
   string accessToken;
   Authentication auth = new  Authentication("AddYourAPIKEYHere");
   try
   {
    accessToken = auth.GetAccessToken();
    txtstatus.Text = "Token: {0} "  + accessToken;
   }
   catch (Exception ex)
   {
    txtstatus.Text = "Failed authentication.";

    txtstatus.Text = ex.Message;
    return;
   }

   txtstatus.Text = "Starting TTSSample request code execution.";
   string requestUri = "https://speech.platform.bing.com/synthesize";
   var cortana = new  Synthesize();
   cortana.OnAudioAvailable += PlayAudio;
   cortana.OnError += ErrorHandler;
   cortana.Speak(CancellationToken.None, new  Synthesize.InputOptions()
   {
    RequestUri = new  Uri(requestUri),
    Text = txtSpeak.Text,
    VoiceType = Gender.Female,
    Locale = cboLocale.SelectedItem.ToString(),
    VoiceName = cboServiceName.SelectedItem.ToString(),
    OutputFormat = AudioOutputFormat.Riff16Khz16BitMonoPcm,
    AuthorizationToken = "Bearer " + accessToken,
   }).Wait();
  }
PlayAudio Event:
This event will be triggered when there is a response to reading the text as audio is available. In this method, we get the Audio stream and first we save it in our root folder. Instead of saving the audio you can also directly play the audio using SoundPlayer class.
private  void  PlayAudio(object  sender, GenericEventArgs<Stream> args)
  {
   Stream readStream = args.EventData;

   try
   {
    string saveTo = Path.GetDirectoryName(Application.ExecutablePath) + @"\SaveMP3File";  //Folder to Save
    if (!Directory.Exists(saveTo))
    {
     Directory.CreateDirectory(saveTo);
    }
    string filename = saveTo + @"\Shanu" + DateTime.Now.ToString("yyyyMMddHHmmss") + ".mp3";  //Save the speech as mp3 file in root folder

    FileStream writeStream = File.Create(filename);

    int Length = 256;
    Byte[] buffer = new  Byte[Length];
    int bytestoRead = readStream.Read(buffer, 0, Length);
    while (bytestoRead > 0)
    {
     writeStream.Write(buffer, 0, bytestoRead);
     bytestoRead = readStream.Read(buffer, 0, Length);
    }

    readStream.Close();
    writeStream.Close();
    SoundPlayer player = new  System.Media.SoundPlayer(filename);
    player.PlaySync();

   }
   catch (Exception EX)
   {
    txtstatus.Text = EX.Message;
   }
   args.EventData.Dispose();
  }
Step 4 – Build and Run the Application
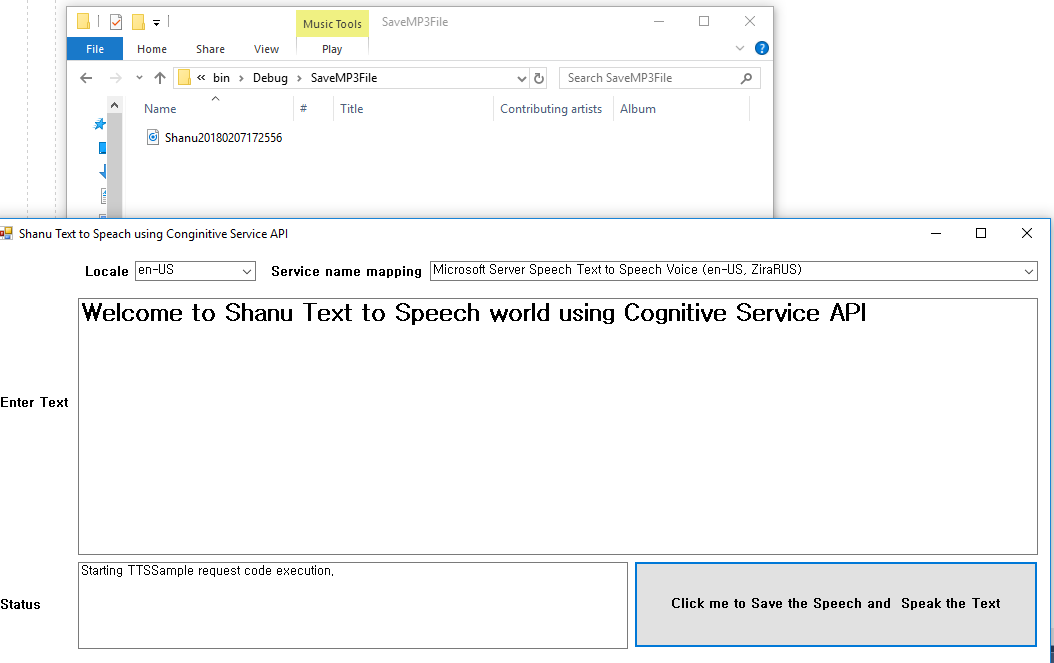
Text to Speech in English Language
We have selected the Locale as “en-US” and entered text to save as speech audio. When we click the button audio file will be created in our root folder.
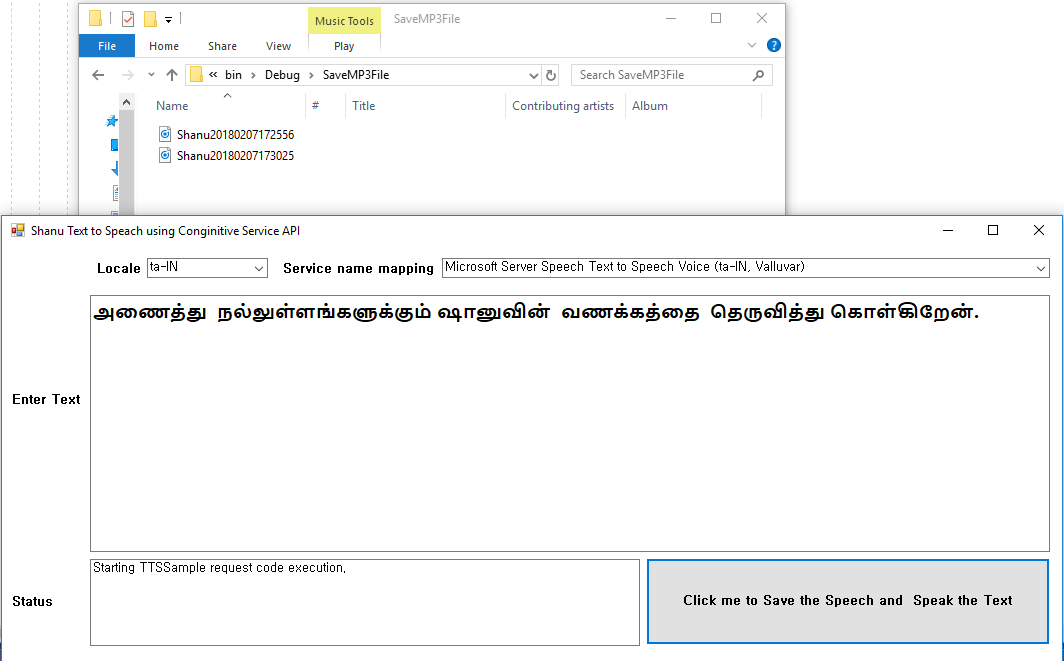
Text to Speech in the Tamil Language
We have selected the Locale as “ta-IN” and entered text to save as speech audio. When we click the button the audio file will be created in our root folder with the Tamil Language as speech.
Text to Speech in the Korean Language
We have selected the Locale as “ko-KR” and entered text to save as speech audio. When we click the button audio file will be created in our root folder with the Korean Language as speech.
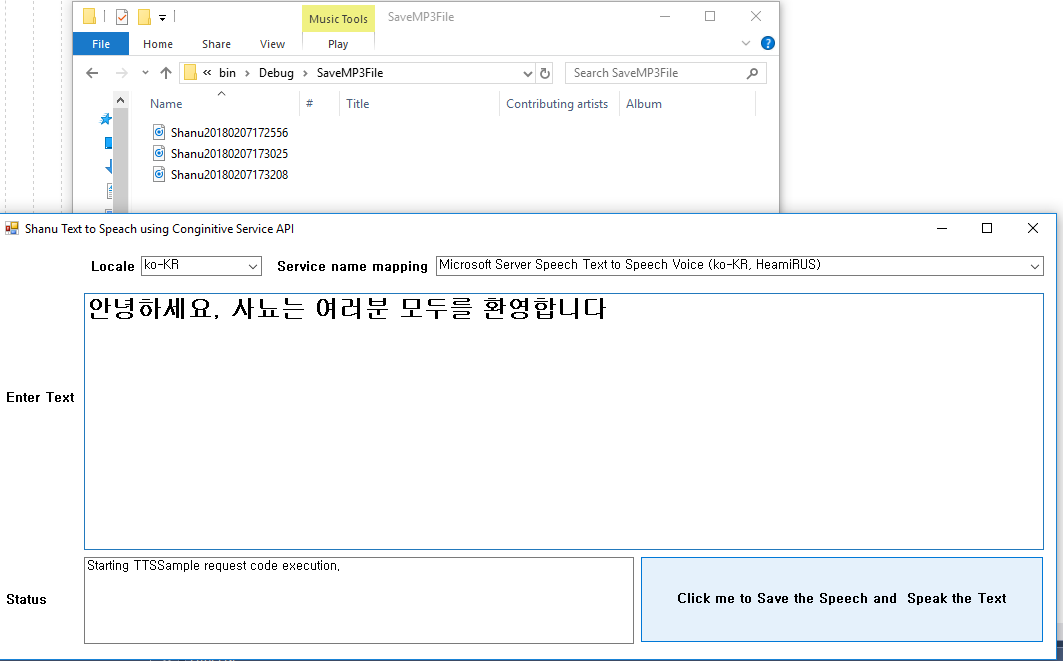
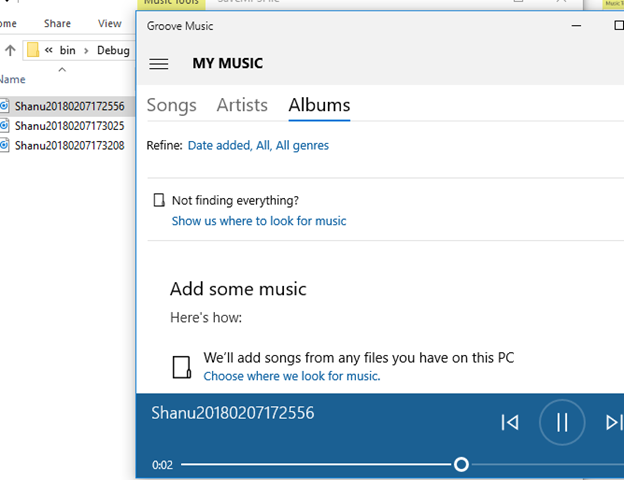
We can also direct play the audio from the saved mp3 format file in our root folder. We can see as now we have three audio files as English, Tamil and Korean language.
Conclusion
Create your account for Cognitive Services from the link and use the API key to run this program.Hope you all like this post and we will be seeing more related to Cognitive Services.
See Also
- Getting started with Angular5 and ASP.NET Core
- ASP.NET Core Template Pack
- Cognitive Services: Emotion API Overview
Download
Text to Speech using Cognitive Service Speech API C#