Visual Studio: Different methods to display unit test
Introduction
The following provides insight on how to view test results while running unit test.
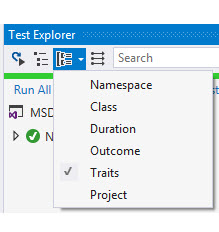
When writing unit test viewing these test in Visual Studio’s test explorer they are shown either as passed or not passed by default which is known as “outcome”. Unit test methods can also be viewed in test explorer as “under namespace”, class, duration, traits (also known as categories) or project.
Outcome method
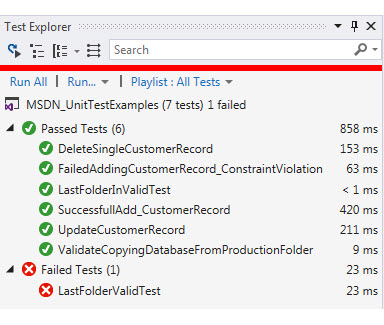
Using outcome is used to group passed and failing test into two separate groups. This is good if all of the unit test methods are generally passing and possibly new test methods may fail or new functionality has been introduced into existing production code which breaks existing methods which will allow a developer to easily see what test a failing in a single group in test explorer.
Duration method
Duration will group test methods in one of three categories, slow, medium or fast. Each group will display time e.g. “Slow > 1 sec (n)” where n is the count of test methods taking longer than one second to complete. Here one can quickly focus on performance of production code to determine as a first step what can be done to decrease time to preform task in production code.

Class groups method
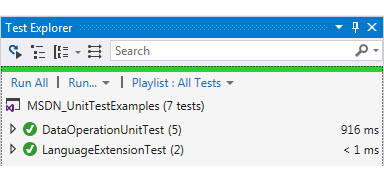
Class groups test classes, for instance, there is a test class for database operations and another test class for testing language extension methods. When selecting “Class” there will be two nodes in test explorer, one for each test class.
Project group method
Project grouping will display a node in test explorer for each project. If there are two unit test projects in a solution then there will be two nodes in test explorer, one for each unit test project.

Category method
Working with traits/categories. Test categories let you run groups of tests based on their assigned categories.

Category caveat
One issue with using categories is the name of the category is a string which if misspelled will have a category with the misspelled name meaning if not caught can lead to confusion. To prevent this from happening, use the following class shown below. This class takes the enum, uses these in a class which allows us to tie into the base categories.
using Microsoft.VisualStudio.TestTools.UnitTesting;
using System;
using System.Collections.Generic;

namespace Tests.CustomTraits
{
    public enum  Trait
    {
        AddingCustomerRecord,
        UpdatingCustomerRecord,
        DeleteCustomerRecord,
        Internal,
        LanguageExtensions
    }

    public class  TestTraitsAttribute : TestCategoryBaseAttribute
    {
        private Trait[] traits;

        public TestTraitsAttribute(params Trait[] traits)
        {
            this.traits = traits;
        }

        public override  IList<string> TestCategories
        {
            get
            {
                var traitStrings = new  List<string>();

                foreach (var trait in traits)
                {
                    string value = Enum.GetName(typeof(Trait), trait);
                    traitStrings.Add(value);
                }

                return traitStrings;
            }
        }
    }
}
Placing this into practice with a unit test method.
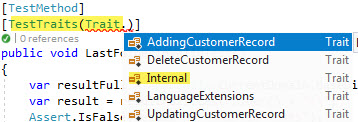
Here are two unit test implementing the above.
using System;
using Microsoft.VisualStudio.TestTools.UnitTesting;
using Tests.CustomTraits;

namespace SolutionTests
{
    [TestClass]
    public class  LanguageExtensionTest
    {
        [TestMethod]
        [TestTraits(Trait.Internal)]
        public void  LastFolderValidTest()
        {
            var resultFull = AppDomain.CurrentDomain.BaseDirectory.UpperFolder(2);
            var result = resultFull.LastFolder();
            Assert.IsTrue(result == "SolutionTests");
        }
        [TestMethod]
        [TestTraits(Trait.Internal)]
        public void  LastFolderInValidTest()
        {
            var resultFull = AppDomain.CurrentDomain.BaseDirectory.UpperFolder(2);
            var result = resultFull.LastFolder() + "\\";
            Assert.IsFalse(result == "SolutionTests");
        }
    }
}
PlayList
Another way to group unit test methods is to create a “play list”. This is done by first opening Test Explorer from the Test menu in Visual Studio, select Windows followed by selecting Test Explorer.
Once test explorer is open, depress and hold the CTRL key, single click several unit test. Now directly below the test explorer’s toolbar there are several links “Run All”, “Run” and PlayList. Select PlayList, right click in test explorer and select “Add to play list” which will then prompt for a file name. Once this has been completed the play list can be executed and will only include the test methods that were selected by selecting the play list just created. To revert back to the former, testing all test methods simply select “all test”.
Remove a PlayList
If the play list becomes obsolete or not necessary, close the solution, find the play list (has a file extension of .playlist) in the solution folder and delete the file. Open the solution and the play list will not appear. Caution: If you delete the playlist while the solution is still opened and then build you will get an error and must close the solution and reopen to get rid of the error.
Adding to a PlayList
To continue adding test to the playlist you should use the top Menu to select “All Tests”, find tests you want to add to the playlist, and simple right click and choose to “Add to Playlist”; now you should see all the test list of the unit test project and not only the “new Playlist” option.
Filtering unit test
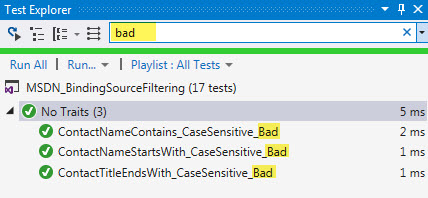
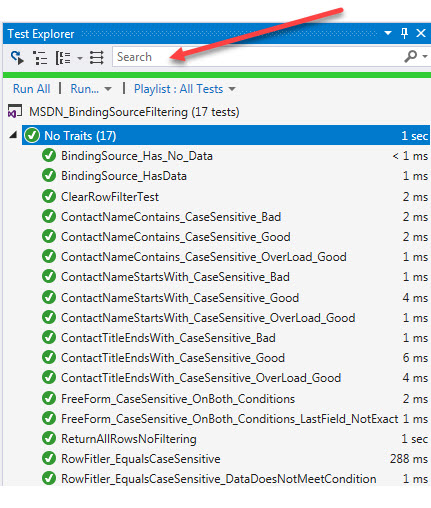
In the toolbar in Test Explorer filtering is done by typing in search/filter text.

Here "bad" has been used as a filter term.
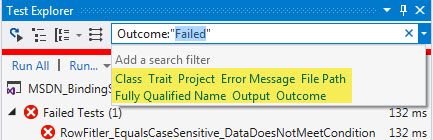
Other search examples which can be used. Click the drop-down, click one of the filter options, complete the filter.
Viewing test method output
There are cases where one needs to view output of a unit test method. One example is working with changes to a backend database. Something is not working as expected.
In the following example a new record is being added to a SQL-Server database table using SqlClient data provider where in normal cases the parameters are not visible.
public bool  Add(Person pPerson)
{
    mHasException = false;
    bool succcess = false;

    /*
        * In a real application this would be checked
        * in a validation method prior to entering this method.
        * It has been placed here to alert you this should be done.
        */
    try
    {
        if (!mGenderIdentifiers.Contains(pPerson.Gender))
        {
            mHasException = true;
            throw new  Exception("Invalid gender");
        }
    }
    catch (Exception generalException)
    {
        mHasException = true;
        mLastException = generalException;
    }

    using (SqlConnection cn = new SqlConnection() { ConnectionString = ConnectionString })
    {
        using (SqlCommand cmd = new SqlCommand() { Connection = cn })
        {
            // insert statement followed by select to get new primary key
            cmd.CommandText = "INSERT INTO dbo.People (FirstName,LastName,Gender,BirthDay) " +
                                "VALUES (@FirstName,@LastName,@Gender,@BirthDay)" +
                                ";SELECT CAST(scope_identity() AS int);";


            cmd.Parameters.AddWithValue("@FirstName", pPerson.FirstName);
            cmd.Parameters.AddWithValue("@LastName", pPerson.LastName);
            cmd.Parameters.AddWithValue("@Gender", pPerson.Gender);
            cmd.Parameters.AddWithValue("@BirthDay", pPerson.BirthDay);

            if (ViewCommand)
            {
                Console.WriteLine(cmd.ActualCommandText());
            }

            cn.Open();

            try
            {
                pPerson.Id = Convert.ToInt32(cmd.ExecuteScalar());
                succcess = true;
            }
            catch (SqlException sqlException)
            {
                mHasException = true;
                mLastException = sqlException;
                throw sqlException;
            }
            catch (Exception generalException)
            {
                mHasException = true;
                mLastException = generalException;
            }
        }
    }

    return succcess;
}
The key to explore parameter values is via a switch in this case.
if (ViewCommand)
{
    Console.WriteLine(cmd.ActualCommandText());
}
ActualCommand is a language extension method which allows replacing the parameter name with the value going to the SQL statement.
using System;
using System.Data;
using System.Linq;
using System.Text;

namespace DataHelperLibrary
{
    public static  class DbExtensions
    {
        /// <summary>
        /// Used to show an SQL statement with actual values for debugging or logging to a file.
        /// </summary>
        /// <param name="pCommand">Command object</param>
        /// <returns>Command object command text with parameter values</returns>
        public static  string ActualCommandText(this IDbCommand pCommand, string pQualifier = "@")
        {
            StringBuilder sb = new  StringBuilder(pCommand.CommandText);

            IDataParameter EmptyParameterNames = (
                from T in  pCommand.Parameters.Cast<IDataParameter>()
                where string.IsNullOrWhiteSpace(T.ParameterName)
                select T).FirstOrDefault();

            if (EmptyParameterNames != null)
            {
                return pCommand.CommandText;
            }

            foreach (IDataParameter p in pCommand.Parameters)
            {
                if ((p.DbType == DbType.AnsiString) ||
                    (p.DbType == DbType.AnsiStringFixedLength) ||
                    (p.DbType == DbType.Date) || (p.DbType == DbType.DateTime) ||
                    (p.DbType == DbType.DateTime2) ||
                    (p.DbType == DbType.Guid) ||
                    (p.DbType == DbType.String) ||
                    (p.DbType == DbType.StringFixedLength) ||
                    (p.DbType == DbType.Time) ||
                    (p.DbType == DbType.Xml))
                {
                    if (p.ParameterName.Substring(0, 1) == pQualifier)
                    {
                        if (p.Value == null)
                        {
                            throw new  Exception($"no value given for parameter '{p.ParameterName}'");
                        }

                        sb = sb.Replace(p.ParameterName, string.Format("'{0}'", p.Value.ToString().Replace("'", "''")));

                    }
                    else
                    {
                        sb = sb.Replace(string.Concat(pQualifier, p.ParameterName),
                            string.Format("'{0}'", p.Value.ToString().Replace("'", "''")));
                    }
                }
                else
                {
                    sb = sb.Replace(p.ParameterName, p.Value.ToString());
                }
            }

            return sb.ToString();

        }
    }
}
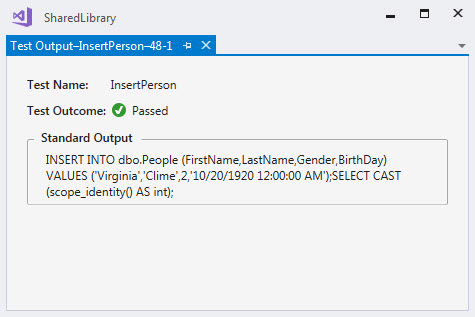
To view the actual SQL statement, click on the code lens icon followed by clicking Output
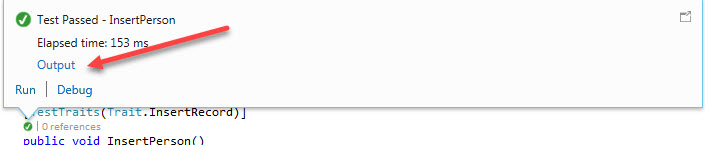
This is the output showing parameter values. Note that the SQL statement can be selected and copied to SQL-Server Management Studio to test in a query window or create a new text file in your project, change the file extension to .sql, this causes Visual Studio to provide access to SQL-Server for running the SQL statement.
Source code
Source code is available on MSDN at the following location
https://code.msdn.microsoft.com/How-to-display-unit-test-fde63b09
Closing remarks
In closing, there are several ways shown above that can provide a view into your test projects that can make life easier when you want to run one test, multiple test either by a grouping mentioned above or through a playlist.
See also
Unit testing your code.
Unit test basics.
How to run unit test from Visual Studio.
Microsoft forum: Testing tool in Visual Studio.
Microsoft forum: Unit testing general.
Getting started with live unit testing in Visual Studio.