Azure Resource Manager: Create and configure new Active Directory Forest in Azure
Introduction
Azure is a comprehensive set of cloud services that developers and IT professionals use to build, deploy and manage applications through a global network of datacenters. Integrated tools, DevOps and a marketplace support you in efficiently building anything from simple mobile apps to internet-scale solutions.
Microsoft Azure became a new infrastructure component of current traditional datacenter management. All customers are moving their on-premises Windows server application workloads to the Azure cloud to save on operating costs, scalability and quick deployment. Traditional Windows applications hosted on the cloud needs Active Directory on the cloud for authentication and authorization.
In this post, we will be providing step-by-step instructions to setup a new Active Directory forest using Azure Windows Server 2016 PaaS server.
Scenario
In this scenario, external users are accessing application servers hosted on Azure from the internet. The application servers are domain joined servers and using the AD as an identity source for authentication and authorization. The Azure application server virtual machines and domain controller virtual machines are running in the same Azure virtual network. They are also included within an availability set for improved fault tolerance.
Create an Azure Virtual Network (VNET)
Log in to the Azure Management Portal – portal.azure.com. Choose Networks and then select Create a Virtual Network or click Add.
Select a name for your Virtual Network, create a larger address space and a subnet and select Create.
Create VMs to run the domain controller and DNS server roles
Once the virtual network is created, we can go ahead and create the base virtual machines which will be running as Active Directory domain controllers.
In the Azure portal, choose Virtual Machines > Windows Server and then Windows Server 2016 Datacenter Image
Select the deployment model as Resource Manager and the select create. In the next screen enter the basic information for the virtual machine.
Name – Type a single label name (such as AzureDC1).
VM Disk Type – Select the disk type needed for this virtual machine.
User Name & Password – Type the name of a user. This user will be a member of the local Administrators group on the VM. You will need this name to sign in to the VM for the first time. The built-in account named Administrator will not work.
Resource Group – Select the resource group name we created during the VNET creation
Location – Choose a location
Click OK and on the next screen select a Virtual machine template based on your requirement
In the Settings page create availability set and other configurations and click OK
Availability Set – To provide redundancy to your application, we recommend that you group two or more virtual machines in an availability set. This configuration ensures that during a planned or unplanned maintenance event, at least one virtual machine will be available and meet the 99.95% Azure SLA. The availability set of a virtual machine can't be changed after it is created.
Storage – Enable this feature to have Azure automatically manage the availability of disks to provide data redundancy and fault tolerance
Network – Choose the Virtual Network we created in first step
Subnet – Choose the subnet
Public IP Address – This is used to communicate to the virtual machine from internet
Network Security Group – Set of firewall rules to control traffic to and from virtual machine
Validate the settings in Summary page and click Create.
Attach a Disk to VM
Note: When you create a VM in Windows Azure you are provided with a temporary storage automatically. This temporary storage is “D:” on a Windows VM and it is “/dev/sdb1” on a Linux VM. This temporary storage must not be used to store data that you are not willing to lose.
Once the virtual machine is deployed, select the virtual machine and click Disks and then Add Data Disk > Create Disk
Enter the size as 10 GB and create and leave the Host Cache Preference set to None. Once the disk is created, click Save. The additional disk is needed to store the AD database, logs, and SYSVOL.
Prepare Data Disk
Log in to the virtual machine and open Server Manager > File and Storage Services. Select Disks and right- click the 10 GB disk we created and New Volume.
Create an NTFS volume and choose Drive letter F:
Reserve a Static IP address
The domain control should have a static IP address configured.
Select your virtual machine AzureDC1, select Networking and click the Network Interface Name
On the network interface page, select IP configurations and click ipconfig1
Under Private IP address, settings change the assignment type to Static and click Save
Install Windows Server Active Directory
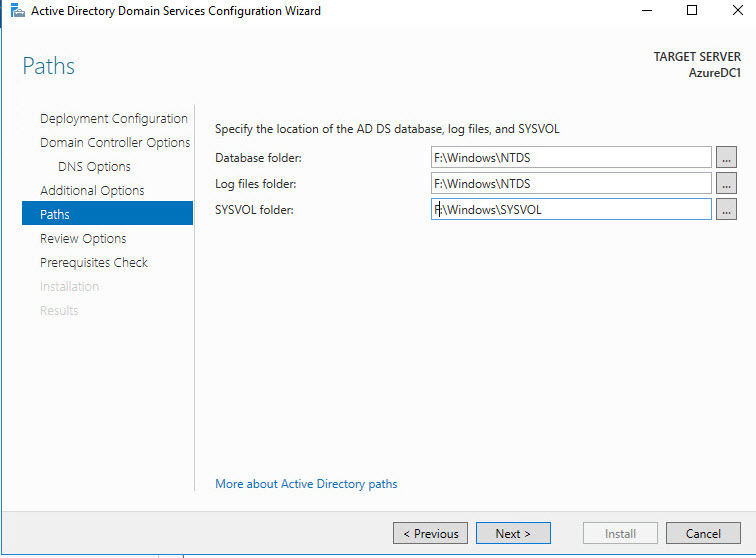
Use the same routine to install AD DS that you use on-premises. For the Active Directory database, logs, and SYSVOL change the default storage location from the operating system drive to the additional data disk that you attached to the VM.
After the DC installation finishes, connect to the VM again and log on to the DC.
Remove DNS Forwarder Setting
In Server Manager, click **Tools **> DNS.
In DNS Manager, right-click the name of the DNS server and click Properties.
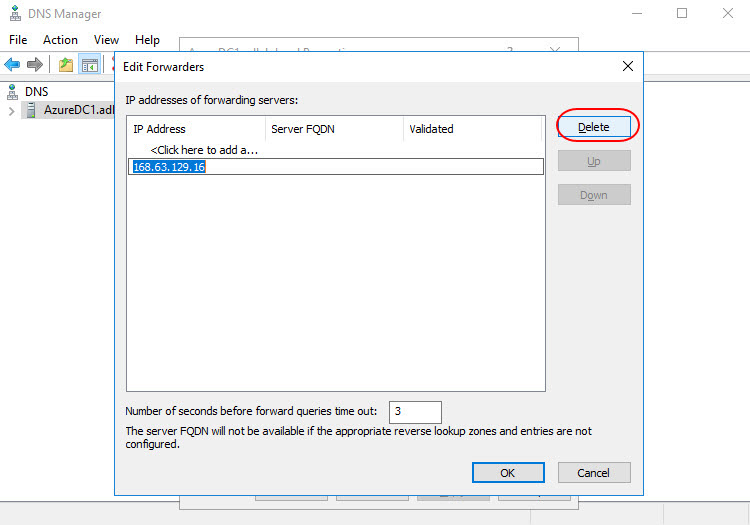
On the **Forwarders **tab, click the IP address of the forwarder and click Edit. Select the IP address and click Delete.
Click OK to close the editor and OK again to close the DNS server properties.
Update the DNS server setting for the virtual network
Click Virtual Networks > double-click the virtual network you created > Configure > DNS servers, type the name and the IP of one of the VMs that runs the DC/DNS server role and click Save.
Select the VM and click **Restart **to trigger the VM to configure DNS resolver settings with the IP address of the new DNS server.
Summary
Perform the steps again the promote an additional domain controller in the same domain. Now the VM's you are adding to the same VNET will have domain controller


