Azure Cognitive Services: Browse images by tag using C#
Introduction
In the following article, we'll see how to develop a program that uses the powerful Azure Cognitive Services to get a list of tags from an image, storing them to further create an application capable of searching images through keywords. The presented source code will be written in C#, and splitted in two applications: the first one will process a directory, searching for JPEG files and analyzing them through Azure. Cognitive Services results will be saved to an XML file. The second program will simply allow the user to enter a keyword, and scan the XML file to find matches. When a match is found, the images will be shown in a WPF DataGrid.
Before we begin, we must create a Cognitive Service resource on Azure. The following section will cover how to do that.
Create an Azure Computer Vision API resource
Log in to Azure portal, then click the "Create a resource" link. In the search bar, enter "Computer Vision API", and confirm. Now our browser will show something like the following screenshot. Click "Create" to proceed.

Now we can assign a name, a geographic location (select the nearest for less latency), and a pricing tier. For the means of the article, the free F0 tier will be a good choice.
In creation confirming, Azure will assign two API keys, which applications need to know and use to access the services functions.
To get the keys, click on the newly created resource, then "Keys" link under "Resource Management"
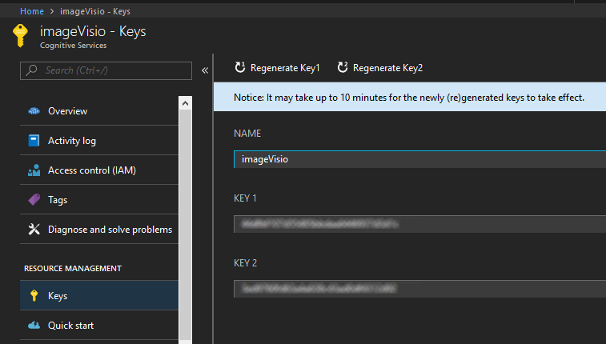
Save one of those keys (a single key will be required) for the following steps.
Write a C# class to use Azure resource
As stated in the Introduction, our source code will be composed of two parts. Here we'll see how to write a simple console app to query Azure Cognitive Services, feeding them with single images we wish to be "seen". The Azure AI will return a set of tags, that will be saved in an XML file for future reference, like a catalog of images along with their descriptive texts.
To achieve that feature, we need first of all a class to comunicate with Azure, and some prerequisites.
Let's open Visual Studio, and create a new solution. Add a first project, which will be a Console App. Then, save it and go to Nuget Manager, where two additional packages need to be installed, being them Microsoft.ProjectOxford.Vision and Newtonsoft.Json

The following class is used to send a Stream to Azure Computer Vision, and to read the returned values:
using Microsoft.ProjectOxford.Vision;
using Microsoft.ProjectOxford.Vision.Contract;
using System.Collections.Generic;
using System.IO;
using System.Linq;
using System.Threading.Tasks;

namespace ivDataGather
{
 class MicrosoftCognitiveCaptionService
 {
 private static  readonly string  ApiKey = "<INSERT YOUR API KEY HERE>";
 private static  readonly string  ApiEndpoint = "https://westus.api.cognitive.microsoft.com/vision/v1.0";

 private static  readonly VisualFeature[] VisualFeatures = { VisualFeature.Description,
 VisualFeature.Tags };

 public async Task<string> GetTagsAsync(Stream stream)
 {
 var client = new  VisionServiceClient(ApiKey, ApiEndpoint);
 var result = await client.AnalyzeImageAsync(stream, VisualFeatures);
 return ProcessAnalysisResult(result);
 }

 private static  string ProcessAnalysisResult(AnalysisResult result)
 {
 string message = result?.Description?.Captions.Count() > 0 ? string.Join(", ", result?.Description?.Captions.Select(x => x.Text)) : "";
 string tags = result?.Tags?.Count() > 0 ? string.Join(", ", result?.Tags?.Select(x => x.Name)) : "";

 var list = new  List<string>();
 message.Split(' ').ToList().ForEach(x =>
 {
 list.Add(x.Trim());
 });

 tags.Split(',').ToList().ForEach(x =>
 {
 list.Add(x.Trim());
 });

 return string.Join(",", list.Distinct().ToList());
 }
 }

}
The first async method, GetTagsAsync, will create a new VisionServiceClient object, given the service API key and the endpoint to use (which is the URL of the service, which could be extracted from Azure, and its based on the chosen geographical location). Here we will query Azure on two features: VisualFeature.Description and VisualFeature.Tags. Those enum values will inform the service we are interested in reading back only those informations.
Once having received a result, GetTagsAsync will call on a second method, ProcessAnalysisResult. The method will return a string object, based on the Description and Tags properties, which will be parsed and taken as a distinct list, comma separated, transformed in a one-line response.
Develop a console app to process an images folder
With those premises, developing the further steps is trivial. Here follows the console part, which simply parse a given directory for JPEG files, sending them to Azure and awaiting results. When they come back to us, those results will be stored in a TaggedImage list (a custom class we'll see in a moment), to be saved in a serialized XML at the end of the procedure.
using System;
using System.Collections.Generic;
using System.IO;
using System.Linq;
using System.Xml.Serialization;

namespace ivDataGather
{
 class Program
 {
 static async void ParseDirectory(string directory, string catalogOutp)
 {
 var itemList = new  List<TaggedImage>();

 var cc = new  MicrosoftCognitiveCaptionService();

 foreach(var f in  Directory.GetFiles(directory, "*.jpg"))
 {
 var r = "";
 var ms = new  FileStream(f, FileMode.Open);
 r = await cc.GetTagsAsync(ms);

 itemList.Add(new TaggedImage()
 {
 FilePath = f,
 Tags = r.Split(',').ToList()
 });

 Console.WriteLine(f + "\n" + r +  "\n");
 ms.Dispose();
 }

 cc = null;

 XmlSerializer serialiser = new  XmlSerializer(typeof(List<TaggedImage>));
 TextWriter fileStream = new  StreamWriter(catalogOutp);
 serialiser.Serialize(fileStream, itemList);
 fileStream.Close();
 }

 static void  Main(string[] args)
 {
 ParseDirectory(@"C:\<input_folder>\images",
  @"C:\<any_output_folder>\ivcatalog.xml");
 Console.ReadLine();
 }
 }
}
using System.Collections.Generic;
using System.IO;
using System.Windows.Media.Imaging;

namespace ivDataGather
{
 public class  TaggedImage
 {
 public string  FilePath { get; set; }
 public string  FileName { get  { return  GetFileAttributes()?.Name; } }
 public string  FileExtension { get  { return  GetFileAttributes()?.Extension; } }
 public string  FileDirectory { get  { return  GetFileAttributes()?.DirectoryName; } }
 public List<string> Tags { get; set; }

 public BitmapImage Image
 {
 get
 {
 return new  BitmapImage(new  System.Uri(this.FilePath));
 }
 }

 private FileInfo GetFileAttributes()
 {
 return new  FileInfo(this.FilePath);
 }
 }
}
As it can be seen, the TaggedImage class simply contains the found file name and path reference and tags (returned by Azure), plus an Image property which returns a BitmapImage object, i.e. the graphical format for the file. That property will be useful for the second part of the program.
Executing the console app
Let's create a sample folder with some images in it.

Running our console app with the path containing the above image will result in something like the following screenshot

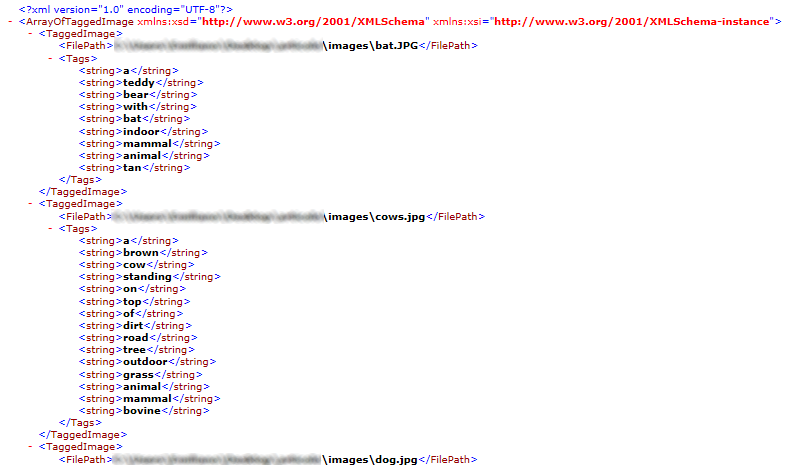
In other words, for every found JPG file, the method GetTagsAsync will return a list of words from Azure image analysis. The console app receives that list, then proceed in saving them to an XML file through an XMLSerializer object. The saved file, from the above analysis, will be as follows:
That file will be used as a catalog by the WPF application, which will be covered in the next section
Develop a WPF app to search tags and show results
The idea behind that part of the solution is really simple: a TextBox in which to write our search term, a button to start searching, and a DataGrid to show all the found results. Obviously, the search involves the deserialization of our XML catalog. Here we will develop using WPF, to quickly implement - through XAML - an image column for our Datagrid.
The XAML code of our MainWindow will be
<Window x:Class="ivImageFinder.MainWindow"
 xmlns="http://schemas.microsoft.com/winfx/2006/xaml/presentation"
 xmlns:x="http://schemas.microsoft.com/winfx/2006/xaml"
 xmlns:d="http://schemas.microsoft.com/expression/blend/2008"
 xmlns:mc="http://schemas.openxmlformats.org/markup-compatibility/2006"
 xmlns:local="clr-namespace:ivImageFinder"
 mc:Ignorable="d"
 Title="Image finder" Height="350" Width="525">
 <Grid>
 <DockPanel HorizontalAlignment="Stretch" LastChildFill="true" VerticalAlignment="Stretch" Background="LightGray">
 <DockPanel Height="50" LastChildFill="True" VerticalAlignment="Top"  DockPanel.Dock="Top" Background="WhiteSmoke">
 <Button x:Name="button" Content="Search"  Width="75" DockPanel.Dock="Right" FontSize="16" Click="button_Click"/>
 <TextBox x:Name="searchBox" TextAlignment="Center" VerticalContentAlignment="Center" HorizontalAlignment="Stretch" Text="TextBox" DockPanel.Dock="Left" FontSize="16"/>
 </DockPanel>
 <DataGrid x:Name="dataGrid" DockPanel.Dock="Bottom">
 <DataGrid.Columns>
 <DataGridTemplateColumn Header="Image" Width="300" IsReadOnly="True">
 <DataGridTemplateColumn.CellTemplate>
 <DataTemplate>
 <Image Source="{Binding Image}"/>
 </DataTemplate>
 </DataGridTemplateColumn.CellTemplate>
 </DataGridTemplateColumn>
 </DataGrid.Columns>
 </DataGrid>

 </DockPanel>
 </Grid>
</Window>
As it can be seen, the image column is easily created by accessing the DataGrid Columns property, customizing a column to contain an Image control. Here we will bind its content to a property named "Image" (the same property we saw above in TaggedImage class - so, the ItemSource property of the DataGrid will be a List<TaggedImage>).
That layout will result in the following window:

The code behind is trivial and consist mainly in the button click handler
using ivDataGather;
using System.Collections.Generic;
using System.IO;
using System.Linq;
using System.Windows;
using System.Xml.Serialization;

namespace ivImageFinder
{
 /// <summary>
 /// Interaction logic for MainWindow.xaml
 /// </summary>
 public partial  class MainWindow : Window
 {
 private string  catalogPath = @"C:\<path_to_catalog_file>\ivcatalog.xml";

 public MainWindow()
 {
 InitializeComponent();
 }

 private void  button_Click(object  sender, RoutedEventArgs e)
 {
 List<TaggedImage> itemList;
 using (var reader = new StreamReader(catalogPath))
 {
 XmlSerializer deserializer = new  XmlSerializer(typeof(List<TaggedImage>));
 itemList = (List<TaggedImage>)deserializer.Deserialize(reader);
 }

 dataGrid.ItemsSource = itemList.Where(x => x.Tags.Contains(searchBox.Text));
 }
 }
}
We have a private variable which specifies the path to our XML catalog. At each button click, the program deserializes the XML content to a List<TaggedImage>, using it as the ItemSource of DataGrid. LINQ is here used to filter only those items which corresponds to the digited text. The Image property will be binded to the Image control of the DataGrid column, showing the desired results.
Here follows some examples of searching for keywords

Source code
The source code used in the article is freely downloadable at: https://code.msdn.microsoft.com/Browse-by-tag-with-Azure-63a479c1