Deploy Windows Server Updates Services (WSUS) 3 SP2 on a DMZ Protected by Forefront TMG 2010 SP2
Scenario
This article explains how to configure WSUS 3 SP2 located in a DMZ to deploy updates to clients that are behind Forefront TMG 2010 SP2. The topology for this scenario is described in the figure below:

Figure 1
On this scenario internal client workstations will receive updates from WSUS which is located in the DMZ. This WSUS Server is not joined to the internal domain. In order to configure the rules on Forefront TMG 2010 you will need to understand the traffic profile for this deployment, which is described below:
- From WSUS to Internal network
- Protocols: HTTP, HTTPs and DNS
- From WSUS to External network
- Protocols: HTTP and HTTPS
Configuring Forefront TMG 2010 SP2
In order to configure Forefront TMG 2010 for this scenario you will need the following requirements:
- 1 Forefront TMG Server with three network adapters
- Apply the 3 Leg Template on Forefront TMG
- Configure the network relationship between internal and DMZ as “Route”
The last two requirements from the list above can be easily applied using the Getting Started Wizard on Forefront TMG as shown in figures 2 and 3:

Figure 2

Figure 3
Once you have that configured you can configure the Forefront TMG rules. We will start by configuring the rules to allow the communication between WSUS and the internal network. Follow the steps below to configure that:
- Open Forefront TMG Management Console. Right click Firewall Policy, point to New and click Access Rule.
- On the Welcome to the New Access Rule Wizard page type the rule name as shown below and click Next.

Figure 4
- On the Rule Action page choose Allow as shown below and click Next.
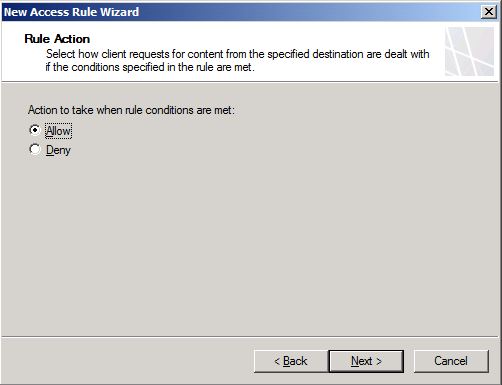
Figure 5
4. On the Protocols page, click Add button and select the protocols HTTP, HTTPS and DNS. Click Close on the Add Protocols window. The Protocols page should look like figure below. Once you confirm that, click Next to continue.
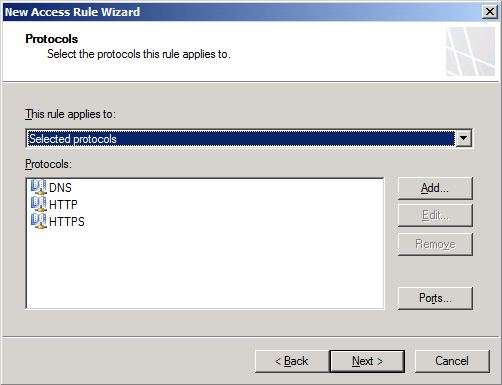
Figure 6
5. On the Malware Inspection page, click Do no enable malware inspection for this rule as shown in the figure below and click Next to continue.

Figure 7
6. In the Access Rule Sources page click Add, click New and choose Computer. Type the WSUS computer name, right below type the IP address and click OK. Select the WSUS Server computer that you just created, click Add, select Internal network, click Add and click Close. Once you finish these steps the Access Rule Sources should look like figure 8. Click Next to continue.
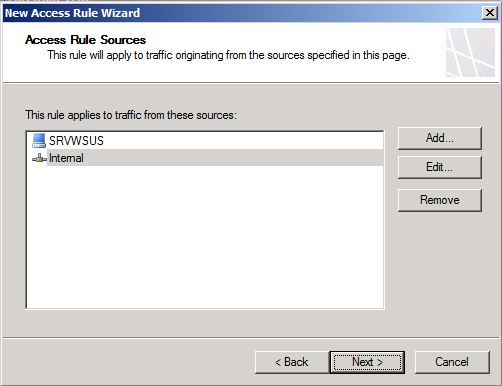
Figure 8
7. Repeat the same procedures from step 6 in the Access Rule Destinations.
8. In the User Sets page leave the default selection (All Users) click Next and click Finish.
Now you will need to create the access rule from WSUS to the Internet. The procedures are pretty much the same, however you will need to make the following changes:
- Step 1 (Rule Name) – change the name to “From WSUS to Internet”.
- Step 4 (Protocols) – select only HTTP and HTTPs.
- Step 6 (Access Rule Sources) – select SRVWSUS only.
- Step 7 (Access Rule Destination) – select External only.
Once you finish creating these two rules click Apply, type a description for this change and click Apply.
Configuring WSUS
The WSUS configuration will be similar to any other default configuration, for that reason the recommendation is that you use the Windows Server Update Services 3.0 SP2 Step By Step Guide in order to configure WSUS.
Configuring Domain Controller
The following tasks should be done in the Domain Controller:
- Configure Group Policy to use the WSUS as an intranet update server
- Make sure to register WSUS Serve’s name on DNS (A Record)
Validating the Configuration on the Client Computer
After finishing the configuration on all other servers you can start validating the configuration on the client computer by following the steps below:
- Open command prompt and run the command gpupdate /force
- Run the command rsop.msc and verify if the WSUS Server name is showing up in the Windows Update policy as shown below:

Figure 9
3. Click Start, All Programs and click Windows Update.
4. Click Check for Updates.
Note: if you have live logging enabled on Forefront TMG you should see the traffic pattern similar to the one below:
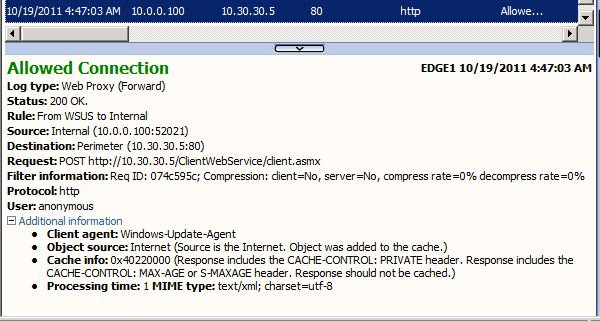
Figure 10
5. Open the file %windir%\windowsupdate.log and check if the client is trying to get update from the WSUS Server as shown below:

Figure 11
6. Switch to WSUS Server and make sure that the computer is already reporting itself to WSUS.