Cognitive Services : Analyze an Image Using Computer Vision API
Introduction
One of the important Cognitive Services API is Computer Vision API and it helps to access the advanced algorithms for processing images and returning valuable information. For example, By uploading an image or specifying an image URL, Microsoft Computer Vision algorithms can analyze visual content in different ways based on inputs and user choices. So we will get various information about the given image. We need a valid subscription key for accessing this feature.
Prerequisites
- Subscription key ( Azure Portal ).
- Visual Studio 2015 or 2017
Requirements
These are the major requirements mention in the Microsoft docs.
- Supported input methods: Raw image binary in the form of an application/octet stream or image URL.
- Supported image formats: JPEG, PNG, GIF, BMP.
- Image file size: Less than 4 MB.
- Image dimension: Greater than 50 x 50 pixels.
Subscription Key Free Trial
If you don’t have Microsoft Azure Subscription and want to test the Computer Vision API because it requires a valid Subscription key for processing the image information. Don’t worry !! Microsoft gives a 7 day’s trial Subscription Key ( Click here ). We can use that Subscription key for testing purpose. If you sign up using the Computer Vision free trial, Then your subscription keys are valid for the west central region ( https://westcentralus.api.cognitive.microsoft.com )
Computer Vision API
First, we need to log into the Azure Portal with our Azure credentials. Then we need to create an Azure Computer Vision Subscription Key in the Azure portal

Click on “Create a resource” on the left side menu and it will open an “Azure Marketplace”. There, we can see the list of services. Click “AI + Machine Learning” then click on the “Computer Vision”.
Provision a Computer Vision Subscription Key
After clicking the "Computer Vision", it will open another section. There, we need to provide the basic information about Computer Vision API.

Name : Name of the Computer Vision API.
Subscription : We can select our Azure subscription for Computer Vision API creation.
Location : We can select our location of resource group. The best thing is we can choose a location closest to our customer.
Pricing tier : Select an appropriate pricing tier for our requirement.
Resource group : We can create a new resource group or choose from an existing one.
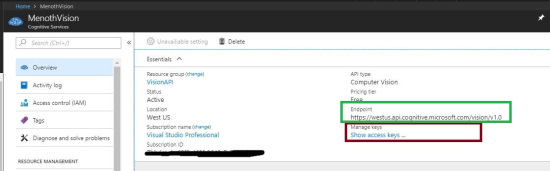
Now click on the MenothVision in dashboard page and it will redirect to the details page of MenothVision ( “Overview” ). Here, we can see the Manage Key ( Subscription key details ) & Endpoint details. Click on the Show access keys links and it will redirect to another page.
We can use any of the Subscription key or Regenerate the given key for getting image information using Computer Vision API.

Endpoint
As we mentioned above the location is same for all the free trail Subscription Key. In Azure, we can choose available locations while creating a Computer Vision API. The following Endpoint we have used in our code.
"https://westus.api.cognitive.microsoft.com/vision/v1.0/analyze"
View Model
The following model will contain the API image response information.
using System;
using System.Collections.Generic;
using System.Linq;
using System.Threading.Tasks;

namespace VisionApiDemo.Models
{
public class  Detail
{
public List<object> celebrities { get; set; }
}

public class  Category
{
public string  name { get; set; }
public double  score { get; set; }
public Detail detail { get; set; }
}

public class  Caption
{
public string  text { get; set; }
public double  confidence { get; set; }
}

public class  Description
{
public List<string> tags { get; set; }
public List

<Caption> captions { get; set; }
}

public class  Color
{
public string  dominantColorForeground { get; set; }
public string  dominantColorBackground { get; set; }
public List<string> dominantColors { get; set; }
public string  accentColor { get; set; }
public bool  isBwImg { get; set; }
}

public class  Metadata
{
public int  height { get; set; }
public int  width { get; set; }
public string  format { get; set; }
}

public class  ImageInfoViewModel
{
public List<Category> categories { get; set; }
public Description description { get; set; }
public Color color { get; set; }
public string  requestId { get; set; }
public Metadata metadata { get; set; }
}
}
Request URL
We can add additional parameters or request parameters ( optional ) in our API “endPoint” and it will provide more information for the given image.
https://[location].api.cognitive.microsoft.com/vision/v1.0/analyze[?visualFeatures][&details][&language]
Request parameters
Currently we can use 3 optional parameters.
- visualFeatures
- details
- language
visualFeatures
The name itself clearly mentions it returns Visual Features of the given image. If we add multiple values in a visualFeatures parameters then put a comma for each value. The following are the visualFeatures parameters in API.
- Categories
- Tags
- Description
- Faces
- ImageType
- Color
- Adult
details
This parameter will return domain specific information whether it is Celebrities or Landmarks.
Celebrities : If the detected image is of a celebrity it identify the same.
Landmarks : If the detected image is of a landmark it identify the same.
language
The service will return recognition results in specified language. Default language is english.
Supported languages.
- en – English, Default.
- zh – Simplified Chinese
Vision API Service
The following code will process and generate image information using Computer Vision API and its response is mapped into the “ImageInfoViewModel”. We can add the valid Computer Vision API Subscription Key into the following code.
using Newtonsoft.Json;
using System;
using System.Collections.Generic;
using System.IO;
using System.Net.Http;
using System.Net.Http.Headers;
using System.Threading.Tasks;
using VisionApiDemo.Models;

namespace VisionApiDemo.Business_Layer
{
public class  VisionApiService
{
const string  subscriptionKey = "<Enter your subscriptionKey>";
const string endPoint =
"https://westus.api.cognitive.microsoft.com/vision/v1.0/analyze";

public async Task<ImageInfoViewModel> MakeAnalysisRequest()
{
string imageFilePath = @"C:\Users\Rajeesh.raveendran\Desktop\Rajeesh.jpg";
var errors = new  List<string>();
ImageInfoViewModel responeData = new  ImageInfoViewModel();
try
{
HttpClient client = new  HttpClient();

// Request headers.
client.DefaultRequestHeaders.Add(
"Ocp-Apim-Subscription-Key", subscriptionKey);

// Request parameters. A third optional parameter is "details".
string requestParameters =
"visualFeatures=Categories,Description,Color";

// Assemble the URI for the REST API Call.
string uri =  endPoint + "?"  + requestParameters;

HttpResponseMessage response;

// Request body. Posts a locally stored JPEG image.
byte[] byteData = GetImageAsByteArray(imageFilePath);

using (ByteArrayContent content = new ByteArrayContent(byteData))
{
// This example uses content type "application/octet-stream".
// The other content types you can use are "application/json"
// and "multipart/form-data".
content.Headers.ContentType =
new MediaTypeHeaderValue("application/octet-stream");

// Make the REST API call.
response = await client.PostAsync(uri, content);
}

// Get the JSON response.
var result = await response.Content.ReadAsStringAsync();

if (response.IsSuccessStatusCode)
{

responeData = JsonConvert.DeserializeObject<ImageInfoViewModel>(result,
new JsonSerializerSettings
{
NullValueHandling = NullValueHandling.Include,
Error = delegate  (object  sender, Newtonsoft.Json.Serialization.ErrorEventArgs earg)
{
errors.Add(earg.ErrorContext.Member.ToString());
earg.ErrorContext.Handled = true;
}
}
);
}

}
catch (Exception e)
{
Console.WriteLine("\n" + e.Message);
}

return responeData;
}

static byte[] GetImageAsByteArray(string imageFilePath)
{
using (FileStream fileStream =
new FileStream(imageFilePath, FileMode.Open, FileAccess.Read))
{
BinaryReader binaryReader = new  BinaryReader(fileStream);
return binaryReader.ReadBytes((int)fileStream.Length);
}
}
}
}
API Response – Based on the given Image
The successful json response.
{
"categories": [
{
"name": "people_group",
"score": 0.6171875,
"detail": {
"celebrities": []
}
},
{
"name": "people_many",
"score": 0.359375,
"detail": {
"celebrities": []
}
}
],
"description": {
"tags": [
"person",
"sitting",
"indoor",
"posing",
"group",
"people",
"man",
"photo",
"woman",
"child",
"front",
"young",
"table",
"cake",
"large",
"holding",
"standing",
"bench",
"room",
"blue"
],
"captions": [
{
"text": "a group of people sitting posing for the camera",
"confidence": 0.9833507086594954
}
]
},
"color": {
"dominantColorForeground": "White",
"dominantColorBackground": "White",
"dominantColors": [
"White",
"Black",
"Red"
],
"accentColor": "AD1E3E",
"isBwImg": false
},
"requestId": "89f21ccf-cb65-4107-8620-b920a03e5f03",
"metadata": {
"height": 346,
"width": 530,
"format": "Jpeg"
}
}
Download
Output
Image information captured using Computer Vision API.For demo purpose, I have taken only a few data even though you can get more information about the image.

Reference
Summary
From this article we have learned how to implement One of the important Cognitive Services API ( Computer Vision API ). I hope this article is useful for all Azure Cognitive Services API beginners.
See Also
It's recommended to read more articles related to ASP.NET Core & Azure App Service.
- ASP.NET CORE 1.0: Getting Started
- ASP.NET Core 1.0: Project Layout
- ASP.NET Core 1.0: Middleware And Static files (Part 1)
- Middleware And Staticfiles In ASP.NET Core 1.0 - Part Two
- ASP.NET Core 1.0 Configuration: Aurelia Single Page Applications
- ASP.NET Core 1.0: Create An Aurelia Single Page Application
- Create Rest API Or Web API With ASP.NET Core 1.0
- ASP.NET Core 1.0: Adding A Configuration Source File
- Code First Migration - ASP.NET Core MVC With EntityFrameWork Core
- Building ASP.NET Core MVC Application Using EF Core and ASP.NET Core 1.0
- Send Email Using ASP.NET CORE 1.1 With MailKit In Visual Studio 2017
- ASP.NET Core And MVC Core: Session State
- Startup Page In ASP.NET Core
- Sending SMS Using ASP.NET Core With Twilio SMS API
- Create And Deploy An ASP.NET Core Web App In Azure
- Chat Bot with Azure Bot Service
- Channel Configuration - Azure Bot Service To Slack Application