C# DataGridView - ListBox - CheckListBox - ListView move items up/down
Introduction

This article provides methods for allowing the following, DataGridView, ListBox, CheckedListBox and ListView to move rows/items up and down by means of two buttons. There are many reasons for providing this which range from displaying field names in a CheckedListBox where any items checked, moved fields up or down are moved to a ListBox to create a SQL statement which may be used in a dynamic report system. Other uses, a business requirement states that data in any of these controls allow the user of the application to order underlying items rather than A-Z or Z-A conventional ordering. This may be for display only or perhaps in an ordering system where the order is important such as in purchasing from a factious music store where the ordering becomes the order in which the user wants to hear the music. Note this functionality is natively used in several operations inside of Visual Studio and many other products.
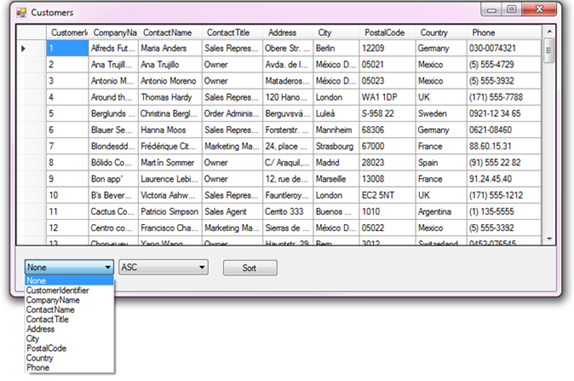
Typical business applications which interact with data usually present data in the user interface un-sorted or sorted by a fixed order or user-defined order (simple example in figure 1) while there is another possibility, provide the user with an option to sort data in a non-orthodox sort order such as business wants the capability to order by row e.g. move row one in a DataGridView, a ListBox, a CheckedListBox or a ListView up or down and remember the position when reopening their application.
Here we have the alternate for re-ordering rows using buttons and extension methods.
Implementation
Each control, DataGridView, ListBox, CheckedListBox, and ListView use language extensions provided in the class project CommonLangageExtensionsLibrary within the solution for the demonstrations. These extensions work with or without binding data to any of these controls.
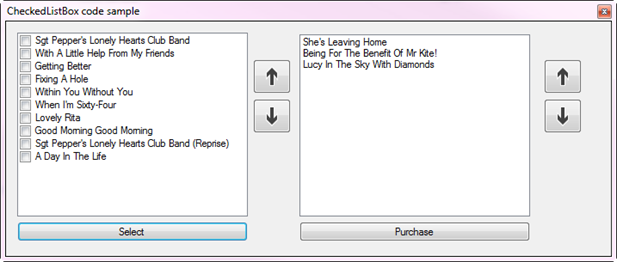
With a CheckedListBox - full source
private void  upButton_Click(object sender, EventArgs e)
{
    listBox1.MoveRowUp();
}
private void  downButton_Click(object sender, EventArgs e)
{
    listBox1.MoveRowDown();
}
With a ListBox setup with a DataSource - full source
private void  upButton_Click(object sender, EventArgs e)
{
    if (lstProducts.SelectedIndex >= 0)
    {
        lstProducts.MoveRowUp(_bsData, _ops.KeyPositionFieldName);
        _hasChanges = true;
    }
}

private void  downButton_Click(object sender, EventArgs e)
{
    if (lstProducts.SelectedIndex >= 0)
    {
        lstProducts.MoveRowDown(_bsData, _ops.KeyPositionFieldName);
        _hasChanges = true;
    }
}
With a ListView - full source
private void  upButton1_Click(object sender, EventArgs e)
{
    listView1.MoveListViewItems(MoveDirection.Up);
}
private void  downButton1_Click(object sender, EventArgs e)
{
    listView1.MoveListViewItems(MoveDirection.Down);
}
With a DataGridView with a DataSource using a BindingSource component. - full source
private void  upButton_Click(object sender, EventArgs e)
{
    _bsData.MoveRowUp();

    _hasChanges = true;
}
private void  downButton_Click(object sender, EventArgs e)
{
    _bsData.MoveRowDown();

    _hasChanges = true;
}
With a DataGridView without a DataSource
private void  upButton_Click(object sender, EventArgs e)
{
    dataGridView1.MoveRowUp();
}

private void  downButton_Click(object sender, EventArgs e)
{
    dataGridView1.MoveRowDown();
}
Fundamentals for working with tables
The data source for controls presenting data must be unsorted as with sorting enabled when moving rows up or down the underlying data source sort will take over and force the sort leaving the positioning appear as it didn’t work and yes it didn’t work properly.
Each database table will require an int field which will hold the row position used when displaying data in a control (DataGridView, ListBox, CheckedListBox or ListView). This field is hidden when presenting data in the user interface. Method provided do not change the row positions but instead house this field and when saving the row position will reorder them.
Instrumenting a database table
For demonstration purposes, we will use Suppliers table from Microsoft NorthWind database which has the following columns which are for storage of business information. A field is needed to track the ordering done in code.
CREATE TABLE  dbo.Suppliers(
    SupplierID INT  IDENTITY(1,1) NOT  NULL,
    CompanyName NVARCHAR(40) NOT NULL,
    ContactName NVARCHAR(30) NULL,
    ContactTitle NVARCHAR(30) NULL,
    Address NVARCHAR(60) NULL,
    City NVARCHAR(15) NULL,
    PostalCode NVARCHAR(10) NULL,
    Country NVARCHAR(15) NULL,
    Phone NVARCHAR(24) NULL
) ON  [PRIMARY]
In this case a field name RowPosition is needed as shown below.
CREATE TABLE  dbo.Suppliers(
    SupplierID INT  NOT NULL,
    CompanyName NVARCHAR(40) NOT NULL,
    ContactName NVARCHAR(30) NULL,
    ContactTitle NVARCHAR(30) NULL,
    Address NVARCHAR(60) NULL,
    City NVARCHAR(15) NULL,
    PostalCode NVARCHAR(10) NULL,
    Country NVARCHAR(15) NULL,
    Phone NVARCHAR(24) NULL,
    RowPosition INT  NULL
) ON  [PRIMARY]
The field can be added by creating a query in Visual Studio or in SSMS (SQL-Server Management Studio)
ALTER TABLE Suppliers ADD [RowPosition] [INT] NULL
Then populate each row which is rather annoying if there are a good deal of rows and whenever humans are involved mistakes can be made. Instead, this can be automated. The first step is to write the statements needed in Visual Studio or SSMS. For Suppliers table the following will first check if the column RowPosition exists if it does drop the column (you could skip this step) followed by adding the column back in. Once the column exists populate each row beginning with 1.
IF EXISTS
(
    SELECT *
    FROM INFORMATION_SCHEMA.COLUMNS
    WHERE table_name = 'Suppliers'
    AND column_name = 'RowPosition'
)
BEGIN
    ALTER TABLE  Suppliers DROP  COLUMN RowPosition
END

ALTER TABLE  OrderingRows.dbo.Suppliers ADD [RowPosition] [INT] NULL

DECLARE @MaxSurrogateKey INT = 0;

UPDATE  dbo.Suppliers
SET     @MaxSurrogateKey = RowPosition = @MaxSurrogateKey + 1
WHERE   RowPosition IS NULL;
SELECT * FROM Suppliers
Using the above this is how it's done in code (the following code is included in the source code)
public bool  RigSuppliersTable()
{
    mHasException = false;
    using (SqlConnection cn = new SqlConnection() {ConnectionString = ConnectionString})
    {
        using (SqlCommand cmd = new SqlCommand() {Connection = cn})
        {
            cmd.CommandText =
                "IF EXISTS  (SELECT * FROM INFORMATION_SCHEMA.COLUMNS " +
                "WHERE table_name = 'Suppliers'  " +
                "AND column_name = 'RowPosition') BEGIN " +
                "ALTER TABLE Suppliers DROP COLUMN RowPosition END";

            try
            {
                cn.Open();
                cmd.ExecuteNonQuery();

                cmd.CommandText = "ALTER TABLE OrderingRows.dbo.Suppliers ADD [RowPosition] [INT] NULL";
                cmd.ExecuteNonQuery();

                cmd.Parameters.AddWithValue("@MaxSurrogateKey", 0);
                cmd.CommandText = "UPDATE  dbo.Suppliers "  +
                                    "SET @MaxSurrogateKey = RowPosition = @MaxSurrogateKey + 1 " +
                                    "WHERE   RowPosition IS NULL; ";

                cmd.ExecuteNonQuery();

            }
            catch (Exception e)
            {
                mHasException = true;
                mLastException = e;
            }
        }
    }

    return IsSuccessFul;
}
If there are related tables they need to be done also. In the following example, we use Microsoft NorthWind database tables Category and Products tables where Products has a key back to Category (full source is included).
public bool  ProductTable(int  pCategoryIdentifier)
{
    mHasException = false;

    var selectStatement = "SELECT ProductID,CategoryID,RowPosition " +
                            "FROM dbo.Products WHERE CategoryID = @CategoryID " +
                            "ORDER BY CategoryID, ProductName";

    var updateStatement = "UPDATE dbo.Products "  +
                            "SET RowPosition = @RowPosition " +
                            "WHERE ProductID = @ProductId";

    var productList = new  List<Product>();

    using (SqlConnection cn = new SqlConnection() {ConnectionString = ConnectionString})
    {
        using (SqlCommand cmd = new SqlCommand() {Connection = cn})
        {
            cmd.CommandText = selectStatement;
            cmd.Parameters.AddWithValue("@CategoryID", pCategoryIdentifier);

            try
            {
                cn.Open();

                var reader = cmd.ExecuteReader();
                var counter = 0;

                while (reader.Read())
                {
                    productList.Add(new Product()
                    {
                        ProductID = reader.GetInt32(0),
                        CategoryID = pCategoryIdentifier,
                        RowPosition = counter
                    });

                    counter += 1;
                }

                reader.Close();

                cmd.Parameters.Clear();

                cmd.CommandText = updateStatement;

                cmd.Parameters.Add(new SqlParameter()
                {
                    ParameterName = "@ProductId",
                    SqlDbType = SqlDbType.Int
                });

                cmd.Parameters.Add(new SqlParameter()
                {
                    ParameterName = "@RowPosition",
                    SqlDbType = SqlDbType.Int
                });
                for (int index = 0; index < productList.Count; index++)
                {
                    cmd.Parameters["@ProductId"].Value = productList[index].ProductID;
                    cmd.Parameters["@RowPosition"].Value = productList[index].RowPosition;
                    cmd.ExecuteNonQuery();
                }

            }
            catch (Exception ex)
            {
                mHasException = true;
                mLastException = ex;
                return false;
            }

        }
    }

    return true;
}
User interface
Implementation, examples found on the web are written directly in the form which requires moving rows up/down which means the only way to reuse them is to copy and paste which is not wise and can lead to problems down the road. The implementation in this article are in a class project where each control type has their own class.
CheckedListBox
In the following example items are added to a CheckedListBox in the Shown event of a form. There are two buttons, one with an up arrow and one with a down arrow representing which direction to move the current item in the CheckedListBox. MoveItem is an extension method where one parameter is the direction to move the current row, the default is moving up, passing false moves the current row down.
private void  CheckedListBoxForm_Shown(object sender, EventArgs e)
{
    var ops = new  Operations();
    var songList = ops.LoadAlbumSongs();

    foreach (Song song in songList)
    {
        checkedListBox1.Items.Add(song);
    }
}

private void  upButton1_Click(object sender, EventArgs e)
{
    checkedListBox1.MoveItem();
}

private void  downButton1_Click(object sender, EventArgs e)
{
    checkedListBox1.MoveItem(false);
}
ListBox
The following example loads a ListBox with a DataTable as the DataSource via a BindingSource component.
_bsData.DataSource = _ops.LoadProductsByCategory(catIdentifier);

lstProducts.DisplayMember = "ProductName";
lstProducts.DataSource = _bsData;
In the following code assertion checks to see if there is a selected item in the ListBox, if there is MoveRowUp/MoveRowDown extension methods work with the underlying ListBox DataSource which is a BindingSource and the DataSource of the BindingSource is a DataTable. Although this can be done without a BindingSource component it is not recommended as this requires more code and BindingSource components provide many useful methods and properties for working with data.
private void  upButton_Click(object sender, EventArgs e)
{
    if (lstProducts.SelectedIndex >= 0)
    {
        lstProducts.MoveRowUp(_bsData, _ops.KeyPositionFieldName);
        _hasChanges = true;
    }
}

private void  downButton_Click(object sender, EventArgs e)
{
    if (lstProducts.SelectedIndex >= 0)
    {
        lstProducts.MoveRowDown(_bsData, _ops.KeyPositionFieldName);
        _hasChanges = true;
    }
}
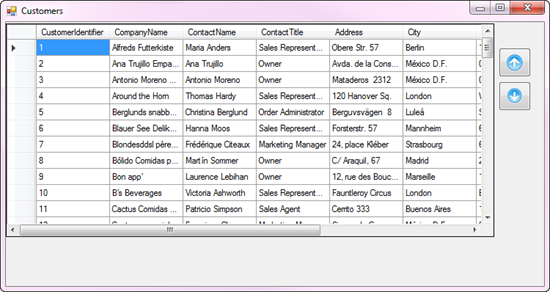
DataGridView
Working with a DataGridView and remember the position in the underlying database table. The DataSource of the DataGridView in this case (similar to the ListBox above) is set to a DataTable. A private form level variable is used to determine if there are changes.
private void  upButton_Click(object sender, EventArgs e)
{
    _bsData.MoveRowUp();

    _hasChanges = true;
}
private void  downButton_Click(object sender, EventArgs e)
{
    _bsData.MoveRowDown();

    _hasChanges = true;
}
Then in form closing event the following code checks if there are changes and if so saves the row position.
private void  DataGridViewRememberForm_FormClosing(object sender, FormClosingEventArgs e)
{
    ((DataTable) _bsData.DataSource).ReorderPositionMarker();
    if (DialogResult == DialogResult.OK)
    {
        if (_hasChanges)
        {
            _ops.UpdateProductTable((DataTable)_bsData.DataSource);
        }
    }
}
In the backend class, we iterate each record and update row position field.
public bool  UpdateProductTable(DataTable pDataTable)
{
    mHasException = false;

    var selectStatement = $"UPDATE dbo.Products SET {KeyPositionFieldName} =" +
                            $" @{KeyPositionFieldName} WHERE ProductID = @ProductId";


    using (var cn = new SqlConnection() { ConnectionString = ConnectionString })
    {
        using (var cmd = new SqlCommand() { Connection = cn })
        {

            cmd.CommandText = selectStatement;
            cmd.Parameters.Add(new SqlParameter()
            {
                ParameterName = $"@{KeyPositionFieldName}",
                SqlDbType = SqlDbType.Int
            });

            cmd.Parameters.Add(new SqlParameter()
            {
                ParameterName = "@ProductId",
                SqlDbType = SqlDbType.Int
            });

            try
            {

                cn.Open();

                // used to give new row postion
                int newPosition = 0;

                for (var rowIndex = 0; rowIndex < pDataTable.Rows.Count; rowIndex++)
                {
                    // set new row position
                    cmd.Parameters[$"@{KeyPositionFieldName}"].Value = newPosition;

                    cmd.Parameters["@ProductId"].Value =
                        pDataTable.Rows[rowIndex].Field<int>("ProductId");

                    cmd.ExecuteNonQuery();
                    newPosition += 1;
                }

            }
            catch (Exception e)
            {
                mHasException = true;
                mLastException = e;
            }
        }
    }

    return !mHasException;
}
ListView
Working with moving rows up/down uses the same exact methods used as all the above and is most a like to the ListBox extension methods.
private void  upButton_Click(object sender, EventArgs e)
{
    listView1.MoveListViewItems(MoveDirection.Up);
}
private void  downButton_Click(object sender, EventArgs e)
{
    listView1.MoveListViewItems(MoveDirection.Down);
}
Special notes
- The code for ListViewItemContainer which implements ICloneable is not required although is useful in the sense the code provides the ability to set the order of items in a ListView.
- Unlike the other controls in the extension method for moving items up/down special attention is required to keep the currently moved item selected which is done by Suspending the control layout, setting focus to the control then resuming the layout as per the extension method below.
public static  void MoveListViewItems(this ListView sender, MoveDirection direction)
{
    int dir = (int)direction;

    bool valid = sender.SelectedItems.Count > 0 &&
                    ((direction == MoveDirection.Down &&
                    (sender.SelectedItems[sender.SelectedItems.Count - 1]
                        .Index <
                    sender.Items.Count - 1)) ||
                    (direction == MoveDirection.Up &&
                    (sender.SelectedItems[0]
                        .Index >
                    0)));

    if (valid)
    {
        sender.SuspendLayout();

        try
        {
            foreach (ListViewItem item in sender.SelectedItems)
            {
                var index = item.Index + dir;
                sender.Items.RemoveAt(item.Index);
                sender.Items.Insert(index, item);
                sender.Items[index].Selected = true;
                sender.Focus();
            }
        }
        finally
        {
            sender.ResumeLayout();
        }
    }
}
Requirements
- SQL-Server, Express edition or better.
- Visual Studio 2017 Community Edition or higher version
- Run the script in DataBackEnd class, script.sql either from Visual Studio or within SQL-Server Management Studio.
- Build the solution. If there are build errors that point to Newtonsoft then right click on Solution Explorer and select restore Nu Get packages and then build the solution.
Rigging up database tables
Refer to the code in CreateRowPosition console project which is currently setup to rig Suppliers table with the RowPosition field along with populating the field. There is also a method which shows how to populate two related tables, Categories, and Products taken from Microsoft NorthWind database.
Important notes
Although the code to move items up/down is fairly simple your best option prior to implementing these extension methods into your project is to take time to read through the code.
Implementing in your solution
Using code in CommonLanguageExtensionsLibrary provides easy methods to provide methods to move items up/down in your projects without the need to down a good deal of code directly into your forms.
Conclusion
Using the methods above provide a developer with a clean way to implement moving items up/down in all common Windows Forms desktop projects be means of adding the CommonLanguageExtensionsLibrary project to your solution, optionally using the project WindowsFormsControls for Up and Down buttons which have predefined images.
See also
Windows Forms ListView: Examining Detail view with SQL-Server
Resources
Visual Studio User Experience Guidelines
Extension Methods (C# Programming Guide)
Source code
https://github.com/karenpayneoregon/WindowsFormsMoveItemsUpDown
- The main code is .NET Framework 4.8, 01/2023 added several .NET Core 7 projects,