Azure AKS : Deploy an Azure Kubernetes Service (AKS) - GA
With Azure Kubernetes Service you can create, configure and manage a cluster of VMs that can run containerized apps. Below are all the steps that someone needs to follow to create an Azure Kubernetes Service (AKS).
Prerequisites
- Create Service principal client ID
- Create Service principal client secret
- Download and install puttygen
- Download and install kubectl package latest version
- Download and install cmder tool
Create Service Principal Client ID
First, we need to create a Service Principal Client ID, because the Kubernetes cluster needs access to interact with Azure APIs.
Below are the steps for a new Service Principal Client ID.
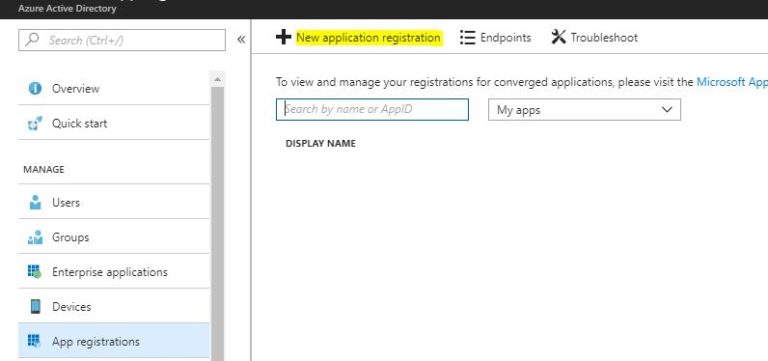
From the main Azure Active Directory blade - App registrations, select + New application registration
**
**
Register New Application
Register a New app by filling up the required fields to create the app, as shown in the image below.
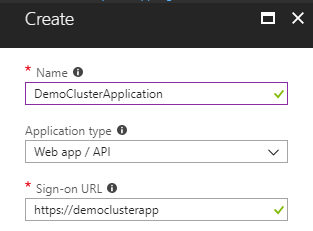
Next, we need to copy the Application ID from the DemoClusterApplication and keep it somewhere safe until the AKS Cluster creation.

Create Service principal client secret
In the previous step we created the Application ID and now we will generate the authentication key.
These can be done from the blade Settings - Keys, type a Description for the key and click Save.
Note
Copy and keep somewhere safe the key value because after the first save it will be not visible.

Create Azure Kubernetes Service (AKS)
Now, we have completed the 2 first basic steps and it's time to begin the Azure Kubernetes Service deployment.
Create a Resource Group
At the first step, we must create a Resource Group, which includes all the necessary resources for the deployment.
We need to provide a Name, select a Subscription, choose a Resource group location and click Create.

Create Resources - Azure Kubernetes Service -AKS
The resource group is deployed and we are ready to create the main resource Azure Kubernetes Service -AKS
Basics Tab
Fill up the Basics blade as shown in the following image,

Click Next Authentication button or Authentication tab to continue the cluster configuration.
Authentication Tab
In this step, we configure the cluster to authenticate with the Service principal.

Select Configure service principal, and on the new blade select Use existing {Service principal} and type the Service principal client ID and the Service principal client secret.
| Service principal client ID | Type the Application ID from the "Service Principal client ID" step |
| Service principal client secret | Type the Secret key, that we copy on "Service principal client secret" step |
Click Next: Networking >> button or Networking tab to move to the next step
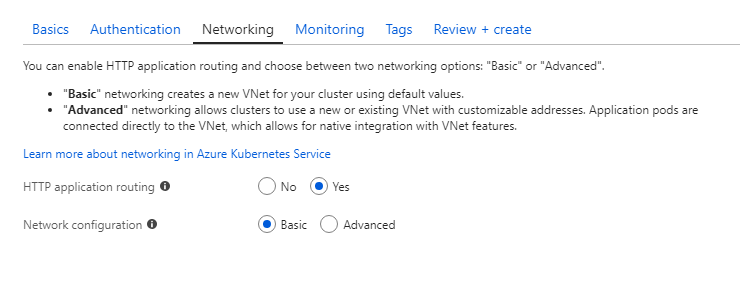
Networking Tab
At the Networking, tab choose for HTTP application routing Yes (default) and for Network configuration Basic (default) or Advanced. In this demo we choose Basic.
| HTTP application routing | Integrated HTTP routing and public DNS for applications |
| Network configuration | Choose between a basic network configuration using kubernetes with a default VNet, or an advanced configuration using Azure CNI withthe option to customize your VNet. |
ClickNext: Monitoring>> button or Monitoring tab to move to the next step,
Monitoring Tab
In this tab, we choose Yes(default) to Enable container monitoring, let the Log Analytics workspace as is or if we can create a new one.

Click Next: Tags>> button or Tags tab to move to the next step,
Tags Tab
At the Tags tab, we can add tags to the resources to easily manage the billing.

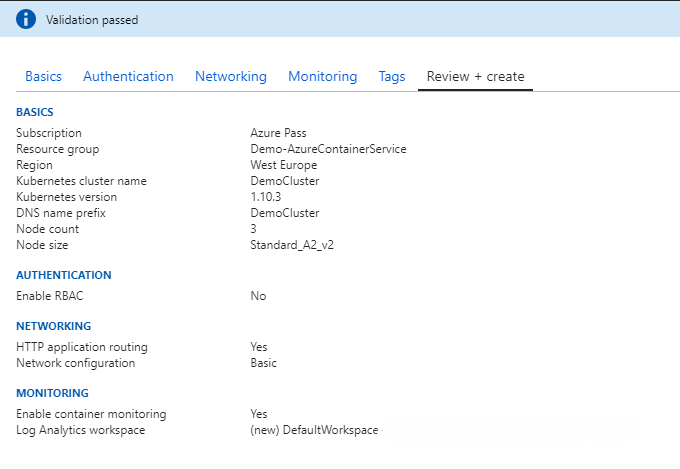
Review + Create Tab
At the final tab, we can make a quick review of the configuration and click Create to start deployment.
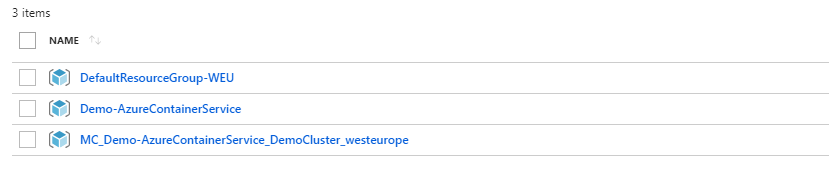
After a couple minutes( 15 - 20 minutes) the cluster is ready. And we can see a brand new Resource Group with all the resources in it.
| DefaultResourceGroup -WEU | Contains the Log Analytics Workspace |
| Demo-AzureContainerService | Contains the Kubernetes service |
| MC_Demo-AzureContainerService_DemoCluster_westeurope | Contains the Kubernetes service resources, such as VMs, Disk, DNS Zone, Route Table, VNet, etc. |
Connect to the cluster
Now, we are ready to connect to the cluster. Open the cmder tool, and type the commands with the following order:
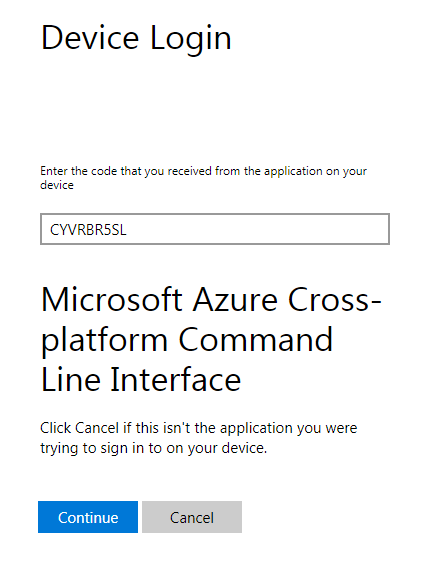
Step 1, Login to Azure
Type the following command to log in on Azure Portal,
az login
This command provides a link and a code to get the device access to your Azure account.

Step 2, Authenticate device login
At step 2, we must open the page https:// microsoft.com/devicelogin, and type the code CYVRBR5SL
Step 3, Get Credentials
Run the command, to get the config file into the path c:\Users\username\kube\config
az aks get-credentials --resource-group Demo-AzureContainerService --name DemoCluster
In the below image we can see the results of this command.
Step 4, Verify Connection
Now we need to verify the connection, to do that run the command
kubectl get nodes
Below is the output of this command, it shows that the agents worked well.

Step 5, Create YAML File Application
Into the folder C:\Users\username\kube, create a .yaml file, e.g. democluster.yaml and paste the following code.
Note
YAML File Is Kubernetes Manifest File Which Includes The Cluster Container Images.
apiVersion: apps/v1beta1
kind: Deployment
metadata:
  name: azure-vote-back
spec:
  replicas: 1
  template:
    metadata:
      labels:
        app: azure-vote-back
    spec:
      containers:
      - name: azure-vote-back
        image: redis
        ports:
        - containerPort: 6379
          name: redis
---
apiVersion: v1
kind: Service
metadata:
  name: azure-vote-back
spec:
  ports:
  - port: 6379
  selector:
    app: azure-vote-back
---
apiVersion: apps/v1beta1
kind: Deployment
metadata:
  name: azure-vote-front
spec:
  replicas: 1
  template:
    metadata:
      labels:
        app: azure-vote-front
    spec:
      containers:
      - name: azure-vote-front
        image: microsoft/azure-vote-front:v1
        ports:
        - containerPort: 80
        env:
        - name: REDIS
          value: "azure-vote-back"
---
apiVersion: v1
kind: Service
metadata:
  name: azure-vote-front
spec:
  type: LoadBalancer
  ports:
  - port: 80
  selector:
    app: azure-vote-front
Run the following command to run the application,
kubectl apply -f democluster.yaml

Step 6, Start The Application
To get the application running to execute the following command,
get service az-demo-cluster-front
At the image below we can see the results of the command.

The Final Result
When the steps are finished, the application is up and running,

Conclusion
In this post, we saw how easily someone can deploy an Azure Kubernetes Service (AKS), after the service has become generally available since 13 June 2018. That means that the developers can build a complete infrastructure which includes VMs, Storages, VNets, LBs etc.