Azure Cognitive Services: Create Chat bot integration with Skype for Business or Web chat (Using QnAmaker & LUIS)
Overview
Create an intelligent ChatBOT and integrate with Skype for Business or Web chat and allow users or customers to interact with the BOT. A Bot can answer to a general question about your business or services, Or Convert your FAQ’s to Chat experience with few clicks. Skype for Business Online keeps you connected with co-workers and business partners through instant messaging, phone, and video calls. Extend this functionality by building bots that users can discover and interact with through the Skype for Business interface. It is easier than you think 
Here is an example bot that replied to IT services related questions:

Prerequisites
Here is what we will need to create a BOT:
- Active Azure Subscription
- Access to qnamaker.ai (Contributor role holder in Azure Cognitive Services resource will automatically get access)
- Access to luis.ai (Optional for advanced options)
- Skype for business Online PowerShell Module
- Skype for business Server 2015 with May 2017 cumulative update. (Optional for the Hybrid environment)
- little coding skills (I shall help, just copy & paste
 )
)
Basic Steps
These are the steps that you will follow:
- Enable Cognitive Services in Azure
- Build a QnAMaker knowledge base
- Create a BOT in Azure and Associate with QnAMaker Knowledgebase
- Enable Skype for Business Channel
- Activate Chatbot Application Endpoint in Skype for Business online
- Enable Hybrid Mode for Skype for business On-premises users (Optional for the hybrid environment)
Let’s Get started!
The Azure Portal
Login to Azure portal and create a Cognitive Service:
From All Services Search for "Cognitive Services"

Click on ADD + and choose QnA Maker under Cognitive Services

In the next Step, we will choose an appropriate Name, Subscription, Pricing tier, Location, app name etc.
The QnAMaker
Login to QnAMaker and create a Knowledge Base
Once the Cognitive Service is created we will now have access to QnAmaker, go to https://qnamaker.ai
Choose to Create a Knowledgebase tab and follow steps to create a new KB, in this step skip step 1 (Creating QnA Service, which we already did in step 2)
Connect our QnA Service to our new KB by choosing Azure Directory ID, Subscription name and QnA Service (Created in Step 2)
Here we can insert a file or URL where we have prebuilt FAQ If we don’t have prebuilt FAQ skip this step and create Knowledgebase. We can add questions and answers later.
You will find the new Knowledge Base under ‘My Knowledge bases’ Tab

Click and open the KB to add questions and answers

Click on + Add QnA pair and Add your Questions and answers.
we can have multiple questions for similar answers, example;
https://blog.cloudadmin.me/wp-content/uploads/2018/08/image_thumb-21.png
Once Questions and answers are completed, Click on ‘Save and Train’. This Basically saves the Knowledge Base.
You may also Test QnA by clicking on ‘Test’ Button next to ‘Save and Train’
Publish The Knowledgebase
Click on the ‘Publish’ Tab and choose Publish.

Now we have a working Knowledgebase which our BOT will make use of.
Create a BOT Service
Go back to Azure console and create a bot service.
Form All services, search for 'Bot Services':

Select ADD for a new Bot. Below are the Bot services available in Azure. Choose ‘Web App Bot’ for this scenario.

Enter a unique name for the bot service, Fill up other details, carefully we must choose the below options;
- Bot Template: Basic (C#)
- SDK Version: SDK v3, I haven’t tried v4
- SDK language: C#
Template: Question and Answer

Now we have a bot and KB, but to make it work we have to link these two services.
Connect Knowledgebase to BOT
Here we will integrate Knowledgebase and BOT
Get below information from Knowledgebase:
QnAKnowledgebaseId , **QnAEndpointHostName ** and QnAAuthKey.
Go to https://qnamaker.ai > My Knowledge Bases Tab > Click on ‘View Code’ on respective KB

This will show the required information:
- QnAKnowledgebaseId
- QnAEndpointHostName
- QnAAuthKey

Back to the Azure portal > Bot Services > Choose the Bot > on the right blade scroll down to see Application Settings. Click on it, on the right side we will see application settings, scroll down to see QnA settings:

Enter the details obtained from the previous step with the required information
That’s all. to see if it worked, Choose Test in Web Chat’ option.
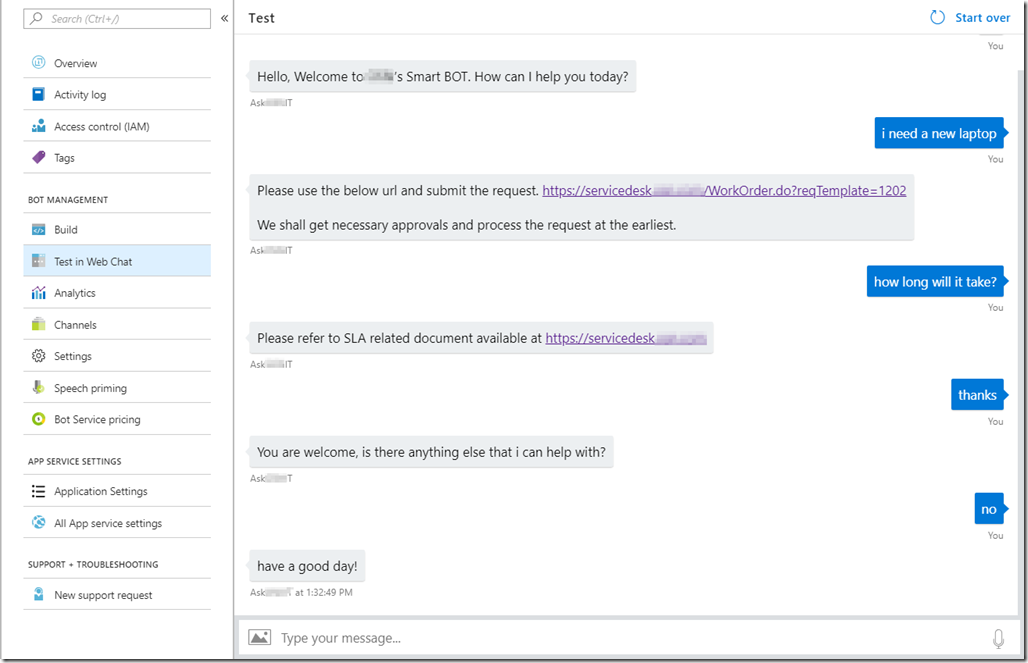
If this is not working STOP here and verify if steps are followed properly. If it is working Congrats, you have crossed the major milestone to the target.