Introduction
In this article, we are going to learn how to translate text into multiple languages using one of the important Cognitive Services API called Microsoft Translate Text API ( One of the API in Language API ). It’s a simple cloud-based machine translation service and obviously we can test through simple Rest API call. Microsoft is using a new standard for high-quality AI-powered machine translations known as Neural Machine Translation (NMT).
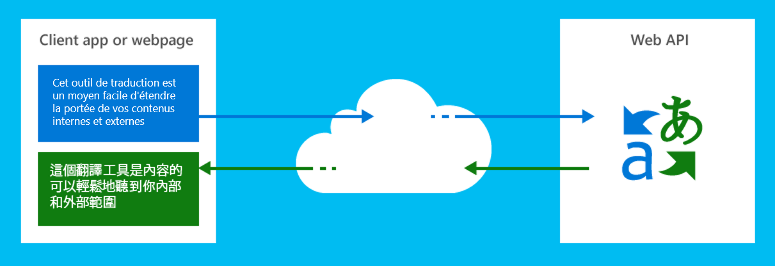
Pic source : https://www.microsoft.com/en-us/translator/business/machine-translation/#whatmachine
You can also refer the following articles on Cognitive Service.
- Cognitive Services : Analyze an Image Using Computer Vision API
- Cognitive Services – Optical Character Recognition (OCR) from an image using Computer Vision API And C#
- Cognitive Services : Extract handwritten text from an image using Computer Vision API With ASP.NET Core And C#
Prerequisites
- Subscription key ( Azure Portal ).
- Visual Studio 2015 or 2017
Translator Text API
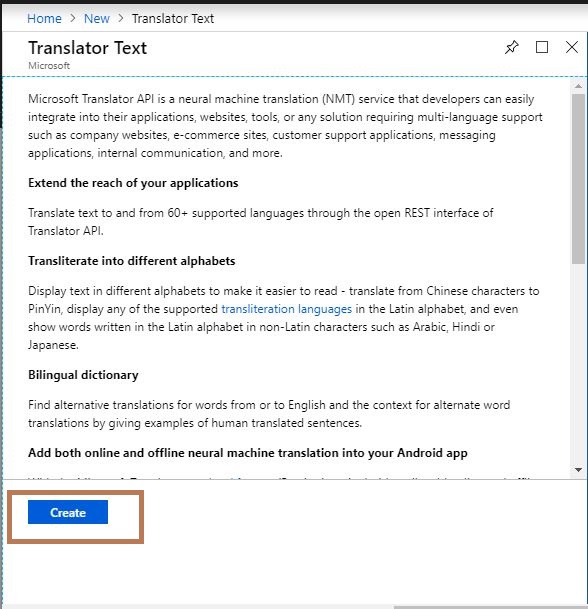
First, we need to log into the Azure Portal with our Azure credentials. Then we need to create an Azure Translator Text API in the Azure portal. So please click on the "Create a resource" on the left top menu and search "Translator Text" in the search bar on the right side window or top of Azure Marketplace.

Click on the “create” button to create Translator Text API.
Provision a Translator Text Subscription Key
After clicking the "Create", It will open another window. There we need to provide the basic information about Translator Text API.
![]()
Name : Name of the Translator Text API ( Eg. TranslatorTextApp ).
Subscription : We can select our Azure subscription for Translator Text API creation.
Location : We can select our location of resource group. The best thing is we can choose a location closest to our customer.
Pricing tier : Select an appropriate pricing tier for our requirement.
Resource group : We can create a new resource group or choose from an existing one.
Now click on the "TranslatorTextApp" in dashboard page and it will redirect to the detailed page of TranslatorTextApp ( "Overview" ). Here, we can see the "Keys" ( Subscription key details ) menu in the left side panel. Then click on the "Keys" menu and it will open the Subscription Keys details. We can use any of the subscription keys or regenerate the given key for text translation using Microsoft Translator Text API.
![]()
Language Request URL
The following request url gets the set of languages currently supported by other operations of the Microsoft Translator Text API.
"https://api.cognitive.microsofttranslator.com/languages?api-version=3.0"
Endpoint
The version of the API requested by the client and the Value must be 3.0 and also we can include query parameters and request header in the following endPoint used in our application.
"https://api.cognitive.microsofttranslator.com/translate?api-version=3.0"
Mandatory required parameters in the query string are "api-version" and "to" . The "api-version" value must be "3.0" as per the current documentation. "to" is the language code parameter used for translating the entered text into the desired language.
The mandatory request headers are "authorization header" and "Content-Type". We can pass our subscription key into the "authorization header" and the simplest way is to pass our Azure secret key to the Translator service using request header "Ocp-Apim-Subscription-Key".
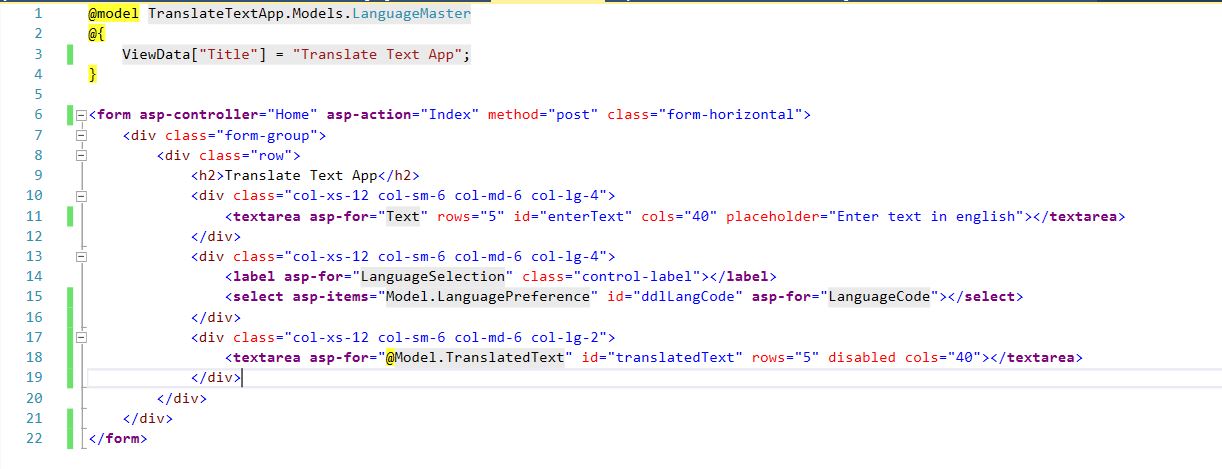
Index.html
The following html contains the binding methodology that we have used in our application by using the latest Tag helpers of ASP.Net Core.
site.js
The following ajax call will trigger for each drop-down index change in the language selection using drop-down list.
// Write your JavaScript code.
$(function () {
    $(document)
        .on('change', '#ddlLangCode', function  () {
            var languageCode = $(this).val();
            var enterText = $("#enterText").val();
            if (1 <= $("#enterText").val().trim().length && languageCode != "NA") {

                $('#enterText').removeClass('redBorder');

                var url = '/Home/Index';
                var dataToSend = { "LanguageCode": languageCode, "Text": enterText };
                dataType: "json",
                    $.ajax({
                        url: url,
                        data: dataToSend,
                        type: 'POST',
                        success: function  (response) {
                            //update control on View
                            var result = JSON.parse(response);
                            var translatedText = result[0].translations[0].text;
                            $('#translatedText').val(translatedText);
                        }
                    })
            }
            else {
                $('#enterText').addClass('redBorder');
                $('#translatedText').val("");
            }
        });
});
Interface
The "ITranslateText" contains one signature for translating text content based on the given input. So we have injected this interface in the ASP.NET Core "Startup.cs" class as a "AddTransient".
using System.Threading.Tasks;

namespace TranslateTextApp.Business_Layer.Interface
{
    interface ITranslateText
    {
        Task<string> Translate(string uri, string text, string key);
    }
}
Translator Text API Service
We can add the valid Translator Text API Subscription Key into the following code.
using Newtonsoft.Json;
using System;
using System.Net.Http;
using System.Text;
using System.Threading.Tasks;
using TranslateTextApp.Business_Layer.Interface;

namespace TranslateTextApp.Business_Layer
{
    public class  TranslateTextService : ITranslateText
    {
        ///
<summary>
        /// Translate the given text in to selected language.
        /// </summary>

        /// <param name="uri">Request uri</param>
        /// <param name="text">The text is given for translation</param>
        /// <param name="key">Subscription key</param>
        /// <returns></returns>
        public async Task<string> Translate(string uri, string text, string key)
        {
            System.Object[] body = new  System.Object[] { new { Text = text } };
            var requestBody = JsonConvert.SerializeObject(body);

            using (var client = new HttpClient())
            using (var request = new HttpRequestMessage())
            {
                request.Method = HttpMethod.Post;
                request.RequestUri = new  Uri(uri);
                request.Content = new  StringContent(requestBody, Encoding.UTF8, "application/json");
                request.Headers.Add("Ocp-Apim-Subscription-Key", key);

                var response = await client.SendAsync(request);
                var responseBody = await response.Content.ReadAsStringAsync();
                dynamic result = JsonConvert.SerializeObject(JsonConvert.DeserializeObject(responseBody), Formatting.Indented);

                return result;
            }
        }
    }
}
API Response – Based on the given text
The successful json response.
[
  {
    "detectedLanguage": {
      "language": "en",
      "score": 1.0
    },
    "translations": [
      {
        "text": "सफलता का कोई शार्टकट नहीं होता",
        "to": "hi"
      }
    ]
  }
]
Download
Output
The given text is translated into desired language listed in a drop-down list using Microsoft Translator API:
Reference
Summary
From this article we have learned translate a text(typed in english) in to different languages as per the API documentation using one of the important Cognitive Services API ( Translator Text API is a part of Language API ). I hope this article is useful for all Azure Cognitive Services API beginners.
See Also
It's recommended to read more articles related to ASP.NET Core & Azure App Service:
- ASP.NET CORE 1.0: Getting Started
- ASP.NET Core 1.0: Project Layout
- ASP.NET Core 1.0: Middleware And Static files (Part 1)
- Middleware And Staticfiles In ASP.NET Core 1.0 - Part Two
- ASP.NET Core 1.0 Configuration: Aurelia Single Page Applications
- ASP.NET Core 1.0: Create An Aurelia Single Page Application
- Create Rest API Or Web API With ASP.NET Core 1.0
- ASP.NET Core 1.0: Adding A Configuration Source File
- Code First Migration - ASP.NET Core MVC With EntityFrameWork Core
- Building ASP.NET Core MVC Application Using EF Core and ASP.NET Core 1.0
- Send Email Using ASP.NET CORE 1.1 With MailKit In Visual Studio 2017
- ASP.NET Core And MVC Core: Session State
- Startup Page In ASP.NET Core
- Sending SMS Using ASP.NET Core With Twilio SMS API
- Create And Deploy An ASP.NET Core Web App In Azure
- Chat Bot with Azure Bot Service
- Channel Configuration - Azure Bot Service To Slack Application