Azure: Resources Migration With MigAz Tool
Introduction
Since ARM was introduced to the public, the need for IaaS workloads migration to the new deployment model, became imperative to take advantage of all the new services and abilities. This target can be accomplished with Azure Migration, Azure Site Recovery(ONLY VMs), Microsoft Community Tool, MigAz. In this post, we talk for the last option the MigAz.
Prerequisites
Microsoft Azure Account(s)
- Subscription Type (CSP, EA, PayAsYouGo)
- MigAz tool, download the latest version from this link
- Azure Powershell Module, latest version.
- Windows Server Editions (2012, 2012 R2, 2016)
- Windows Desktop Editions (8, 8.1, 10)
Note
The AWS MigAz is not yet integrated into the v2 project baseline and remains available via the AWS folders. (AWS Release)
What MigAz can do
MigAz, after connected to the source Azure Account scans all the subscriptions for resources. When we select what resources want to migrate then it creates two JSON files, one template file and another file with parameters. Both files are needed to be migration successful.
ASM(v.1) to ARM(v.2) Migration
With this functionality, we can migrate the ASM IaaS workloads to ARM templates. What happens behind the scene, is first copying the blobs to a storage account and deploying the resources using an ARM Template.
ARM(v.2) to ARM(v.2) Migration
This is more simple than the previous one because the resources are already in the ARM and we just want to move the resources to another account or subscription.
AWS to ARM(v.2) Migration
The MigAz tool also provides the functionality to migrate resources from AWS Infrastructure to Azure ARM.
How MigAz Works
To understand how MigAz works, we are going to see a demo in the following steps.
Note
Before we get started we must now that the logs are saved in the location %USERPROFILE%\appdata\Local with the file name MigAz-.log and MigAz-XML-.log.
At the following steps, we describe the procedure that we must follow to migrate the Azure resources.
- Sign into the source subscription
- Select the resources that we want to migrate to the Target Azure Subscription
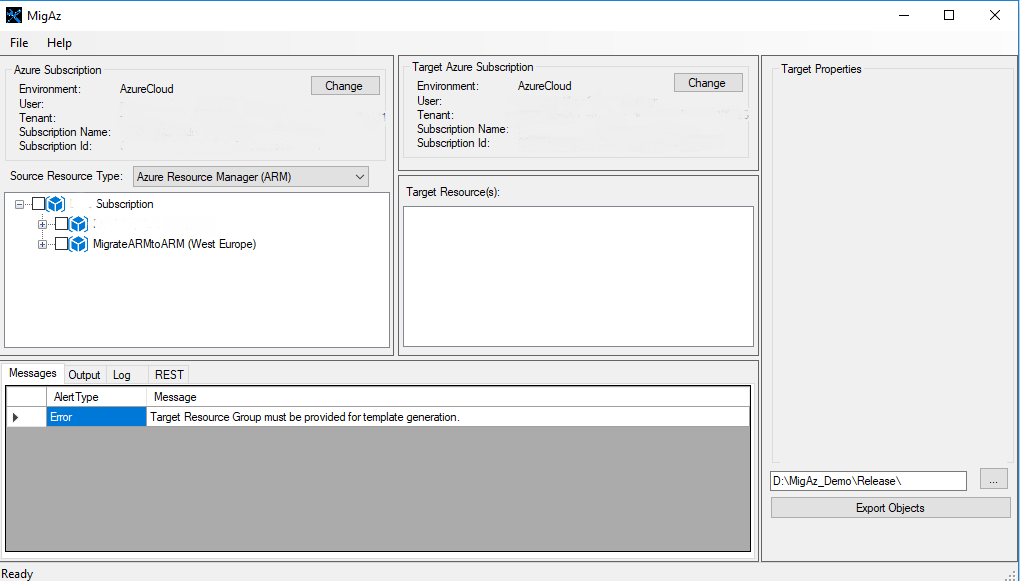
At the table below there are few alerts that we must solve to proceed to the next step, which is to Export the Objects.
| Alert Type | Message |
| Error | Target Resource Group Location must be provided for template generation |
| Warning | Target Storage Account ‘igratetodiagv2’ is not utilized within this Resource Group Deployment as a Virtual Machine Disk Target. Consider removing to avoid creation of a non-utilized Storage Account. |
| Warning | Virtual Machine ‘MigVM’ is not part of an Availability Set. OS Disk should be migrated to Azure Premium Storage to receive an Azure SLA for single server deployments. The existing configuration will receive no (0%) Service Level Agreement (SLA). |
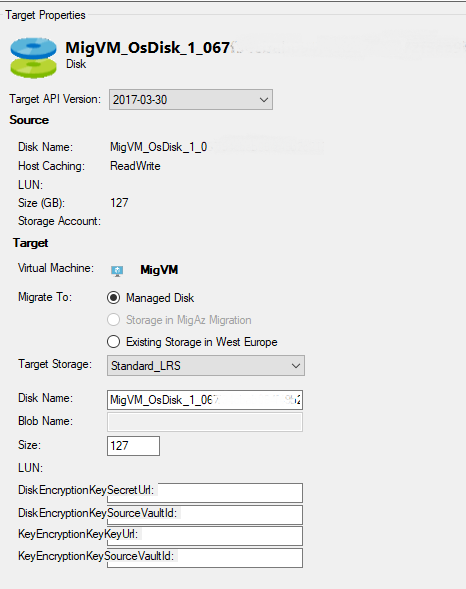
| Recommendation | Consider using disk size 128GB (P10), as this disk will be billed at that capacity per Azure Premium Storage billing sizes. |
Basic Checks (Errors,Warnings,Recommendations)
The Errors
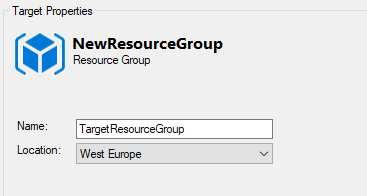
Error 01. Target Resource Group Location must be provided for template generation.
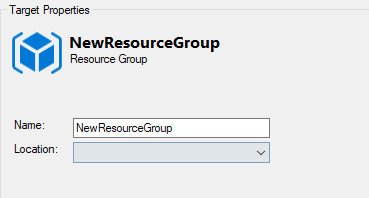
Solution 01. Type a Name for the Target Resource Group and Select a Location.
The Warnings
Warning 01. Target Storage Account ‘igratetodiagv2’ is not utilized within this Resource Group Deployment as a Virtual Machine Disk Target. Consider removing to avoid creation of a non-utilized Storage Account.
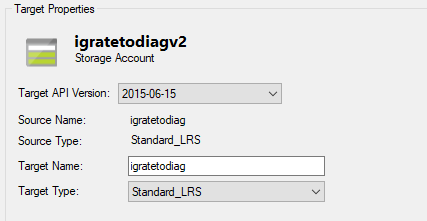
Solution 01. From the left side in the MigAz tool, uncheck the {igrateodiag} which is the diagnostics storage account.
Warning 02. Virtual Machine ‘MigVM’ is not part of an Availability Set. OS Disk should be migrated to Azure Premium Storage to receive an Azure SLA for single server deployments. The existing configuration will receive no (0%) Service Level Agreement (SLA).
Solution 02. The solution for this warning as the message said is that the disk should be migrated without Availability Set SLA.
The Recommendations
Recommendations 01. Consider using disk size 128GB (P10), because the new disk will be billed at that capacity, as per Azure Premium Storage billing sizes.
Solution 01. Change the Size value from 127 to 128.
Export Objects
After we solve the errors, warnings, and recommendations we are ready to Export the Objects by clicking the button [Export Objects], these objects will export to the specified path {D:\MigAz_Demo\Release\

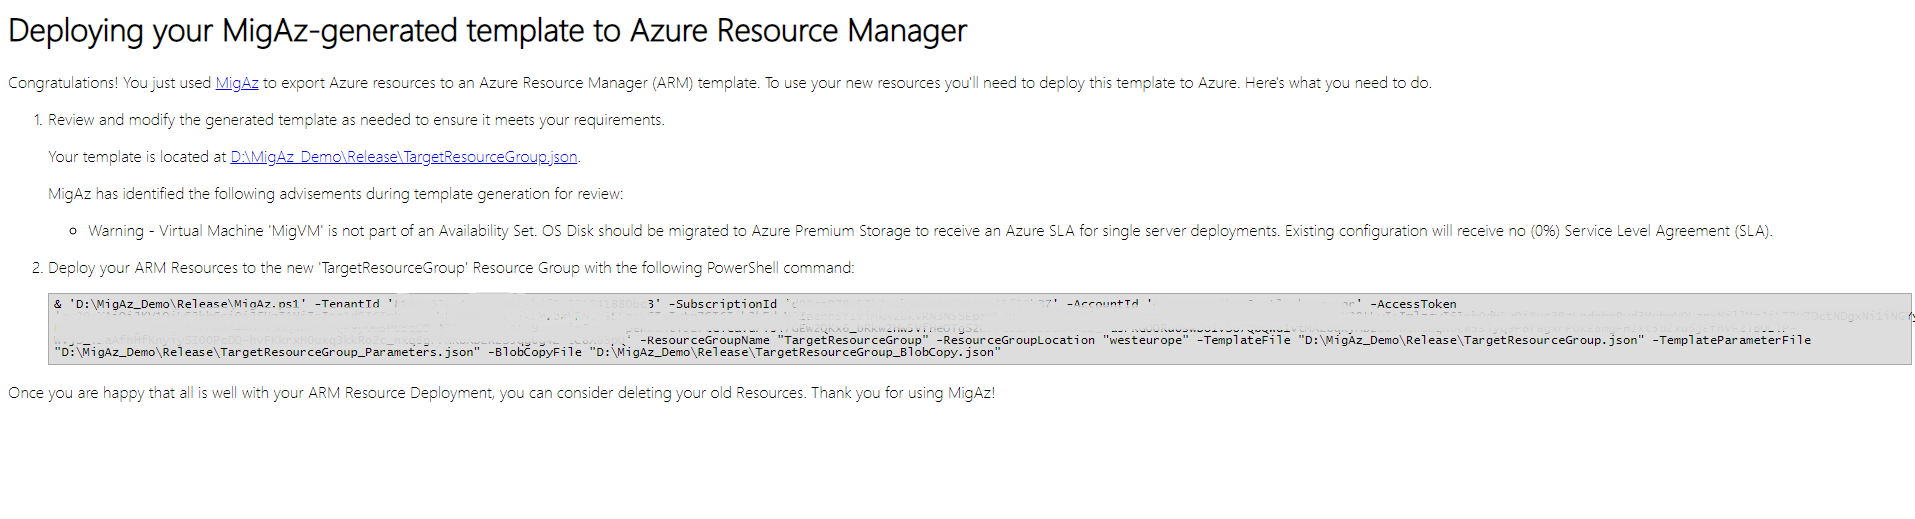
To begin the deployment, we must click the {Show Deployment Instructions}.
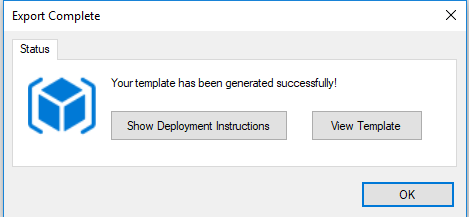
An HTML page will open, and we must run the Powershell command to begin the deployment.
The Deployment
Migration Process
We open an elevated Powershell window, copy & paste and execute the following piece of code,
& 'D:\MigAz_Demo\Release\MigAz.ps1' -TenantId 'xxxxxxxx-xxxx-xxxx-xxxx-xxxxxxxxxxxx' -SubscriptionId 'yyyyyyyy-yyyy-yyyy-yyyy-yyyyyyyyyyy' -AccountId 'mailaccount@outlook.com' -AccessToken 'xxxxxxxxxxxxxxxxxxxxxxxxxxxxxxxxxxxxxxxxxxxxxxxxxxxxxxxxxxxxxxxxxxxxxxxxxxxxxxxxxxxxxxxxxxxxxxxxxxxxxxxxxxxxxxxxxxxxxxxxxxxxxxxxxxxxxxxxxxxxxxxxxxxxxxxxxxxxxxxxxxxxxxxxxxxxxxxxxxxxxxxxxxxxxxxx' -ResourceGroupName "TargetResourceGroup" -ResourceGroupLocation "westeurope" -TemplateFile "D:\MigAz_Demo\Release\TargetResourceGroup.json" -TemplateParameterFile "D:\MigAz_Demo\Release\TargetResourceGroup_Parameters.json" -BlobCopyFile "D:\MigAz_Demo\Release\TargetResourceGroup_BlobCopy.json"

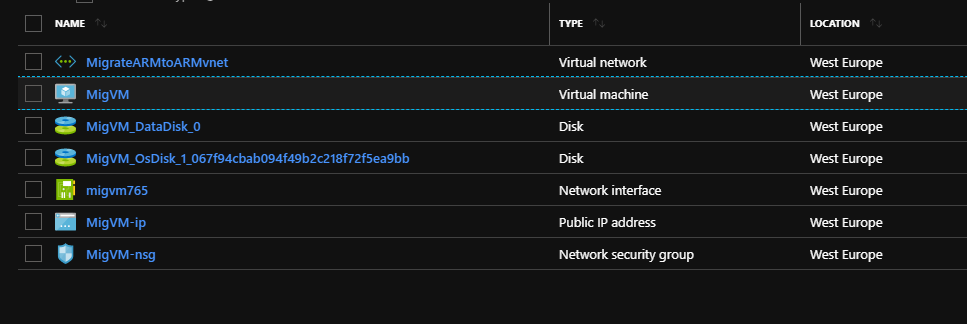
After the Deployment Ends, the two temporary storage accounts will be removed.


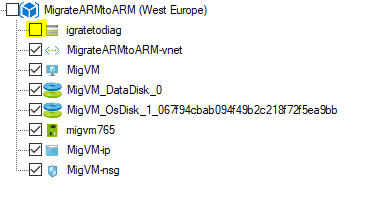
At the next image, we are able to see the resources that MigAz migrated from one Azure Account to another.
Public IP Configuration
After migration completed (blob copy and resources deployment) remains one last step and it is about the Public IP. At the below step we are able to learn how to achieve this goal on the ARM to ARM and on ASM to ARM migration scenarios.
Note
Beware of the restrictions when planning to move resources. For example, 'Standard_SKU' IPs cannot be moved, but 'Basic_SKU' can. For more details check this link.
ARM to ARM (IP Config)
Dissociate the reserved IP address from the source ARM VM. From Network Interface - Public IP Address click Dissociate.

Associate the reserved IP which dissociated in the previous step. From Network Interface - Public IP Address click Associate.

ASM to ARM (IP Config)
- Dissociate the reserved IP address from the ASM VM. To dissociate the reserved IP from the ASM Virtual Machine we must execute the next PowerShell command.
Remove-AzureReservedIPAssociation -ReservedIPName <Name of reserved IP> -ServiceName <cloud service name> - Migrate IP Address To ARM
If you haven’t registered for migration, please register using the command below,
Register-AzureRmResourceProvider -ProviderNamespace Microsoft.ClassicInfrastructureMigrate Get-AzureRmResourceProvider -ProviderNamespace Microsoft.ClassicInfrastructureMigrate
Move the reserved IP, by executing the next 3 PowerShell lines,
Move-AzureReservedIP -Validate -ReservedIPName <`` Name of reserved IP ``>
Move-AzureReservedIP -Prepare -ReservedIPName < `` Name of reserved IP`` >
Move-AzureReservedIP -Commit -ReservedIPName <``Name of reserved IP``>
Finally, we have to assign the IP address to the Migrated Virtual Machine, we can do this via the Azure Portal.
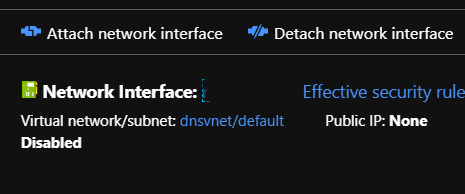
From the Virtual machine's blade, select the migrated VM, click Networking
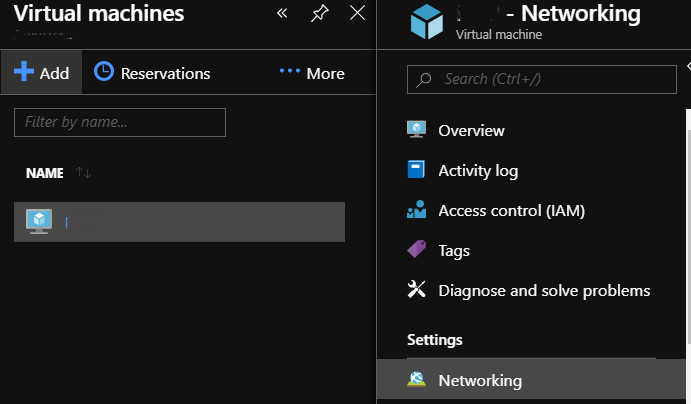
and click the Network Interface [Name].
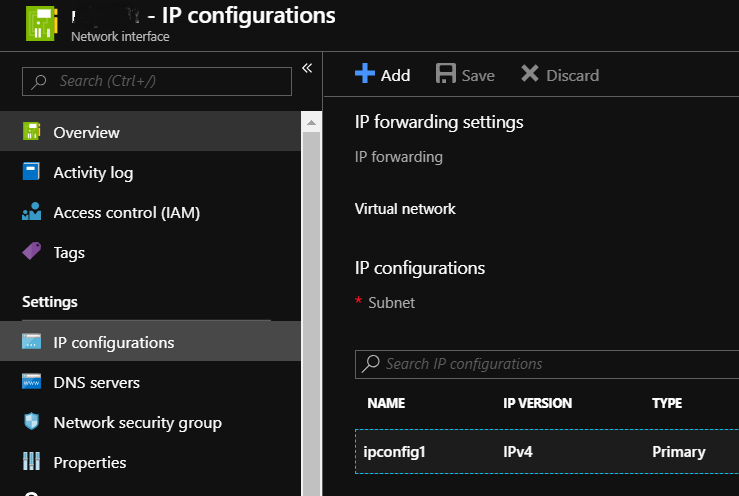
Select IP configurations and click ipconfig1
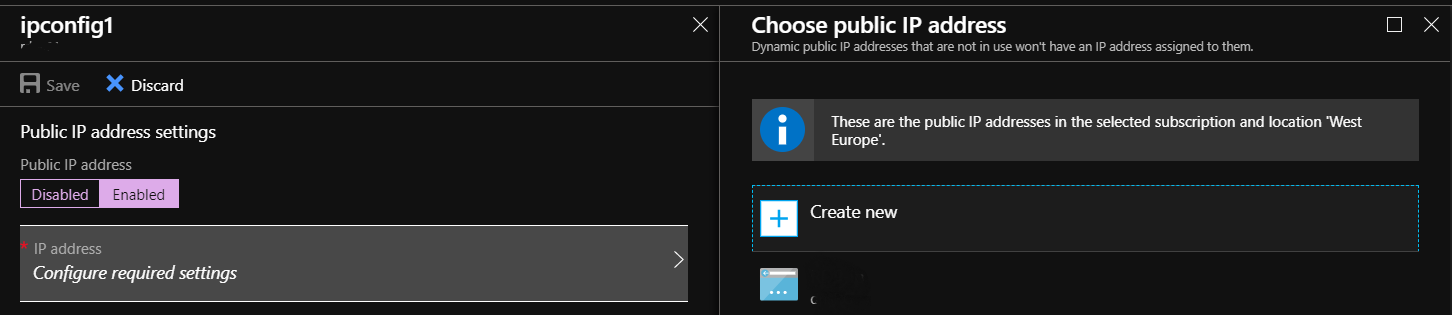
Enable public IP address feature to enter the public IP address settings, choose the public IP address "xxx.xxx.xx.xx" and save the changes
Summary
In this post, we read how to migrate IaaS workloads in Azure. Especially we see how we can migrate from ASM v.1 to ARM v.2 with MigAz tool.
See Also
- Site Recovery
- Community tools to migrate IaaS resources from classic to Azure Resource Manager
- Migrate Azure VMs to another region
- Migrate from Amazon Web Services (AWS) and other platforms to Managed Disks in Azure
- Platform-supported migration of IaaS resources from classic to Azure Resource Manager
- Prepare Azure resources for replication of on-premises machines
- Services that can be moved