Azure Active Directory: Create An B2C Tenant
Azure Active Directory (Azure AD) B2C is a cloud identity management service that enables developers to customize and control the user sign in, sign up, and profile management process. Azure Azure AD B2C service provides functionality to work with user social account, emails, and custom IdPs. The first step of Azure AD B2C is creating a tenant. This article explains how to create an Azure AD B2C tenant.
Introduction of Azure Active Directory B2C
Azure AD B2C can be easily integrated across mobile and web platforms. Your customers can log in to your application or applications using their existing social accounts or by creating new credentials. Some of the core features.
- Protect your consumer's identities
- Login with social media accounts
- Customizable user experiences
- Pay only for what you use
In this first article of the series, you'll learn how to create an Azure AD B2C tenant to get started.
Create an Azure Active Directory B2C tenant
1. Sign in
Sign in to the Azure Portal (Your Azure Account)
2. Filter
Click to this "Directory and Subscription" filter in the top menu. See the all Directories in your portal.
3. Create Tenant
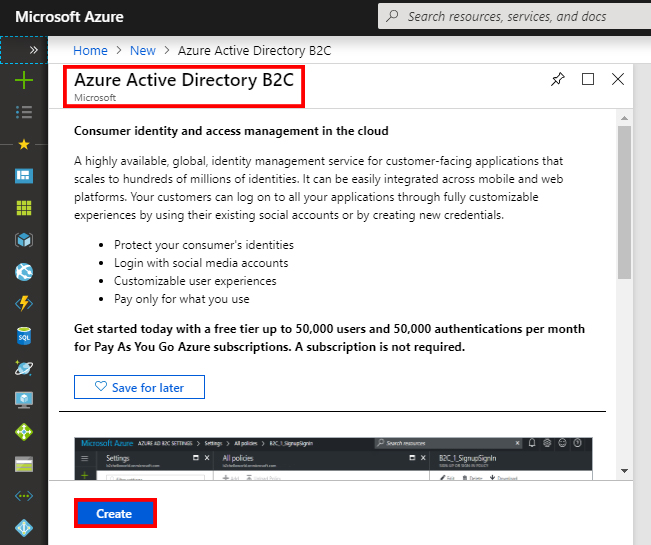
Create a new B2C Tenant. Click the "Create a resource" - Search or type in your search bar "Azure Active Directory B2C" - Select and open.
4. AAD B2C
After this, search and select Active Directory B2C, and then click Create.
5. new tenant
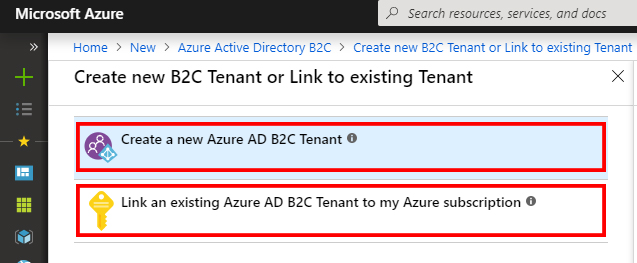
After this, select Create a new Azure Ad B2C Tenant.
Link an existing Azure AD B2C Tenant to my Azure subscription.
6. First, Select and Open "Create a new Azure AD B2C Tenant"
Enter an organization name and initial domain name, which is used in the tenant name, select the country (it can't be changed later), and then click Create.
After, Create directory. Display the notification "Successfully created directory dream".
Once you've successfully created directory, then select and open "Link an existing Azure AD B2C Tenant to my Azure subscription".
7. Click in the Azure AD B2C Resource.
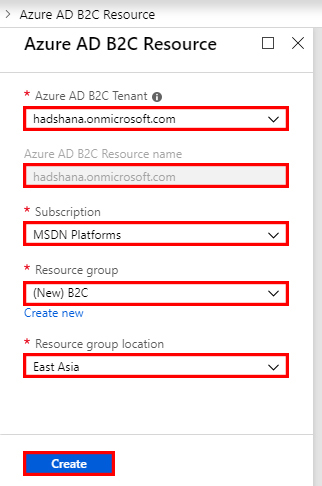
Select Link an existing Azure AD B2C Tenant to my Azure subscription. Select thr tenant that you created, select your subscription. See the "hadshana.onmicrosoft.com" (initial domain name).
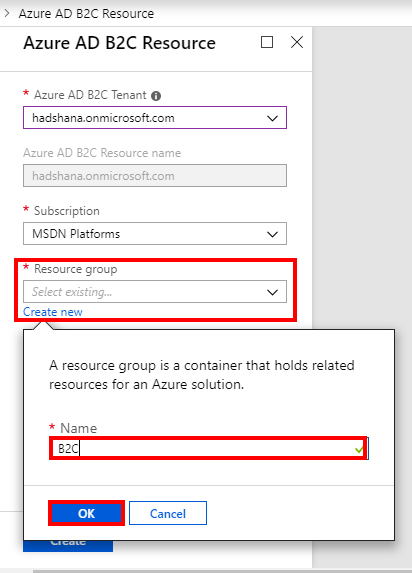
Azure AD B2C Tenant and Azure AD B2C Resource name are the same. Then, create new and enter a name for the resource group or use the existing Resource group.
After selecting the location fill in the form. Click in the "Create" button.
8. Now start using your new tenant,
using the directory that contains your Azure AD B2C tenant by clicking the Directory and subscription filiter in the top menu and choosing the directory that contains it.
Summary
In this article, we learned how to create an Azure AD B2C tenant. In my next article, I will cover the next step of this series.


