Azure Databases: Introduction To SQL Managed Instances
Introduction
This post is an intro of the Azure SQL database Managed Instance. A fully managed SQL Server instance hosted in Azure Cloud, communicates with on-premise LAN or Azure VNet and provides most SQL Server features to applications.
Note
Managed Instances are not available for every region, check the supported regions from this link.
Supported Subscription Types
Until the time this article was posted, there is a limitation for the subscription types that supports SQL Managed Instance deployments, and these types are:
- Pay-As-You-Go
- Cloud Service Provider (CSP)
- Enterprise Agreement (EA)
- Enterprise Dev/Test
- Pay-As-You-Go Dev/Test
Benefits
SQL Database Managed Instance has Built-In High Availability 99,99% uptime SLA, and a lot of other benefits:
- Security : SQL Audit, Row Level Security, Always Encrypted, etc.
- Programmability : Cross-database queries, Linked Server, CLR modules, etc.
- Operational : SQL Agent, DMVs, XEvents, DB Mail, Automatic Patching, etc.
Features
There are many features available that previously someone could have only found on an on-premise SQL Server installation. Imagine a SQL Server instance fully isolated and protected in Azure cloud inside your corporate network. It sounds awesome and it truly is.
- Always Encrypted, (Read more here)
- Always On Availability Groups, (More about Always On AG, in this link)
- SQL Server Agent (Read about this feature in this link)
- SQL Server Data Tools (SSDT)
- SQL Server Integration Services (SSIS)
- SQL Server Powershell (Read more here)
- Windows Server Fail-over Clustering (Read More in Microsoft docs)
Connectivity
Azure SQL Managed Instance provides a highly secured and isolated environment.
There are three ways a user can access Azure Managed Instance and all three are quite secured :
- Deploying a VM inside the same VNet and connect via SSMS.
- From a remote point, if you deploy a P2S (Point-To-Site) or S2S (Site-To-Site) VPN.
- Connect a Web Application to a Managed Instance using Azure App VNet .
Application Deployment Topologies
At the following image we are able to see the different use-cases for applications deployment using SQL Managed Instance.
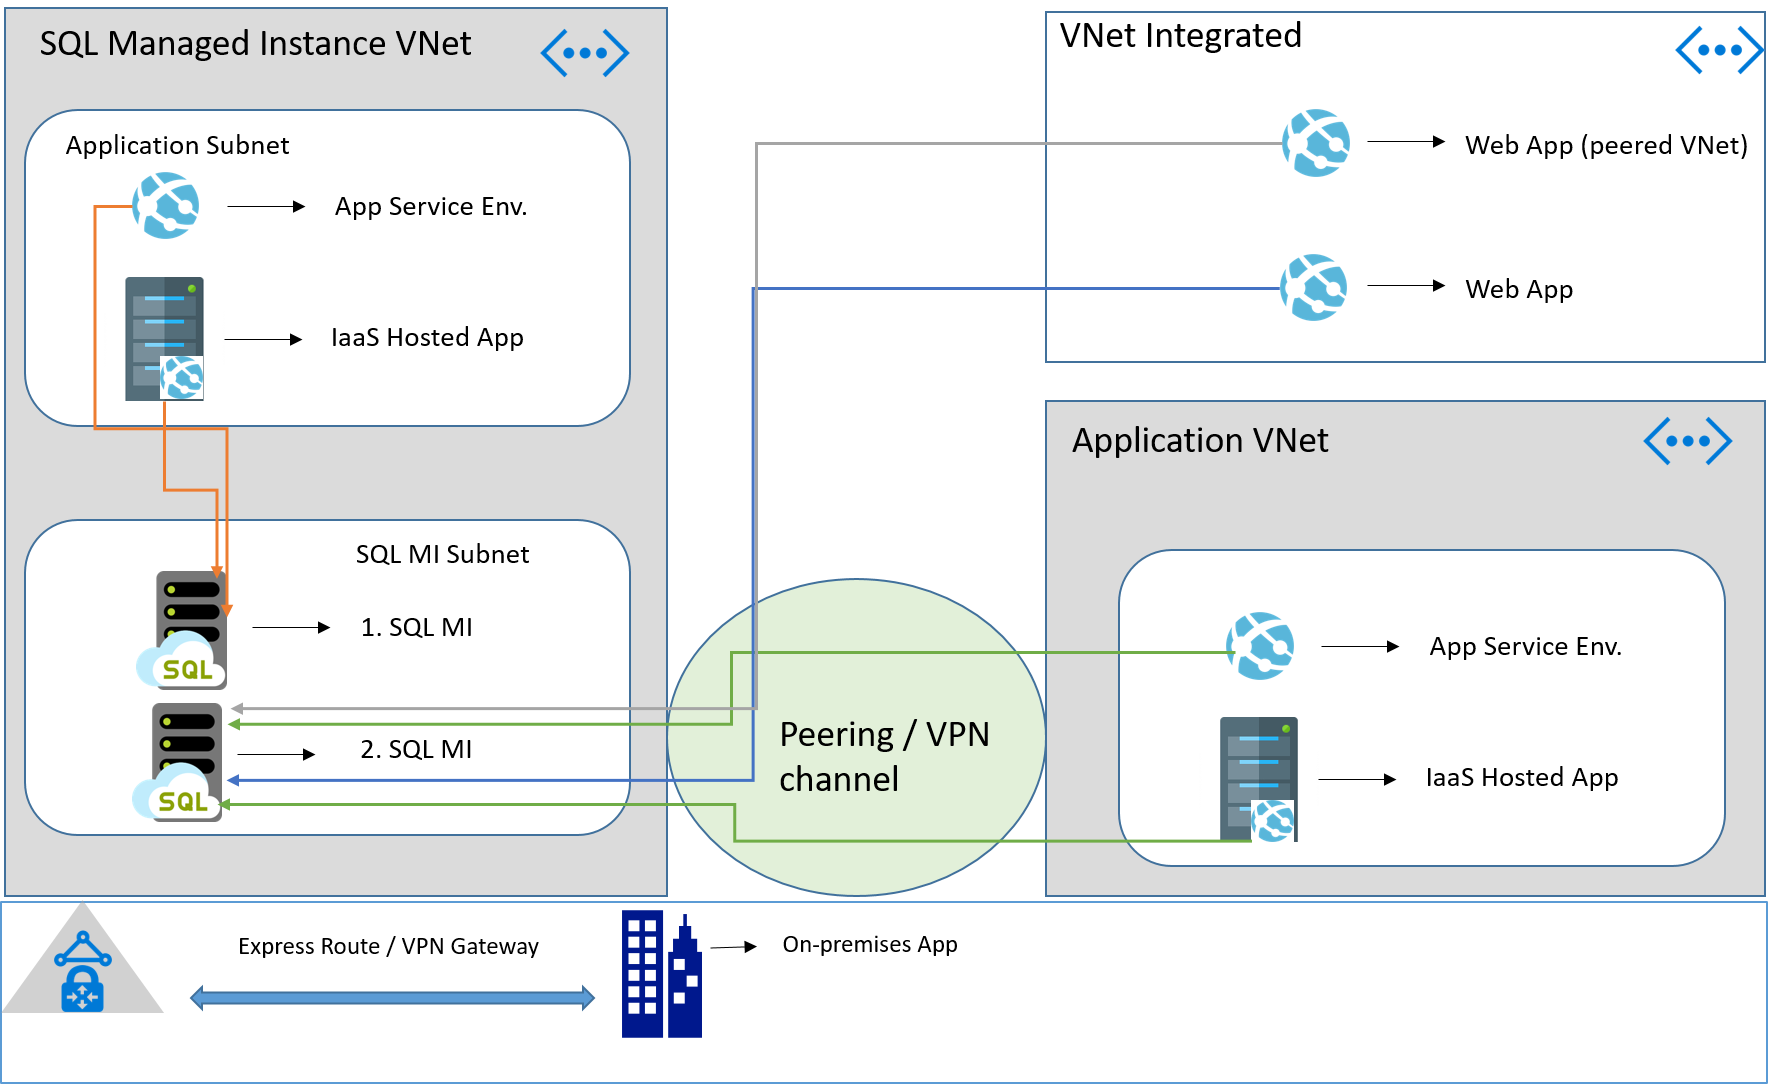
As the previous image shows, applications can integrate with Managed Instances in the following ways:
- Apps hosted in a dedicated subnet inside the SQL MI Vnet (App Service apps and IaaS hosted apps).
- Using Vnet peering or VPN channels to integrate from a different Vnet (App Service apps and IaaS hosted apps).
- Using the Vnet integration feature (App Service apps only).
- On-premises apps integrate with SQL MI using Express Route / VPN Gateway
Hardware Generation Characteristics
There are two SQL Database Managed Instance hardware generations (Gen4, Gen5), at the table below we can see the differences between them.
| Gen 4 | Gen 5 | |
| Hardware | Intel E5-2673 v3 (Haswell) 2.4-GHz processors,
attached SSD vCore = 1 PP (physical core) |
Intel E5-2673 v4 (Broadwell) 2.3 GHz processors,
fast eNVM SSD, vCore = 1 LP (hyper-thread) |
| Compute | 8,16,24 vCores | 8,16,24,32,40,64,80 vCores |
| Memory | 7 GB per vCore | 5.1 GB per vCore |
| Max Storage (Business Critical) | 1 TB | 1 TB, 2 TB, or 4 TB depending on the number of cores |
Service Tier Characteristics
There are two service tiers in SQL Managed Instance, General Purpose, and Business Critical :
General Purpose : This service tier is for apps with typical requirements for performance.
Business Critical : On the other hand Business Critical, is for apps that require high performance and low IO latency.
At the table below we can see what are the capabilities for every tier.
| Feature | General Purpose | Business Critical |
| Number of vCores* | Gen4: 8,16,24
Gen5: 8,16,24,32,40,64,80 |
Gen4: 8,16,24,32
Gen5: 8,16,24,32,40,64,80 |
| Memory | Gen4: 56GB - 156GB
Gen5: 44GB - 440GB *Proportional to the number of vCores |
Gen4: 56GB - 156GB
Gen5: 41GB - 408GB *Proportional to the number of vCores |
| Max Storage Size | 8 TB | Gen4: 1 TB
Gen5: 1 TB for 8,16 vCores 2 TB for 24 vCores 4 TB for 32, 40, 64, 80 vCores |
| Max Storage Per Database | Determined by the max storage size per instance | Determined by the max storage size per instance |
| Max Number Of Databases
Per Instance |
100 | 100 |
| Max Database Files Per Instance | Up to 280 | 32.767 files per database |
| Data/Log IOPS (approximate) | 500-7500 per file *Depends on the file size | 11K - 110K (1375 per vCore) |
| Instance Log throughput | 22MB/s per instance | 3MB/s per vCore, Max 48MB/s |
| Data throughput (approximate) | 100-250 MB/s per file *Depends on the file size | 24-48 MB/s per vCore |
| IO latency (approximate) | 5-10 ms | 1-2 ms |
| Max TempDB size | 192-1920 GB (24 GB per vCore) | No constraints - limited by the max instance storage size |
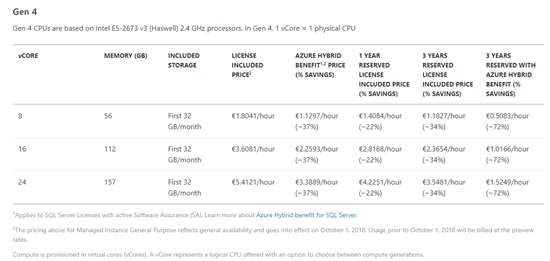
Managed Instance Pricing
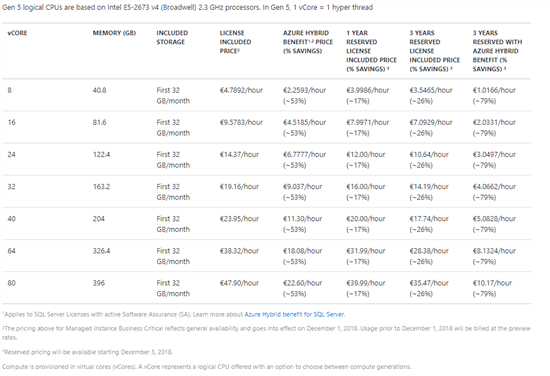
At the following images, we can see the prices for the General purpose (Gen 4, Gen 5) tiers.
Note
To view the image in full size we need to click on the image
General Purpose
In case we have a moderate workload we can see the prices for the General purpose tier.
Gen 4 Tier
Gen 5 Tier

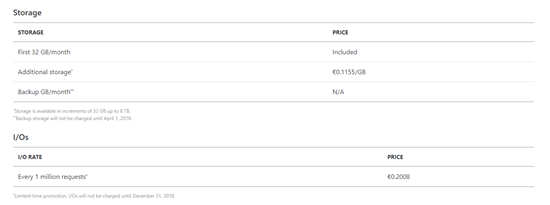
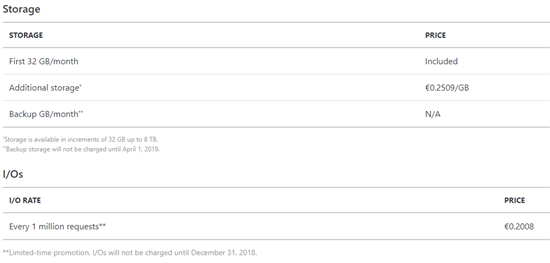
Storage and I/Os
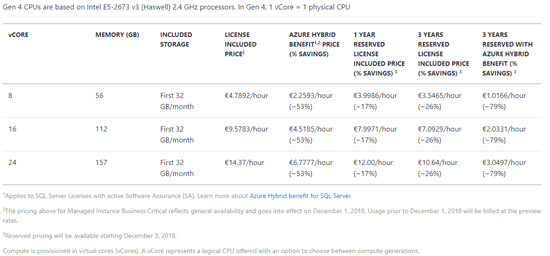
Business critical
If the application needs fast IO and high availability requirements then we should check the following prices which are for the Business critical tier.
Gen 4
Gen 5
Storage and I/Os
Migrate To Azure SQL Managed Instance
At this point of this post, we talk about the migration process of an existing on-premises SQL Server instance to Azure SQL Managed Instance, and the ability to take advantage of all the possibilities it provides.
There are two ways to migrate an instance to Azure, offline and online :
- Offline: The application that uses the SQL instance will have downtime when the migration begins.
- Online: In this way, the downtime for the application will be limited for a short time at the end of the migration.
Except for the instructions above (Offline, Online), we can also migrate using Azure PowerShell.
Azure Database Migration Pricing
The pricing tiers from Azure Database Migration are two, the Standard and the Premium. Per Subscription, someone can create two Data Migration Services. Also, the Standard Tier of the Data Migration Service is FREE to use for offline migrations. At the following link, we can see the pricing details, Azure Database Migration Service pricing.
Create A SQL Managed Instance
Azure SQL Managed Instance is already (General Available) and the deployment is automated from Azure.
Search For The Service
The first thing we have do is to search for the "Azure SQL Managed Instance" service, select and click Create.

Create SQL MI
At the first deployment blade, we must fill up the required fields.

| Setting | Value |
| Subscription | Select a valid Azure Subscription |
| Managed instance name | Type the SQL Managed Instance Name |
| Managed Instance admin login | Type the administration login name |
| Password / Confirm password | Type and re-type the administrator's password |
| Collation | Type the collation for the Instance, the default is SQL_Lating1_General_CP1_CI_AS |
| Location | Select the location where the managed instance will be created. |
| Virtual network | Select Create a new virtual network or an existing one |
| Resource Group | Select Create new, or an existing Resource Group |
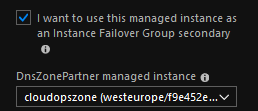
If this is checked, then we must select an existing Managed Instance in the other DNS Zone to create a Fail-over Group.
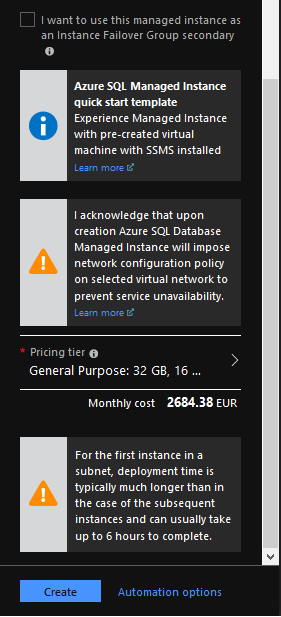
The last we have to configure is the Pricing tier that we will use for the SQL Managed Instance. We must be very careful with this selection because it must fit to the application needs.

Select Create and wait until the SQL Managed Instance deployment complete.
Note
The deployment takes more than 10 hours to complete.
Connect To Azure SQL Managed Instance
Unlike the SQL Managed Instance service in Preview, now it's easier to connect to the Managed Instance.
There are two options in the Azure Portal to do this.
From the Settings - Quickstart, we can select between Virtual machine with SSMS and Point-to-Site VPN connection.
A virtual machine with SSMS
Follow the next steps to create a Virtual Machine attached to the VNet with the latest SSMS version.
Step 1. Run the following PowerShell code :
$scriptUrlBase = 'https://raw.githubusercontent.com/Microsoft/sql-server-samples/master/samples/manage/azure-sql-db-managed-instance/attach-jumpbox'

$parameters = @{
    subscriptionId = '########-####-####-####-############'
    resourceGroupName = 'SQLMI_RG'
    virtualNetworkName = 'SQLMI_VNET'
    administratorLogin  = 'azureuser'
    administratorLoginPassword  = '<password>'
}

Invoke-Command -ScriptBlock ([Scriptblock]::Create((iwr ($scriptUrlBase+'/attachJumpbox.ps1?t='+ [DateTime]::Now.Ticks)).Content)) -ArgumentList $parameters, $scriptUrlBase
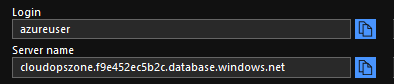
Step 2. Use RDP to connect to the VM
Step 3. From the VM, open SSMS and use the parameters from the Azure Portal, as the image below shows.
Point-to-Site VPN connection
In case we want to connect to the Managed Instance from a local network we must follow these steps :
Step 1. Runt the PowerShell code shown below
$scriptUrlBase = 'https://raw.githubusercontent.com/Microsoft/sql-server-samples/master/samples/manage/azure-sql-db-managed-instance/attach-vpn-gateway'

$parameters = @{
    subscriptionId = '########-####-####-####-############'
    resourceGroupName = 'SQLMI_RG'
    virtualNetworkName = 'SQLMI_VNET'
    certificateNamePrefix  = 'cert4cloudopszone'
}

Invoke-Command -ScriptBlock ([Scriptblock]::Create((iwr ($scriptUrlBase+'/attachVPNGateway.ps1?t='+ [DateTime]::Now.Ticks)).Content)) -ArgumentList $parameters, $scriptUrlBase
Note
The above code also automatically creates a certificate, e.g cert4cloudopszone.
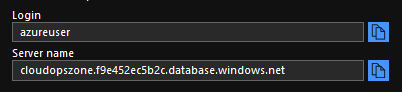
Step 2. Download and Install the VPN client on the computer that we want to connect using SSMS
Step 3. After we connect to the Vnet using the previously created VPN Gateway, open the SSMS by using the credentials from the Azure Portal as the next image.
Restore Database To SQL Azure Managed Instance
In this point, we are ready to restore database(s) for the application(s). We can do this in two ways, via T-SQL and PowerShell. Down, in the references section, we can find detailed instructions about the database restore procedure.
Conclusion
In this post, we made a thorough report about the Azure SQL Managed Instance service. We mentioned the key characteristics and benefits of this service and finally, we made a quick demo of the service implementation.
Reference
Azure Deployment Topologies
Service Tier Characteristics
Migrate To Azure SQL Managed Instance
- Prerequisites
- Register the Microsoft.Data Migration resource provider
- Create an Azure Database Migration Service instance
- Create a migration project
Azure SQL Managed Instance Pricing
Create A SQL Managed Instance
- Quickstart: Create an Azure SQL Database Managed Instance
- Configure a point-to-site connection
- Logical server firewall rule
Restore Database To SQL Azure Managed Instance
See Also
SQL Feature Comparison
Database Features
- SQL Database application development overview
- Multi-model capabilities of Azure SQL Database
- Optimize performance by using In-Memory technologies in SQL Database
- Getting Started with Temporal Tables in Azure SQL Database
Azure SQL Database: Monitoring and tuning
- Query Performance Insights
- Azure SQL Analytics
- Automatic Tuning
- Intelligent Insights using AI to monitor and troubleshoot database performance
- Performance recommendations for SQL Database
- Azure SQL Database metrics and diagnostics logging
Azure SQL Database: Scalability