Azure: Create Runbook and add Schedules using PowerShell
Introduction
Azure Automation enables users to automate tasks that are manual and repetitive in nature by using Runbooks. Runbooks are nothing but a set of tasks that perform some automated implementation in Azure Automation.
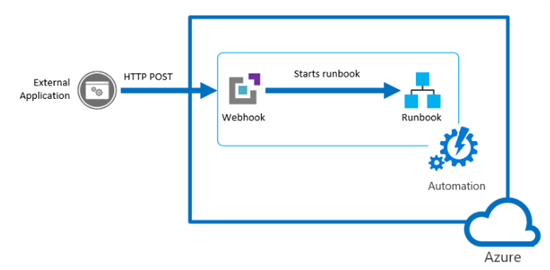
Runbooks in Azure Automation are based on Windows PowerShell or Windows PowerShell Workflow. We can code and implement the logic that we want to automate using PowerShell. Once the runbook has been created and the implementation logic is added to it, we can invoke and run it from the client applications by issuing a POST request using Webhook. To put it simply, a webhook allows us to start a particular runbook in Azure Automation through a single HTTP request. The entire flow has been summarized below :
In this article, we will see how to use PowerShell to create an Azure Runbook. The steps that we will cover are :
- Create Azure Automation Account
- Create the runbook
- Import PowerShell Code to runbook
- Publish the runbook
- Schedule the runbook
Create Azure Automation Account
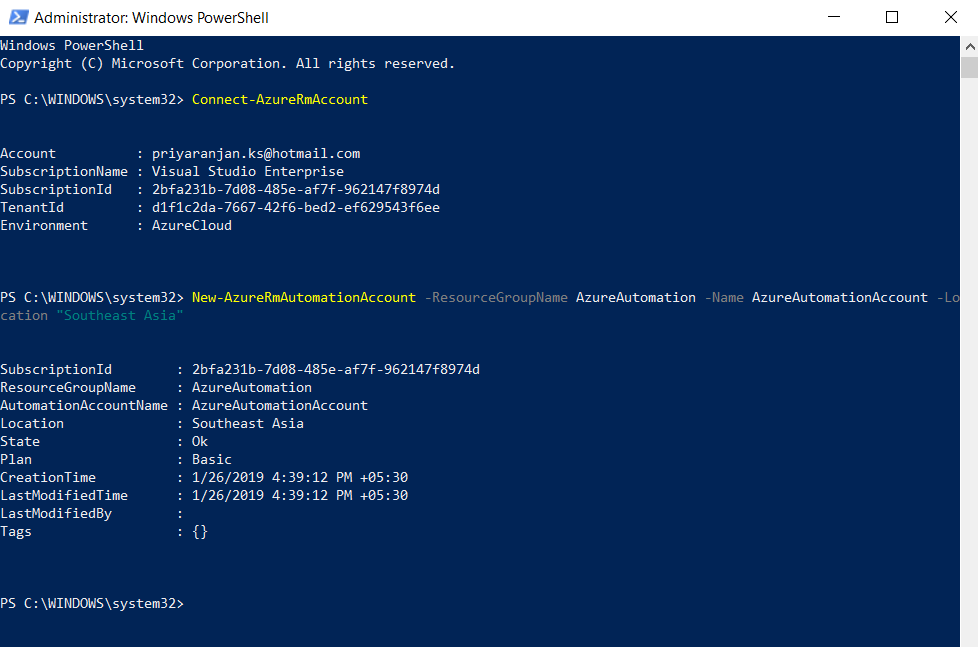
So as to interact with Azure, ensure that you have the Azure RM Module installed. We can install this module by running the below command :
Install-Module AzureRM –AllowClobber
Once we have the module installed, connect to Azure by running the command
Connect-AzureRmAccount
Before getting started with Azure Automation, we have to create Automation Accounts which will be used to authenticate the runbooks. We will use the below command to create the Azure Automation Account
New-AzureRmAutomationAccount -ResourceGroupName AzureAutomation -Name AzureAutomationAccount -Location "Southeast Asia"
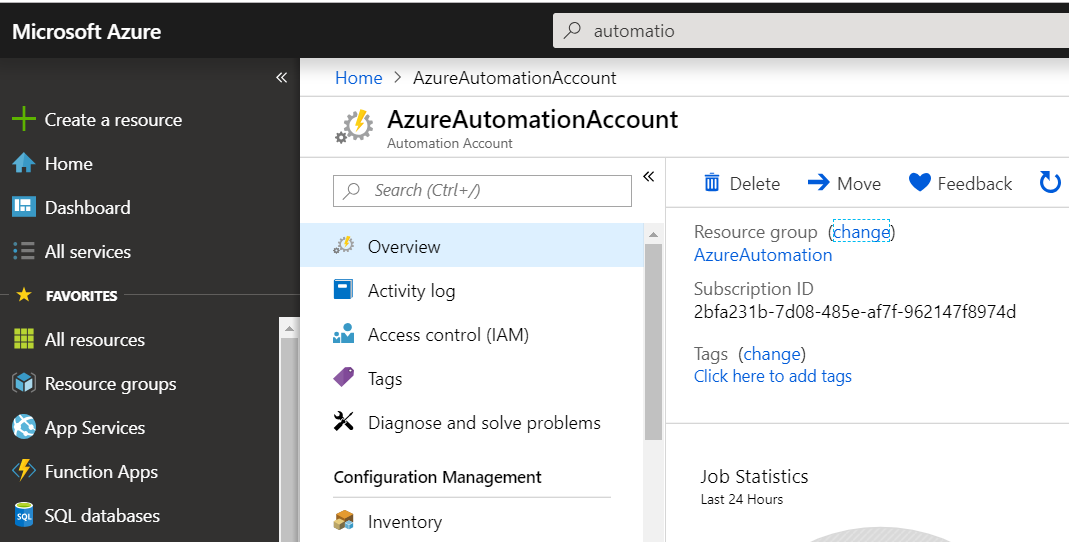
We can verify the account creation from Azure Portal as well :
Create Azure Automation Runbook
Now let's go ahead and create the runbook using the command :
New-AzureRmAutomationRunbook -Name RetrieveData_SendMail -Type PowerShell -ResourceGroupName AzureAutomation -AutomationAccountName AzureAutomationAccount

Once created,Get- AzureRmAutomationModule will fetch the created runbook
Get-AzureRmAutomationModule -ResourceGroupName AzureAutomation -AutomationAccountName AzureAutomationAccount | select name, version
Import PowerShell Code
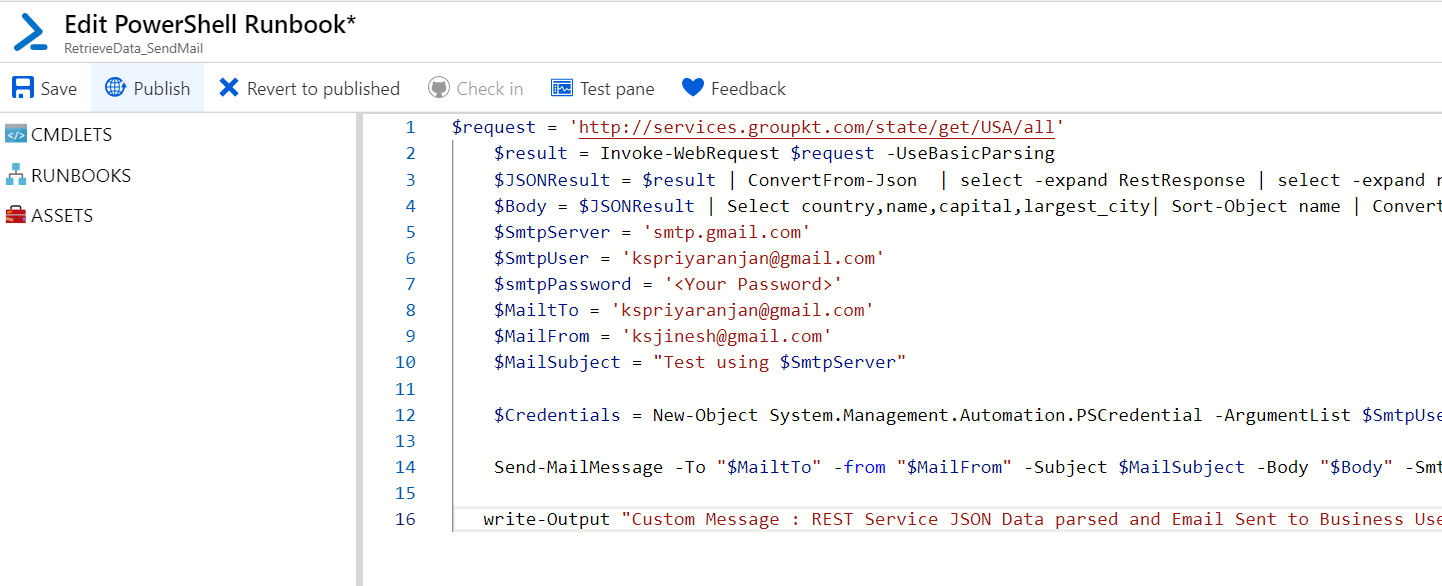
Now we have to populate the Runbook with the Powershell code that we have written in the local PS1 file. The below code connects to an Open REST API, fetches the data and sends the retrieved data to a business user.
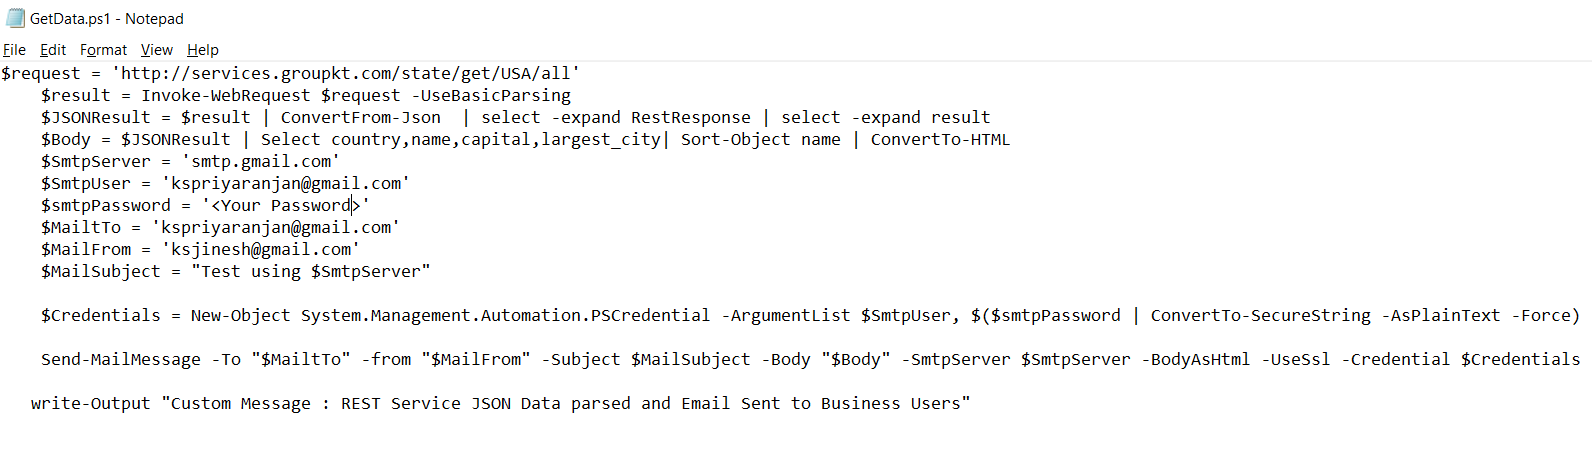
$request = 'http://services.groupkt.com/state/get/USA/all'
  $result = Invoke-WebRequest $request -UseBasicParsing
  $JSONResult = $result | ConvertFrom-Json  | select -expand RestResponse | select -expand result
  $Body = $JSONResult | Select country,name,capital,largest_city| Sort-Object name | ConvertTo-HTML
  $SmtpServer = 'smtp.gmail.com'
  $SmtpUser = 'kspriyaranjan@gmail.com'
  $smtpPassword = '<Your Password>'
  $MailtTo = 'kspriyaranjan@gmail.com'
  $MailFrom = 'ksjinesh@gmail.com'
  $MailSubject = "Test using $SmtpServer"

  $Credentials = New-Object System.Management.Automation.PSCredential -ArgumentList $SmtpUser, $($smtpPassword | ConvertTo-SecureString -AsPlainText -Force)

  Send-MailMessage -To "$MailtTo" -from "$MailFrom" -Subject $MailSubject -Body "$Body" -SmtpServer $SmtpServer -BodyAsHtml -UseSsl -Credential $Credentials

 write-Output "Custom Message : REST Service JSON Data parsed and Email Sent to Business Users"
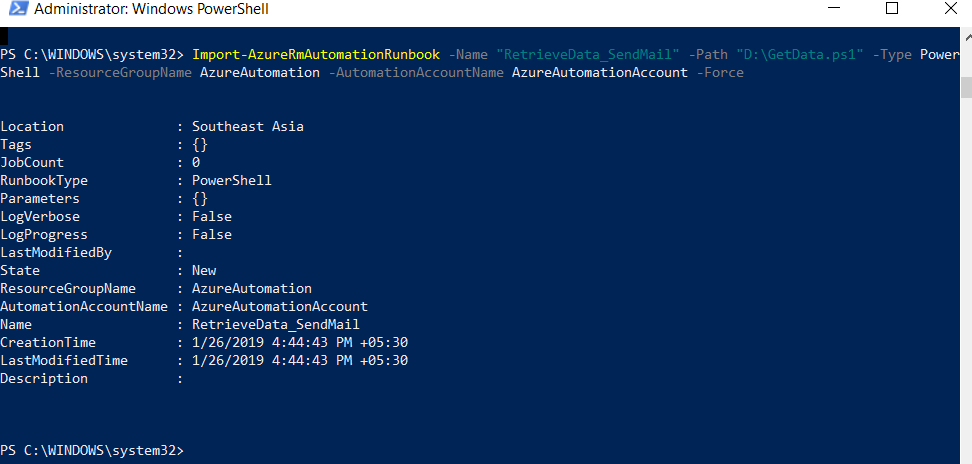
We can import the code to Runbook using the below command :
Import-AzureRmAutomationRunbook -Name "RetrieveData_SendMail" -Path "D:\GetData.ps1" -Type PowerShell -ResourceGroupName AzureAutomation -AutomationAccountName AzureAutomationAccount –Force
We can verify the uploaded code from the runbook in the Azure Portal.
Publish the runbook
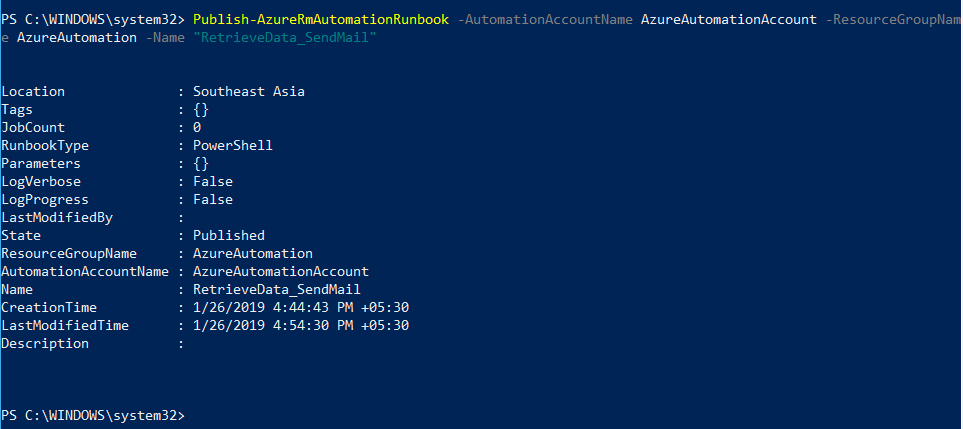
Before we can start using the runbook, we have to publish it. We will use the below command to publish the runbook:
Publish-AzureRmAutomationRunbook -AutomationAccountName AzureAutomationAccount -ResourceGroupName AzureAutomation -Name "RetrieveData_SendMail"
Start the runbook
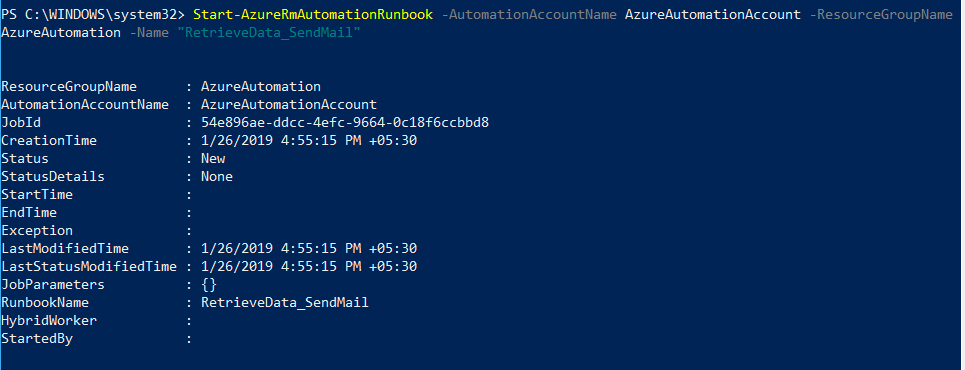
Once the runbook is published, we can test its working by starting it by using the command :
Start-AzureRmAutomationRunbook -AutomationAccountName AzureAutomationAccount -ResourceGroupName AzureAutomation -Name "RetrieveData_SendMail"
We can check the runbook runs from Azure portal which will give us thereal-timee status of runbook runs.
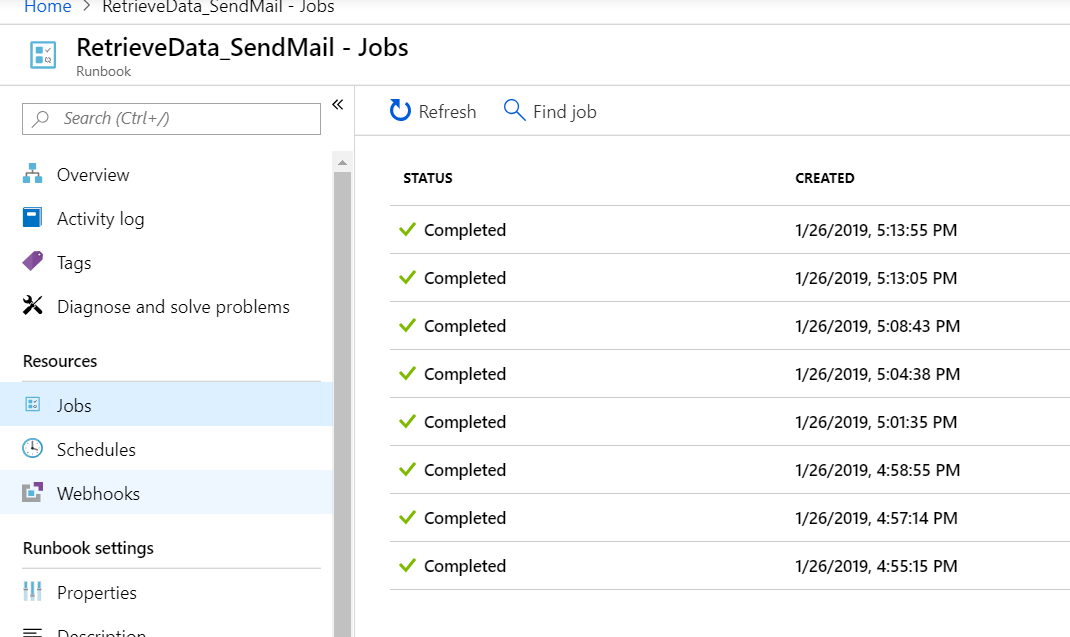
Thus the runbook has run successfully and we have received the email with the content from the Open REST API

Schedule the runbook
We can also schedule the runbook so that it starts at a particular time and we can even choose to run it between a specified interval time just like a timer job. So as to register the schedule we need to do two steps :
- Create a run time schedule
- Register the schedule with the runbook
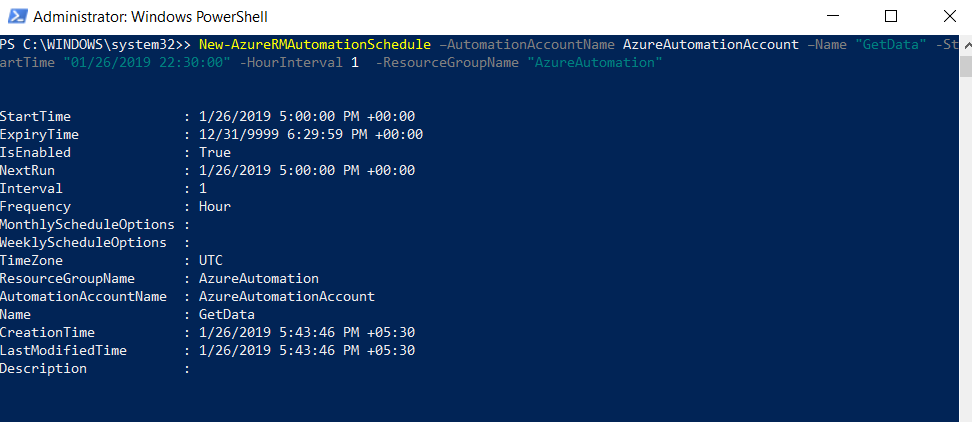
We can create the schedule using the below command. This would create a schedule so that it would run every hour. You can get more details about the possible schedules here
New-AzureRMAutomationSchedule –AutomationAccountName AzureAutomationAccount –Name "GetData" -StartTime "01/26/2019 22:30:00" -HourInterval 1 -ResourceGroupName "AzureAutomation"
Once the schedule is created, we can register it to the runbook using the command :
Register-AzureRmAutomationScheduledRunbook -Name RetrieveData_SendMail -ResourceGroupName AzureAutomation -AutomationAccountName AzureAutomationAccount -ScheduleName "GetData"

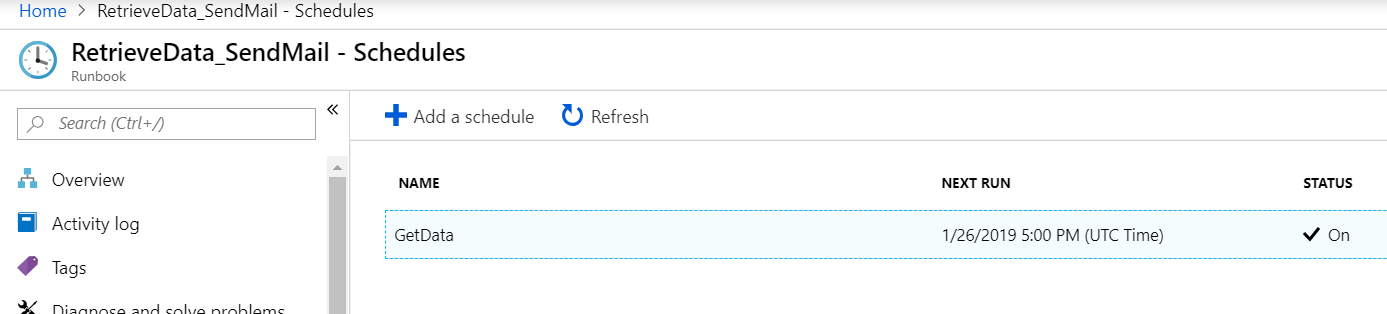
We can view the registered schedules from the Azure Portal.
Summary
Thus we saw how to create an Azure Runbook using PowerShell, Import the code to the runbook and schedule it to run on a recurring interval