Office Online Server 2016: How to update
Introduction
This posting consolidates notes, experience and references with respect to updating Office Online Server 2016 (OOS). Updating OOS is similar to updating its predecessor, Office Web Apps Server 2013, but with the added caveat that in OOS, builds are handled like versions, meaning that software updates are associated with builds, not versions. For OOS, before installing the latest security patch, you need to uninstall the current build and then install the latest build. If you don't, you may see the odd message, The expected version of the product was not found on the system. Another way of looking at it is that for OOS, you not only perform upgrades version-to-version, but also from build-to-build. Though patch administration is increased in upgrading from OWA to OOS, the commandlets that need to be executed for upgrading and updating remained unchanged. One last thing: installing a patch does not update the build number.
This procedure assumes a single-server OOS farm integrated with a SharePoint 2016 farm that is used internally over an encrypted connection.
Procedure: Install Software Update / security patch installation
Remote into the server hosting OOS, launch Programs and Features, and then note down the build number for Microsoft Office Online Server.
On any machine, navigate to Office Online Server release schedule and the compare the installed OOS build version with the latest release build version listed.
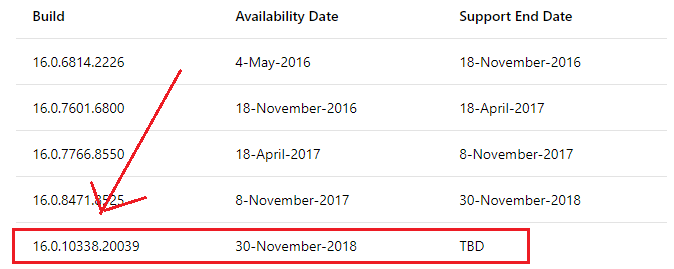

If it's the same as the most recent build release listed, continue to the next step. Otherwise, perform the steps listed in Procedure: Upgrade Build, below, and then return here and continue to the next step.
On the server hosting OOS, use Windows Update to check whether new update is available for OOS.
Because software updates are associated with build releases, if you have an older build installed, you may not see the latest updates appear in Windows Update. This is just like if you have SharePoint 2013 installed: you will not see updates for SharePoint 2016. Therefore, after upgrading the OOS build, you will need to force Windows Update to run so that it checks for software updates for the upgraded OOS build. For Windows Server 2012, you do this via the Windows Update applet in Control Panel. For Windows Server 2016, you do this by opening an elevated PowerShell shell on the OOS machine, and then executing USOClient StartScan.
From Windows Update, obtain the KB number of the OOS software update that need to be installed. Download the update to the machine hosting OOS.
Launch an elevated PowerShell shell.
Execute Import-Module -Name OfficeWebApps.
Execute Get-OfficeWebAppsFarm | Out-File C:\OOSConfig.txt. This writes the current OOS configuration to a text file. You'll need to know this configuration in order to properly craft the New-OfficeWebAppsFarm parameter list so that the new OOS instance is configured exactly like the previous one.
Execute Remove-OfficeWebAppsMachine. This removes the running application only and does not remove the binaries.
Run the update installers as Administrator, and reboot as required.
Using the OOS configuration you captured earlier, develop the parameter list for creating the new OOS machine. Here's an example:
New-OfficeWebAppsFarm -InternalURL "https://oos.contoso.com" -EditingEnabled:$True -CertificateName "[certificatename]" -AllowHTTP:$False -AllowCEIP:$False -CacheLocation "D:\DiskCache" -LogLocation "D:\Logs" -LogVerbosity "High"
In the elevated PowerShell shell, execute the New-OfficeWebAppsFarm commandlet you crafted previously.
Open a browser and then connect to https://oos.contoso.com/hosting/discovery. This should return an XML listing of available services. Seeing this is a pretty good indication that the new OOS instance is operational.
Open a browser and connect to any site employing Office online, and test being able to open and edit an office document.
This completes OOS software update / security patch installation.
Procedure: Upgrade Build
Obtain the latest build release ISO from your organization's Volume Licensing Service Center account, and then copy it to the server or servers (if supporting an OOS farm) hosting OOS.
Remote into the OOS server, and then launch an elevated PowerShell shell.
Execute Import-Module -Name OfficeWebApps.
Execute Get-OfficeWebAppsFarm | Out-File C:\OOSConfig.txt. This writes the current OOS configuration to a text file. You'll need to know this configuration in order to properly craft the New-OfficeWebAppsFarm parameter list.
Execute Remove-OfficeWebAppsMachine. This removes the running application only and does not remove the binaries.
Mount the ISO as a DVD drive. Once you mount it, the build number will appear as the name of the DVD.
Open the DVD, right-click on setup.exe, and then choose Run as Administrator.
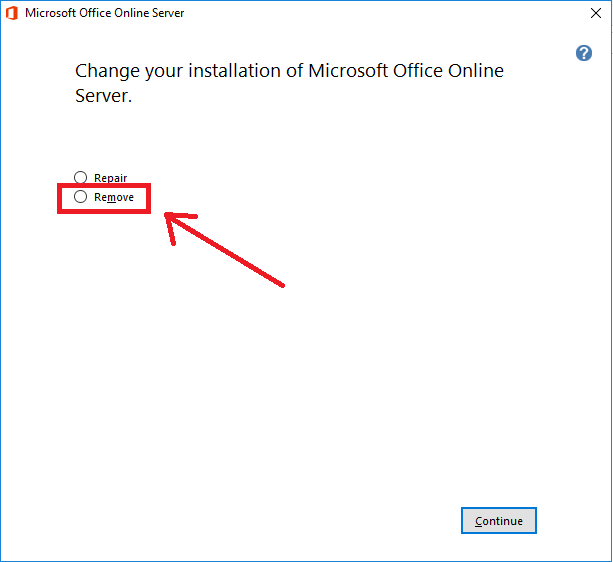
Choose Remove, and then click Continue.
Click Yes, and then click Continue.
Click Close, once the current build binaries have been removed.
Right-click on setup.exe, again, and then choose Run as Administrator, and reboot as required.
Check the terms of agreement, and then click Continue.
Update the file location, as desired, and then click Install Now.
Click Close, once the binary installation is completed.
Using the OOS configuration you captured earlier, develop the parameter list for creating the new OOS machine. Here's an example:
New-OfficeWebAppsFarm -InternalURL "https://oos.contoso.com" -EditingEnabled:$True -CertificateName "[certificatename]" -AllowHTTP:$False -AllowCEIP:$False -CacheLocation "D:\DiskCache" -LogLocation "D:\Logs" -LogVerbosity "High"
In the elevated PowerShell shell, execute the New-OfficeWebAppsFarm commandlet you crafted previously.
Open a browser and then connect to https://oos.contoso.com/hosting/discovery. This should return an XML listing of available services.
Test opening and editing office documents in the browser.
This completes OOS build upgrade.
Summary
This posting has introduced you to the peculiar approach that needs to be taken when applying software updates to Office Online Server 2016. For OOS, not only are version-to-version upgrades performed but also build-to-build upgrades. In other words, builds for OOS are handled just like we handle version upgrades for SharePoint. This means that when a new build for OOS is released, you need to uninstall your current build and then install the new build. It also means that if you have an older build of OOS installed, you may not see the latest software updates appearing in Windows Update just like you won't see software updates for SharePoint 2016 appearing if you only have SharePoint 2013 deployed. While the significantly increased "upgrade" frequency does increase our administrative effort, there are no new commandlets to familiarize yourself with, and the upgrade and update procedures are generally the same.
References
- Apply software updates to Office Online Server
- Office Online Server release schedule
- Office Online Server 2016 Troubleshooting: The expected version of the product was not found on the system
- How to force Windows Server 2016 to check for updates
- USOCLIENT.EXE - Documentation?
- New-OfficeWebAppsFarm
- Get-OfficeWebAppsFarm
- SharePoint 2016: How to knowledgeably administer Adobe PDF integration
- Configure Office Online Server for SharePoint Server
Notes
- You may find it helpful to educate your management and system admins on the dependencies of OOS as they may not necessarily appreciate the subtleties of SharePoint and OOS software updating. For example, though OOS software updates will appear in Windows Update, OOS software updates (like for SharePoint) are not to be installed via Windows Update (see Apply software updates to Office Online Server).