Windows Forms ListView: Examining Detail view with SQL-Server
Introduction

Although Microsoft documentation for the ListView class is well written along with many code snippets on the Internet there are no well-rounded code samples to follow for populating a ListView control from start to finish reading from a data source.
The following C# code samples provide guidance to populate a ListView from both SQL-Server database table and Json files. Focus is on working with ListView control in Details view, ListView Groups and checked rows. For VB.NET developers see the mirror article and code sample.
Intended audience
Hobbyist or developer with basic understanding of working with SQL-Server and a firm grasp of the C# language.
Basic setting: ListView control at design time
With a Window form selected and the Toolbox visible double click on a ListView, resize the ListView to accommodate data intended to populate the ListView. On the top right-hand corner of the ListView single click the chevron. From the view dropdown select Details. Click “Edit columns”. For each item .e.g. first name, last name click the “Add” button, name the column e.g. FirstNameColumn, set the Text property e.g. First Name, when done press OK. Don’t be concerned with column width at this time, this will be done later.
Basic detail view: Contacts Example
Create a class which represents data read from a database table. In the following example customer contacts of type owner will be the target for the first example. This class is a partial representation of several joined tables.
namespace SqlServerOperations.Classes
{
    public class  Contact
    {
        public int  CustomerIdentifier { get; set; }
        public string  CompanyName { get; set; }
        public string  FirstName { get; set; }
        public string  LastName { get; set; }
        public string  PhoneTypeDescription { get; set; }
        public string  PhoneNumber { get; set; }
        public string  CountryName { get; set; }
        public string[] ItemArray => new[]
        {
            CompanyName,
            FirstName,
            LastName,
            PhoneNumber,
            CountryName
        };
    }
}
The ItemArray property will be used to add items to the ListView as the Add method accepts an array of items. The follow method is in a class solely responsible for reading data from a SQL-Server database.
Note that the WHERE condition is hard coded, this could be rigged up to accept a int parameter to represent the contact type.
public List<Contact> GetOwnerContacts()
{
    mHasException = false;
    var ownerContacts = new  List<Contact>();


    var selectStatement =
        @"
        SELECT   Cust.CustomerIdentifier ,
                 Cust.CompanyName ,
                 cont.FirstName ,
                 cont.LastName ,
                 PT.PhoneTypeDescription ,
                 CCD.PhoneNumber ,
                 Countries.CountryName
        FROM     Customers AS Cust
                 INNER JOIN dbo.Contact AS cont ON Cust.ContactIdentifier =
                    cont.ContactIdentifier
                 INNER JOIN dbo.ContactContactDevices AS CCD ON cont.ContactIdentifier =
                    CCD.ContactIdentifier
                 INNER JOIN dbo.PhoneType AS PT ON CCD.PhoneTypeIdenitfier =
                    PT.PhoneTypeIdenitfier
                 INNER JOIN dbo.Countries ON Cust.CountryIdentfier = Countries.id
        WHERE    ( Cust.ContactTypeIdentifier = 7 )
        ORDER BY Cust.CompanyName;";


    using (var cn = new SqlConnection() { ConnectionString = ConnectionString })
    {
        using (var cmd = new SqlCommand() { Connection = cn })
        {
            try
            {
                cn.Open();

                cmd.CommandText = selectStatement;

                var reader = cmd.ExecuteReader();
                while (reader.Read())
                {
                    ownerContacts.Add(new Contact()
                    {
                        CustomerIdentifier = reader.GetInt32(0),
                        CompanyName = reader.GetString(1),
                        FirstName = reader.GetString(2),
                        LastName = reader.GetString(3),
                        PhoneTypeDescription = reader.GetString(4),
                        PhoneNumber = reader.GetString(5),
                        CountryName = reader.GetString(6)
                    }) ;
                }

            }
            catch (Exception e)
            {
                mHasException = true;
                mLastException = e;
            }
        }
    }

    return ownerContacts;
}
In the form with the ListView, in form shown event a new instance of the data class is created followed by call the method above. To ensure that any screen updates are not shown (from adding and resizing columns) BeginUpdate is invoked before adding items to the ListView. If there is a chance of a runtime exception the code between BeginUpDate and the line above EndUpdate may be wrapped in a try-finally statement so that the ListView is partly populated is in working order although the ListView may be unstable so better to prevent any other operations to proceed as seen fit.
private void  Form1_Shown(object  sender, EventArgs e)
{
    var dataOperations = new  SqlInformation();
    var contacts = dataOperations.GetOwnerContacts();

    ownerContactListView.BeginUpdate();
    foreach (var contact in contacts)
    {

        ownerContactListView.Items.Add(
            new ListViewItem(contact.ItemArray)
            {
                Tag = contact.CustomerIdentifier
            });

    }

    ownerContactListView.AutoResizeColumns(ColumnHeaderAutoResizeStyle.HeaderSize);
    ownerContactListView.EndUpdate();

    ownerContactListView.FocusedItem = ownerContactListView.Items[0];
    ownerContactListView.Items[0].Selected = true;
    ActiveControl = ownerContactListView;

}
During the iteration of contacts a new row is added to the ListView using an overload which accepts an object array which is possible using the Contact ItemArray method. Rather then create an instance of a ListViewItem as a variable and then passing the variable to the Add method it's more efficient to simple add the item directly in the add method. The Tag property is set to the primary key of the contact which is available later to get more information from the database tables. In the following code sample the Tag property for the current item is cast to a integer which can be used to reference back to the table customers.
var id = Convert.ToInt32(ownerContactListView.SelectedItems[0]
    .Tag
    .ToString());
Sizing of columns is performed using the following line which sizes per data which has been added to the ListView.
ownerContactListView.AutoResizeColumns(ColumnHeaderAutoResizeStyle.HeaderSize);
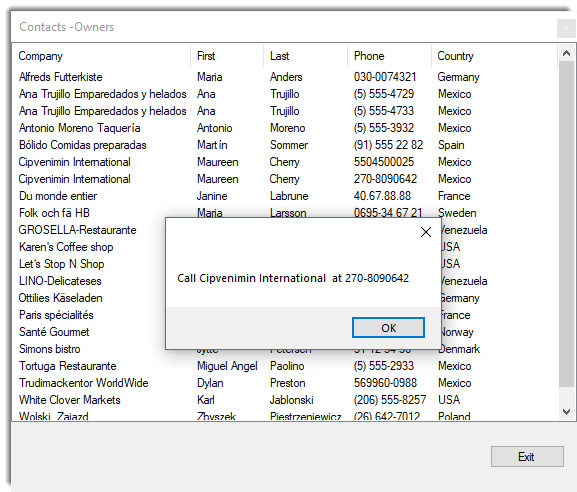
To get details for the current ListView Item, in this case the ListView MouseDoubleClick event. The contact and phone will be displayed in a message dialog.
private void  ListView1_MouseDoubleClick(object sender, MouseEventArgs e)
{
    MessageBox.Show(
        $"Call {ownerContactListView.SelectedItems[0].Text} at " +
        $"{ownerContactListView.SelectedItems[0].SubItems[3].Text}");
}
Screenshot
Basic Detail view with grouping: Products/Category example
In a conventional view for selecting products a DataGridView is used with a filtering mechanism to show one category at a time while an alternate approach would be to group products by category which a standard DataGridView is not capable of without a fair amount of custom coding or a third party grid control. A ListView is the perfect fit when multiple groups (or in this case categories) need to be displayed together.
Step 1: Obtain items which represent groups
This demonstration groups products by categories. The following class is used to create a list for working with groups.
namespace SqlServerOperations.Classes
{
    public class  Category
    {
        public int  CategoryId { get; set; }
        public string  Name { get; set; }
        public override  string ToString()
        {
            return Name;
        }
    }
}
In the form shown event the data class is created and a call is made to obtain categories.
var dataOperations = new  SqlInformation();
var categories = dataOperations.Categories();
Code to obtain categories from a database table.
public List<Category> Categories()
{
    mHasException = false;

    var categoryList = new  List<Category>();
    var selectStatement = "SELECT CategoryID,CategoryName FROM dbo.Categories";

    using (var cn = new SqlConnection() {ConnectionString = ConnectionString})
    {
        using (var cmd = new SqlCommand() {Connection = cn})
        {
            cmd.CommandText = selectStatement;
            try
            {
                cn.Open();
                var reader = cmd.ExecuteReader();
                while (reader.Read())
                {
                    categoryList.Add(new Category()
                    {
                        CategoryId = reader.GetInt32(0),
                        Name = reader.GetString(1)
                    });
                }
            }
            catch (Exception e)
            {
                mHasException = true;
                mLastException = e;
            }
        }
    }

    return categoryList;
}
Step 2: Populate ListView
For each category products for the current category are read from the database tables using the following method in the data class.
public List<Product> Products(int pIdentifier)
{
    mHasException = false;

    var productList = new  List<Product>();

    var selectStatement =
        @"
        SELECT   P.ProductID ,
                 P.ProductName ,
                 P.SupplierID ,
                 S.CompanyName AS Supplier ,
                 S.Phone ,
                 P.CategoryID ,
                 P.UnitPrice ,
                 P.UnitsInStock
        FROM     dbo.Products AS P
                 INNER JOIN dbo.Suppliers AS S ON P.SupplierID = S.SupplierID
        WHERE    P.CategoryID = @CategoryIdentifier
        ORDER BY P.ProductName;";

    using (var cn = new SqlConnection() {ConnectionString = ConnectionString})
    {
        using (var cmd = new SqlCommand() {Connection = cn})
        {
            cmd.CommandText = selectStatement;
            cmd.Parameters.AddWithValue("@CategoryIdentifier", pIdentifier);

            try
            {
                cn.Open();
                var reader = cmd.ExecuteReader();
                while (reader.Read())
                {

                    productList.Add(new Product()
                    {
                        ProductId = reader.GetInt32(0),
                        ProductName = reader.GetString(1),
                        SupplierId = reader.GetInt32(2),
                        Supplier = reader.GetString(3),
                        Phone = reader.GetString(4),
                        CategoryId = reader.GetInt32(5),
                        UnitPrice = reader.GetDecimal(6),
                        UnitsInStock = reader.GetInt16(7)
                    });

                }
            }
            catch (Exception e)
            {
                mHasException = true;
                mLastException = e;
            }
        }
    }

    return productList;
}
Definition of the Product class.
namespace SqlServerOperations.Classes
{
    public class  Product
    {
        public int  ProductId { get; set; }
        public string  ProductName { get; set; }
        public int  SupplierId { get; set; }
        public string  Supplier { get; set; }
        public string  Phone { get; set; }
        public int  CategoryId { get; set; }
        public decimal? UnitPrice { get; set; }
        public int  UnitsInStock { get; set; }
        /// <summary>
        /// Container for ListView item to store primary keys
        /// </summary>
        public ProductTag IdentifiersTag => new ProductTag()
        {
            CategoryId = CategoryId,
            SupplierId = SupplierId,
            ProductId = ProductId
        };

        public override  string ToString()
        {
            return $"{ProductName}";
        }
    }
}
Note IdentifiersTag property contains primary and foreign keys for use later if needed to query for more information of fields not obtained in the read operation above or for when edits are needed.
namespace SqlServerOperations.Classes
{
    /// <summary>
    /// Container to store primary keys in a ListViewItem used
    /// in the project BasicListViewGroupsExample
    /// </summary>
    public class  ProductTag
    {
        public int  ProductId { get; set; }
        public int  SupplierId { get; set; }
        public int  CategoryId { get; set; }
    }
}
Once products have been returned from the database a name is composed for the current group which becomes the name of the group (ListViewGroup) along with a indexer to keep group names unique. Unlike the first example which used an array to populate a list item this example sets each sub-item directly in the constructor for adding a new item along with assigning the group and within the Tag property keys for referencing back to the tables in the database.
For some simple formatting if a product has nothing in stock the units in stock has a foreground color of bold red. Finally the list item is added to the ListView.
private void  Form1_Shown(object  sender, EventArgs e)
{
    var dataOperations = new  SqlInformation();
    var categories = dataOperations.Categories();

    var categoryIndex = 1;

    // ReSharper disable once TooWideLocalVariableScope
    var groupName = "";

    foreach (var category in categories)
    {
        var products = dataOperations.Products(category.CategoryId);

        /*
         * Some category names have unwanted characters and/or whitespace, remove these chars.
         */
        groupName = category.Name.Replace("/", "").Replace(" ", "");

        var currentGroup = new  ListViewGroup(category.Name, HorizontalAlignment.Left)
        {
            Header = category.Name,
            Name = $"{groupName}Group{categoryIndex}"
        };

        categoryIndex += 1;

        ProductListView.Groups.Add(currentGroup);

        foreach (var product in products)
        {
            var listViewProductItem = new  ListViewItem(new[]
            {
                product.ProductName,
                product.Supplier,
                product.Phone,
                product.UnitPrice.ToString(),
                product.UnitsInStock.ToString()
            }, -1)
            {
                Group = currentGroup,
                /*
                 * Contains primary and foreign keys for current product
                 */
                Tag = product.IdentifiersTag,
                /*
                 * Required to change font and ForeColor below
                 */
                UseItemStyleForSubItems = false
            };


            /*
             * Alter user that the product is not available.
             * Could have excluded the product, that would be dependent
             * on business requirements. Also reorder information could
             * be presented.
             */
            if (product.UnitsInStock == 0)
            {
                listViewProductItem.SubItems[4].ForeColor = Color.Red;

                listViewProductItem.SubItems[4].Font = new  Font(
                    listViewProductItem.SubItems[4].Font.FontFamily,
                    listViewProductItem.SubItems[4].Font.Size, FontStyle.Bold);

            }

            ProductListView.Items.Add(listViewProductItem);
        }
    }

    ProductListView.FocusedItem = ProductListView.Items[0];
    ProductListView.Items[0].Selected = true;

    ActiveControl = ProductListView;

    ProductListView.ItemSelectionChanged += ProductListView_ItemSelectionChanged;
    ProductListView.ItemCheck += ProductListView_ItemCheck;

    GroupsComboBox.DataSource = ProductListView.Groups.Cast<ListViewGroup>().Select(lvg => lvg.Name).ToList();
}
Once all items have been added the first item is focused.
Screenshot
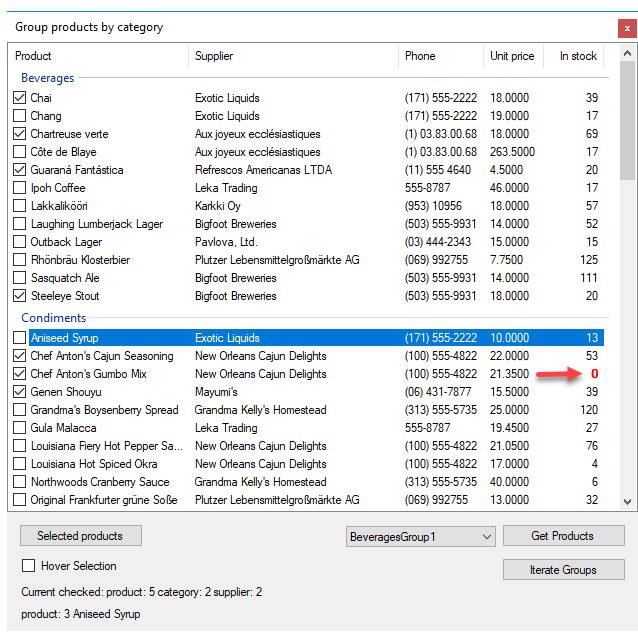
Checked rows
To add check boxes, select the ListView, select properties, find CheckBoxes and set to true.
Iterate checked rows
For this example the code is in a button click which writes results to the IDE output window while in a production all there would be a list to pass to business logic for processing.
/// <summary>
/// Demonstration for iterating a single ListViewGroup
/// by group name in ComboBox
/// </summary>
/// <param name="sender"></param>
/// <param name="e"></param>
private void  GetGroupProductsButton_Click(object sender, EventArgs e)
{
    var specificGroup = ProductListView.Groups.Cast<ListViewGroup>()
        .FirstOrDefault(lvg => lvg.Name == GroupsComboBox.Text);

    for (int index = 0; index < specificGroup.Items.Count; index++)
    {
        var productTag = specificGroup.Items[index].ProductTag();
        Console.WriteLine($"Id: {productTag.ProductId} Product: {specificGroup.Items[index].Text}");
    }
}
Take note on var productTag = specificGroup.Items[index].ProductTag(); where ProductTag is a language extension method within the current project. This keeps the cast process out of sight for cleaner code in the form.
using System.Windows.Forms;
using SqlServerOperations.Classes;

namespace BasicListViewGroupsExample.LanguageExtensions
{
    /// <summary>
    /// Contains project specific extension methods
    /// </summary>
    public static  class ListViewExtensions
    {
        /// <summary>
        /// Get primary and foreign keys for a product
        /// within a ListView
        /// </summary>
        /// <param name="sender"></param>
        /// <returns></returns>
        public static  ProductTag ProductTag(this ListViewItem sender)
        {
            return (ProductTag) sender.Tag;
        }
    }
}
Another place the extension method is useful for is when traversing rows in the ListView, here other details may be obtained using the keys stored in the current item tag property. Here keys are simply displayed in labels.
private void  ProductListView_ItemSelectionChanged(object sender, ListViewItemSelectionChangedEventArgs e)
{
    if (e.IsSelected)
    {
        var primaryKeys = e.Item.ProductTag();
        SelectionChangedLabel.Text =
            $"product: {primaryKeys.ProductId} " +
            $"{ProductListView.Items[e.ItemIndex].Text}";
    }
}
The following code shows how to collect checked row items into a child form.
private void  SelectedProductsButton_Click(object sender, EventArgs e)
{
    var checkedItems = ProductListView.CheckedItems;

    if (checkedItems.Count > 0)
    {
        var sb = new  StringBuilder();

        for (int index = 0; index < checkedItems.Count; index++)
        {
            var keys = checkedItems[index].ProductTag();

            sb.AppendLine(
                $"{keys.CategoryId}," +
                $"{checkedItems[index].Group.Header}," +
                $"{keys.ProductId}," +
                $"{checkedItems[index].Text}," +
                $"{keys.SupplierId}," +
                $"{checkedItems[index].SubItems[0].Text}");
        }

        /*
         * Show selected products, in a real application this data
         * would be sent to a method to process the products
         */

        var f = new  SelectedProductsForm(sb.ToString());

        try
        {
            f.ShowDialog();
        }
        finally
        {
            f.Dispose();
        }
    }
    else
    {
        MessageBox.Show("No product(s) selected");
    }
}
Other examples
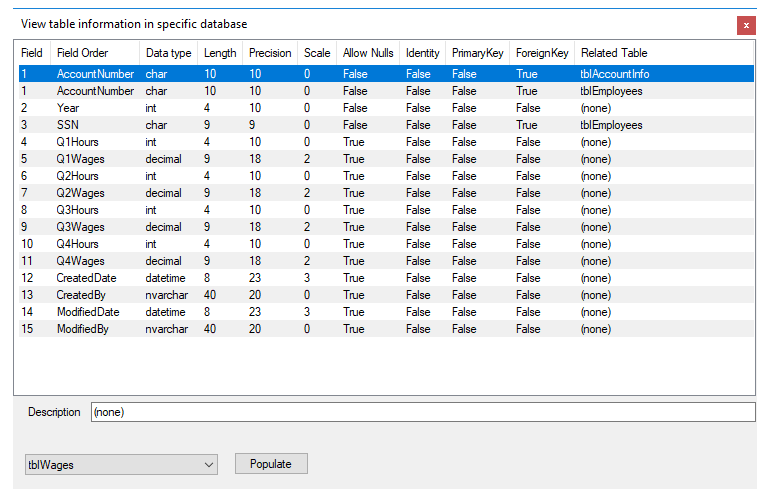
SQL-Server table columns and related tables
In the following example which follows the same code paths as the examples shown above a ListView is setup for displaying table column definitions and related tables.
The following class is responsible for table information.
using System;

namespace SqlServerOperations.Classes
{
    public class  ServerTableItem
    {
        public string  Table { get; set; }
        public string  Field { get; set; }
        public Int16? FieldOrder { get; set; }
        public string  DataType { get; set; }
        public Int16? Length { get; set; }
        public string  Precision { get; set; }
        public Int32 Scale { get; set; }
        public string  AllowNulls { get; set; }
        public string  Identity { get; set; } = String.Empty;
        public string  PrimaryKey { get; set; }
        public string  ForeignKey { get; set; } = String.Empty;
        public string  RelatedTable { get; set; }
        public string  Description { get; set; }
        public override  string ToString()
        {
            return Field;
        }
    }
}
Warning for novice coders: Reading information is rather complicated!!!
- Using the SQL statement below, data is read into a DataTable
- Using Lambda group statement tables columns are grouped together by table name into an anonymous type.
- The result set above is iterated over and items are placed into a Dictionary of Dictionary<string, List<ServerTableItem>>
Method which returns table information explained above.
public Dictionary<string, List<ServerTableItem>> TableDependencies()
{
    mHasException = false;

    var informationTable = new  DataTable();

    var selectStatement = @"
        SELECT  syso.name [Table],
                sysc.name [Field],
                sysc.colorder [FieldOrder],
                syst.name [DataType],
                sysc.[length] [Length],
                CASE WHEN sysc.prec IS NULL THEN 'NULL' ELSE CAST(sysc.prec AS VARCHAR) END [Precision],
        CASE WHEN sysc.scale IS null  THEN '-' ELSE sysc.scale END [Scale],
        CASE WHEN sysc.isnullable = 1 THEN 'True' ELSE  'False' END [AllowNulls],
        CASE WHEN sysc.[status] = 128 THEN 'True' ELSE  'False' END [Identity],
        CASE WHEN sysc.colstat = 1 THEN 'True' ELSE  'False' END [PrimaryKey],
        CASE WHEN fkc.parent_object_id is  NULL THEN 'False'  ELSE 'True' END [ForeignKey],
        CASE WHEN fkc.parent_object_id is  null THEN '(none)' ELSE obj.name  END [RelatedTable],
        CASE WHEN ep.value is  NULL THEN '(none)'  ELSE CAST(ep.value as NVARCHAR(500)) END [Description]
        FROM [sys].[sysobjects] AS syso
        JOIN [sys].[syscolumns] AS sysc on syso.id = sysc.id
        LEFT JOIN [sys].[systypes] AS syst ON sysc.xtype = syst.xtype and syst.name != 'sysname'
        LEFT JOIN [sys].[foreign_key_columns] AS fkc on syso.id = fkc.parent_object_id and
            sysc.colid = fkc.parent_column_id
        LEFT JOIN [sys].[objects] AS obj ON fkc.referenced_object_id = obj.[object_id]
        LEFT JOIN [sys].[extended_properties] AS ep ON syso.id = ep.major_id and sysc.colid =
            ep.minor_id and ep.name = 'MS_Description'
        WHERE syso.type = 'U' AND  syso.name != 'sysdiagrams'
        ORDER BY [Table], FieldOrder, Field;";

    using (var cn = new SqlConnection() {ConnectionString = ConnectionString})
    {
        using (var cmd = new SqlCommand() {Connection = cn})
        {
            cmd.CommandText = selectStatement;

            try
            {

                cn.Open();

                informationTable.Load(cmd.ExecuteReader());
            }
            catch (Exception e)
            {
                mHasException = true;
                mLastException = e;
            }

        }
    }

    var result = from row in  informationTable.AsEnumerable()
        group row by row.Field<string>("Table") into grp
        select new
        {
            TableName = grp.Key,
            Rows = grp,
            Count = grp.Count()
        };

    var tableDictionary = new  Dictionary<string, List<ServerTableItem>>();

    foreach (var topItem in result)
    {

        if (!tableDictionary.ContainsKey(topItem.TableName))
        {
            tableDictionary[topItem.TableName] = new  List<ServerTableItem>();
        }

        foreach (var row in topItem.Rows)
        {
            tableDictionary[topItem.TableName].Add(new ServerTableItem()
            {
                Table = topItem.TableName,
                Field = row.Field<string>("Field"),
                FieldOrder = row.Field<short>("FieldOrder"),
                DataType = row.Field<string>("DataType"),
                Length = row.Field<short>("Length"),
                Precision = row.Field<string>("Precision"),
                Scale = row.Field<int>("Scale"),
                AllowNulls = row.Field<string>("AllowNulls"),
                Identity = row.Field<string>("Identity"),
                PrimaryKey = row.Field<string>("PrimaryKey"),
                ForeignKey = row.Field<string>("ForeignKey"),
                RelatedTable = row.Field<string>("RelatedTable"),
                Description = row.Field<string>("Description")
            });
        }
    }

    return tableDictionary;
}
The Dictionary returned above is set to a ComboBox data source where a BindingSource is required as a ComboBox.DataSource does not handle dictionaries.
private void  Form1_Shown(object  sender, EventArgs e)
{
    var items = _tableInformation.TableDependencies();
    tableInformationComboBox.DataSource = new  BindingSource(items, null);
    tableInformationComboBox.DisplayMember = "Key";
}
When a selection is made from the ComboBox, clicking the associated button populates the ListView using a more drawn out method by adding SubItems rather than using an array to setup a ListViewItem.
Once the load process has completed the first item is selected followed by painting alternate rows in a light grey.
private void  GetInformationButton_Click(object sender, EventArgs e)
{
    listView1.Items.Clear();

    var detailItems = ((KeyValuePair<string, List<ServerTableItem> >)
        tableInformationComboBox.SelectedItem);

    foreach (var serverTableItem in detailItems.Value)
    {
        var item = listView1.Items.Add(serverTableItem.FieldOrder.ToString());
        item.SubItems.Add(serverTableItem.Field);
        item.SubItems.Add(serverTableItem.DataType);
        item.SubItems.Add(serverTableItem.Length.ToString());
        item.SubItems.Add(serverTableItem.Precision);
        item.SubItems.Add(serverTableItem.Scale.ToString());
        item.SubItems.Add(serverTableItem.AllowNulls);
        item.SubItems.Add(serverTableItem.Identity);
        item.SubItems.Add(serverTableItem.PrimaryKey);
        item.SubItems.Add(serverTableItem.ForeignKey);
        item.SubItems.Add(serverTableItem.RelatedTable);

        item.Tag = serverTableItem.Description;
    }

    listView1.AutoResizeColumns(ColumnHeaderAutoResizeStyle.HeaderSize);
    listView1.FocusedItem = listView1.Items[0];
    listView1.Items[0].Selected = true;
    ActiveControl = listView1;

    /*
     * Shade alternate rows
     */
    var index = 0;
    var shadedBackgroundColor = Color.FromArgb(240, 240, 240);

    foreach (ListViewItem item in listView1.Items)
    {
        if (index++ % 2 != 1) continue;
        item.BackColor = shadedBackgroundColor;
        item.UseItemStyleForSubItems = true;
    }
}
Working with moving rows up/down
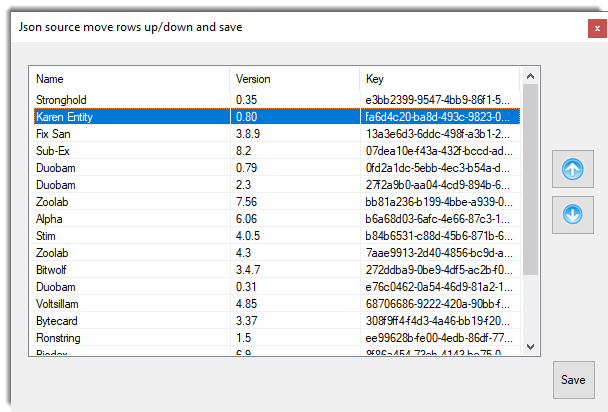
This example provide functionality to move rows up/down using a language extension called in the two buttons to the left of the ListView. The ListView data in this case comes from a Json file although the data source does not matter as data can also be read from a database.
Class to read a Json file.
using Newtonsoft.Json;
using System.Collections.Generic;
using System.IO;

namespace JsonLibrary
{
    /// <summary>
    /// Responsible, using JsonNet to read and write json
    /// from a json file to and from a concrete class
    /// </summary>
    public class  FileOperations
    {
        /// <summary>
        /// Read json file into a list which will be passed to
        /// a form to load into a ListView
        /// </summary>
        /// <param name="pFileName">File to read json from</param>
        /// <returns></returns>
        public List<Application> LoadApplicationData(string pFileName)
        {

            using (var r = new StreamReader(pFileName))
            {
                var json = r.ReadToEnd();
                return JsonConvert.DeserializeObject<List<Application>>(json);
            }

        }
        /// <summary>
        /// Takes a list of application stored in a ListView and save the
        /// data to a json file.
        /// </summary>
        /// <param name="pApplications">List of Application</param>
        /// <param name="pFileName">Path and file name to save the list oo</param>
        public void  SaveApplicationData(List<Application> pApplications, string pFileName)
        {

            using (var file = File.CreateText(pFileName))
            {
                var serializer = new  JsonSerializer
                {
                    Formatting = Formatting.Indented
                };

                serializer.Serialize(file, pApplications);
            }

        }

    }
}
Which uses the following class to hold the Json data. Note a similar method, ItemArray which is used in the loading of data into the ListView.
namespace JsonLibrary
{
    public class  Application
    {
        public int  id { get; set; }
        public string  ApplicationName { get; set; }
        public string  ApplicationVersion { get; set; }
        public string  ApplicationKey { get; set; }
        /// <summary>
        /// Used to load listview items in ListViewJsonExampleForm
        /// </summary>
        /// <returns></returns>
        public string[] ItemArray()
        {
            return new[] { ApplicationName, ApplicationVersion, ApplicationKey };
        }

    }
}
In Form Shown event data returned from the Json file now in a list is iterated through to populate the ListView.
private void  ListViewJsonExampleForm_Shown(object sender, EventArgs e)
{
    listView1.View = View.Details;

    listView1.GridLines = true;
    listView1.OwnerDraw = false;
    listView1.FullRowSelect = true;

    //Add column header
    listView1.Columns.Add("NameColumn", 200);
    listView1.Columns.Add("VersionColumn", 130);
    listView1.Columns.Add("KeyColumn", 160);

    listView1.Columns[0].Text = "Name";
    listView1.Columns[1].Text = "Version";
    listView1.Columns[2].Text = "Key";

    var applicationList = _fileOperations.LoadApplicationData(_fileName);

    /*
     * Add each item from json and set the identifier using the tag property
     * where the identifier is used to save item positions in SavePositionsButton.
     */
    foreach (var app in applicationList)
    {
        var item = new  ListViewItem(app.ItemArray()) {Tag = app.id};
        listView1.Items.Add(item);
    }

    listView1.Items[0].Selected = true;
    listView1.Select();
}
To move ListView rows up/down the following extension method is used which is within a class project so it can be used in other projects.
using System.Windows.Forms;

namespace LanguageExtensions
{
    public enum  MoveDirection { Up = -1, Down = 1 };
    public static  class ListViewExtensions
    {
        /// <summary>
        /// Move row up or down dependent on direction parameter
        /// </summary>
        /// <param name="sender"></param>
        /// <param name="moveDirection">Up or Down</param>
        public static  void MoveListViewItems(this ListView sender, MoveDirection moveDirection)
        {
            int direction = (int)moveDirection;

            bool valid = sender.SelectedItems.Count > 0 &&
                         ((moveDirection == MoveDirection.Down &&
                           (sender.SelectedItems[sender.SelectedItems.Count - 1]
                                .Index < sender.Items.Count - 1)) ||
                          (moveDirection == MoveDirection.Up && (sender.SelectedItems[0] .Index > 0)));

            if (valid)
            {
                sender.SuspendLayout();

                try
                {
                    foreach (ListViewItem item in sender.SelectedItems)
                    {
                        var index = item.Index + direction;
                        sender.Items.RemoveAt(item.Index);
                        sender.Items.Insert(index, item);
                        sender.Items[index].Selected = true;
                        sender.Focus();
                    }
                }
                finally
                {
                    sender.ResumeLayout();
                }
            }
        }
    }
}
Implementation of extension method for moving rows up/down.
/// <summary>
/// Move current row unless first item
/// </summary>
/// <param name="sender"></param>
/// <param name="e"></param>
private void  upButton_Click(object sender, EventArgs e)
{
    listView1.MoveListViewItems(MoveDirection.Up);
}
/// <summary>
/// Move row down unless last item.
/// </summary>
/// <param name="sender"></param>
/// <param name="e"></param>
private void  downButton_Click(object sender, EventArgs e)
{
    listView1.MoveListViewItems(MoveDirection.Down);
}
Deleting selected rows
The following language extension method provides the base for removing selected rows.
public static  class Extensions
{
    public static  List<ListViewItem> SelectedRows(this ListView.ListViewItemCollection sender)
    {
        return sender.Cast<ListViewItem>()
            .Where(listViewItem => listViewItem.Selected)
            .Select(listViewItem => listViewItem)
            .ToList();
    }
}
Add the following class to the project which will be used to prompt the user if they are sure the selected rows should be removed.
public static  class Dialogs
{
    [DebuggerStepThrough]
    public static  bool Question(string Text)
    {
        return (MessageBox.Show(
                    Text,
                    Application.ProductName,
                    MessageBoxButtons.YesNo,
                    MessageBoxIcon.Question,
                    MessageBoxDefaultButton.Button2) == DialogResult.Yes);
    }
}
The following code is found in this form in the supplied source code repository.
Add a button for removing rows.
private void  RemoveSelectedButton_Click(object sender, EventArgs e)
{
    DeleteSelectedListViewRows();
}
Then
private void  DeleteSelectedListViewRows()
{
    var selectedRows = ownerContactListView.Items.SelectedRows();

    if (Question($"Remove {selectedRows.Count} rows?"))
    {
        selectedRows.ForEach(listViewItem =>
            ownerContactListView.Items.Remove(listViewItem));
    }
}
Finally the following method captures pressing the delete key.
protected override  bool ProcessCmdKey(ref Message msg, Keys keyData)
{
    if (keyData != (Keys.Delete)) return base.ProcessCmdKey(ref msg, keyData);
    DeleteSelectedListViewRows();
    return true;
}
Setting up code samples
- From Solution Explorer execute "Restore NuGet Packages" (for Newtonsoft.Json and BaseConnectionLibrary)
- Run the script DataScript.sql
- Change DatabaseServer to the name of your server e.g. .\SQLEXPRESS
- Ensure Framework 4.7.2 or later is installed
Summary
This article has presented the basics for adding items to a ListView from database tables and Json for detail view using groups and check boxes for learning how to do this in Windows Forms projects.
See also
ListView as usercontrol with auto complete functionality using C#.NET
C# DataGridView - ListBox - CheckListBox - ListView move items up/down
Source code
The following GitHub repository contains all code for this article.