Azure: Backing up VM with Azure Portal & PowerShell
1. Introduction
Microsoft Azure provides hundreds of different services, Azure Backup is one of them which we will be going into today. The main purpose of Azure Backup as the name says is to provide the ability to both protect and restore data within the Microsoft Azure cloud.
2. Requirements
2.1 Operating System versions
All the Windows operating systems must be 64 bit, Azure Backup does not support 32-bit operating systems.
2.1.1 Servers
| Operating System | Edition |
| Windows Server 2019 | Standard, Datacenter Essentials |
| Windows Server 2016 | Standard, Datacenter Essentials |
| Windows Server 2012 R2 | Standard, Datacenter Foundation |
| Windows Server 2012 | Standard, Datacenter Foundation |
| Windows Server 2008 R2 SP1 | Standard, Enterprise, Datacenter, Foundation |
| Windows Server 2008 | Standard, Enterprise, Datacenter |
| Windows Storage Server 2016 | Standard, Workgroup |
| Windows Storage Server 2012 R2 |
Standard, Workgroup, Essential |
| Windows Storage Server 2012 |
Standard, Workgroup |
2.1.2 Clients
| Operating System | Edition |
| Windows 10 | Home, Professional, Enterprise |
| Windows 8.1 | Professional, Enterprise |
| Windows 8 | Professional, Enterprise |
| Windows 7 | Starter, Home Basic, Home Premium, Professional, Ultimate, Enterprise |
2.2 Microsoft Azure Recovery Services (MARS) agent
Azure Backup uses an agent called the Microsoft Azure Recovery Services (short for MARS) agent to perform backups on both Azure and on-premises machines.
The latest agent can be downloaded from here: https://aka.ms/azurebackup_agent
2.3 Recovery Services Vault
The Recovery Services Vault is a storage entity which is where Azure Backup stores all its data. A Recovery Services Vault is required before enabling any backups.
3. Enabling Azure Backup on an Azure VM
We will now go through step-by-step on how to enable Azure Backup on an Azure virtual machine.
3.1 Enabling Azure Backup (Azure Portal)
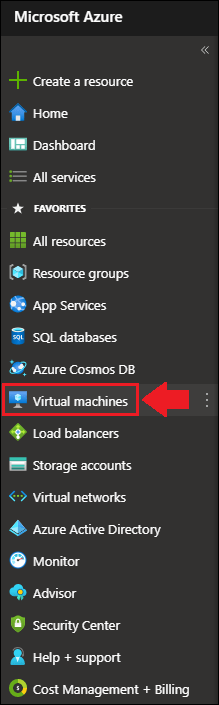
1. In the Azure Portal search for the virtual machine that we want to back up, or locate it by clicking on the Virtual machines pane.
2. Once we have located our Azure virtual machine, select it by clicking on it.

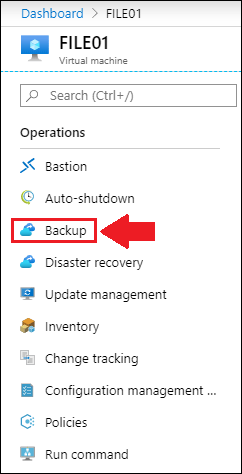
3. On the left-hand pane under “Operations“, click on the Backup pane.
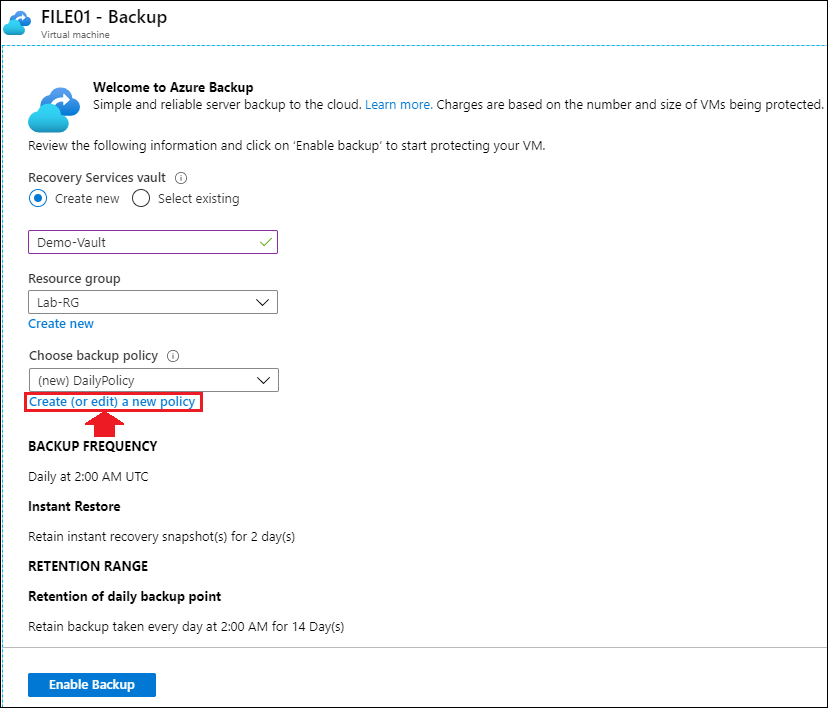
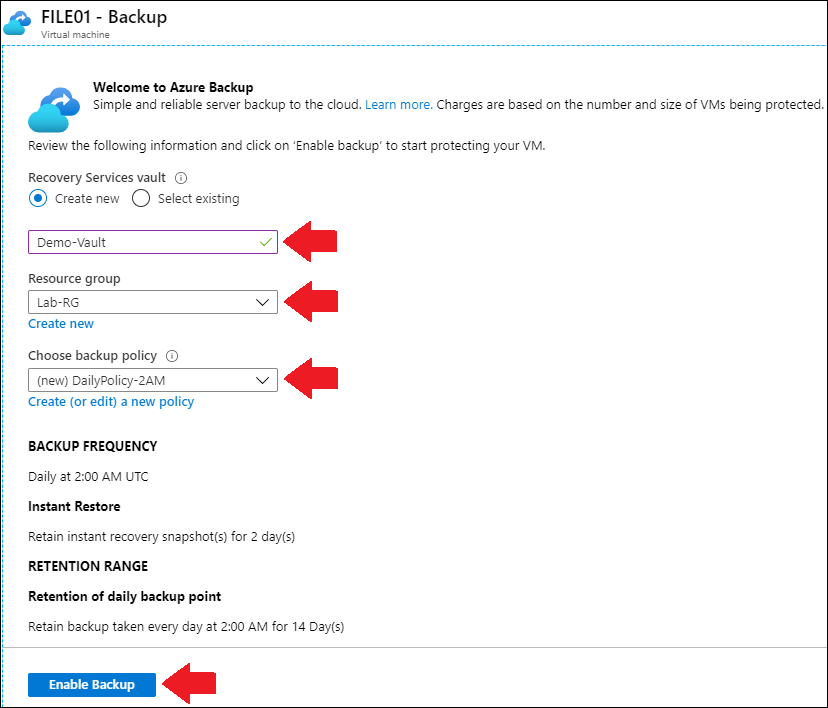
4. We should now see a “Welcome to Azure Backup” window, we will now have to configure the following:
- Recovery Services Vault (Use an existing one or create a new one)
- Resource Group (Use an existing one or create a new one)
- Backup Policy (Configure the backup schedule for the Azure VM, this is optional)
In this example we will create a new Recovery Services Vault and use an existing Resource Group.
For the Recovery Services Vault we have chosen the name “Demo-Vault“, and for the Resource Group we’ve selected an existing one called “Lab-RG“.

5. We will now create a backup policy, click on Create (or edit) a new policy.
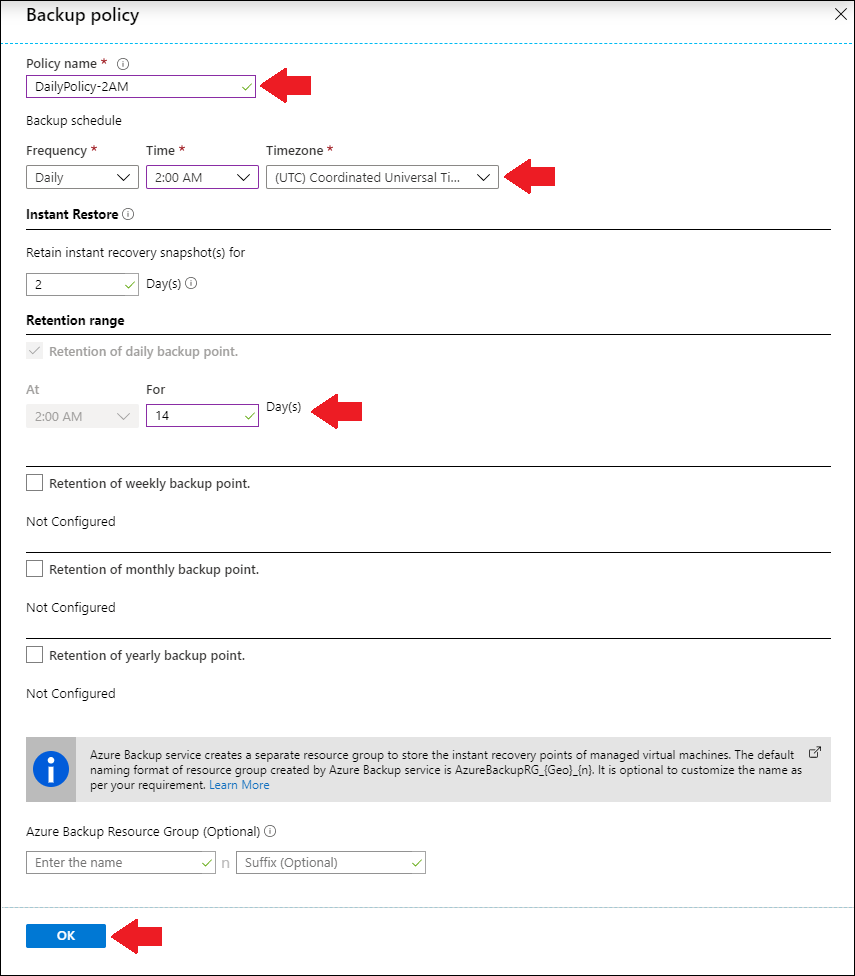
6. Define a name for the backup policy, then configure the backup frequency and backup retention to our needs.
In this example we will create a backup policy with a retention of two weeks (14 days).
Once everything looks good, click OK to create the backup policy.
7. We have now configured everything for our Azure VM backup, now all we need to do is to enable the backup, to do so click on the Enable Backup at the bottom of the page.
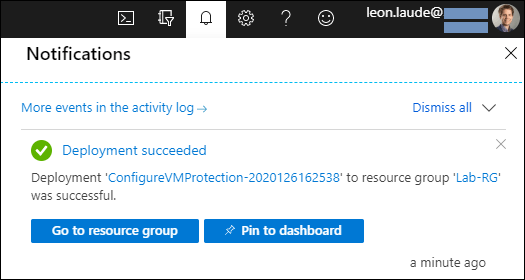
Our Azure Backup deployment will now be under way!
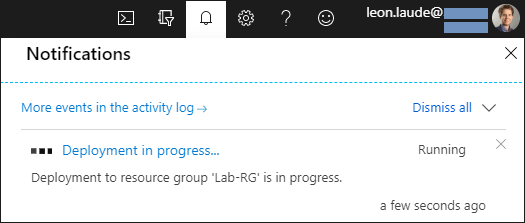
The deployment shouldn’t take long, once the deployment of Azure Backup has been completed we will see it as successful.
3.2 Enabling Azure Backup (PowerShell)
We will now go through the same steps as above but with PowerShell, we will need to install the Azure PowerShell module for this, we can download it from HERE.
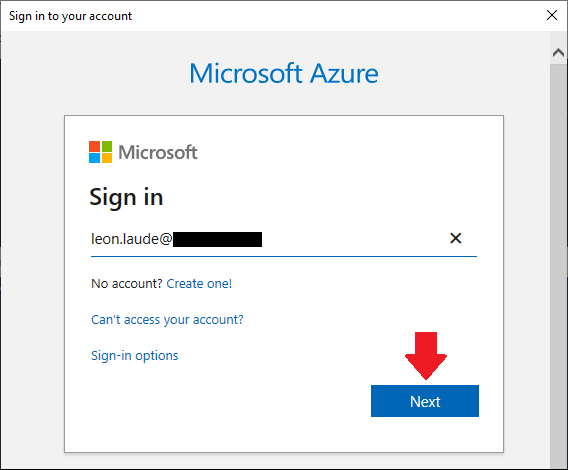
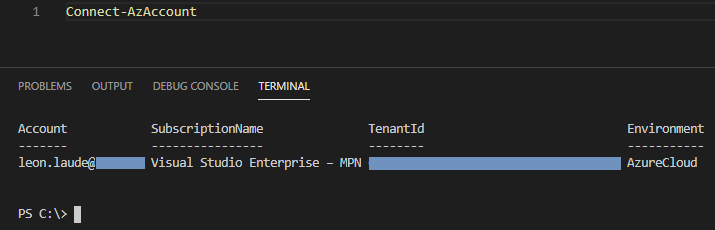
1. Login to our Azure subscription with the Connect-AzAccount command.
Connect-AzAccount

2. We will now get an Microsoft Azure sign in window, provide the credentials to our Azure subscription.
3. Once we’ve successfully signed in to our Azure subscription, we should receive a similar output:
4. The first time we use Azure Backup we need to register the Azure Recovery Service Provider in our Azure subscription, we can do so with the Register-AzResourceProvider command.
So the full command would be:
Register-AzResourceProvider -ProviderNamespace "Microsoft.RecoveryServices"
We should now receive a similar output:

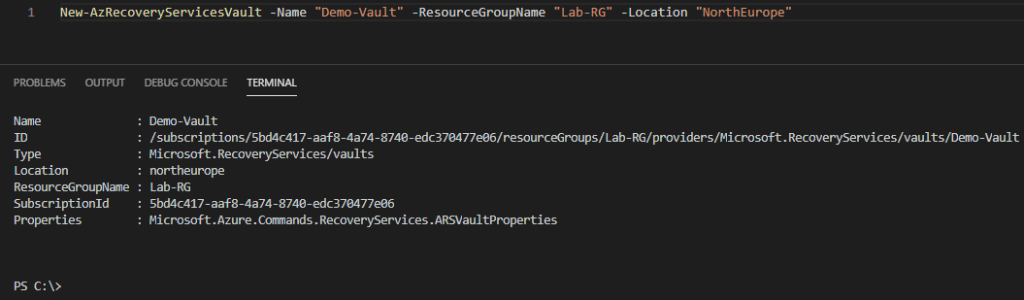
6. Now we can continue by creating the Recovery Services Vault, to create one we can use the New-AzRecoveryServicesVault command.
To make this easier, we’ll provide the required information for the required command switches:
-Name “DemoVault”
-ResourceGroupName “Lab-RG”
-Location “NorthEurope”
Here’s the full command:
New-AzRecoveryServicesVault -Name "Demo-Vault" -ResourceGroupName "Lab-RG" -Location "NorthEurope"
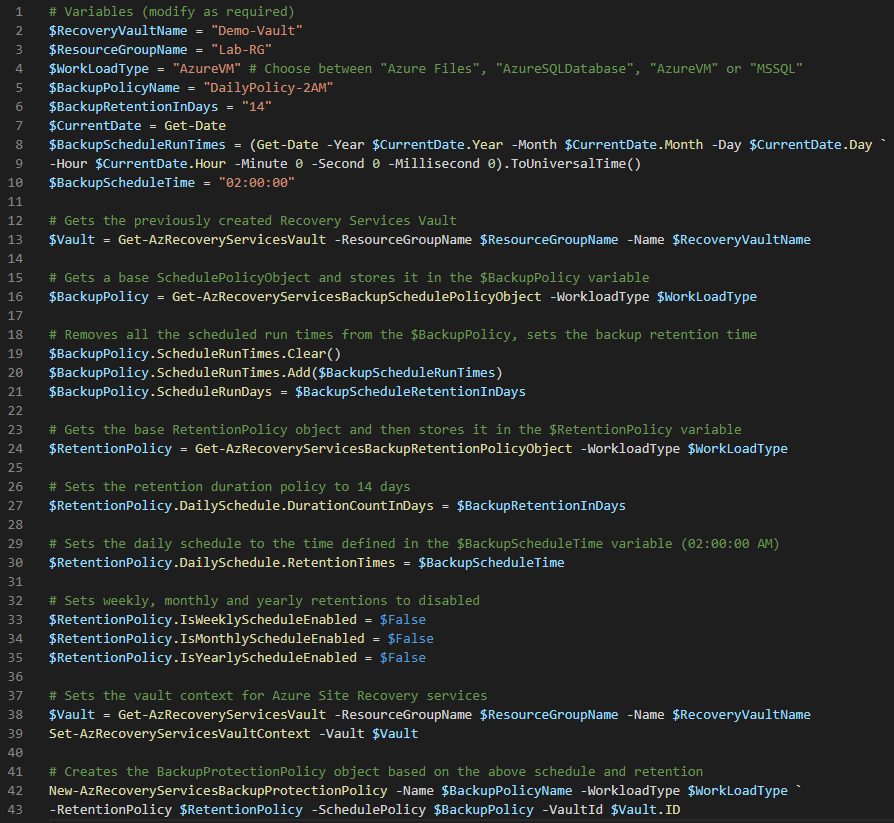
7. To create a backup policy we can make use of the New-AzRecoveryServicesBackupProtectionPolicy command.
We’ll create the same policy as we did by using the Azure Portal:
# Variables (modify as required)
$RecoveryVaultName = "Demo-Vault"
$ResourceGroupName = "Lab-RG"
$WorkLoadType = "AzureVM" # Choose between "Azure Files", "AzureSQLDatabase", "AzureVM" or "MSSQL"
$BackupPolicyName = "DailyPolicy-2AM"
$BackupRetentionInDays = "14"
$CurrentDate = Get-Date
$BackupScheduleRunTimes = (Get-Date -Year $CurrentDate.Year -Month $CurrentDate.Month -Day $CurrentDate.Day `
-Hour $CurrentDate.Hour -Minute 0 -Second 0 -Millisecond 0).ToUniversalTime()
$BackupScheduleTime = "02:00:00"

# Gets the previously created Recovery Services Vault
$Vault = Get-AzRecoveryServicesVault -ResourceGroupName $ResourceGroupName -Name $RecoveryVaultName

# Gets a base SchedulePolicyObject and stores it in the $BackupPolicy variable
$BackupPolicy = Get-AzRecoveryServicesBackupSchedulePolicyObject -WorkloadType $WorkLoadType

# Removes all the scheduled run times from the $BackupPolicy, sets the backup retention time
$BackupPolicy.ScheduleRunTimes.Clear()
$BackupPolicy.ScheduleRunTimes.Add($BackupScheduleRunTimes)
$BackupPolicy.ScheduleRunDays = $BackupScheduleRetentionInDays

# Gets the base RetentionPolicy object and then stores it in the $RetentionPolicy variable
$RetentionPolicy = Get-AzRecoveryServicesBackupRetentionPolicyObject -WorkloadType $WorkLoadType

# Sets the retention duration policy to 14 days
$RetentionPolicy.DailySchedule.DurationCountInDays = $BackupRetentionInDays

# Sets the daily schedule to the time defined in the $BackupScheduleTime variable (02:00:00 AM)
$RetentionPolicy.DailySchedule.RetentionTimes = $BackupScheduleTime

# Sets weekly, monthly and yearly retentions to disabled
$RetentionPolicy.IsWeeklyScheduleEnabled = $False
$RetentionPolicy.IsMonthlyScheduleEnabled = $False
$RetentionPolicy.IsYearlyScheduleEnabled = $False

# Sets the vault context for Azure Site Recovery services
$Vault = Get-AzRecoveryServicesVault -ResourceGroupName $ResourceGroupName -Name $RecoveryVaultName
Set-AzRecoveryServicesVaultContext -Vault $Vault

# Creates the BackupProtectionPolicy object based on the above schedule and retention
New-AzRecoveryServicesBackupProtectionPolicy -Name $BackupPolicyName -WorkloadType $WorkLoadType `
-RetentionPolicy $RetentionPolicy -SchedulePolicy $BackupPolicy -VaultId $Vault.ID
8. We will now continue to enable the backup for an Azure virtual machine by using the Enable-AzRecoveryServicesBackupProtection cmdlet.
There are three (3) required parameters that we will need to provide:
-ResourceGroupName
-Name
-Policy
Here’s the commands:
# Gets the backup policy that we created earlier and puts it in the $BackupPolicy variable
$BackupPolicy = Get-AzRecoveryServicesBackupProtectionPolicy -Name "DailyPolicy-2AM"
$ResourceGroupName = "Lab-RG"
$VirtualMachine = Get-AzVM -Name "FILE01"

# Enables the backup on the specified virtual machine with the specified backup policy
Enable-AzRecoveryServicesBackupProtection `
-ResourceGroupName $ResourceGroupName `
-Name $VirtualMachine.Name `
-Policy $BackupPolicy
Here's how the output looks like once we’ve run the above commands:
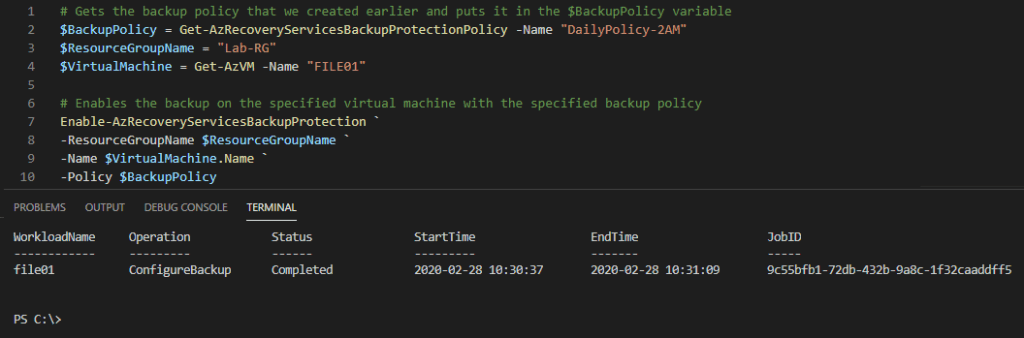
We have now successfully enabled the backup on a Azure virtual machine.
4. Running a backup job on an Azure VM
In this section we will go through on how to actually run a backup on an Azure virtual machine.
4.1 Run a backup job on an Azure VM (Azure Portal)
1. In the Azure Portal, head to the Virtual Machines tab on the left-hand side of the Azure portal.
2. Select the Azure virtual machine that we enabled backup on by clicking on it.

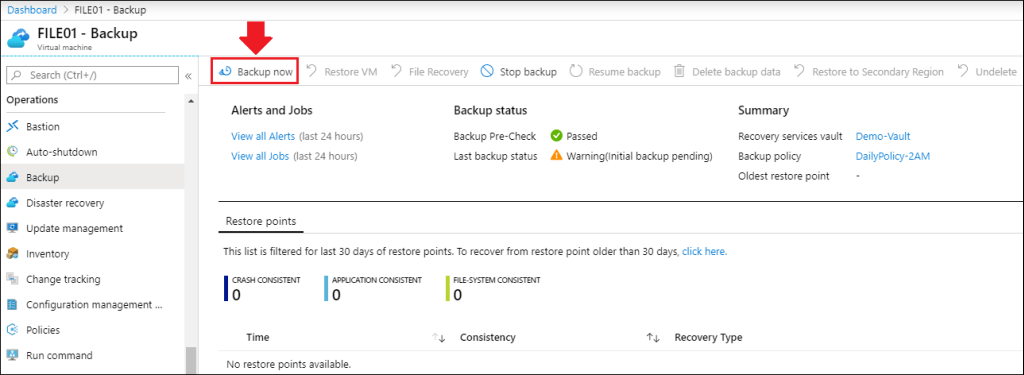
3. Click on the Backup tab on the left-hand side which is found under “Operations”.

4. On the upper toolbar, click Backup now to start backing up.
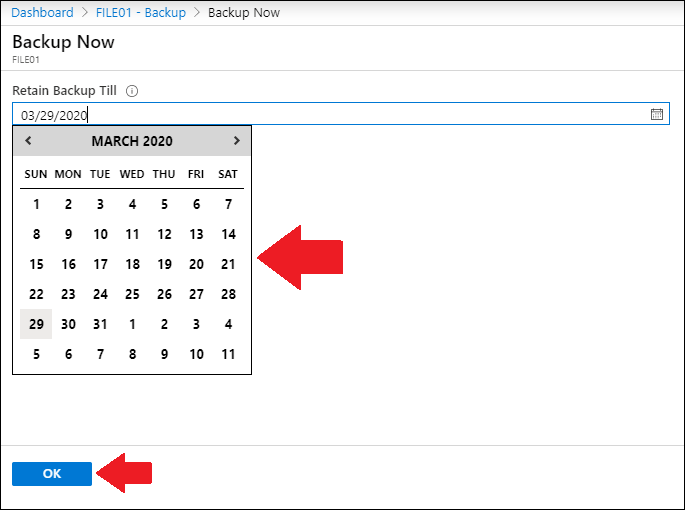
5. Select a date for how long we want to retain the backup till and then click OK.
(By default the backup retention policy is 30 days)
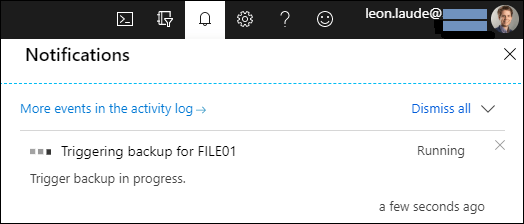
The backup will now be initiated:
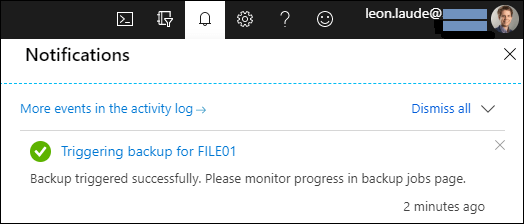
Once the backup has completed, we should receive the following notification:
4.2 Run a backup job on an Azure VM (PowerShell)
To perform a so called on-demand backup, we can use the Backup-AzRecoveryServicesBackupItem cmdlet.
We will need to specify the container in our Recovery Services vault that will hold our backup data, first we need to retrieve the container which can be done with the Get-AzRecoveryServicesBackupContainer cmdlet.
Every virtual machine that we back up is considered as an “item”, if we want to retrieve information about the virtual machine backup we can use the following cmdlet Get-AzRecoveryServicesBackupItem.
1. Assuming we still have our PowerShell connected to our Azure subscription, we start by specifying the backup container:
$BackupContainer = Get-AzRecoveryServicesBackupContainer `
-ContainerType "AzureVM" `
-FriendlyName "FILE01"

2. Then we obtain the information about our virtual machine that we want to back up:
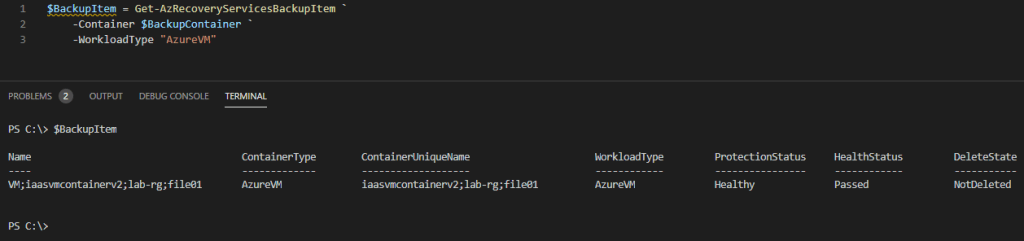
$BackupItem = Get-AzRecoveryServicesBackupItem `
-Container $BackupContainer `
-WorkloadType "AzureVM"
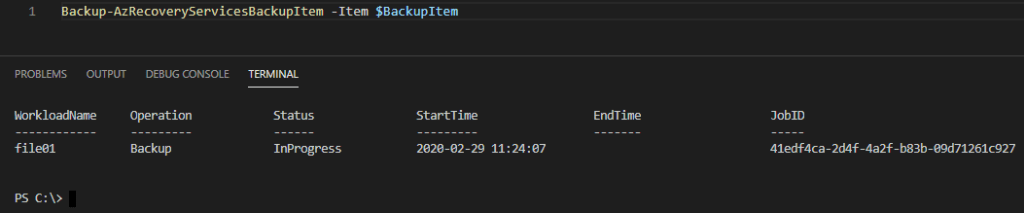
3. To finally back up we run the following cmdlet:
Backup-AzRecoveryServicesBackupItem -Item $BackupItem
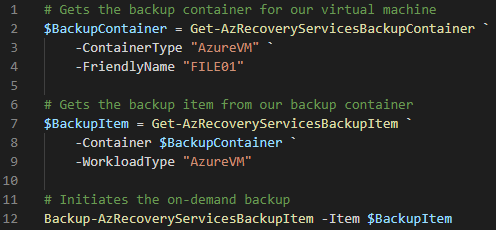
Here’s the full script for an on-demand backup:
# Gets the backup container for our virtual machine
$BackupContainer = Get-AzRecoveryServicesBackupContainer `
-ContainerType "AzureVM" `
-FriendlyName "FILE01"

# Gets the backup item from our backup container
$BackupItem = Get-AzRecoveryServicesBackupItem `
-Container $BackupContainer `
-WorkloadType "AzureVM"

# Initiates the on-demand backup
Backup-AzRecoveryServicesBackupItem -Item $BackupItem
5. Conclusion
In this article we've gone through two different methods (Azure Portal and Azure PowerShell) on how to enable backups on Azure VMs, and also how to run backups of Azure VMs. Both methods offer a quick and easy way of backing up Azure VMs, backups have become a very important part, due to the amount of ransomware attacks so it is imperative to ensure backups have been enabled and configured properly.