Office 365 Public CDN to serve the content
Overview
Office 365 Public Content Delivery Network (CDN) offers the good option to host the static content like JavaScript files, CSS, images, documents in CDN. The files in CDN help better serve on SharePoint pages and custom solutions.
About Office 365 Public CDN
- The administrator can enable Office 365 Public CDN with SharePoint Online Management Shell.
- Admin can set up an individual SharePoint Document Library or a folder inside it to serve as a CDN origin.
- Content exposed over the CDN can be accessed by anyone anonymously.
- The static content can now be accessed using the CDN URLs.
- The CDN URLs can be used in SharePoint sites and any customization that can be hosted in the SharePoint. For e.g. SharePoint Framework web part
Prerequisites
Below are the prerequisites to set up Office 365 CDN:
- Office 365 Global / SharePoint Administrator rights
- SharePoint Online Management Shell (Download the latest version from here)
Set up Office 365 CDN
Follow below steps to set up Office 365 CDN:
1. Open SharePoint Online Management Shell (with admin
2. Connect to SharePoint Online tenant
$creds = Get-Credential
Connect-SPOService -Url https://[tenant]-admin.sharepoint.com/ -Credential $creds
Replace [tenant] with your tenant name.
3. Check the CDN settings status for your tenant.
Get-SPOTenant | fl *cdn*

4. Enable the Public CDN settings for your tenant.
Set-SPOTenant -PublicCdnEnabled $true
You can optionally configure the allowed file types or extensions with below command:
Set-SPOTenant -PublicCdnAllowedFileTypes "CSS,EOT,GIF,ICO,JPEG,JPG,JS,MAP,PNG,SVG,TTF,WOFF,TXT"
Create CDN origin
With the CDN settings applied, we are now ready to configure SharePoint document library or a folder inside it as a CDN origin.
- Browse to SharePoint site.
- Use any out of box document library to host the assets or create a new one.
- Optionally, create a folder inside SharePoint document library to host the assets.
- Copy or upload the content files to SharePoint document library.
- Check-in and publish the files as needed.
- Execute below command to create new CDN origin:
New-SPOPublicCdnOrigin -Url "https://[tenant].sharepoint.com/Documents"
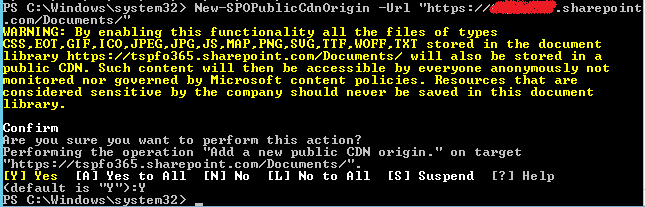
Any files under CDN enabled location (including subfolders) will be accessible anonymously via CDN.
Other Helpful CDN Commands
List CDN Origins
View the list of all available CDN origins in your Office 365 tenant.
Get-SPOPublicCdnOrigins

Remove the CDN origin
Remove-SPOPublicCdnOrigin -Identity <id>
<id> is the value of the ID parameter from Get-SPOPublicCdnOrigins cmdlet
Please note, it may take up to 15 minutes for changes to get into the effect.
Use CDN on SharePoint Pages and Customizations
Once we have the CDN origin setup, we have to replace them with the actual CDN URLs. We have to use the REST API to get the prefix for one of the asset from CDN origin and we can use the CDN URL as a constant for referring other assets in the origin.
The structure or syntax of CDN URL is as below
https://publiccdn.sharepointonline.com/[tenant host name]/[ID of the public CDN origin]/[sub-path under the origin]
REST API to get Public CDN URL
Use below REST API to retrieve the url for Public CDN.
https://contoso.sharepoint.com/_vti_bin/publiccdn.ashx/url?itemurl=https://contoso.sharepoint.com/Documents/9.PNG
Original URL will be returned if asset does not exists in origin or the file type is not enabled as exposed file type for CDN.
For image renditions can be accessed from CDN using height and width parameters
https://publiccdn.sharepointonline.com/[tenant].sharepoint.com/2646007161eeae8fe.../image.png?height=100&width=100&cropMode=fit
Conclusion
Office 365 CDN offers an option to host static content like files which can be served from unique location to SharePoint customizations and pages. Only thing to consider is the files can be accessed by anyone anonymously.