Azure Automation : Deploy and Configure Update Management
Introduction
**Update Management is one of the many solutions, offered by Azure Automation. **
Other solutions offered by Azure Automation include Process Automation (Runbooks), Configuration Management (Change Tracking, Inventory, DSC) and many shared capabilities (RBAC, connection, scheduling, auditing, certificates etc.). Shared capabilities are those which can be consumed by multiple solutions within Azure Automation.
In this article, we will focus on the Update Management solution. We will discuss how can we deploy and manage a robust and industry standard patch management solution using this managed service.
Update Management - Important Points
- Azure Update Management is a managed solution offered by Microsoft.
- It also does not support Windows Nano Server or Azure Kubernetes Service Nodes.
- Update Management does not offer any patch rollback option. So you should have a separate rollback plan for critical servers, such as restoring from latest backup.
- You can onboard machines from different subscriptions, to the update management solution.
- Update Management supports Azure VMs as well as non-Azure machines.
- By default, updates are downloaded from Internet. However, you can also configure local update repository if outbound Internet is blocked for client machines.
- Microsoft states that Update management is a free service. You only have to pay for log data stored in the Azure Log Analytics service. For more details, please visit this link.
Planning and Prerequisites
Before you deploy Update Management solution , make sure that you meet the Network, Firewall and Access requirements.
Supported and unsupported client types
Make sure that Azure Update Management supports the type of workload which you are going to patch. For details of supported and unsupported client types, please refer this Microsoft document.
Network and Firewall Requirements
- VMs which are part of Update Management solution needs to contact below URLs over port 443 :
- *.ods.opinsights.azure.com
- *.oms.opinsights.azure.com
- *.blob.core.windows.net
- *.azure-automation.net
2) For Windows VMs to download updates from Windows Update sites, certain URLs need to be accessible from source VMs. So below URLs need to be whitelisted in Firewall :
- http://windowsupdate.microsoft.com
- http://*.windowsupdate.microsoft.com
- https://*.windowsupdate.microsoft.com
- http://*.update.microsoft.com
- https://*.update.microsoft.com
- http://*.windowsupdate.com
- http://download.windowsupdate.com
- https://download.microsoft.com
- http://*.download.windowsupdate.com
- http://wustat.windows.com
- http://ntservicepack.microsoft.com
Windows Update uses WinHttp with Partial Range requests to download updates . So , if there is any proxy server in your environment, you might have to allow HTTP range requests to following URLs.
- *.download.windowsupdate.com
- *.dl.delivery.mp.microsoft.com
- *.emdl.ws.microsoft.com
For more details and up-to-date list, please refer this URL.
- For Red Hat Linux, below IP addresses need to be whitelisted so that Linux VMs can download updates from Red Hat Update Infrastructure (RHUI).
- 13.91.47.76
- 40.85.190.91
- 52.187.75.218
- 52.174.163.213
- 52.237.203.198
For an up-to-date list and for more details, please refer this URL.
4) Many organizations block outbound Internet through NSGs and Firewalls. For Update Management solution to work properly, you must open outbound 443 connection to Internet from your source VM Network.
We recommend to visit the Network Planning section in Update Management Documentation, before you implement Update Management solution in any large environment.
Update Source
In case you are planning to use local patch repository for Windows and Linux VMs instead of Internet repository, your network and firewall planning will be changed significantly.
For example, you might want to use WSUS as the local patch repository for your Windows Servers. In that case, all Windows Servers need to approach the WSUS servers to download updates and patches, rather than downloading from Internet. As a result, many of the network and firewall requirements which we have mentioned in the previous sections would need to be re-considered.
Access Requirements
To deploy and configure update deployment, you need specific privileges. You can refer this Microsoft document for the access level which you need to implement this solution.
In addition, you need specific privileges in Azure Subscription and Azure AD to create Azure Run-as Account. An Application administrator in Azure Active Directory and an Owner in a subscription can create Run-as account.
For more information regarding run-as account permission, please refer this article.
Workspace Mapping
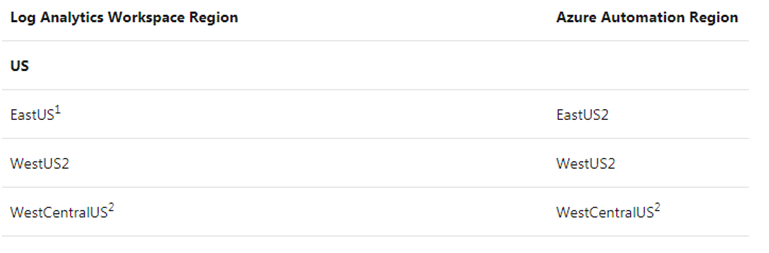
In order to use Azure Update Management Solution, you need to link Azure Automation Account and Log Analytics Workspace. This linking is not supported in every region, and Microsoft has published a Workspace Mapping table, which must be referred before you create Automation Account and Log Analytics Workspace.
However, as Microsoft says, **this mapping only applies to the Automation Account and the Log Analytics workspace. The resources reporting to your Automation Account or Log Analytics workspace can reside in other regions. **
For example, you are going to setup an update management solution which will cover VMs for East US regions. So as per the below table, you have to create Automation Account in East US2 region, and Log Analytics Workspace in East US region. Then only you will be able to link Automation Account and Log Analytics Workspace, which is required for update management solution to work.
One Time Setup
Now have we have covered all the prerequisites and planning related to update management, let's deploy the solution.
Create Azure Automation Account and Run-as Account
You can create Automation Account using Azure Portal, or using some code.
Make sure you are creating the Automation Account in the correct region, so that you can link a Log Analytics Workspace.
If you create Automation Account through portal, the run-as account will be created at the same time provided we have required access mentioned in the previous section.
If we create Automation Account programmatically, we need to create run-as account separately. Microsoft has published a PowerShell script, which can be called with appropriate parameters to create the run-as account. Please note that your system should have Azure RM PowerShell module installed to run the script.
To create an Automation Account through Azure portal, please refer this link.
Create Log Analytics Workspace
You can create Log Analytics Workspace using Azure Portal, or using some code.
Make sure you are creating the Log Analytics Workspace in the correct region, so that you can link it to the Automation Account which you have created in previous step.
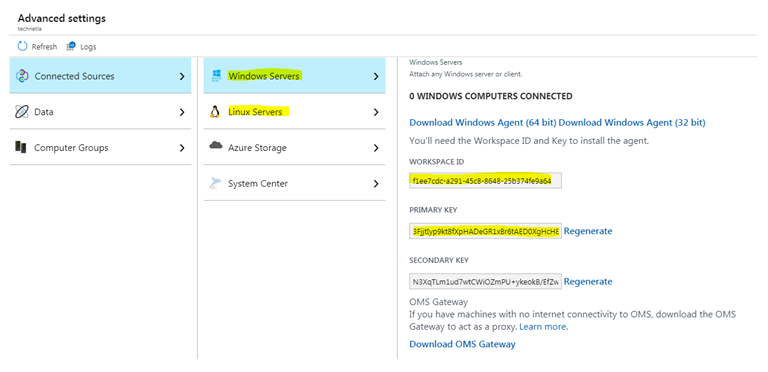
Once you create the workspace, you can note down the workspace ID and workspace Key. You will get this information in the Advanced Settings > Connected Source section of Log Analytics Workspace. You will need this information in future, especially if you onboard VMs through code.
You can also generate separate Workspace Keys for Windows and Linux VMs if you want.
Enable Update Management Solution
In order to use the Update management solution for the first time, you need to enable the solution from Azure Portal.
While enabling the solution, you will get the option of selecting Log Analytics Workspace. Make sure you select the correct Log Analytics Workspace, which you have planned to use with this Automation Account.
Once you are done, just click Enable, and update management solution will be enabled.
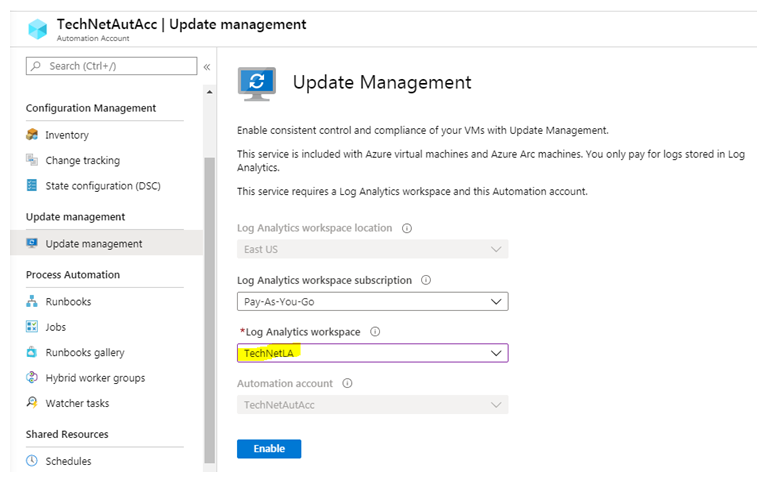
Once you enable Update Management, the Automation Account and The Log Analytics Workspace will be linked with each other. You can validate it with Linked Workspace section under Automation Account.
In case you have created the Log Analytics Workspace but it is not showing here in the drop down menu, you have probably created in the wrong region which does not support linking. You can refer to the Workspace Mapping table which we have discussed earlier.
If you want deploy entire Update Management solution using Azure Resource Manager template, please use this link.
Configure VM Onboarding Option
You can onboard each VM from Update Management Console. On the other hand, you can also partially automate VM onboarding process.
To automate VM Onboarding process, you have to ensure that a VMs would appear on Azure Update Management console as soon as they report to the Log Analytics Workspace.
For that to do, you have to change below option to Enable on all available and future machines. Please remember that this is a one-time setup. Once changed, this option will be grayed out and will no longer be available to change.
You will get this option in the Manage Machines section within Update Management console.
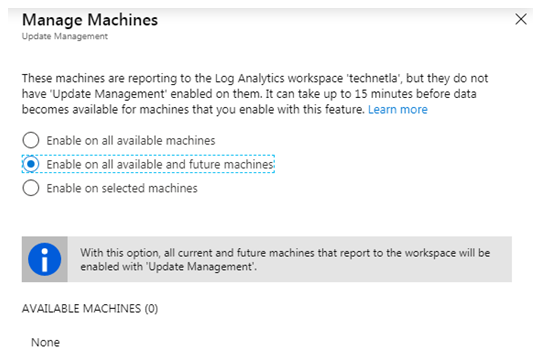
Now, once you connect your VM to Log Analytics Workspace through MMA / OMS agent, the VM should reflect to the Update Management console within 15-20 minutes.
Create Deployment Schedule
Deployment Schedule is a key component of the Update Management Solution. An effective patch management solution depends on the effective deployment schedule strategy.
Using Deployment schedule, you can define following parameters :
- When a group of VMs machines will be patched.
- Which machines will be patched (Static / Dynamic machine grouping).
- What Operating System Will be patched (Windows or Linux but not both).
- What type of updates will be deployed (Ex: Critical, Security etc).
- Whether any update need to be excluded.
- Any pre or post deployment task need to be performed (pre-post script).
- System reboot option after update installation (Yes/No/If required).
- Maintenance Window (Default is 120 minutes)
Proper planning is required before creating each deployment schedule and creating VM group.
**For machine grouping, we recommend to use Dynamic Grouping approach. In this approach, you will not statically attach any VM to any deployment schedule, rather you will define some criteria in the deployment schedule. **
Once you define the criteria and save it, Azure will create a query. During the deployment, it will run that query and will apply the patches to those machines which are generated by the query result.
Dynamic Grouping supports below criteria :
• Subscription(s)
• Resource Group(s)
• Location(s)
• Tag(s)
You can specify all or some of the criteria's. The subscription criteria is mandatory.
In the below figure, we have created an Azure query with 1 subscription, 2 locations and one tag. There is currently one Azure VM which comes under this query. As a result, when this deployment will run, it will run on that Azure VM.
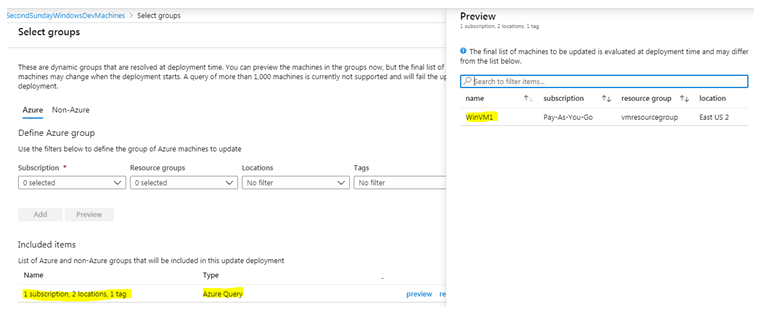
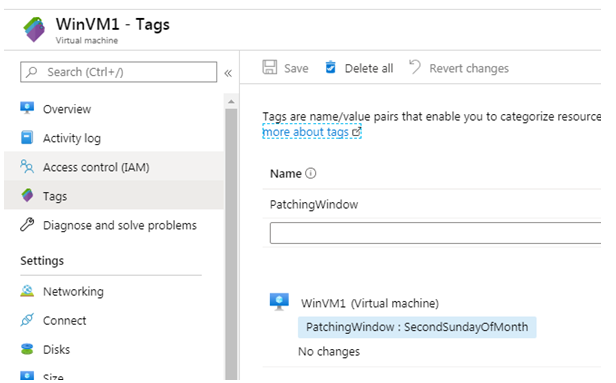
As you can understand, the role of proper VM tagging is important here. In this case, we are using a Tag called PatchingWindow, with a meaningful key value that corresponds to the patch schedule.
To know more about Update Deployment, please refer this link.
To create deployment schedule using PowerShell, you can use New-AzureRmAutomationSoftwareUpdateConfiguration or New-AzAutomationSoftwareUpdateConfiguration cmdlets. You can refer this link for the reference script.
In our test lab, we have observed that the above script is not retrieving VM list if you specify the location with space. For example. the location "Japan East" or "UK South" does not retrieve VM details from the Dynamic Group, but if we mention the location as "JapanEast" or "UKSouth", then the query works as expected.
Onboard Machines
Now that you have done with the initial setup, you can start onboarding computers on Update Management.
Install MMA / OMS Agent
You can onboard Azure VMs and non-Azure machines from the Update Management portal. You can also onboard them programmatically, using some code.
When you onboard Windows or Linux Servers to Update Management, an agent is installed within the OS. This is true for Azure as well as non-Azure servers.
- For Windows Servers, it is Microsoft Monitoring Agent (MMA)
- For Linux Servers, it is OMS agent.
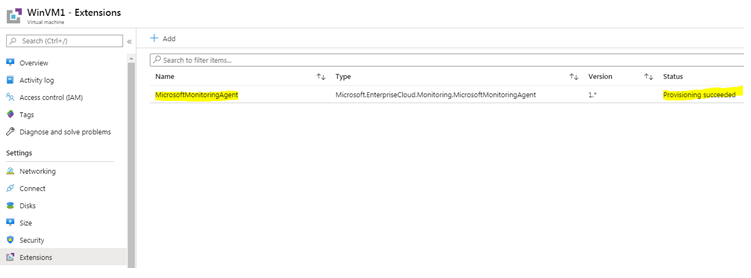
For Azure VMs, these agents are installed with the help of Azure VM Extension.
If you are installing the MMA / OMS agent programmatically, you need to provide the Log Analytics Workspace ID and Key. This you can find in the Log Analytics Advanced Settings section, which we have discussed previously.
You can also install MMA or OMS agents using Azure Policy. Below two Azure policies will do this :
- Deploy Log Analytics Agent for Windows VMs
- Deploy Log Analytics Agent for Linux VMs
Post Agent Installation
Once the agent is installed, you can do some verification from your end.
• First, verify that the agent has been installed successfully, from the VM Extension blade.
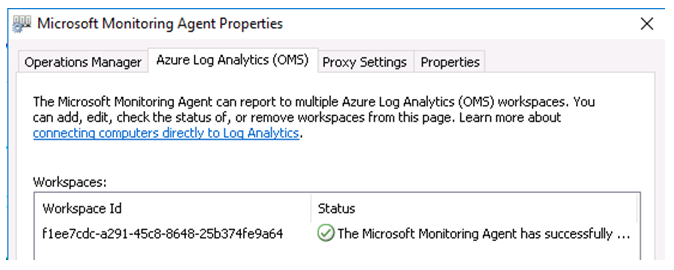
• Next, ensure that the agent is able to connect to the Log Analytics Workspace. For Windows VMs, you can go to Control Panel > Microsoft Monitoring Agent and check the connectivity.
Also validate the Workspace ID and ensure that the agent is reporting to the correct workspace.
• You can also validate the connection by running TestCloudConnection command from the Windows Server, where you have installed MMA agent. This tool is available in : C:\Program Files\Microsoft Monitoring Agent\Agent
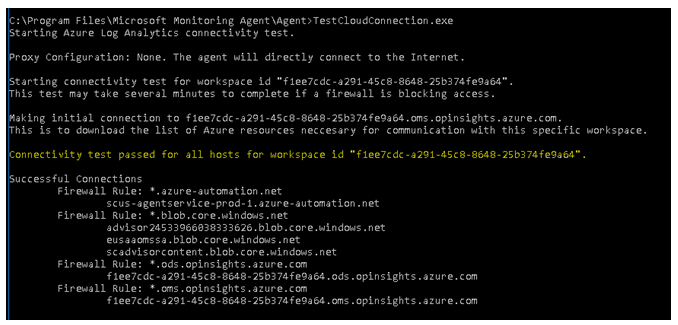
If connectivity test is not passed for all of the above endpoints, then you have to check your firewall rules based on the error.
• Lastly, you can verify that the System Hybrid Runbook Worker Group is created for the added Server, under Hybrid Worker Groups > System Hybrid Worker Groups.
For each system that you add, one System Hybrid Worker Group will be created.

**If all the above tests are green, you can expect that the server that you have added will be available in Update Management console in next 15-20 minutes. **
Agent Troubleshooting
To deploy patches on the machines, the Update Agent Status must be in Ready state. If the Update agent readiness status is showing Not ready, then patches will not be deployed on that machine.

Sometimes the Update agent status is shown as Not ready. In that case, you will get a troubleshooting link and once you run the troubleshooter, it will perform a series of tests. Once the testing is done, it will show you a detailed test result , which will indicate the issue.
Post Onboarding Activities
Add the machine to appropriate patch schedule
Once we onboard a machine, we need to ensure that it is part of the correct patch schedule. As we are using Dynamic Machine Grouping, so this can be achieved by putting appropriate Tag to the VM.
As mentioned earlier, we can reserve a Tag (Ex: patchwindow or maintenancewindow) for putting the patching window for each machine that we onboard. Using this Tag value, the VM will be part of the appropriate patch schedule through Dynamic Grouping.
Disable Automatic Reboot after Update Deployment
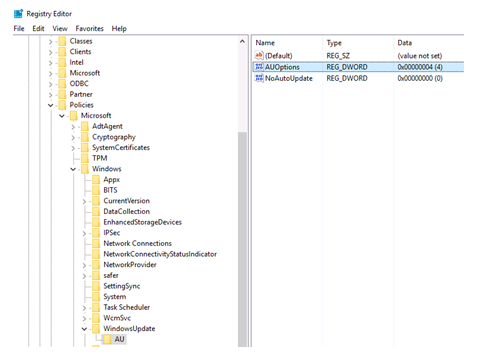
To make sure that updates are not getting installed outside Update management schedule, Microsoft recommends to set below Key to 3 : auto download but do not auto install, for all Update Management clients.
HKEY_LOCAL_MACHINE\SOFTWARE\Policies\Microsoft\Windows\WindowsUpdate\AU
Default value is 4: auto download and install. But for Update Management clients, we should change it to 3 : auto download but do not auto install.
Also ensure that the value of NoAutoUpdate is set to the default value Zero. If the value is set to One, the automatic updates will be disabled.
If you change this settings through Group Policy, then use below option:
Computer Configuration\Administrative Templates\Windows Components\Windows update\Configure Automatic Updates,
For more information, refer below links :
- Updates are installed without a deployment
- Configuring Automatic Update
- Configure Windows Update settings for Update Management
Configure Local Repository (Optional)
In case you are planning to deploy a local patch repository like WSUS for Windows VMs, you need to do some configuration .
Configure Group Policy
First, you need to configure below Group Policy to ensure that the clients will contact that WSUS server instead of the Windows Update URL, to download updates.
Computer Configuration\Administrative Templates\Windows Components\Windows Update\Specify Intranet Microsoft update service location.
Here, you have to put the WSUS Server name or IP address.
For details, refer this link.
Once you have change the group Policy in Active Directory, please reboot the clients or run Gpupdate /force.
Validate Update Source
To validate the update source, run below two powershell commands in the client system :
$MUSM = New-Object -ComObject "Microsoft.Update.ServiceManager"
$MUSM.Services | select Name, IsDefaultAUService
If the value of IsDefaultAUService is true for WSUS, then WSUS is the update source for this client.
Configure Firewall for WSUS
Please allow communication in port 8530 and 8531 between WSUS Server and WSUS client.
Summary
In this article, we have discussed how to deploy an effective patch management solution. Every organization has different requirement, but this article will serve as a general guideline which can be re used in almost any environment.
Before deploying this solution to a production environment, we recommend to do a proof of concept (POC) and get it reviewed by key stakeholders. This is especially applicable for Dynamic VM Grouping, Patch Schedule deployment and patch repository configuration.
See Also
- Update Management solution in Azure
- General Availability: Non-Azure Groups for Azure Update Management
- Integrate with Configuration Manager
- Azure Automation frequently asked questions