Azure DevOpsm Access Using Personal Access Token (PAT)
You may have come across a requirement, wherein you needed to update Azure DevOps objects programmatically and it is obvious that there must be some *authentication *mechanism which has to be in place.
Now, there are many methods one can use to authenticate, but for this post, I’ve specifically chosen personal access token. PAT, which is short for *Personal Access Token *is a way to provide an alternate password to authenticate to Azure DevOps.
To understand more about how to generate this token and how to utilize this, let’s follow certain steps and make a successful REST API call.
When to use Personal Access Token
*PAT *is usually used in a scenario when you want external applications to interact with *Azure DevOps *but you do not want to provide that application your primary Azure portal credentials due to security reasons. So, in this case, *PAT *can be used. So, here *PAT *is just an another password which can access only your *Azure DevOps *services.
Generating Personal Access Token
First step is to sign in to Azure DevOps, which will have the URL of format https://dev.azure.com/\<organizationName> and go to *Settings *as shown below,

On *Settings *page, under Security, select Personal access tokens. Once it is clicked, a page will open on right side with an option to create a new token as shown in the below screen shot,

Click on New Token and a new dialog will come up as shown below, wherein the Name of the token has to be provided along with the *Organization *name,
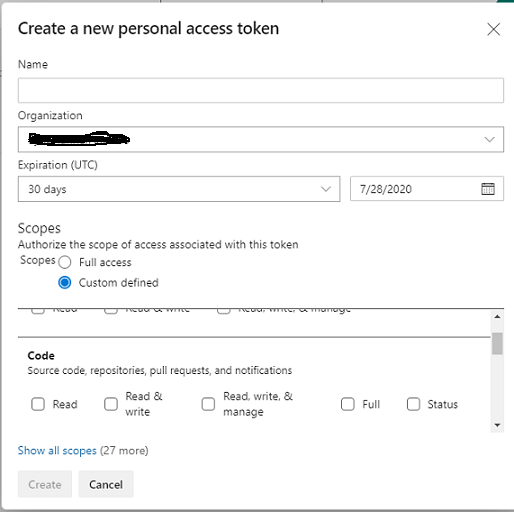
One of the most important things in the above dialog is the Scope. Based on the business needs, one can select the scope for which this *PAT *is generated.
Using Personal Access Token
Next we will be using this newly generated *PAT *to make a call to one of the REST APIs. So, let’s quickly create a new C# class in your project and name it as DevOpsConnectionManager. This class will hold the basic information, which is required to make a successful connection to Azure DevOps,
public class  DevOpsConnectionManager
  {
    private readonly  string organizationName;
    private readonly  string projectName;
    private readonly  string userName;
    private readonly  string personalToken;
    private readonly  string baseUrl;

    private DevOpsConnectionManager(string organizationName, string projectName, string userName, string personalToken)
    {
      this.organizationName= organizationName;
      this.projectName= projectName;
      this.userName = userName;
      this.personalToken= personalToken;
      this.baseUrl = $"https://dev.azure.com/{organization}/{project}/_apis/wit";
    }

   public string  BaseUrl
    {
      get
      {
        return baseUrl;
      }
      private set  { }
    }

    public string  Version { get; set; } = "api-version=5.1";
    public HttpClient CreateHttpClient()
    {
      HttpClient httpClient = new  HttpClient();
      httpClient.DefaultRequestHeaders.Accept.Add(new System.Net.Http.Headers.MediaTypeWithQualityHeaderValue("application/json"));
      httpClient.DefaultRequestHeaders.Authorization = new  AuthenticationHeaderValue("Basic", Convert.ToBase64String(System.Text.ASCIIEncoding.ASCII.GetBytes(string.Format("{0}:{1}", userName, personalToken))););
      return httpClient;
    }
}Now the caller code, which is going to utilize our connection manager class to create an instance and finally make a call to the API. Here is the snippet for that,

  public async Task UpdateInformation(string id, List<WorkItemParameter> parameters)
        {
          var connection =   new  DevOpsConnectionManager(organizationName,projectName,userName,personalToken);
          using  (var client = connection.CreateHttpClient())
          {
            var urlForWorkItem = $  "{connection.BaseUrl}/workitems/{id}?{connection.Version}"  ;
            var content = JsonConvert.SerializeObject(parameters);
            HttpContent content =   new  StringContent(content, Encoding.UTF8,
                      "application/json-patch+json"  );
            var response = await client.PatchAsync(urlForWorkItem, content);
          }
        }And that’s all for today. Hope you enjoyed this. Happy learning!   References Microsoft Docs